How to Detect Hidden Moisture in Bathrooms
To detect hidden moisture in bathrooms, check the areas where water and humidity get trapped first: behind toilets, under sinks, around tubs and showers, along baseboards, inside vanity cabinets, near flooring edges, and on walls that stay cool or damp after bathing. Look for musty odors, soft trim, peeling paint, swollen cabinet panels, loose caulk, darkened grout, damp floor edges, and moisture readings that remain elevated after the room should be dry.
Bathrooms hide moisture easily because daily steam, splashing, plumbing connections, and poor airflow allow water to move into cracks, seams, wall cavities, cabinet bases, and flooring edges. A careful inspection helps you find moisture before it turns into visible mold, structural swelling, or expensive bathroom repairs.
This guide explains how to check the bathroom areas where hidden moisture most often develops, including walls, flooring edges, vanities, toilets, tubs, showers, and enclosed fixture spaces. For a broader room-by-room inspection system, use how to find hidden moisture in different areas of your home.
Why Hidden Bathroom Moisture Is So Common
Bathrooms produce frequent moisture from showers, baths, sinks, toilets, and daily cleaning. Even when visible surfaces look dry, moisture can remain trapped behind trim, cabinets, wall materials, flooring seams, and fixture edges.
Daily Moisture Production in Bathrooms
Every shower, bath, and sink use releases water into the air and onto surrounding surfaces. When steam and splashing water settle repeatedly on drywall, wood trim, grout, cabinet bases, and flooring edges, small amounts can seep into porous materials and dry slowly.
If the bathroom stays humid for long periods after use, hidden dampness becomes more likely because moisture has more time to move into seams, cracks, and enclosed spaces.
How Enclosed Spaces Trap Humidity
Bathrooms are typically smaller rooms with limited airflow compared to kitchens or living areas. Doors often remain closed, and ventilation may be insufficient or poorly maintained. Without proper airflow, humid air stays trapped longer and has more time to settle into surrounding materials.
Even bathrooms equipped with exhaust fans can develop hidden moisture problems if the fan is undersized, clogged, or not used consistently. High humidity creates conditions where condensation forms on cooler surfaces such as exterior walls, plumbing lines, and tile edges.
If your bathroom walls frequently feel damp or stay cool and slightly wet after showers, it may indicate ongoing humidity buildup. For the causes behind that pattern, see why bathroom walls stay damp.
Most Common Places Hidden Moisture Develops in Bathrooms
Hidden moisture rarely spreads randomly. It develops in predictable locations based on how water moves, how humidity behaves, and how bathroom materials are installed. Knowing where moisture is most likely to accumulate allows homeowners to inspect efficiently instead of guessing.
Many of these areas remain concealed during normal daily use. That is why moisture problems often develop unnoticed until odors, staining, or mold begin to appear.
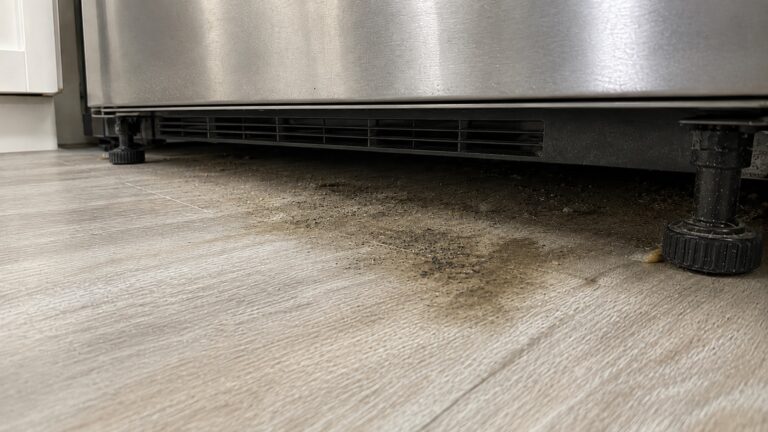
Behind Toilets
The area behind toilets is one of the most overlooked moisture zones in bathrooms. Because this space is difficult to see and reach, small leaks or condensation problems may go unnoticed for long periods.
Common causes of hidden moisture behind toilets include:
- Minor tank condensation during humid weather
- Loose supply line fittings
- Seal deterioration around the toilet base
- Water splashing against the wall during cleaning
In many bathrooms, moisture accumulates gradually behind the tank or along the wall where airflow is limited. If mold develops in this area, it often relates to the moisture behavior patterns explained in why mold forms behind toilets.
Inspecting this location periodically is essential because damage often begins behind the fixture before spreading outward into flooring or baseboard materials.
Around Bathtubs and Showers
Bathtubs and showers generate the highest concentration of water exposure in most bathrooms. Even well-installed tile and waterproofing systems allow small amounts of moisture to reach surrounding materials over time.
Hidden moisture around showers commonly develops:
- Behind tile seams or grout joints
- Around caulking lines that have cracked or separated
- Behind fiberglass or acrylic shower surrounds
- Along the lower edge where walls meet the tub
If grout becomes worn or caulking gaps develop, moisture can seep into wall cavities and remain trapped behind the finished surface. In bathrooms with frequent shower use, repeated exposure increases the chance of concealed dampness forming inside wall assemblies.
If the area develops recurring musty odors, dark spotting, or hidden growth behind fixture edges, the issue may involve mold rather than moisture alone. Those warning signs are covered in signs of mold behind bathroom fixtures.
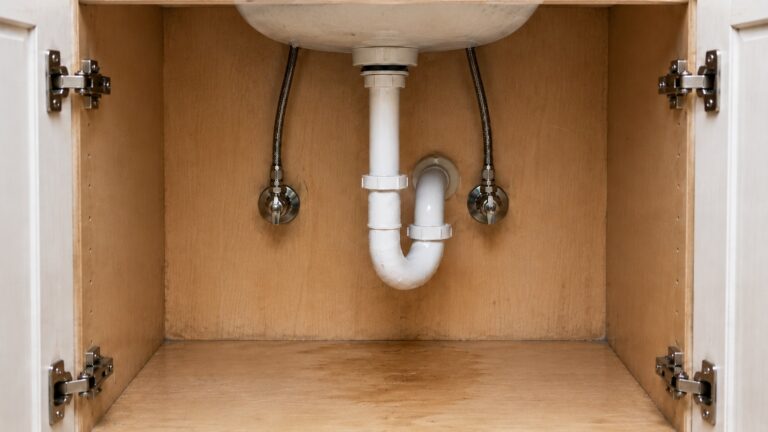
Under Sinks and Cabinets
Cabinet spaces beneath sinks create ideal environments for hidden moisture. Plumbing connections, limited airflow, and enclosed cabinetry combine to trap moisture in a confined space.
Moisture under sinks often develops due to:
- Slow leaks from drain connections
- Condensation on supply pipes
- Cleaning water pooling inside cabinets
- Small unnoticed drips from shutoff valves
Because cabinet interiors are rarely inspected closely, moisture may remain hidden until materials begin to warp or develop musty odors. If left untreated, concealed mold growth behind cabinetry can develop without obvious surface warning signs.
If the cabinet smells musty, shows dark spotting, or has swelling panels, the issue may have moved beyond moisture detection into hidden mold symptoms. Those patterns are covered separately in signs of hidden mold behind bathroom cabinets.
Behind Baseboards and Trim
Baseboards serve as finishing trim along the lower edge of bathroom walls, but they also create small gaps where moisture can collect unnoticed. Water from showers, floor splashing, or plumbing issues often moves downward and accumulates near wall bottoms.
Hidden moisture behind baseboards typically results from:
- Water splashing onto floors during bathing
- Leaks traveling downward inside walls
- Moisture migrating through flooring materials
- Poor ventilation that keeps floors damp longer
Even when floors appear dry, moisture may remain trapped behind trim where evaporation occurs slowly. Detecting hidden dampness in this area requires targeted inspection techniques similar to those described in how to detect moisture behind baseboards.
Inside Bathroom Walls
Wall cavities are one of the most common locations for concealed moisture accumulation. Moisture may enter walls through leaks, condensation, or material seepage, then remain hidden behind drywall for extended periods.
Hidden moisture inside walls may result from:
- Minor plumbing leaks
- Shower moisture penetrating wall surfaces
- Condensation forming on cooler wall sections
- Water migration from nearby fixtures
Wall moisture problems often develop slowly, making early detection difficult without careful observation. When bathroom humidity remains elevated, moisture can accumulate inside wall systems even without direct water contact.
Reducing moisture levels in these areas often requires targeted humidity control strategies similar to those discussed in how to reduce bathroom wall moisture.
Around Flooring Edges
Flooring edges near tubs, toilets, and sinks frequently collect hidden moisture. Water splashes, drips, and condensation accumulate along floor joints where materials meet.
Moisture along flooring edges may travel beneath:
- Vinyl flooring seams
- Tile grout lines
- Laminate flooring joints
- Baseboard trim edges
Once moisture enters subfloor materials, it dries slowly and may cause swelling or soft spots over time. Early detection in these locations prevents more extensive structural damage that could eventually require professional repair intervention.
Early Clues That Bathroom Moisture Is Hiding Behind Surfaces
Hidden moisture problems usually develop slowly before becoming severe. In many cases, visible mold or structural damage appears only after moisture has been present for weeks or months. Recognizing early warning signs helps homeowners detect moisture before major repairs become necessary.
Many of these early symptoms seem minor at first. However, repeated exposure to humidity or small amounts of water often produces patterns that indicate concealed moisture is present behind surfaces.
Musty Odors That Return Quickly
A persistent musty odor is one of the earliest indicators of hidden moisture. Even when visible surfaces appear clean, trapped moisture inside wall cavities or behind fixtures can produce noticeable smells.
Odors often become stronger after:
- Hot showers that increase humidity
- Bathroom doors remain closed for long periods
- Air circulation decreases overnight
- Moisture levels rise during humid weather
If odors return shortly after cleaning or ventilation, moisture may be trapped inside materials rather than on exposed surfaces. This pattern commonly develops before visible mold appears.
Paint or Surface Changes
Changes in painted or finished surfaces often signal moisture movement behind walls or trim. Paint and surface coatings act as barriers, but when moisture accumulates behind them, pressure and swelling begin to alter their appearance.
Common surface changes include:
- Bubbling or blistering paint
- Peeling or cracking finishes
- Discoloration near corners or edges
- Uneven texture along wall surfaces
These signs frequently appear near tubs, showers, or plumbing fixtures where moisture exposure is highest. Even small areas of peeling paint may indicate hidden dampness beneath the surface.
Persistent Humidity After Bathroom Use
Bathrooms normally become humid during use, but humidity should decline relatively quickly once ventilation begins. If humidity lingers long after showers or baths, hidden moisture buildup may already be occurring.
Signs of excessive humidity retention include:
- Mirrors remaining fogged for extended periods
- Walls feeling damp long after use
- Condensation forming repeatedly on the same surfaces
- Surfaces drying slowly between uses
Persistent humidity often signals ventilation problems or hidden moisture retention inside wall or flooring systems. Monitoring humidity levels regularly helps detect patterns that indicate deeper moisture issues.
Soft or Swollen Materials
Wood trim, baseboards, and cabinetry respond visibly to prolonged moisture exposure. When materials absorb water, they expand, soften, or distort slightly.
Watch for:
- Swelling at baseboard edges
- Cabinet bottoms becoming soft
- Warped trim or molding
- Flooring that feels uneven or spongy
Material changes often develop gradually and may appear subtle at first. However, these structural responses typically confirm that moisture has been present long enough to affect surrounding materials.
How to Physically Check for Hidden Moisture
Visual observation alone may not confirm hidden moisture. Physical inspection methods help identify concealed dampness in areas that cannot be seen directly. These techniques allow homeowners to detect problems early while minimizing unnecessary damage to materials.
Follow a consistent inspection order so you do not miss hidden moisture paths:
- Start at the highest moisture source, such as the showerhead, tub surround, sink backsplash, or toilet tank.
- Check seams, caulk lines, grout joints, pipe penetrations, and fixture edges for gaps or discoloration.
- Move downward to cabinet bases, baseboards, floor edges, and trim intersections.
- Compare suspected areas with a similar dry area in the same room.
- Recheck the same area after the bathroom has been unused long enough to dry normally.
Visual Inspection Techniques
Start by carefully examining surfaces under strong lighting. Use a flashlight to highlight subtle changes in texture, color, or alignment. Light directed at a shallow angle across surfaces helps reveal irregularities that may otherwise go unnoticed.
Focus attention on:
- Corners near tubs and showers
- Edges of cabinets and vanities
- Baseboard intersections
- Areas behind toilets
- Floor edges near fixtures
Look for differences in surface appearance between similar areas. For example, if one section of wall paint looks slightly darker or uneven compared to surrounding areas, it may indicate hidden moisture beneath the surface.
Touch Testing Methods
Touch is one of the simplest and most effective ways to detect hidden moisture. Many moisture problems produce subtle temperature or texture differences that can be felt even when surfaces look normal.
During touch testing:
- Run your hand along walls and trim
- Check for cool or damp spots
- Press gently on suspected areas
- Compare nearby surfaces for differences
Moist areas often feel slightly cooler than dry surfaces due to evaporation effects. If materials feel unusually soft or spongy, moisture absorption may already be occurring inside the structure.
Safe Probing Techniques
In some cases, gentle probing helps confirm whether materials have absorbed moisture. This method should be performed carefully to avoid unnecessary damage.
Safe probing methods include:
- Using a small blunt tool to press gently on trim
- Checking for resistance changes in wood materials
- Listening for hollow or soft sounds when tapping surfaces
- Inspecting hidden edges inside cabinets
Do not use sharp tools that could puncture plumbing lines or electrical components. If resistance changes noticeably during probing, further inspection may be necessary.
When to Inspect Behind Fixtures
Some hidden moisture problems develop behind fixtures that remain stationary for long periods. Periodically checking these areas helps prevent long-term moisture buildup from going unnoticed.
Consider inspecting behind fixtures when:
- Odors persist despite cleaning
- Paint changes appear behind plumbing fixtures
- Water stains develop near wall edges
- Humidity remains unusually high
In many cases, moving small removable items such as storage containers or cabinet contents allows access to inspection zones without removing permanent fixtures. Larger fixture inspections should only be performed when symptoms strongly indicate hidden moisture or when professional guidance is available.
Tools That Help Detect Bathroom Moisture
While visual and physical inspections provide valuable clues, specialized tools can significantly improve moisture detection accuracy. Many homeowners use these tools to confirm suspicions before taking further action or contacting professionals.
Moisture Meters
Moisture meters are one of the most useful tools for checking suspicious bathroom surfaces. Use them to compare suspected damp areas against nearby dry areas around baseboards, drywall, cabinets, flooring edges, and shower-adjacent walls.
Do not rely on one isolated reading. Scan in a pattern and compare multiple points. A repeated elevated pattern along a wall bottom, cabinet base, or shower edge is more useful than one random number.
In situations where baseboards or trim appear affected, meter readings can confirm conditions similar to those described in how to detect moisture behind baseboards.
Infrared Thermometers
Infrared thermometers help detect temperature differences across surfaces. Moisture often causes slight cooling effects due to evaporation, making damp areas appear cooler than surrounding materials.
These devices are particularly useful for:
- Scanning wall surfaces quickly
- Identifying unusually cool spots
- Comparing temperature differences between surfaces
- Monitoring potential condensation zones
While infrared thermometers do not directly measure moisture content, they help identify areas requiring closer inspection.
Hygrometers
Hygrometers measure humidity levels in indoor air. Monitoring humidity inside bathrooms helps determine whether moisture conditions are contributing to hidden dampness.
Ideal bathroom humidity levels typically remain below levels that allow moisture to linger excessively. When humidity stays elevated for extended periods, it increases the likelihood that hidden moisture will form behind surfaces.
Monitoring humidity patterns can also reveal conditions associated with persistent dampness patterns, similar to those discussed in why bathroom walls stay damp.
Flashlight Inspection Techniques
A simple flashlight remains one of the most valuable inspection tools. Strong directional light reveals subtle texture changes, stains, and uneven surfaces that are difficult to see under normal lighting.
Use flashlights to:
- Inspect behind fixtures
- Check under sinks and cabinets
- Highlight paint irregularities
- Examine grout lines and seams
Even small differences in surface appearance may indicate moisture activity beneath finished materials.
Why One Damp Spot Can Point to a Larger Bathroom Moisture Problem
A damp spot in one bathroom area does not always mean the source is directly behind that spot. Water can travel downward by gravity, move sideways through porous materials, or form as condensation where humid air reaches cooler surfaces. That is why bathroom moisture inspections should follow the path around the fixture, wall, trim, and floor instead of checking only the first visible stain.
For example, moisture near a baseboard may come from floor splashing, a shower edge, a sink drain, toilet condensation, or damp air trapped behind trim. If the same area remains damp after normal drying time, inspect the nearby fixture connections, caulk lines, grout joints, cabinet base, and flooring edge before assuming the surface problem is isolated.
When Hidden Bathroom Moisture Requires Professional Inspection
Not all moisture problems can be resolved through routine inspection alone. Some situations require professional evaluation to prevent structural damage or mold spread.
Stop the inspection and get professional help if you find soft drywall, crumbling trim, sagging flooring, active water near electrical fixtures, sewage-contaminated water, spreading mold, or moisture that returns after repeated drying. Do not paint, caulk over, or cover stained materials until the moisture source has been identified and corrected.
Repeated Moisture Symptoms
If moisture symptoms return repeatedly after cleaning or drying, hidden moisture sources may still be active. Recurring dampness often indicates ongoing water intrusion or ventilation problems.
Professional inspection may be necessary when:
- Musty odors return quickly
- Paint continues to peel
- Surfaces remain damp frequently
- Humidity levels remain elevated
Expanding Damp Zones
Moisture that spreads beyond its original location signals increasing structural involvement. Expanding stains or softening materials often indicate that moisture is traveling inside concealed spaces.
If affected areas grow larger over time, professional assessment helps identify the moisture pathway and prevent further spread.
Mold Growth Indicators
Visible mold growth strongly suggests long-term moisture exposure. When mold appears repeatedly or spreads across surfaces, hidden moisture likely exists behind surrounding materials.
Addressing mold without identifying the underlying moisture rarely produces lasting results. If visible mold is already present, moisture detection should come before cleanup, and broader cleanup decisions can be handled through how to remove mold permanently.
Structural Material Damage
When materials begin to warp, crumble, or soften significantly, structural moisture exposure may already be advanced. Signs of structural involvement include:
- Severely warped baseboards
- Soft flooring
- Large areas of peeling paint
- Persistent moisture despite drying efforts
At this stage, professional inspection helps determine repair needs and prevents further deterioration.
How Often You Should Check Bathrooms for Hidden Moisture
Routine inspection reduces the risk of long-term damage. Most hidden moisture problems develop gradually, so regular monitoring helps detect issues before they escalate.
Recommended inspection frequency includes:
- Monthly: Visual inspection of common moisture zones
- Every 3 months: Detailed inspection behind fixtures and cabinets
- After plumbing repairs: Follow-up moisture checks
- After high humidity events: Inspection following heavy bathroom use
Regular inspections become especially important in bathrooms with limited ventilation or high daily usage.
Frequently Asked Questions
How do I know if moisture is hiding behind bathroom walls?
Look for warning signs such as peeling paint, persistent damp odors, and cool or soft wall surfaces. Moisture meters and humidity monitoring tools help confirm hidden moisture when visible signs are uncertain.
Can hidden moisture exist without visible mold?
Yes. Moisture often develops before mold appears. Many bathrooms contain hidden moisture for extended periods before visible mold becomes noticeable.
How long can moisture stay hidden in a bathroom?
Moisture can remain hidden for weeks or months depending on ventilation, humidity levels, and material type. Enclosed spaces allow moisture to persist much longer than exposed surfaces.
What tools are best for detecting bathroom moisture?
Moisture meters, hygrometers, infrared thermometers, and flashlights provide the most useful detection support. Each tool helps identify different moisture patterns.
Is hidden bathroom moisture always caused by leaks?
No. Hidden moisture can also develop from condensation, humidity buildup, or water splashing into concealed areas. Leak detection should still be considered when moisture persists.
Should I remove bathroom baseboards to check for moisture?
Baseboard removal is usually unnecessary during early inspection stages. However, removal may be appropriate when moisture damage becomes visible or persistent.
First follow structured inspection methods like those explained in how to detect moisture behind baseboards before you remove baseboards.
What to Do After You Find Hidden Bathroom Moisture
If you find hidden bathroom moisture, first identify whether the area dries fully after normal bathroom use. Then check nearby fixture connections, caulk lines, grout joints, cabinet bases, baseboards, and flooring edges for a pattern. Moisture that returns, spreads, smells musty, or softens materials should not be covered with paint, caulk, or trim until the source is fixed.
A small damp area may only require better ventilation, drying, and closer monitoring. Persistent moisture, active leaks, soft materials, or mold indicators usually require a deeper inspection before repairs are made. If the same bathroom moisture problem keeps returning after drying or cleaning, compare the pattern with why moisture problems keep returning.
2 Comments
Comments are closed.