How to Dry Kitchen Sink Cabinets After Leaks
To dry kitchen sink cabinets after a leak, first stop the water source, remove stored items, absorb standing water, keep the doors open, run a fan into the cabinet, and use a dehumidifier if the area stays humid. Do not close the cabinet or reload stored items until hidden corners, seams, and cabinet materials stay dry for several days.
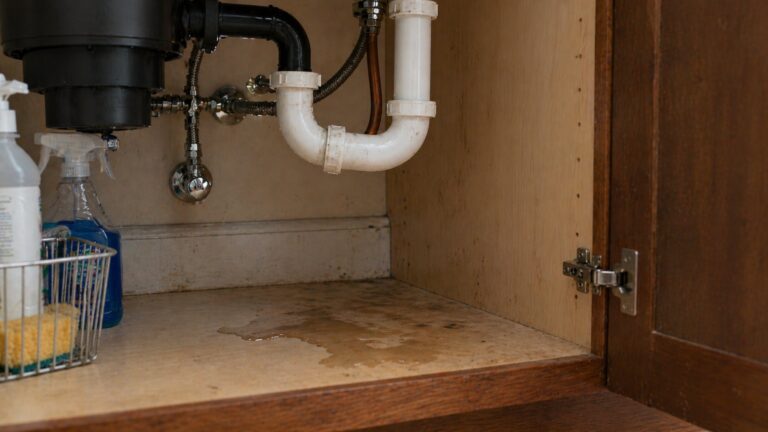
If you are unsure whether moisture damage has already started, first check the signs of water damage under kitchen sinks. If the leak is still active or keeps returning, dry the cabinet only after the water source has been stopped.
What to Do Immediately After a Sink Leak
Quick action is the most important factor in preventing serious cabinet damage. The longer moisture remains inside cabinet materials, the more likely swelling, warping, and mold growth become.
Shut Off the Water Supply
If a leak is still active, stopping the water source should be the first priority. Most kitchen sinks have shutoff valves located beneath the sink, allowing water flow to be stopped quickly.
If water has reached outlets, electrical cords, a garbage disposal connection, or dishwasher wiring, avoid using fans or electrical equipment in the wet area until it is safe. Unplug nearby devices only if you can do so without touching water.
Stopping the leak prevents additional water from soaking cabinet materials and allows drying to begin effectively.
Remove Everything From the Cabinet
Stored items trap moisture and block airflow, slowing the drying process. Removing all contents exposes the cabinet surfaces and allows better air movement.
Items commonly stored under sinks include:
- Cleaning supplies
- Trash bags
- Sponges and cloths
- Storage bins
- Paper products
Any items that feel damp should be dried separately to prevent spreading moisture back into the cabinet.
Absorb Standing Water Immediately
Standing water is the most damaging form of moisture inside cabinets. Removing visible water quickly reduces how deeply materials absorb moisture.
Effective absorption methods include:
- Using thick towels to soak up water
- Pressing cloths firmly into corners
- Repeating wiping until surfaces feel damp instead of wet
- Replacing saturated towels as needed
Even small amounts of standing water can seep into seams and edges, so thorough removal is essential.
If the water came from a sewage backup, dirty drain overflow, or contaminated source, do not treat the cabinet as a simple drying project. Contaminated water may require removal of damaged porous materials and professional cleanup.
How to Dry Kitchen Sink Cabinets Step-by-Step
Drying kitchen cabinets requires more than wiping surfaces. Moisture often penetrates into hidden areas, making airflow and monitoring essential for full drying.
Step 1: Leave Cabinet Doors Fully Open
Opening cabinet doors increases airflow and allows moisture to escape. Enclosed cabinets trap humidity, slowing evaporation and increasing mold risk.
Keeping doors open throughout the drying process helps:
- Improve ventilation
- Reduce humidity inside the cabinet
- Speed up evaporation
- Prevent moisture buildup in hidden areas
Step 2: Use Fans to Increase Airflow
Air movement is one of the most effective ways to speed up drying. Portable fans help remove moisture vapor from cabinet surfaces and improve circulation.
For best results:
- Place the fan facing directly into the cabinet opening
- Keep airflow consistent for at least several hours, and longer if the cabinet base, seams, or back corners still feel damp
- Adjust the fan angle to reach corners
- Use multiple fans if moisture levels are high
Keep the fan running long enough for the cabinet base, rear corners, and pipe openings to dry, not just the front surfaces.
Step 3: Dry Hidden Areas and Corners
Moisture often remains trapped in areas that are difficult to reach. These zones dry more slowly and create the highest mold risk if overlooked.
Focus on drying:
- Back corners of the cabinet
- Edges around pipe openings
- Seams between panels
- Undersides of cabinet bases
Careful attention to hidden zones helps prevent moisture from returning after initial drying.
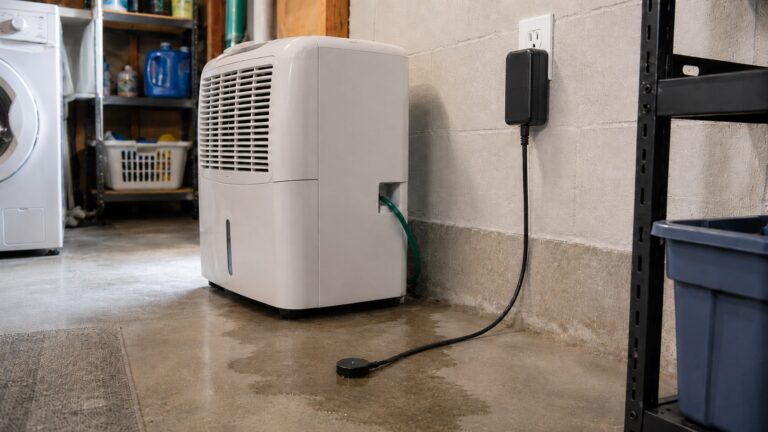
Step 4: Use a Dehumidifier if Needed
High indoor humidity slows evaporation and extends drying time. In humid kitchens, using a dehumidifier significantly improves drying speed.
A dehumidifier helps by:
- Removing moisture from the surrounding air
- Improving evaporation efficiency
- Reducing overall humidity levels
- Supporting faster cabinet drying
If humidity levels are difficult to control, the broader guide to choosing and using a dehumidifier effectively explains how dehumidifiers support drying in damp home areas.
Step 5: Monitor Moisture Levels Over Time
Drying does not end when surfaces feel dry. Internal moisture can remain hidden inside cabinet materials, increasing the risk of mold growth.
Monitoring helps identify whether drying is complete or still in progress. Check the cabinet base, rear corners, pipe openings, seams, toe-kick area, and the floor directly in front of the sink.
Useful monitoring methods include:
- Checking surfaces daily for dampness
- Watching for new stains
- Noting any returning odors
- Observing changes in cabinet texture
Consistent monitoring helps detect moisture problems before they worsen.
Tools That Help Dry Under-Sink Cabinets Faster
Most under-sink cabinet leaks can be dried with towels, steady airflow, humidity control, and careful moisture checks. The goal is to remove visible water first, then keep air moving long enough for seams, corners, and cabinet materials to dry internally.
Absorbent Towels and Cloths
Absorbent towels are often the first tool used during cabinet drying. They remove standing water quickly and prevent moisture from spreading into surrounding materials.
Effective towel use includes:
- Pressing firmly into wet areas
- Replacing saturated towels frequently
- Focusing on seams and edges
- Drying corners thoroughly
Towels are most useful during the early stages of drying when visible water is present.
Portable Fans
Fans are one of the most effective tools for removing moisture from cabinet surfaces. Continuous airflow speeds evaporation and prevents moisture from becoming trapped.
Portable fans should be positioned to direct airflow into the cabinet opening rather than simply circulating air nearby.
Dehumidifiers
Dehumidifiers remove excess moisture from the surrounding air, allowing wet surfaces to dry more efficiently. They are particularly useful in humid climates or kitchens where airflow alone is not enough.
Dehumidifiers are especially helpful when:
- Humidity levels are high
- Cabinet materials feel damp after several hours
- Moisture keeps returning after wiping
- Drying progress slows unexpectedly
For a kitchen cabinet leak, a small room dehumidifier or nearby household dehumidifier is usually enough unless moisture has spread beyond the cabinet. For broader equipment guidance, see how to choose and use a dehumidifier effectively.
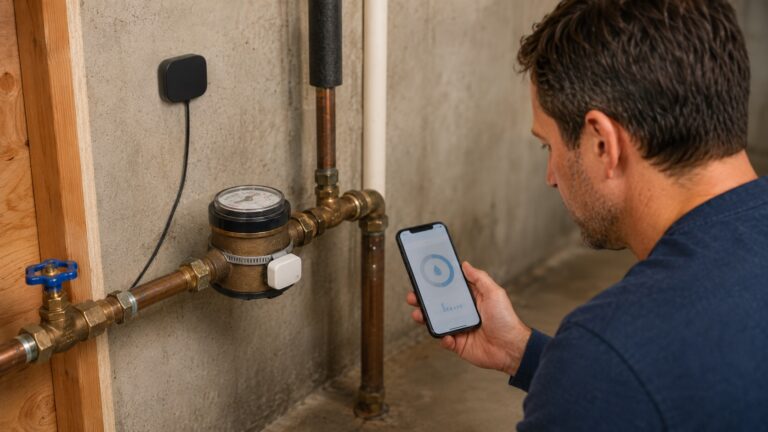
Moisture Meters
Moisture meters provide a more reliable way to confirm whether cabinets are fully dry, especially if the cabinet base is particleboard, MDF, plywood, or unfinished wood. Surface dryness does not always mean internal moisture has disappeared.
Moisture meters help homeowners:
- Detect hidden moisture inside cabinet materials
- Monitor drying progress accurately
- Identify areas that require additional airflow
- Prevent premature closure of cabinet doors
Understanding moisture levels inside materials is one of the most reliable ways to confirm drying success. Tools such as those reviewed in this comparison of best moisture meters for home use can help verify when cabinets are fully dry.
How Long It Takes to Dry Kitchen Sink Cabinets
Drying time varies depending on several factors, including the severity of the leak, cabinet material type, and airflow conditions. Understanding realistic drying timelines helps homeowners avoid stopping the process too early.
Minor Moisture Exposure
Small spills or brief leaks often require less time to dry. When moisture exposure is limited, airflow and wiping usually resolve the issue quickly.
Typical drying time for minor exposure:
- 6 to 24 hours with proper airflow
- Shorter drying time in dry climates
- Longer drying time in humid environments
Even minor exposure requires monitoring to confirm that moisture does not remain trapped in hidden areas.
Moderate Leak Exposure
Leaks that occur repeatedly or remain unnoticed for several days often require longer drying times. Moisture usually penetrates deeper into cabinet materials during moderate exposure.
Typical drying time for moderate leaks:
- 24 to 72 hours with consistent airflow
- Additional time if humidity levels remain high
- Longer drying required for particleboard cabinets
Moderate exposure often produces swelling or discoloration, making careful drying essential to limit permanent damage.
Severe Saturation
Standing water or prolonged leaks can fully saturate cabinet materials. Severe exposure requires extended drying time and more aggressive airflow techniques.
Typical drying time for severe saturation:
- 3 to 7 days or longer
- Continuous airflow recommended
- Possible need for dehumidification
- Inspection for structural damage afterward
Severe moisture exposure increases the likelihood of mold growth if drying is incomplete.
How to Reduce Mold Risk While Cabinets Dry
Mold risk increases when damp cabinet materials stay enclosed. The safest approach is to keep the cabinet open, keep air moving, and avoid storing items inside until the area stays dry.
Maintain Continuous Airflow
Stopping airflow too early allows moisture to settle back into materials. Continuous airflow supports consistent evaporation and prevents hidden moisture buildup.
Continuous airflow helps:
- Reduce mold growth risk
- Remove lingering moisture vapor
- Improve drying efficiency
- Maintain stable cabinet conditions
Watch for Persistent Odors
A persistent odor is a warning sign that the cabinet should stay open and continue drying instead of being closed or reloaded with stored items.
If odors continue, homeowners should review the underlying causes explained in why mold forms under kitchen sink cabinets to better understand moisture conditions that support mold growth.
Keep Cabinets Open Until Hidden Areas Stay Dry
Closing cabinet doors prematurely traps moisture inside and slows evaporation. Cabinets should remain open until drying is fully complete.
Leaving doors open:
- Improves airflow
- Reduces humidity buildup
- Supports moisture evaporation
- Prevents recurring dampness
Closing cabinets too early is one of the most common reasons moisture problems return.
Signs That Kitchen Sink Cabinets Are Fully Dry
Knowing when cabinets are fully dry helps prevent moisture from becoming trapped again. Many homeowners stop drying too early, which allows hidden moisture to remain inside cabinet materials.
Cabinets are typically considered dry when both visible and hidden moisture has been removed. Confirming this stage helps reduce the risk of mold growth and long-term structural damage.
No Dampness on Surfaces
Cabinet surfaces should feel completely dry to the touch. Even slight dampness suggests moisture may still be present inside materials.
Check these areas carefully:
- Cabinet floor panels
- Side walls
- Back corners
- Edges around pipe openings
Any remaining dampness means drying should continue until surfaces remain consistently dry.
No Musty Odors Present
Musty odors after drying usually mean moisture is still trapped somewhere in the cabinet, around pipe openings, or beneath the cabinet base.
If odors persist after drying, reviewing the common signs of water damage under kitchen sinks can help determine whether moisture remains inside cabinet materials.
Stable Cabinet Materials
Dry cabinets typically maintain stable shape and strength. Materials that remain swollen or distorted may indicate permanent damage rather than ongoing moisture.
Look for:
- No new swelling appearing
- No expanding stains
- No soft or weakening surfaces
- No visible moisture returning
If cabinet materials remain stable for several days, drying has likely been successful.
When Professional Drying May Be Necessary
Some moisture problems require professional assistance. While many leaks can be handled with airflow and drying methods, severe exposure may demand specialized equipment.
Large Amounts of Standing Water
If significant water collects under cabinets, moisture may penetrate deeper into subfloor materials. Larger leaks often require stronger drying equipment to remove internal moisture.
Situations that may require professional help include:
- Standing water covering large cabinet areas
- Water spreading beyond the cabinet interior
- Repeated water accumulation after drying
- Multiple affected cabinets
Professional drying may be needed when moisture has moved beyond the cabinet into the subfloor, wall base, or adjacent cabinets.
Cabinet Materials Are Severely Damaged
Severe swelling or structural damage often prevents successful drying. Once materials begin breaking apart, repair or replacement may be necessary.
Warning signs include:
- Cabinet flooring cracking or collapsing
- Large areas of warped materials
- Panels separating from each other
- Cabinet supports becoming unstable
If structural damage appears, stop loading the cabinet and inspect further before covering the area or replacing stored items. Soft, crumbling, sagging, or separating cabinet materials may need repair or replacement after the leak source is corrected. In these situations, homeowners often benefit from reviewing how to fix persistent leaks under kitchen sinks to identify long-term solutions.
Moisture Returns After Drying
Recurring moisture usually indicates that the leak has not been fully resolved. Drying alone cannot fix an active leak, so repeated moisture signals an ongoing plumbing issue.
Moisture returning after drying usually means the original leak was not fully corrected. If the problem keeps coming back, the next step is to inspect whether the sink supply lines, drain connections, shutoff valves, or pipe openings are still allowing water into the cabinet.
If moisture continues returning, long-term prevention strategies described in how to prevent recurring leaks under kitchen sinks can help reduce repeated damage.
Common Mistakes to Avoid When Drying Sink Cabinets
Drying mistakes often lead to recurring moisture problems.
Ignoring Hidden Areas
Many homeowners dry visible surfaces but overlook hidden corners. Moisture trapped in these areas creates long-term damage.
Common overlooked areas include:
- Pipe openings
- Rear cabinet corners
- Underside edges
- Panel seams
Thorough drying requires attention to all moisture-prone locations.
Stopping Drying Too Soon
Drying often appears complete before internal moisture has evaporated. Stopping early allows hidden moisture to remain trapped.
Continue airflow until the cabinet remains dry after the fan has been off for a while, not just while air is actively blowing across the surface.
Blocking Airflow With Stored Items
Returning stored items too soon traps humidity and slows evaporation. Cabinet contents should remain outside until drying is fully confirmed.
Allowing airflow to continue freely improves drying reliability and reduces long-term moisture risks.
Key Takeaways
- Quick action after leaks helps prevent cabinet swelling, hidden moisture, and mold growth.
- Airflow is one of the most effective tools for drying cabinet interiors.
- Hidden areas require careful attention during the drying process.
- Drying times vary based on moisture severity and humidity levels.
- Persistent moisture may indicate unresolved plumbing problems.
- Professional drying may be necessary for severe water exposure.
Frequently Asked Questions About Drying Kitchen Sink Cabinets
Can kitchen cabinets dry on their own?
Cabinets may dry naturally in very dry environments, but airflow significantly speeds the process. Without airflow, moisture can remain trapped inside cabinet materials.
How long should cabinet doors stay open?
Cabinet doors should remain open until visible surfaces, seams, rear corners, and the cabinet base remain dry and stable for several days. This helps hidden moisture evaporate before stored items are returned.
Is using a fan enough to dry cabinets?
A fan may be enough for a minor leak if the cabinet dries quickly and moisture does not return. Larger leaks, humid conditions, swollen materials, or damp seams may require a dehumidifier, moisture meter checks, or professional drying.
Should swollen cabinet materials be replaced?
Severely swollen materials often do not return to their original shape. If structural strength is reduced, replacement may be necessary.
What happens if cabinets are not fully dried?
Incomplete drying increases the risk of mold growth, odors, and long-term structural damage. Continued moisture exposure often leads to recurring problems.
After the Cabinet Is Dry
After the cabinet stays dry for several days, check the plumbing connections one more time before returning stored items. Keep paper products, cardboard, and absorbent supplies out of the cabinet until you are confident no moisture is returning.
If stains expand, odors return, cabinet panels soften, or water appears again, treat the issue as an unresolved leak or hidden moisture problem rather than a completed drying job.
2 Comments
Comments are closed.