How to Find Hidden Water Leaks Inside Walls (Step-by-Step Detection Guide)
To find a hidden water leak inside a wall, start by confirming that water is active in the system, then narrow the location with visual clues, a water meter test, moisture readings, fixture checks, and professional leak detection tools if the source is still unclear.
The goal is not to open random sections of drywall. The goal is to follow the evidence until you know whether the leak is likely coming from a supply pipe, drain line, fixture, appliance line, roof or exterior wall entry point, or another nearby moisture source.
If you are not sure whether the wall is wet yet, start with signs of hidden moisture in walls. If moisture is already likely, the next step is to trace where the water is coming from.
This guide focuses on leak source detection: what to check first, how to test whether water is still moving, how to map moisture patterns, and when to stop and call a leak detection specialist. For broader non-invasive inspection methods, see how to detect moisture without opening walls.
How to Find Hidden Water Leaks Inside Walls
Hidden water leaks can often be detected by combining observation, testing, and measurement techniques. The goal is to locate the most likely leak source without unnecessarily opening walls.
The most reliable leak detection methods include:
- Identifying visual warning signs
- Listening for water movement sounds
- Using moisture meters to locate damp areas
- Monitoring water usage patterns
- Checking plumbing fixtures and nearby systems
- Using advanced detection tools when necessary
Using multiple detection methods improves accuracy and helps confirm whether moisture is actively entering the wall.
Signs That Water May Be Leaking Inside Walls
Before locating a leak, recognizing the warning signs of hidden water damage helps narrow down the affected area. Many leaks produce visible symptoms before the exact source becomes obvious.
Common signs of hidden leaks include:
- Water stains appearing on walls or ceilings
- Peeling or bubbling paint
- Warped drywall or baseboards
- Musty odors that persist over time
- Soft or swollen wall surfaces
- Unexpected increases in water bills
- Recurring moisture in the same location
If these warning signs appear, identifying the leak source quickly becomes important. Comparing symptoms with known moisture indicators in the signs of hidden moisture in walls guide helps determine whether moisture is spreading.
Method 1: Look for Visual Clues That Indicate a Leak
Visual inspection is one of the most effective first steps in locating hidden leaks. Many leaks produce subtle but recognizable surface changes before more serious damage develops.
This method requires careful observation of wall surfaces, trim, and nearby structures.
Common Visual Signs of Hidden Water Leaks
Visual symptoms often appear gradually as moisture spreads through materials. Early identification helps prevent widespread damage.
Watch for:
- Yellow or brown stains forming on drywall
- Paint bubbling or peeling from surfaces
- Warped or swollen baseboards
- Cracks forming along drywall seams
- Water spots forming near ceilings or corners
- Discoloration beneath windows
Visual signs often appear close to the leak source, but moisture can travel along structural materials. Understanding moisture movement patterns improves detection accuracy.
Where to Focus Your Visual Inspection
Hidden leaks most often occur near plumbing fixtures and water supply lines. Checking these locations first improves the chances of finding the leak quickly.
Focus inspection efforts near:
- Sinks and plumbing connections
- Bathrooms and shower walls
- Kitchen appliances using water lines
- Water heater areas
- Exterior-facing walls
- Basements and crawl spaces
Visual inspection provides the starting point for identifying likely leak areas before using specialized tools.
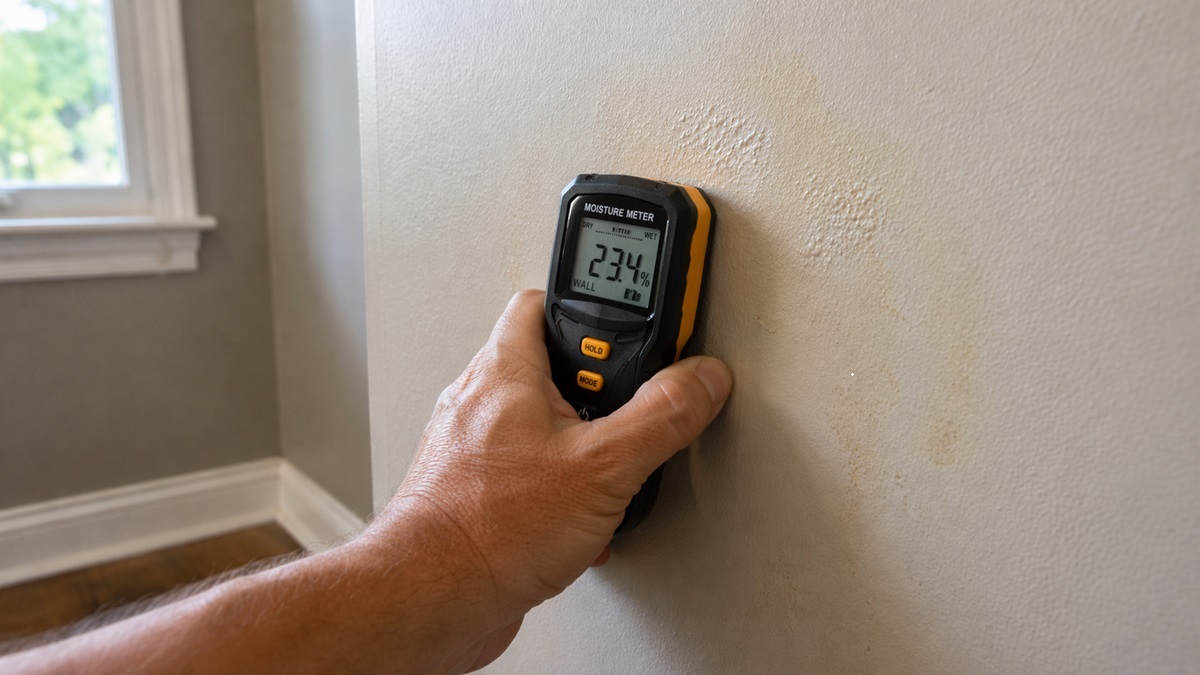
Method 2: Use Moisture Meters to Locate Damp Areas
Moisture meters are among the most reliable tools for tracing hidden leak locations inside walls. (See the best moisture meters for detecting hidden water damage.) These devices help map moisture spread patterns so you can follow damp areas back to the most likely leak source.
Because moisture spreads beyond the original leak source, measuring moisture levels helps map the affected area.
How Moisture Meters Help Identify Leak Locations
Moisture meters detect elevated moisture levels within drywall and wood materials. By comparing readings across multiple locations, it becomes easier to identify where moisture concentrations are highest.
Moisture meter readings help identify:
- Damp zones inside walls
- Moisture spread patterns
- Hidden plumbing leaks
- Lingering moisture after water damage
- Areas requiring further inspection
Choosing a reliable moisture meter improves detection accuracy. If you are selecting a meter for home use, our guide to the best moisture meters for home use explains which models perform well across common materials.
For exact moisture thresholds and safe ranges, see moisture levels that indicate water damage.
Method 3: Listen for Sounds That Indicate a Hidden Leak
Hidden water leaks often produce subtle sounds before visible damage appears. Listening carefully in quiet conditions can help identify the general location of a leak inside a wall.
This method is especially useful when leaks occur in plumbing systems that remain pressurized, even when fixtures are turned off.
Common Sounds That May Indicate a Hidden Leak
Water moving through pipes or escaping through small openings often produces recognizable sounds. These sounds may be faint but consistent.
Listen for:
- Dripping sounds inside walls
- Soft rushing or flowing water
- Hissing sounds from pressurized pipes
- Tapping or ticking noises from pipe movement
- Water movement when no fixtures are in use
Listening for these sounds becomes easier when background noise is reduced.
Best Conditions for Detecting Leak Sounds
Listening techniques work best under quiet conditions. Reducing noise improves the ability to detect faint sounds inside walls.
Listening is most effective:
- Late at night or early in the morning
- When appliances are turned off
- When water fixtures are not running
- Near plumbing-heavy areas such as kitchens and bathrooms
Although sound detection helps identify suspicious areas, confirming moisture levels remains important. Using moisture detection methods from our how to detect moisture without opening walls guide can help verify moisture conditions.
Method 4: Use Your Water Meter to Confirm a Hidden Leak
Your home’s water meter can provide strong evidence that a hidden leak exists. This simple test helps determine whether water is flowing somewhere in the system even when all fixtures appear turned off.
This is one of the simplest ways to confirm whether water is moving when no fixture should be using water.
How to Perform a Water Meter Leak Test
Follow these steps carefully to determine whether water is leaking inside your home:
- Turn off all water fixtures inside and outside the home.
- Check that appliances are not running, including washing machines, dishwashers, and irrigation systems.
- Locate your home’s water meter, usually found outside near the street or inside a utility area.
- Record the current meter reading.
- Wait 30 to 60 minutes without using any water.
- Check the meter again.
If the meter reading changes during the waiting period, water is likely flowing somewhere in the system. This usually indicates a leak that requires further investigation.
Why Water Meter Testing Is So Effective
Water meters measure all water entering your home. If the meter changes while every faucet, toilet, appliance, irrigation line, and exterior hose bib is off, water is likely escaping somewhere in the system.
This method helps identify:
- Hidden plumbing leaks
- Slow leaks inside walls
- Undetected water loss
- Leaks behind fixtures
- Leaks beneath flooring
If water meter readings confirm a leak, locating the exact source becomes the next priority.
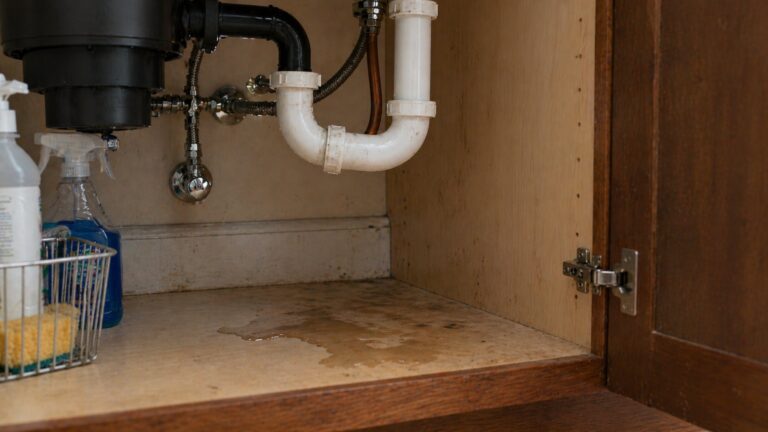
Method 5: Check Plumbing Fixtures and Nearby Systems
Most hidden leaks originate near plumbing fixtures or water supply connections. Inspecting these areas carefully helps identify the most likely leak sources.
Small plumbing leaks often begin at connection points where pipes meet fixtures.
Common Plumbing Locations Where Leaks Occur
Plumbing-heavy areas should be inspected first because they experience frequent water flow and pressure changes.
Focus on:
- Bathroom sinks and vanity cabinets
- Kitchen sink plumbing connections
- Toilet water supply lines
- Dishwasher water connections
- Refrigerator water lines
- Water heater fittings
- Washing machine hoses
Leaks near these locations often spread moisture into surrounding walls.
Signs of Fixture-Related Leaks
Fixture leaks may produce visible symptoms that help narrow down the leak source.
Watch for:
- Damp cabinets or flooring
- Rust forming on pipe connections
- Water pooling beneath fixtures
- Discoloration near plumbing lines
- Recurring moisture in the same location
If leaks originate from fixtures, repairing these connections often stops moisture from spreading into walls.
Method 6: Monitor Water Usage Patterns
Unusual water usage patterns often indicate hidden leaks that remain undetected. Monitoring water usage helps identify leaks that may not produce immediate visible symptoms.
Even slow leaks can cause long-term damage if left unresolved.
Warning Signs of Abnormal Water Usage
Changes in water usage patterns provide important clues that water may be escaping somewhere in the system.
Watch for:
- Unexpected increases in water bills
- Water running sounds without explanation
- Pressure drops in plumbing fixtures
- Water heaters running more frequently
- Persistent damp areas appearing without clear cause
Monitoring these changes helps identify leaks that develop slowly over time.
A changing water bill does not reveal the exact wall location, but it strengthens the case that a plumbing leak may be active somewhere in the system.
Method 7: Use Advanced Tools to Locate Hidden Leaks
When basic detection methods do not clearly identify a leak location, advanced tools may help locate moisture inside walls with greater precision. These tools are commonly used by inspectors and restoration professionals to identify leak sources without unnecessary demolition.
Advanced detection methods provide more detailed information about moisture patterns and structural conditions.
Infrared Thermal Cameras
Infrared thermal cameras detect temperature differences on wall surfaces. Because moisture affects temperature patterns, damp areas often appear cooler than surrounding materials when viewed through thermal imaging.
Thermal cameras help identify:
- Hidden moisture zones inside walls
- Leaks behind insulation
- Water intrusion from exterior walls
- Areas with abnormal drying patterns
- Moisture spread across large surfaces
Although thermal imaging does not measure moisture directly, it helps identify suspicious areas that require further testing.
This method is often used alongside moisture meters to confirm elevated moisture levels. Understanding how to interpret these readings helps determine whether damage is likely. Our guide on moisture levels that indicate water damage explains safe reading ranges for common materials.
Electronic Leak Detection Equipment
Professional leak detection tools use specialized sensors to locate water movement inside plumbing systems. These devices detect vibration patterns, sound waves, and pressure changes within pipes.
Electronic leak detection tools help locate:
- Leaks inside pressurized plumbing lines
- Small pinhole leaks in pipes
- Water movement inside hidden cavities
- Leaks inside slab foundations
These tools allow technicians to pinpoint leak locations more accurately than basic observation methods.
Pressure Testing Systems
Pressure testing is another method used to confirm hidden leaks. This technique involves monitoring pressure levels within plumbing systems to detect leaks that may not be visible.
Pressure testing helps identify:
- Hidden pipe failures
- Leaks inside walls or floors
- Small leaks that occur intermittently
- Leaks within closed plumbing systems
Because pressure testing requires specialized equipment, it is typically performed by trained professionals.
Best Tools for Finding Hidden Wall Leaks
The most useful tools depend on what you need to confirm. A moisture meter is usually the best first tool for mapping damp drywall or wood. A thermal camera can help spot suspicious temperature patterns, a borescope can visually inspect a small wall cavity, and professional acoustic or pressure equipment can trace hidden plumbing leaks more precisely.
For most homeowners, a moisture meter is the most practical starting point. If you are comparing available options, reviewing the best moisture meters for home use guide can help identify reliable models.
When to Call a Professional Leak Detection Specialist
Some leak problems are too complex to diagnose using basic tools. Professional leak detection specialists use advanced equipment to locate leaks quickly and accurately.
Knowing when to seek professional help helps prevent delays that may worsen structural damage.
Signs That Professional Help May Be Necessary
Professional inspection may be recommended when:
- Water meter readings indicate a leak but the source cannot be found
- Moisture readings remain elevated over time
- Visible damage continues spreading
- Leaks affect multiple rooms
- Water damage involves large areas
- Strong odors persist despite cleaning
Professional detection helps locate leak sources efficiently, reducing unnecessary wall removal and repair costs.
Safety note: Do not cut into walls, disturb moldy materials, or work near electrical outlets, wiring, or wet insulation until the source and risk level are clear. If the wall feels soft, crumbling, unusually warm, or electrically unsafe, stop and call a qualified professional.
Step-by-Step Hidden Wall Leak Detection Workflow
Finding a hidden water leak inside walls becomes much easier when methods are used in the correct sequence. Instead of guessing randomly, following a structured approach helps narrow down the source quickly and reduces unnecessary wall damage.
This workflow combines observation, testing, and measurement to locate leaks as accurately as possible.
Step 1: Identify Visible Warning Signs
Begin by looking for physical changes on walls, ceilings, and nearby surfaces. Visible symptoms help identify the general area where moisture is entering.
Common warning signs include:
- Water stains forming on drywall
- Bubbling or peeling paint
- Warped baseboards
- Recurring damp spots
- Musty odors in specific areas
If warning signs appear, comparing symptoms with the signs of hidden moisture in walls guide helps confirm whether hidden moisture is likely present.
Step 2: Confirm the Leak Using Your Water Meter
After identifying suspicious areas, confirm whether water is actively leaking. Performing a water meter test provides strong evidence that water is escaping somewhere in the system.
If meter readings change while no fixtures are running, a leak is likely present.
This step helps distinguish between moisture caused by leaks and moisture caused by humidity or condensation.
Step 3: Locate the Area With the Highest Moisture Levels
Once a leak is confirmed, moisture measurements help identify where water concentration is greatest. Moisture meters allow homeowners to compare readings across multiple locations.
Areas with the highest readings are often closest to the leak source, but water can travel along studs, pipes, insulation, flooring, and trim. Check above, below, and beside the highest reading before deciding where the leak started.
Choosing reliable tools improves measurement accuracy. If you are selecting equipment, reviewing the best moisture meters for home use guide can help identify dependable options.
Step 4: Inspect Nearby Plumbing Fixtures
After identifying moisture patterns, inspect plumbing fixtures located near the affected area. Many hidden leaks originate from connections behind sinks, toilets, and appliances.
Look for:
- Loose pipe fittings
- Corroded connections
- Damp cabinets
- Water pooling beneath fixtures
Repairing fixture-related leaks often prevents moisture from spreading further into walls.
Step 5: Use Advanced Detection Methods if Needed
If the leak source remains unclear, advanced tools such as thermal cameras or professional inspection equipment may be necessary. These tools help locate leaks hidden deep within walls or structural components.
Professional detection becomes especially valuable when moisture continues spreading despite initial repairs.
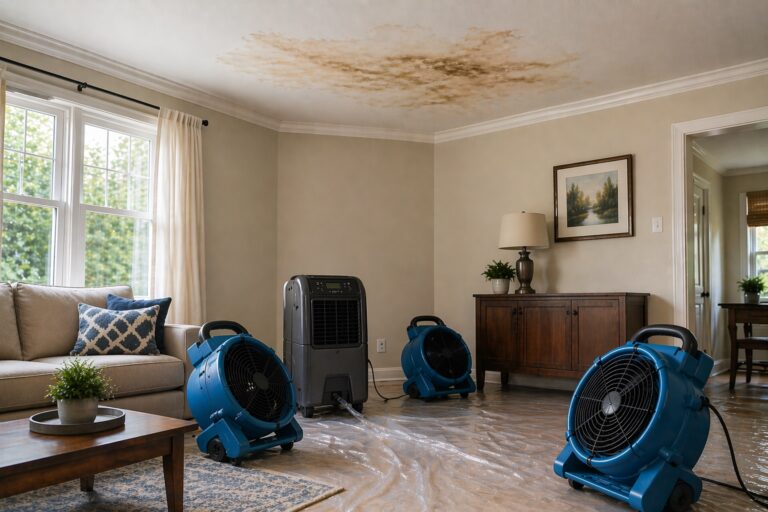
How Hidden Leaks Lead to Mold Growth
Hidden water leaks create ideal conditions for mold growth and long-term structural damage when moisture remains trapped inside walls. Even small leaks can produce enough moisture to support mold development if left unresolved.
Mold growth often begins within 24 to 48 hours after moisture exposure. This rapid timeline highlights the importance of locating leaks quickly.
If moisture remains unresolved, mold may begin forming inside drywall and structural materials. Reviewing signs of mold behind walls can help determine whether mold growth has already started.
For timing, how long mold takes to grow after water damage explains why hidden leaks should be addressed quickly.
Frequently Asked Questions About Hidden Water Leaks
How do plumbers find hidden leaks inside walls?
Professional plumbers use specialized tools such as moisture meters, thermal imaging cameras, and pressure testing systems to locate leaks. These tools allow technicians to identify leak sources without unnecessary demolition.
Can a leak exist without visible water?
Yes, hidden leaks often develop slowly and may not produce visible water immediately. Moisture can remain trapped inside walls long before visible signs appear.
How can you tell if a pipe is leaking inside a wall?
Common indicators include musty odors, water stains, bubbling paint, and increased water bills. Confirming moisture levels using measurement tools helps determine whether leaks are present.
Do moisture meters help find hidden leaks?
Yes, moisture meters are one of the most effective tools for identifying leak locations. Elevated readings help identify areas where moisture is accumulating inside wall materials.
How expensive is professional leak detection?
The cost of professional leak detection varies depending on location, property size, and the complexity of the leak. Simple inspections may be relatively affordable, while complex detection may require specialized equipment.
How long can a hidden leak go unnoticed?
Hidden leaks can remain undetected for weeks or even months if symptoms are subtle. Slow leaks often produce gradual damage that becomes noticeable only after significant moisture buildup occurs.
Hidden Wall Leak Detection Checklist
The fastest way to narrow a hidden wall leak is to combine system-wide evidence with local moisture mapping.
The most important steps for locating hidden leaks include:
- Identifying visible warning signs
- Confirming leaks using water meter testing
- Measuring moisture levels across surfaces
- Inspecting plumbing fixtures carefully
- Using advanced detection tools when necessary
Following a structured detection process improves accuracy and reduces the risk of overlooking hidden moisture sources.
What to Do After You Find the Leak Source
Once the source is found, stop the water before covering stains, repainting, replacing trim, or closing wall openings. Cosmetic repair before leak repair usually allows the same moisture problem to return.
After the leak source is found, use our guide to finding hidden moisture in different areas of your home to check nearby wall, floor, ceiling, and cabinet areas that may also be affected.
8 Comments
Comments are closed.