How to Detect Hidden Moisture in Attics
The most common signs of moisture in attic insulation are clumping, matting, dark discoloration, musty odors, frost, damp-looking low spots, and insulation that appears compressed or heavier than nearby dry areas. These signs often show up before roof decking, rafters, or ceiling drywall show obvious damage.
Moisture in attic insulation can come from roof leaks, condensation, poor attic ventilation, air leaks from the living space, or exhaust fans that discharge into the attic. This article focuses on the visible and indirect warning signs, not full leak tracing or repairs. For broader location-based moisture checks, see this guide to how to find hidden moisture in different areas of your home.
Safety note: Avoid walking between ceiling joists or handling insulation directly if mold, heavy moisture, or damaged wiring may be present. Observe from stable framing or an attic platform whenever possible.
Why Moisture in Attic Insulation Is a Serious Warning Sign
Attic insulation is designed to trap air and slow heat transfer. When moisture changes the texture, height, color, or smell of insulation, it usually means water is being trapped long enough to affect performance or nearby attic materials.
Wet insulation can lose loft, hold odors, support mold growth, and transfer moisture into roof sheathing, rafters, trusses, fasteners, or ceiling drywall. The visible insulation change is often only the first clue; the larger moisture source still needs to be identified.
If mold is suspected, avoid disturbing insulation unnecessarily. Related attic mold behavior is explained in this guide to signs of mold growth in attic spaces.
Common Visible Signs of Moisture in Attic Insulation
The most reliable early signs are changes in insulation appearance, height, texture, smell, and location. Check suspicious areas against nearby dry-looking insulation so you can spot differences instead of relying on one isolated mark.
Moisture-related symptoms commonly appear near:
- Roof leaks
- Ventilation openings
- Roof penetrations
- Bathroom or kitchen exhaust outlets
- Cold roof edges
- Areas with poor airflow
Insulation Appears Clumped or Matted
One of the clearest signs of moisture exposure is insulation that looks clumped, compacted, or matted instead of fluffy and evenly distributed.
This symptom is especially common in:
- Blown-in cellulose insulation
- Loose-fill fiberglass insulation
- Areas beneath slow roof leaks
- Locations with condensation buildup
Clumping often indicates repeated wetting rather than a single isolated event.
Insulation Feels Damp or Heavy
In accessible areas, insulation may feel noticeably heavier or slightly damp to the touch. However, homeowners should avoid disturbing insulation unnecessarily, especially if mold is suspected.
Instead of touching insulation directly, look for indirect indicators such as:
- Flattened surfaces
- Compressed layers
- Dense areas that appear heavier than surrounding insulation
- Reduced loft compared to nearby dry insulation
If insulation appears consistently compressed or uneven, it may be retaining moisture beneath the surface.
Dark or Discolored Patches on Insulation
Dark staining or discoloration often indicates moisture accumulation or contamination. These stains may appear as:
- Gray patches
- Brown streaks
- Darkened areas along insulation edges
- Localized color changes beneath roof penetrations
Discoloration may occur before visible mold growth appears. In many cases, staining represents early moisture accumulation that has not yet produced biological growth.
When discoloration appears directly above ceiling stains below, the problem may involve ongoing water entry rather than temporary humidity changes. These ceiling-level symptoms are discussed in more detail in this guide to signs of water damage under ceilings.
Sagging or Settled Insulation Areas
Wet insulation often settles unevenly due to added weight from absorbed moisture. Over time, this can cause visible depressions or uneven coverage.
Common warning patterns include:
- Low spots between ceiling joists
- Thin insulation coverage in isolated zones
- Uneven insulation height across attic areas
- Settling concentrated beneath roof penetrations
Settled insulation frequently indicates repeated wetting events rather than a single moisture incident.
If you suspect insulation has shifted due to moisture, the next step is usually a structured inspection process such as the one explained in how to inspect attic areas for moisture damage.
Additional Visual Signs That Moisture Is Affecting Attic Insulation
After checking for clumping, discoloration, and settling, look for secondary signs such as mold, crusting, frost, or moisture beneath the insulation. These usually mean the problem has repeated or lasted long enough to affect nearby attic materials.
Visible Mold Growth on Insulation Surfaces
Visible mold growth usually means insulation or nearby attic materials have stayed damp repeatedly or long enough for contamination to develop.
Common visual mold indicators include:
- Black, green, or gray speckled patches
- Fuzzy or powdery surface growth
- Clusters of dark spotting across insulation layers
- Growth spreading from insulation to nearby wood framing
Mold growth on insulation often signals ongoing moisture rather than a one-time event. If mold is visible, moisture is likely still present or has returned repeatedly.
For a fuller attic mold checklist, see this guide to signs of mold growth in attic spaces.
Crusty or Hardened Insulation Surfaces
In some cases, insulation exposed to repeated wetting and drying cycles develops hardened or crust-like surfaces. This symptom is especially common in cellulose insulation that has absorbed moisture and then dried unevenly.
Hardened insulation surfaces may:
- Form uneven clumps that do not break apart easily
- Appear rigid instead of soft
- Show crusted layers on top of otherwise loose material
- Indicate long-term moisture exposure rather than recent wetting
When insulation develops hardened surfaces, its ability to trap air is reduced, which can lower thermal performance and contribute to higher heating or cooling costs.
Insulation Appears Frosted or Icy in Cold Weather
During winter conditions, moisture trapped inside attic air can freeze on insulation surfaces. This often occurs when warm indoor air leaks into a cold attic and condenses into frost.
Typical frost-related warning signs include:
- White frost crystals covering insulation surfaces
- Ice buildup near roof edges
- Frozen moisture around roof penetrations
- Water dripping during thaw cycles
Frost may look harmless, but thaw cycles can repeatedly wet insulation and leave damp or compressed areas behind.
If frost is visible, the attic may be experiencing airflow or ventilation failures. These patterns are often associated with conditions explained in how to detect inadequate roof ventilation.
Water Dripping or Moisture Accumulation Beneath Insulation
In more advanced cases, moisture may collect beneath insulation layers, especially if water is entering from roof leaks or condensation above the insulation surface.
This condition may produce:
- Visible damp areas beneath insulation layers
- Water staining along joists
- Wet drywall surfaces beneath attic spaces
- Localized pooling in low attic areas
Moisture accumulating beneath insulation usually indicates ongoing water entry rather than occasional humidity changes.
When water movement becomes visible in attic materials, the source may involve roof system damage. Many of these patterns overlap with those described in signs of moisture damage in roof rafters.
Odor and Comfort Clues That Suggest Moisture in Attic Insulation
Not all insulation moisture signs are visible from the attic access point. Musty odors, cold spots, uneven temperatures, or indoor humidity changes can point to damp insulation before obvious attic damage is visible.
Musty or Earthy Odors Inside the Home
Persistent musty odors often indicate moisture buildup in hidden areas, including attic insulation. These odors may be noticeable in upper floors, hallways, or closets near attic access points.
Typical odor characteristics include:
- Earthy or damp smells
- Stronger odors during humid weather
- Odors that intensify after rainfall
- Lingering smells even after cleaning indoor spaces
Odor development usually occurs before visible mold growth spreads widely. If musty smells are present, attic insulation should be inspected for moisture-related damage.
Indoor odor behavior related to hidden moisture is also discussed in signs of hidden mold in homes, which explains how concealed moisture sources produce noticeable smells.
Cold Spots or Uneven Indoor Temperatures
Moisture-damaged insulation often loses its insulating ability, allowing heat to escape or enter more easily. This leads to temperature imbalances inside the home.
Common comfort-related warning signs include:
- Cold ceilings during winter
- Warm upper floors during summer
- Draft-like sensations near ceiling areas
- Rooms that never reach desired temperatures
These symptoms often develop gradually and may initially be mistaken for HVAC problems. However, insulation performance loss caused by moisture frequently contributes to uneven indoor comfort.
Increased Indoor Humidity Levels
Indoor humidity problems do not prove attic insulation is wet, but they can support the pattern when they appear together with attic odors, frost, condensation, or damp-looking insulation.
Signs of humidity-related moisture issues include:
- Condensation on windows
- Damp-feeling indoor air
- Visible moisture on cold surfaces
- Frequent need for dehumidifiers
If attic insulation moisture is suspected, humidity patterns should be evaluated along with other attic symptoms. Broader moisture behavior is explored in signs of moisture caused by ventilation failure, which explains how airflow issues influence humidity levels.
Signs of Moisture in Attic Insulation by Material Type
Different insulation materials react differently when exposed to moisture. Understanding how each material behaves helps homeowners recognize early warning signs more accurately.
Fiberglass Insulation Warning Signs
Fiberglass insulation is one of the most widely used attic insulation materials. Although fiberglass does not absorb water like cellulose, it still traps moisture between fibers.
Typical fiberglass moisture signs include:
- Flattened fiberglass batts
- Reduced loft height
- Dark streaks along batt surfaces
- Water staining near roof penetrations
- Localized compression beneath condensation areas
Fiberglass batts may appear dry on top while remaining damp underneath, especially when moisture originates from condensation above the insulation layer.
Blown-In Cellulose Insulation Warning Signs
Cellulose insulation is particularly sensitive to moisture because it is made from recycled paper products. When exposed to moisture, cellulose tends to absorb water quickly.
Common cellulose moisture indicators include:
- Large clumps forming within insulation layers
- Heavy, dense areas of material
- Uneven settling patterns
- Dark discoloration across surfaces
- Persistent musty odors
Cellulose insulation may also support mold growth more readily than fiberglass if moisture remains present.
Spray Foam Insulation Warning Signs
Spray foam insulation behaves differently than loose-fill or batt materials. Because spray foam forms a continuous layer, moisture signs may appear at foam edges, seams, roof decking, rafters, or trapped leak paths rather than inside the foam itself.
Typical spray foam moisture indicators include:
- Discoloration on nearby wood framing
- Moisture staining adjacent to foam surfaces
- Condensation forming along edges
- Odors developing in enclosed attic areas
Foam insulation problems often require careful inspection because moisture may remain hidden behind sealed surfaces.
Less Obvious Signs That Moisture Is Present in Attic Insulation
Some attic insulation moisture problems develop without obvious wet spots or visible mold. If insulation looks mostly normal but ceiling stains, damp access areas, or condensation near roof penetrations appear, further evaluation is usually necessary. In many cases, confirming hidden moisture requires techniques explained in how to detect hidden moisture in attics.
Condensation Around Roof Penetrations
Moisture often accumulates around roof penetrations such as:
- Plumbing vent pipes
- Electrical conduits
- Chimneys
- Vent stacks
- Exhaust fan ducts
Condensation forming near these areas may gradually spread into nearby insulation. Over time, insulation surrounding penetrations may become damp or compressed without obvious dripping water.
When condensation repeatedly forms near penetrations, the problem may involve poor sealing or air leakage. Related moisture patterns affecting roof components are described in signs of condensation on roof sheathing.
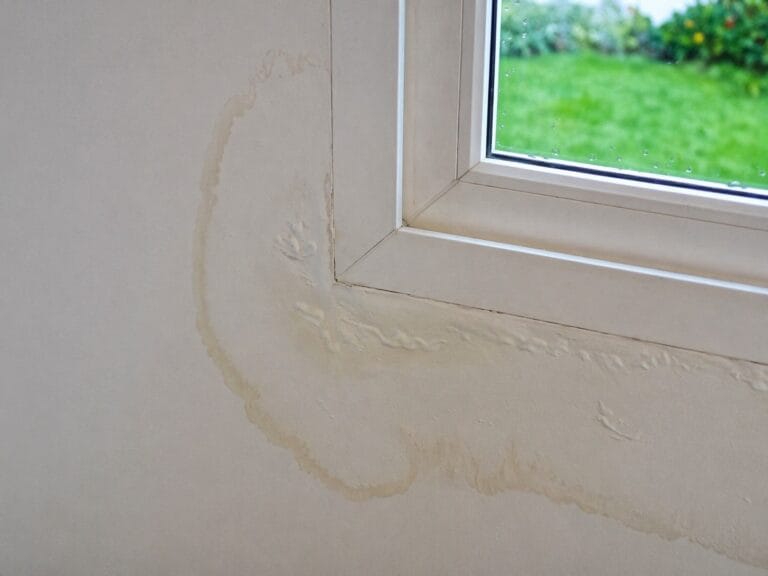
Water Stains on Ceiling Surfaces Below the Attic
Ceiling stains are often one of the earliest visible signs of attic moisture affecting insulation. Water traveling through insulation layers may eventually reach ceiling drywall, creating visible discoloration inside the home.
Typical ceiling warning signs include:
- Yellow or brown ceiling stains
- Soft spots in ceiling drywall
- Peeling paint or bubbling finishes
- Recurring stains after rainfall
When ceiling stains appear beneath attic areas, moisture may already be traveling through insulation materials above.
If ceiling damage is visible, further moisture movement may be occurring within structural materials. These conditions often overlap with those explained in signs of water damage under ceilings.
Unusual Dampness Near Attic Access Points
Attic access hatches sometimes show signs of moisture exposure before other attic areas. Because these openings connect indoor and attic environments, warm air leakage often concentrates near access doors.
Warning signs near attic access points include:
- Moisture around hatch frames
- Condensation forming on access covers
- Musty smells near attic openings
- Discoloration around ceiling trim
When these symptoms appear, moisture may already be affecting nearby insulation layers.
How Moisture in Attic Insulation Differs From Mold or Roof Leak Damage
Not every insulation moisture problem is caused by roof leaks, and not every wet insulation issue leads to mold growth immediately. Understanding the differences between these conditions helps homeowners identify potential causes without making incorrect assumptions.
This section provides a high-level comparison to help interpret observed symptoms. Detailed cause explanations are covered separately in why attics develop hidden moisture problems.
Moisture Without Active Leaks
Many attic insulation moisture problems develop without visible dripping water. In these cases, moisture usually originates from condensation or airflow problems.
Typical signs include:
- Evenly distributed damp insulation
- Frost formation in winter
- No clear leak location
- Moisture appearing across wide attic areas
This pattern often indicates humidity-related moisture buildup rather than direct water entry.
Moisture From Active Roof Leaks
Roof leaks usually produce localized wet spots that appear beneath specific roof areas. Moisture from leaks may saturate insulation quickly and spread outward from the source.
Typical leak-related warning signs include:
- Isolated wet patches beneath roof joints
- Water stains appearing after rainfall
- Dripping sounds during storms
- Rapid insulation saturation
If leak symptoms are suspected, inspection of roof framing and surfaces becomes critical. These leak patterns are often associated with symptoms explained in signs of moisture damage in roof framing.
Moisture Leading to Mold Development
Mold growth occurs when insulation remains wet for extended periods. While moisture alone does not always produce mold immediately, prolonged damp conditions increase the likelihood of contamination.
Signs that moisture may already be supporting mold growth include:
- Persistent musty odors
- Visible dark staining on nearby materials
- Fuzzy surface growth
- Expanding discoloration patterns
Once mold develops, insulation replacement may become necessary, depending on severity and material type.
What to Do After You Notice Signs of Moisture in Attic Insulation
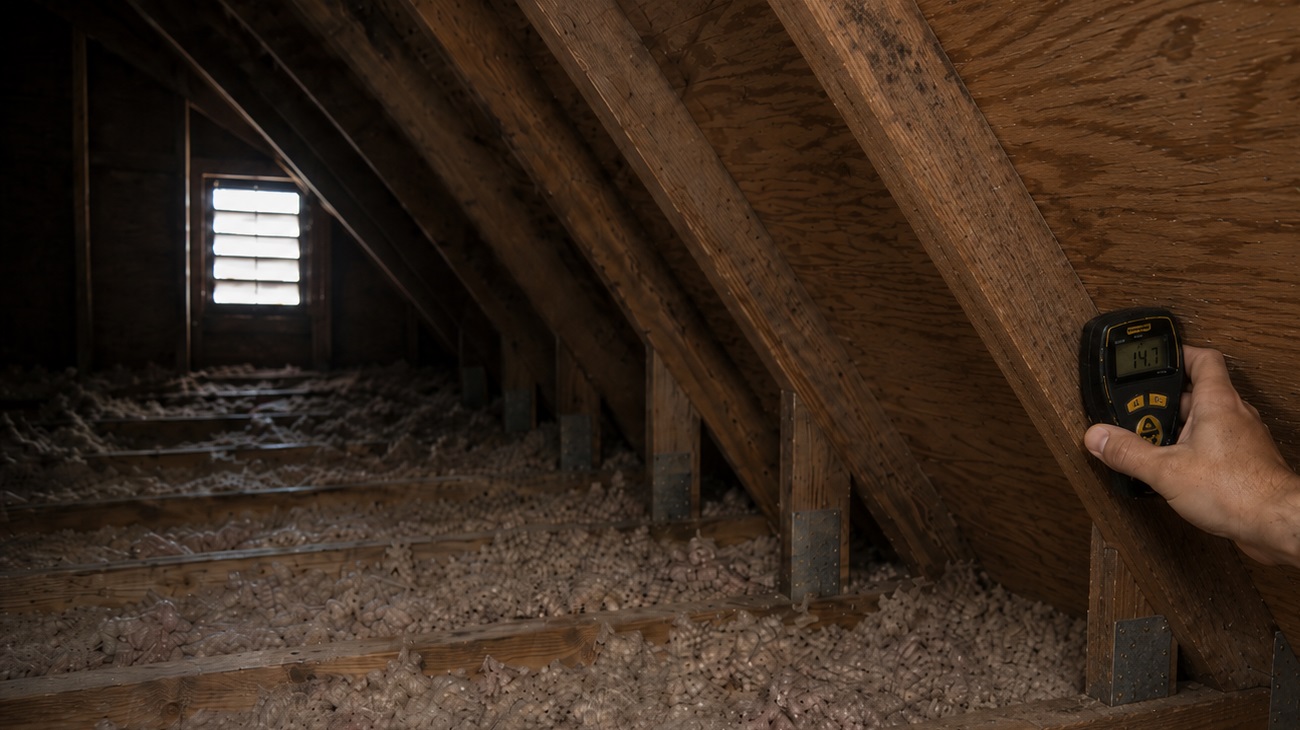
Seeing moisture signs in attic insulation does not automatically mean major repairs are required, but the pattern should be confirmed before the insulation is assumed to be dry or harmless.
Do not step between ceiling joists, compress large areas of insulation, or disturb suspected mold growth while checking. Use a flashlight from stable attic framing or an attic platform whenever possible.
The next step after identifying symptoms is to confirm the presence and extent of moisture. This typically involves a more structured evaluation such as the process outlined in how to detect hidden moisture in attics, which explains how to identify moisture sources without damaging insulation materials.
Look for Patterns Rather Than Isolated Spots
When reviewing attic insulation, focus on patterns rather than individual damp areas. Moisture patterns provide important clues about what may be causing the problem.
For example:
- Moisture near roof penetrations may indicate flashing or sealing issues
- Damp insulation along roof edges may signal ventilation problems
- Widespread moisture may indicate indoor humidity imbalance
- Localized wet spots may point to roof leaks
Recognizing these patterns helps determine whether the moisture source is structural, environmental, or ventilation-related.
Avoid Disturbing Suspected Mold Areas
If insulation shows signs of mold growth, avoid disturbing the material unnecessarily. Disturbing contaminated insulation may release spores into the air, increasing exposure risks.
Instead of touching affected areas:
- Observe from a distance
- Document visible changes
- Note odor strength and location
- Record areas showing repeated moisture
If mold growth appears significant, professional evaluation may be necessary before further handling occurs.
Check Related Areas That Often Show Moisture First
Moisture rarely affects insulation alone. Related surfaces may show early signs before insulation damage becomes obvious.
Common areas to review include:
- Roof sheathing surfaces
- Rafters and trusses
- Ventilation openings
- Bathroom exhaust duct outlets
- Attic access doors
When these areas show condensation or staining, insulation moisture is likely part of a broader attic moisture pattern.
If insulation moisture appears alongside ventilation symptoms, addressing airflow issues becomes critical. Preventive strategies are explained in how to prevent moisture build-up in attics, which focuses on long-term moisture control solutions.
When to Call a Professional for Attic Insulation Moisture
Moisture in attic insulation becomes urgent when it is widespread, recurring, moldy, affecting living spaces, or spreading into roof decking, framing, or ceiling drywall.
Professional assessment may be necessary when:
- Large areas of insulation remain wet
- Mold growth becomes visible
- Strong odors persist inside living areas
- Water stains repeatedly appear on ceilings
- Structural materials show deterioration
- Moisture returns after attempted corrections
Professionals can evaluate roof leaks, condensation patterns, air leaks, mold contamination, and insulation replacement needs without spreading contaminated material through the attic. If a broader attic review is needed, this guide on how to inspect attic areas for moisture damage explains a more systematic assessment.
FAQ — Signs of Moisture in Attic Insulation
How can I tell if attic insulation is wet without touching it?
Wet insulation often appears flattened, clumped, or discolored. You may also notice musty odors, uneven insulation height, or frost formation during winter. These visual clues usually indicate moisture presence even without direct contact.
Can attic insulation dry on its own?
Some insulation may dry after minor moisture exposure, but drying does not always restore performance. Insulation that stays compressed, develops mold, smells musty, or becomes heavily saturated usually needs professional evaluation and may require replacement.
What does mold on attic insulation look like?
Mold typically appears as dark, fuzzy, or speckled growth on insulation surfaces. Colors may range from black and green to gray or white. Mold growth usually indicates prolonged moisture exposure.
When is moisture in attic insulation urgent?
Moisture in attic insulation is more urgent when the wet area is spreading, mold is visible, odors enter living areas, ceiling stains keep returning, or roof decking and framing show dark staining or softness. Small isolated damp areas still need investigation, but large wet areas or recurring symptoms require faster action.
Should wet insulation be removed immediately?
Removal decisions depend on moisture severity, duration, and contamination level. Minor dampness may dry, but heavily saturated, compressed, or mold-contaminated insulation often requires removal. Proper inspection helps determine the safest response.