How to Inspect Attic Areas for Moisture Damage
To inspect attic areas for moisture damage, start at the attic entry, then check insulation, roof decking, rafters, ventilation paths, roof penetrations, eaves, and any areas below ceiling stains or musty odors. Look for damp insulation, dark wood staining, rusted nail tips, musty odors, blocked vents, condensation, frost, and soft or weakened framing.
Many homeowners begin attic inspections after noticing ceiling stains, musty odors, or rising humidity levels. If these warning signs are already present, reviewing signs of moisture in attic insulation can help identify early symptoms that indicate moisture may already be affecting attic materials.
This guide explains how to inspect attic moisture damage step by step, what each finding may indicate, and when the results should lead to monitoring, deeper testing, or professional evaluation.
This attic-specific inspection fits into a broader location-by-location moisture check. For a wider home inspection framework, see how to find moisture in different parts of your home.
Why Attic Moisture Inspection Is Important
Attic moisture inspections matter because small roof leaks, condensation patterns, and blocked ventilation paths can affect insulation and framing before stains appear on finished ceilings.
Early Inspections Reduce Repair Costs
Attic moisture is usually cheaper to address when it is still limited to a small stain, blocked vent path, or damp insulation patch. Once moisture reaches framing, ceiling drywall, or large insulation areas, repairs become more invasive and may require insulation replacement, structural work, or energy-efficiency repairs.
Hidden Moisture Often Develops Without Visible Damage
Attic moisture frequently forms beneath insulation or inside framing cavities, making it difficult to detect without careful inspection. Small moisture problems may exist for months before visible ceiling damage occurs.
Hidden moisture conditions often require targeted evaluation techniques. These techniques are explained in how to detect hidden moisture in attics, which provides additional guidance on confirming moisture presence.
Routine Inspection Helps Prevent Recurring Problems
Recurring attic moisture often shows up as the same stain, damp insulation patch, or rust pattern returning after storms or seasonal temperature changes. Rechecking those areas helps confirm whether the problem is isolated or ongoing.
Safety Preparations Before Entering the Attic
Safety preparation is the first and most important step before inspecting attic areas. Attics contain multiple hazards that can cause injury if proper precautions are not followed.
Do not continue the inspection if you see exposed wiring, wet electrical components, unstable framing, animal activity, heavy mold-like contamination, or an unsafe access point. In those situations, inspect only from the opening and call a qualified professional.
Wear Appropriate Protective Equipment
Protective equipment helps reduce exposure to dust, mold particles, and sharp materials commonly found in attic environments.
Recommended protective equipment includes:
- Dust mask or N95 respirator, especially if dust or suspected mold is present
- Protective gloves
- Safety glasses
- Long-sleeved clothing
- Closed-toe footwear
Using proper equipment reduces the likelihood of irritation or injury during inspection.
Use Adequate Lighting for Visibility
Proper lighting is essential for identifying moisture damage accurately. Many attic areas contain shadows that conceal surface details.
Lighting recommendations include:
- Use a bright flashlight or headlamp
- Position lighting at angles to reveal surface textures
- Illuminate dark corners and tight spaces
- Carry backup lighting when possible
Walk Only on Structural Support Areas
Attic floors often consist of exposed framing members rather than continuous flooring. Walking directly on unsupported surfaces may cause serious damage or injury.
Safe walking practices include:
- Step only on joists or designated walkways
- Avoid stepping on insulation-covered drywall
- Move slowly to maintain balance
- Use stable boards if necessary
Following these precautions helps prevent falls and ceiling damage.
Step-by-Step Attic Inspection Process
Use the same order each time so new stains, damp areas, and ventilation changes are easier to compare during future inspections.
Step 1 — Inspect the Attic Entry Area
The attic entry area often shows early signs of moisture because it connects living spaces with attic environments.
Look for:
- Moisture stains around hatch edges
- Condensation on access covers
- Discoloration near framing
- Musty odors near openings
Also check whether warm indoor air is leaking around the hatch. A stained, damp, or poorly sealed access cover can point to air leakage that carries household moisture into the attic.
Step 2 — Inspect Insulation Condition
Insulation is usually the first material affected by moisture. Changes in insulation appearance often indicate developing problems.
Look for the following insulation conditions:
- Clumped or compacted material
- Flattened insulation surfaces
- Uneven thickness patterns
- Discolored areas
- Damp, musty, or sour odors rising from the insulation
If insulation shows unusual changes, these may match symptoms described in signs of moisture in attic insulation, which explains how visible patterns relate to moisture exposure.
Avoid digging deeply into insulation if it appears moldy, contaminated, or heavily damp. Disturbing damaged insulation can release dust and particles, and severe contamination should be evaluated before cleanup begins.
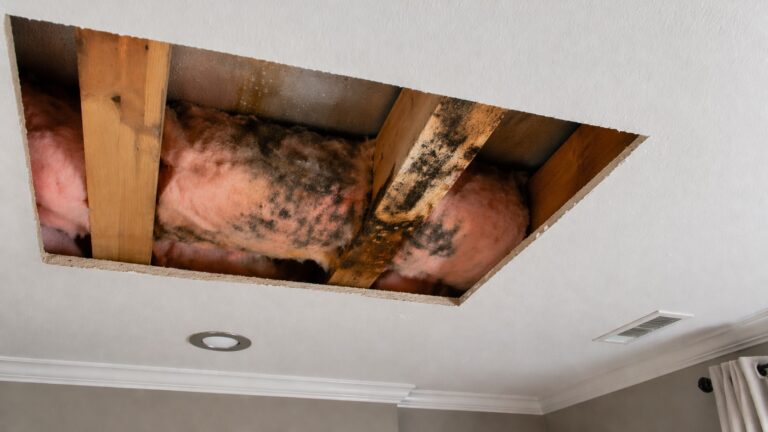
Step 3 — Inspect Roof Decking and Structural Framing
After evaluating insulation, the next step is to inspect structural materials such as roof decking, rafters, and trusses. These components often reveal long-term moisture patterns that insulation alone may not show.
Structural inspection helps determine whether moisture has moved beyond insulation and begun affecting roof sheathing, rafters, trusses, or fasteners.
Look closely for:
- Dark staining on the underside of roof sheathing
- Discoloration that follows wood grain or roof sheathing seams
- Spotty surface growth or dark patches that may indicate mold
- Soft or weakened wood fibers
- Rust forming on metal fasteners
Rust on nail tips is particularly important to identify. Nail tips that penetrate roof decking often rust before insulation shows visible damage. If rust is present, moisture may be condensing repeatedly on roof surfaces.
These patterns may relate to airflow or humidity conditions described in why attics develop hidden moisture problems, which explains how moisture cycles develop over time.
Step 4 — Inspect Ventilation Components
Ventilation systems help move moisture out of attic spaces. When airflow becomes restricted, humidity can build up and increase condensation risk.
Carefully inspect all ventilation components to ensure they remain open and functional.
Check Soffit Vents for Blockage
Soffit vents allow fresh air to enter the attic. Blocked soffits reduce airflow and allow moisture to accumulate.
Common blockage causes include:
- Insulation covering vent openings
- Dust or debris buildup
- Pest nests inside vent channels
- Deterioration of vent covers
Clear airflow at soffit vents is essential for proper ventilation performance.
Inspect Ridge Vents for Debris or Clogging
Ridge vents allow warm, humid air to exit attic spaces. Over time, ridge vents may accumulate debris that restricts airflow.
During inspection, look for:
- Debris, shingle granules, or nesting material near vent openings
- Crushed, lifted, or poorly seated ridge vent material
- Matted dust, blocked slots, or areas where little daylight or airflow is visible
- Deteriorated vent materials
In many homes, mesh-style ridge vents are more prone to clogging with dust and debris. Reduced airflow limits the ability of the ventilation system to remove moisture effectively.
Verify Airflow Paths Remain Open
Air must travel freely from intake vents to exhaust vents. Any obstruction along this path reduces ventilation efficiency and increases the likelihood of trapped moisture.
Check whether insulation is blocking airflow channels near eaves. Also look for areas where stored items, ductwork, or construction debris may interfere with air movement.
Step 5 — Inspect Around Roof Penetrations
Roof penetrations are common moisture entry points. These areas interrupt the roof surface and often rely on flashing, sealants, or boot materials to remain watertight.
Inspect carefully around:
- Plumbing vent pipes
- Chimneys
- Exhaust vent openings
- Roof-mounted ventilation fans
- Skylight openings
Look for water staining, darkened sheathing, damp insulation, or repeated discoloration beneath these areas.
Even minor staining around penetrations may indicate slow leaks that require further evaluation.
Pay attention to stain direction. A narrow stain that starts above a pipe or chimney and runs downward usually suggests water entry from the roof side, while moisture on cold metal ducting may point more toward condensation.
Step 6 — Inspect Attic Edges and Eaves
Attic edges and eaves are important inspection areas because they are closely connected to roof runoff, ventilation intake, and exterior wall conditions.
Moisture near eaves may indicate roof edge leaks, blocked ventilation, ice dam patterns in cold climates, or wind-driven rain intrusion.
Look for:
- Wet insulation near exterior walls
- Dark staining along roof edges
- Water marks below soffit areas
- Damaged baffles or blocked airflow channels
- Localized mold-like discoloration
Moisture damage near attic edges should be compared with exterior roof and gutter conditions when possible.
Step 7 — Check for Condensation, Frost, or Seasonal Moisture Patterns
Some attic moisture problems are seasonal. Condensation may appear during cold weather, while roof leaks may become more noticeable after rain.
During inspection, look for:
- Water droplets on roof decking
- Frost on nail tips or sheathing
- Condensation on ductwork
- Dampness that appears during specific weather conditions
- Repeated moisture in the same locations
Seasonal patterns are especially important because materials may appear dry during some inspections even though moisture returns under certain conditions.
How to Evaluate Moisture Damage Severity
After completing the inspection, evaluate the severity of the findings. Not all attic moisture signs require the same response.
Severity depends on the amount of moisture, how long the problem has existed, whether materials are structurally affected, and whether the moisture source is still active.
Minor Moisture Signs
Minor signs may indicate early or limited moisture exposure.
Examples include:
- Small isolated stains
- Light rust on a few nail tips
- Slight insulation discoloration
- Occasional condensation without widespread damage
Minor findings should still be photographed and rechecked after the next rain, cold spell, or humid period. If the mark grows or returns, treat it as active rather than minor.
Moderate Moisture Damage
Moderate damage suggests repeated or ongoing moisture exposure.
Examples include:
- Multiple stained insulation areas
- Persistent musty odors
- Visible rust across many nail tips
- Wood staining near roof penetrations
- Blocked ventilation paths with moisture symptoms
Moderate findings usually require identifying and correcting the moisture source before damage worsens.
Serious Moisture Damage
Serious attic moisture damage may affect structural safety, indoor air quality, or long-term building performance.
Examples include:
- Soft or crumbling wood
- Widespread mold-like growth
- Large wet insulation areas
- Active dripping or water trails
- Sagging ceiling materials below the attic
Serious findings should be evaluated professionally, especially when structural wood, electrical components, or widespread contamination may be involved.
What to Document During the Inspection
Documentation helps track moisture patterns and compare conditions over time. Good records are especially useful when problems appear seasonal or intermittent.
During inspection, document:
- The date of inspection
- Weather conditions before inspection
- Locations of stains or damp areas
- Photos of affected insulation or framing
- Whether odors are present
- Any ventilation obstructions
- Changes compared with previous inspections
Photos should include both close-up details and wider views that show where the damage is located.
When possible, photograph the same area again after the next heavy rain or cold spell. A stain that grows, darkens, or returns in the same place is more important than an old mark that stays unchanged.
Common Mistakes During Attic Moisture Inspections
Attic inspections can miss important problems when they are rushed or performed without a consistent method.
Checking Only the Center of the Attic
Many moisture problems occur near roof edges, penetrations, valleys, and ventilation paths rather than in the center of the attic. Inspecting only easy-to-reach areas may miss the source of damage.
Assuming Dry Surfaces Mean No Moisture Problem Exists
Attic materials may dry between weather events or seasonal changes. A surface that looks dry during inspection may still have a history of repeated moisture exposure.
Look for staining, rust, odor, and material changes rather than relying only on visible dampness.
Ignoring Ventilation Restrictions
Blocked ventilation can create attic moisture problems even when the roof is not leaking. Insulation blocking soffit vents, clogged ridge vents, and poor airflow paths should all be considered during inspection.
Disturbing Damaged Materials Too Aggressively
Pulling apart insulation, scraping surfaces, or disturbing mold-like growth can spread particles and increase exposure risk. If significant contamination is suspected, avoid unnecessary disturbance until the situation is evaluated properly.
When to Inspect Attic Areas for Moisture Damage
Inspection frequency depends on roof age, climate, ventilation quality, and the home’s moisture history.
As a general practice, attic areas should be inspected:
- At least once or twice per year
- After major storms
- After roof repairs or replacements
- When ceiling stains appear
- When musty odors develop indoors
- When insulation performance seems reduced
Homes with prior attic moisture problems may require more frequent monitoring until conditions remain stable.
What to Do After Finding Moisture Damage
The next step depends on the inspection findings. Moisture damage should not be ignored, even when it appears minor.
If Damage Appears Minor
Small isolated findings should be photographed, dated, and rechecked after rain, cold weather, or humidity changes. If the stain, rust, odor, or damp insulation expands, treat it as an active moisture problem instead of an old mark.
Minor moisture patterns may also point to early ventilation or condensation problems. Preventive measures are discussed in how to prevent moisture build-up in attics.
If Damage Appears Active or Widespread
Active or widespread moisture requires more urgent attention. The moisture source should be identified before materials are repaired or replaced.
Signs of active or widespread damage include:
- Wet insulation
- Fresh staining
- Dripping water
- Spreading discoloration
- Softened wood
- Strong musty odors
These findings often require professional evaluation, especially when roof leaks, ventilation failures, or structural materials are involved.
If No Moisture Damage Is Found
If the attic appears dry and no warning signs are present, take a few baseline photos and continue periodic inspections. Clear reference photos make future stains, damp spots, rust patterns, or blocked vents easier to recognize.
When to Call a Professional
Professional help is recommended when attic moisture appears active, widespread, recurring, unsafe to access, or connected to structural wood, roofing, wiring, or heavy contamination.
Call a professional if you find:
- Large areas of wet insulation
- Soft or rotted wood
- Widespread mold-like growth
- Active roof leaks
- Electrical components near moisture
- Recurring moisture after previous repairs
- Sagging ceiling materials below the attic
Professional evaluation can help determine whether the problem involves roofing, ventilation, insulation, structural framing, or hidden moisture sources.
Key Takeaways
- A complete attic moisture inspection should include the entry area, insulation, roof decking, framing, ventilation paths, penetrations, and eaves.
- Rust on nail tips, damp insulation, stains, odors, and soft wood are important warning signs.
- Unsafe access, exposed wiring, wet electrical components, unstable framing, or heavy contamination should stop the DIY inspection.
- Moisture findings should be documented and compared over time.
- Professional evaluation is recommended for widespread, active, or structural moisture damage.
Conclusion
A good attic moisture inspection follows a clear path: entry area, insulation, roof decking, framing, ventilation, penetrations, eaves, and documented findings. The most important clues are damp or compressed insulation, dark wood staining, rusted nail tips, blocked airflow paths, condensation, frost, musty odors, and soft framing.
If the findings are small and isolated, document them and recheck after weather changes. If moisture is widespread, returning, mold-like growth is visible, or structural wood feels soft, stop the DIY inspection and get professional evaluation before the damage spreads.
How do I inspect attic areas for moisture damage?
Use a top-down and edge-to-center pattern: check the access hatch, insulation, underside of roof sheathing, rafters or trusses, soffit and ridge ventilation, roof penetrations, eaves, and any areas below indoor stains or odors.
What are the first signs of moisture damage in an attic?
Early signs include clumped insulation, dark stains on roof decking, rust on nail tips, musty odors, condensation, frost, and discoloration near roof penetrations or attic edges.
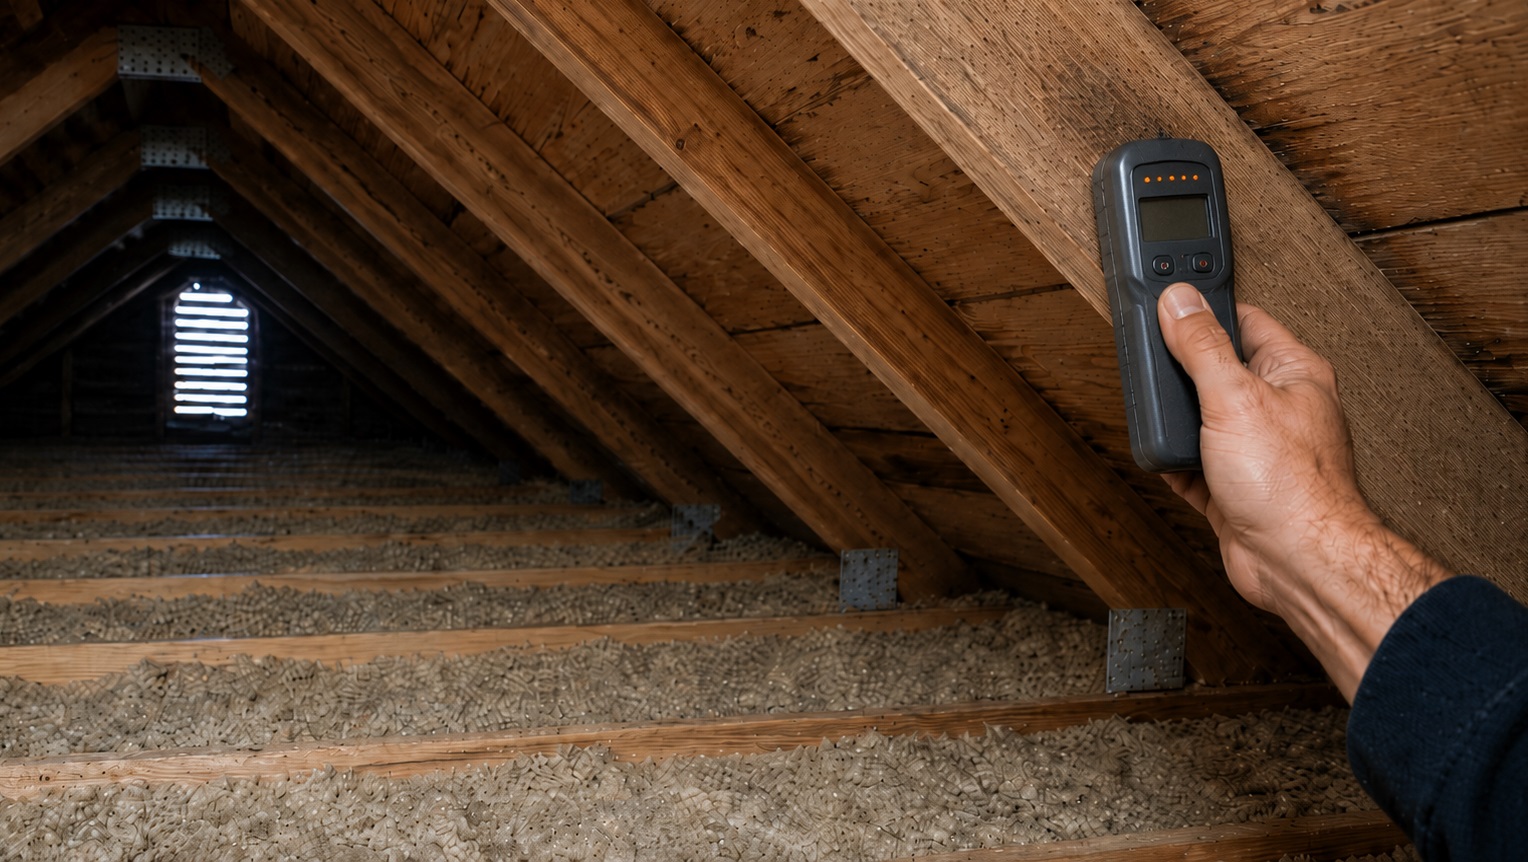
What tools are needed to inspect an attic?
Basic attic inspection tools include a bright flashlight or headlamp, gloves, an N95 respirator or dust mask, safety glasses, a camera, and a notebook. A moisture meter can help confirm suspicious areas, but this article focuses on the visual inspection sequence.
Is attic inspection safe for homeowners?
Basic visual attic inspections can be safe for some homeowners, but only if they use proper lighting, wear protective equipment, and step only on joists or designated walkways. Do not continue if the attic has unsafe access, heavy contamination, electrical hazards, or weak framing.
How often should attic areas be inspected for moisture damage?
Inspect attic areas at least once or twice per year, and recheck after major storms, roof work, new ceiling stains, musty odors, unusual humidity, or cold-weather condensation.
What attic moisture signs usually need professional evaluation?
Large wet insulation areas, active dripping, soft or rotted wood, widespread mold-like growth, wet electrical components, recurring stains, or sagging ceiling materials should be evaluated professionally.