How to Inspect Exterior Penetrations for Moisture Problems
Exterior penetrations should be inspected when damp baseboards, peeling paint, musty odors, wall stains, swollen trim, or recurring moisture appear near an exterior-facing wall after rain. A cable line, hose bib, vent cover, pipe sleeve, electrical box, light fixture, conduit opening, or old patched hole may look small from outside, but it can still let water move behind siding, trim, sheathing, insulation, or drywall.
A good inspection starts inside, then moves outside. Match the indoor moisture clue with exterior openings near, above, and beside that area. Look for cracked sealant, loose covers, stains, poor slope, soft trim, water trails, and surrounding siding damage before assuming the problem is a roof leak, plumbing leak, or window leak.
Exterior penetrations are one of the places where water enters homes through structural gaps. The goal is not to tear the wall apart or caulk every visible gap. The goal is to decide whether a specific opening is letting water into the wall system and whether the issue needs further evaluation.
Why Exterior Penetrations Need Moisture Inspection
An exterior penetration is any place where something passes through or mounts into the outside wall. These openings interrupt the layers that normally help the wall shed water. Siding, housewrap, flashing, trim, sheathing, and sealant all have to work around the penetration. If the opening is poorly sealed, loose, cracked, sloped the wrong way, or missing proper water-shedding details, rainwater can get behind the surface.
This is why wall penetrations become leak points. The weak spot is not always the visible hole. It may be a hidden gap behind a vent cover, a loose hose bib flange, a cable that slopes toward the wall, a cracked gasket behind a light fixture, or a pipe sleeve with failed sealant around it.
Moisture inspection matters because penetration leaks can stay hidden and may not appear indoors directly behind the opening. Water can enter during wind-driven rain, travel behind siding or sheathing, and show up lower on the wall after repeated storms. A recurring damp area after rain is a stronger clue than a one-time mark.
Start With the Interior Moisture Clues
Before walking around the exterior, begin with the moisture clues inside the home. Interior symptoms help narrow the search area. Without that starting point, it is easy to inspect random exterior openings and miss the penetration that lines up with the actual leak path.
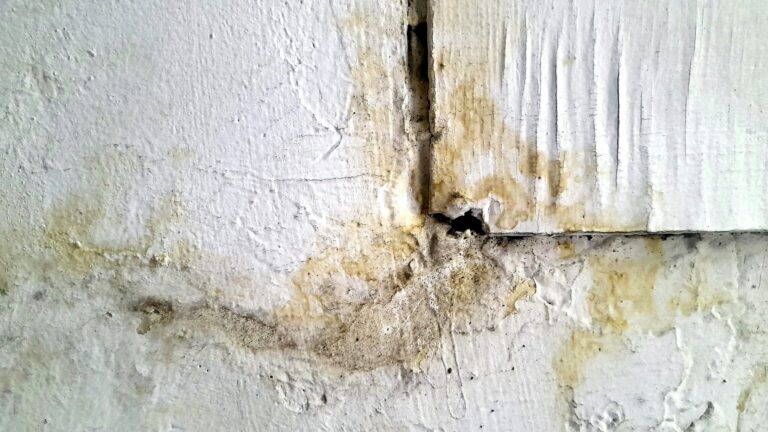
Look for Stains on Exterior-Facing Walls
Water stains on exterior-facing walls are one of the most useful clues. The stain may appear around drywall, baseboards, window trim, door trim, outlets, corners, or lower wall areas. A stain does not prove that a penetration is leaking, but it does tell you where to begin comparing interior damage with exterior features.
If the stain is near the lower part of a wall, look outside for penetrations above that area as well as directly behind it.
Check Damp Baseboards and Soft Trim
Damp baseboards, soft trim, swollen casing, or warped lower wall materials may indicate water traveling down inside the wall cavity. A penetration higher on the wall can leak behind the exterior surface, and the water may not become visible until it reaches the baseboard or floor line.
If the same baseboard area feels damp after rain, the issue may be more than indoor humidity. Compare that interior location with outside wall features such as cable entries, vents, hose bibs, exterior outlets, utility boxes, and old patched holes.
Notice Musty Smells After Rain
A musty smell near one wall, corner, closet, or baseboard can be an early warning sign of trapped moisture. Odor alone does not prove that an exterior penetration is leaking, but if the smell becomes stronger after rain, the exterior wall should be inspected carefully.
Musty odors can develop before obvious staining appears. Moisture may be affecting drywall paper, dust, insulation, trim, or wood inside a low-airflow wall cavity. This is why odor patterns are important during a moisture inspection.
Pay Attention to Timing and Weather Patterns
When the moisture appears is just as important as where it appears. If dampness shows up after wind-driven rain, heavy storms, or rain from a specific direction, an exterior opening may be involved. If the area stays dry during calm rain but gets wet during sideways rain, a penetration, seam, flashing edge, or exterior joint may only leak under pressure.
Write down when the moisture appears, how long it lasts, and whether it happens after every rain or only certain storms. These patterns can help you avoid guessing and make the exterior inspection more focused.
Compare Moisture With Nearby Utilities and Fixtures
Once you identify the interior symptom, think about what is on the other side of that wall. Exterior utilities and fixtures are easy to forget because they are outside, but they often line up with interior moisture clues. A cable entry, dryer vent, bathroom exhaust vent, hose bib, exterior outlet, light fixture, conduit, or AC line set may be near the same wall area.
If you notice repeated dampness near an exterior wall and there is a penetration nearby outside, that opening should become part of the inspection. Related symptom patterns are covered more directly in signs water is entering through wall penetrations.
Match Interior Symptoms to Exterior Openings
After you identify the interior moisture clue, inspect the matching exterior wall area, then work upward and outward from that point. Look for anything that interrupts the wall surface: vents, pipes, cables, utility boxes, hose bibs, exterior lights, conduit, old patches, or wall-mounted fixtures.
Look Above the Interior Stain
If the stain is near a baseboard, check exterior openings above the stain first, especially if they are exposed to rain. A cable, vent, pipe, or fixture several feet higher may be the entry point if water is running downward behind the wall surface.
Check Beside the Interior Symptom
Wind-driven rain and capillary movement can push or pull water sideways behind materials. If there is no obvious penetration directly behind the stain, inspect nearby openings on the same wall section. A fixture or cable entry beside the indoor symptom may still be connected to the moisture path.
This is especially important around corners, trim edges, siding transitions, and wall-mounted fixtures. Water may enter at one point and appear inside at a slightly different location.
Compare Exterior Height and Interior Damage
Estimate whether the exterior penetration is higher, lower, or level with the indoor sign. A penetration above the damage can allow water to run downward. A penetration level with the damage may allow direct entry. A penetration below the damage is less likely unless water is wicking upward from wet materials or another source is involved. You do not need exact measurements; the goal is to build a practical moisture map.
Inspect the Wall Section as a System
Do not focus only on one opening. Exterior penetrations often interact with nearby siding, trim, flashing, drainage paths, and joints. A vent may be sealed correctly on one side but exposed to water from a siding seam above it. A cable entry may leak because water is running down from an upper trim joint. A hose bib may be loose because the surrounding siding has softened.
The penetration may be the visible weak point, but nearby materials may explain why water is reaching it.
What to Inspect Around the Exterior of the Home
Exterior penetration inspection should be careful, visual, and methodical. You are looking for signs that water can get behind the visible surface or that moisture has already been affecting nearby materials. Work from safe ground-level areas whenever possible, and avoid opening or disturbing electrical, gas, plumbing, or mechanical components.
A simple inspection order is: identify the indoor clue, find the matching exterior wall area, inspect openings above and beside that area, check the sealant and cover, look for stains or water trails, then compare what you see with the timing of the moisture indoors.
Cable and Utility Entry Points
Inspect cable, internet, satellite, security, and other low-voltage entry points where wires pass through the wall. Look for gaps around the cable, cracked sealant, missing wall plates, loose clips, or holes that were drilled at a poor angle.
Also check whether the cable slopes toward the wall. If water can run along the cable directly into the opening, the entry point is more vulnerable. A proper exterior layout should help water drip away before it reaches the wall. For a deeper explanation of this specific issue, see how cable entry points allow moisture inside.
Exterior Vents
Inspect dryer vents, bathroom exhaust vents, kitchen exhaust vents, combustion vents, and other exterior wall vent covers. Look for cracked vent hoods, loose covers, missing sealant, open top edges, gaps along the sides, damaged siding around the vent, or staining below the opening.
Check whether the vent appears to shed water away from the wall. A vent that traps water, slopes inward, or pulls away from the siding can allow moisture behind the cover. Vent openings have their own moisture risks, especially when rain, airflow, and wall openings interact, as explained in how exterior vent openings cause moisture.
Hose Bibs and Pipe Penetrations
Inspect outdoor faucets, hose bibs, plumbing pipes, and pipe sleeves where they pass through exterior walls. Look for loose fixtures, cracked caulk, gaps behind the flange, siding damage, stains below the pipe, or soft trim around the opening.
Hose bibs deserve extra attention because they are often pulled or twisted during normal use. If the faucet moves when a hose is attached or removed, that movement can break the seal around the wall. Rainwater may then enter around the pipe even if the plumbing connection itself is not leaking. For symptom patterns at this specific fixture, see signs water is entering around outdoor faucets.
Electrical Boxes and Light Fixtures
Inspect exterior outlets, light fixtures, cameras, doorbells, and junction boxes from the outside without opening them. Look for gaps behind the cover, missing gaskets, cracked caulk, loose mounting, rust stains, discoloration, or water marks below the fixture.
Do not remove covers, open boxes, or touch wet electrical components during inspection. Moisture near electrical penetrations should be treated as a safety concern. If you see water stains, active dampness, buzzing, rust, corrosion, or damaged covers around an electrical fixture, stop the inspection in that area and have it evaluated by a qualified professional.
AC Lines, Gas Lines, and Conduit
Inspect AC line sets, gas lines, electrical conduit, and mechanical penetrations visually. Look for gaps around the sleeve, cracked sealant, missing covers, loose plates, or signs that water is running toward the opening.
Do not pull, bend, disconnect, or move these lines. Mechanical, gas, refrigerant, and electrical systems can create safety risks if disturbed. Your inspection should focus on visible moisture clues around the wall opening, not repair or adjustment.
Abandoned Holes and Old Repairs
Look for old cable holes, removed vent openings, patched pipe penetrations, unused conduit holes, and former fixture locations. These are easy to miss because no active utility may be attached. However, an old patch can crack, shrink, loosen, or separate from the wall over time.
Abandoned openings are common around areas where satellite dishes, cable services, security systems, or old exterior fixtures were removed. If the patch is soft, cracked, recessed, loose, or stained, it may be allowing water into the wall.
Nearby Trim, Siding, and Fasteners
The condition of the surrounding wall matters. Inspect the siding, trim, fasteners, seams, and edges near the penetration. Look for swelling, rot, peeling paint, separated siding, cracked trim, open screw holes, dark staining, algae, dirt trails, or material that no longer sits flat.
Sometimes the penetration is not the only issue. Water may be reaching the opening from a failed trim joint or siding seam above it. If nearby materials are damaged, the leak may be part of a larger exterior wall moisture problem rather than a single failed caulk line.
Inspect the Condition of Sealant and Covers
Sealant and exterior covers are often the first visible clues around a penetration. They do not tell the whole story, but they can show whether water has a path behind the surface. Inspect these areas carefully before assuming the opening is safe or before treating the problem as a simple caulk repair.
Look for Cracked, Missing, or Separated Sealant
Check the sealant around pipes, cables, vents, fixtures, hose bibs, conduit, and utility plates. Look for cracks, gaps, missing sections, hardened caulk, shrinking, or separation from one side of the joint. A thin line where the sealant has pulled away may be enough for wind-driven rain to enter.
Failed sealant is one of the most common exterior leak clues, but it is not always the only cause. If you want the broader cause-based explanation, see how improper sealing causes exterior leaks.
Check Whether Covers Sit Tight Against the Wall
Vent covers, exterior lights, utility plates, hose bib flanges, outlet covers, and cable plates should sit securely against the wall. If a cover is warped, loose, cracked, tilted, or pulling away, water may be able to get behind it.
Pay attention to the top and side edges. Water often enters behind the upper edge of a loose cover, then runs down behind the plate where the actual opening is hidden.
Look for Open Screw Holes and Fastener Stains
Screws and fasteners can create small water paths. Look for rust stains, dark streaks, soft material around screws, missing screws, oversized screw holes, or fasteners that no longer hold tightly. These signs may suggest that water has been reaching the fixture or wall material repeatedly.
Fastener leaks are usually small, but they can still contribute to hidden moisture when they happen over and over.
Check the Material Behind the Seal
Sealant needs a stable surface to work. If the wood, siding, trim, masonry, or surrounding material is soft, cracked, swollen, rotted, dusty, loose, or peeling, the seal may not last. A bead of caulk applied to damaged material can fail quickly because the surface underneath is not sound.
If the material around the penetration is deteriorating, the issue may be beyond simple resealing. The wall area may need drying, repair, or professional evaluation before it can be sealed correctly.
Check Slope, Water Direction, and Drainage Clues
Inspection is not only about finding gaps. It is also about understanding where water goes when it hits the penetration. A penetration is more likely to leak when its shape, slope, or nearby materials direct water toward the wall instead of away from it.
Check Whether Cables or Lines Slope Toward the Wall
Cables, wires, small pipes, and conduit should not guide water toward the opening. If a cable slopes downward into the wall, rainwater can follow the cable directly toward the penetration. This can happen even when the opening is small.
Look for a drip point or downward loop before the wall entry. If water has no place to fall away before reaching the opening, the entry point is more vulnerable during rain.
Look for Stains Below the Opening
Dark streaks, dirt trails, algae, mildew-like surface growth, or water stains below a penetration may show that water is repeatedly washing over that area. Staining below a vent, pipe, outlet, cable entry, or fixture can suggest that water is collecting near the opening or moving behind the cover.
These stains do not always prove that water is entering the wall, but they are important clues. They show where water has been moving on the exterior surface.
Check Whether Water Can Collect on Top of the Fixture
Flat-topped fixtures, poorly shaped covers, or gaps above wall-mounted components can collect water. If rain sits on top of a vent hood, light fixture, utility plate, or pipe flange, it has more time to find small openings.
Open top edges are especially vulnerable. The top edge of a penetration should not act like a shelf that traps rainwater against the wall.
Look for Blocked or Misunderstood Drainage Paths
Some wall systems have intentional drainage paths. Weep holes, small gaps, vented spaces, and siding drainage edges may be designed to let water escape. Do not assume every opening should be sealed.
If a previous repair sealed drainage paths near a penetration, water may be trapped behind siding, trim, or veneer. That trapped water can then move toward the wall cavity or keep nearby materials damp.
Inspect After Rain When It Is Safe
A dry-weather inspection can miss clues that become visible after rain. If it is safe to do so, inspect exterior penetrations after a storm or during a break in wet weather. Stay on stable ground and avoid unsafe climbing, wet ladders, electrical fixtures, or hard-to-reach areas.
Look for Darkened or Damp Materials
After rain, damp materials may look darker than surrounding areas. Check siding, trim, masonry, wood, and caulk lines around penetrations. Dark staining near a vent, pipe, cable, or fixture may show where water has been sitting or entering.
Watch for Water Trails
Water trails can reveal the path rain takes across the wall. Look for streaks above or below penetrations, dirt lines that run downward, or wet paths that lead toward an opening. A trail above the penetration may mean water is being delivered from a higher siding seam, trim joint, or flashing edge.
Compare Outside Wet Areas With Inside Symptoms
After rain, compare exterior wet areas with the interior wall location. If a damp exterior penetration is above or near the same area where indoor staining appears, that penetration becomes a stronger suspect.
For a broader moisture-detection approach beyond exterior penetrations, see how to find, fix, and prevent moisture problems in homes.
What Different Moisture Patterns May Mean
Moisture patterns do not always prove the exact source, but they can help you decide what to inspect next. The goal is to read the pattern carefully instead of assuming every stain means the same thing.
Moisture Below the Penetration
Moisture below a penetration may mean water is entering at the opening and traveling downward. This is common with loose vents, cracked sealant, cable holes, hose bibs, and exterior fixture plates.
The source may also be higher than the penetration if water is running down from a siding joint, trim gap, or flashing edge before reaching the opening.
Moisture Beside the Penetration
Moisture beside a penetration may suggest wind-driven rain, side-entry behind a plate, or capillary movement through a narrow gap. It may also indicate that the surrounding siding or trim is contributing to the leak.
Side staining should make you inspect the full wall section, not only the penetration itself.
Leak Only During Wind-Driven Rain
If the area leaks only during storms with strong wind, the opening may be vulnerable to pressure-driven rain. A small gap that stays dry during calm rain can leak when water is pushed sideways against the wall.
This pattern is common around vents, cable entries, loose covers, exterior lights, and openings on exposed sides of the house.
Recurring Dampness After Caulking
If the same area becomes damp after it has already been caulked, the visible seal was probably not the whole problem. The penetration may be loose, oversized, poorly sloped, missing flashing, wet behind the surface, or receiving water from a higher entry point. Inspect the larger wall area before adding more sealant.
Musty Odor Without Visible Water
A musty odor near an exterior wall can suggest hidden dampness even when no active dripping is visible. If the odor worsens after rain and appears near a wall with vents, pipes, cables, hose bibs, or other exterior openings, inspect nearby penetrations and exterior joints carefully.
What Not to Do During Inspection
Inspecting exterior penetrations for moisture should be careful and safe. The goal is to identify visible clues, compare patterns, and decide whether further evaluation is needed. It is not the same as repairing electrical, gas, plumbing, HVAC, or structural components.
Do Not Open Electrical Fixtures or Boxes
Do not remove exterior outlet covers, light fixtures, junction boxes, doorbells, cameras, or electrical plates if you suspect moisture. Water near electrical components can create shock, corrosion, or fire risks. If you see staining, rust, active dampness, or water near an electrical penetration, have it evaluated by a qualified professional.
Do Not Move Gas Lines, AC Lines, or Conduit
Gas lines, refrigerant lines, conduit, and mechanical penetrations should not be pulled, bent, disconnected, or adjusted during a homeowner inspection. You can look for visible gaps, stains, cracked sealant, or loose covers, but the system itself should be left alone.
Do Not Assume Every Gap Should Be Sealed
Some gaps are accidental leak paths, but others are intentional drainage or ventilation openings. Sealing every visible opening can trap water behind siding, veneer, trim, or flashing. Before sealing anything, make sure the opening is not designed to drain or vent moisture, and make sure the surrounding material is dry and sound enough to hold a seal.
Do Not Inspect Unsafe High Areas
Do not climb wet ladders, lean out of windows, walk on roofs, or attempt to inspect upper-story penetrations from unsafe positions. If the suspected penetration is above safe ground-level access, use binoculars from the ground or hire a qualified professional.
Do Not Ignore Soft or Rotted Materials
If the trim, siding, sheathing, or wall surface around a penetration feels soft, swollen, crumbling, or rotted, do not treat the issue as a simple caulk repair. Damaged materials may mean water has been entering for a while, and new sealant may not bond properly until the damaged area is repaired.
When to Use a Moisture Meter or Camera
Basic tools can help confirm whether moisture is present, but they should be used realistically. A moisture meter, flashlight, or inspection camera can support your observations, but no tool replaces careful pattern recognition or professional evaluation when hidden wall damage is suspected.
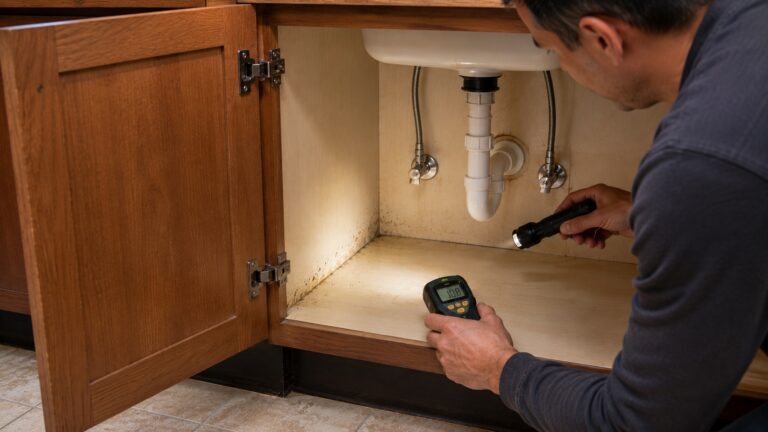
Using a Moisture Meter Near Interior Symptoms
A moisture meter can help compare suspect areas with nearby dry materials. For example, if drywall below an exterior vent reads higher than similar drywall on an unaffected wall, that may support the possibility of hidden dampness. Readings are most useful when compared against the same material type in a dry control area.
Moisture meters do not identify the exterior source by themselves. They can show that a material may be damp, but you still need to connect that reading with rain timing, exterior openings, staining, odor, and visible wall conditions.
Using a Flashlight for Exterior Details
A flashlight can help reveal gaps behind covers, cracks in sealant, staining under fixtures, small holes, open screw holes, and shadow lines where a plate has pulled away from the wall. This is often enough to identify areas that deserve closer attention.
Using a Camera for Documentation
Photos are useful for tracking changes over time. Take pictures of interior stains, exterior penetrations, cracked sealant, water trails, and damp areas after rain. If the issue worsens or a professional inspection is needed, photos can help show the pattern.
Using Inspection Cameras Carefully
Inspection cameras or borescopes can sometimes help view limited areas, but they should not be used to puncture walls randomly or disturb electrical, gas, plumbing, or HVAC components. If you need to open materials to inspect inside a wall, the situation may be beyond a basic homeowner inspection.
If you want broader non-invasive moisture detection methods, see how to detect moisture without opening walls.
When to Call a Professional
Call a qualified professional if water appears near electrical fixtures, outlets, lights, conduit, cameras, junction boxes, gas lines, refrigerant lines, plumbing pipes, mechanical equipment, or areas that require unsafe access. These situations should not be handled as simple exterior sealing issues.
You should also get help when the same area keeps getting wet after caulking, stains spread, trim or siding feels soft, musty odors return after rain, or the wall may be wet behind the surface. These signs suggest the problem may extend beyond the visible penetration.
If multiple penetrations on the same wall show staining, movement, cracked sealant, or dampness, the issue may involve a larger exterior wall moisture problem. In that case, a professional can inspect how the siding, trim, flashing, penetrations, and drainage details work together.
FAQ
How do I know if an exterior penetration is leaking?
An exterior penetration may be leaking if moisture appears near an exterior-facing wall after rain, especially below or beside a pipe, vent, cable, hose bib, outlet, or fixture. Other clues include cracked sealant, loose covers, stains below the opening, soft trim, and musty odors that worsen after storms.
Should I inspect exterior penetrations after rain?
Yes, if it is safe. After rain, damp materials, water trails, dark staining, and active drip patterns may be easier to see. Stay on stable ground and avoid electrical fixtures, wet ladders, roofs, or unsafe high areas.
Can I use a moisture meter near a wall penetration?
Yes. A moisture meter can help compare suspect interior materials with nearby dry areas. It can support your inspection, but it does not identify the leak source by itself. Use readings along with rain timing, exterior clues, staining, odor, and visible material condition.
Is cracked caulk always the source of a penetration leak?
No. Cracked caulk is an important clue, but the leak may also involve poor slope, missing flashing, a loose fixture, an oversized hole, failed surrounding material, or water entering from above. Cracked sealant should be inspected as part of the larger wall area.
What does staining below a vent or cable entry mean?
Staining below a vent or cable entry may mean water is repeatedly washing over or entering around that opening. It does not prove the exact source, but it is a strong clue that the penetration and nearby wall details should be inspected carefully.
Should I remove a vent cover, outlet cover, or exterior fixture to inspect behind it?
Do not remove electrical fixtures, gas-line covers, mechanical components, or anything that creates a safety risk. Simple vent covers may still hide sharp edges, pests, wiring, or damaged materials, so removal should only be done if you can do it safely and understand what you are disturbing. When in doubt, call a professional.
When should I call a contractor for a penetration leak?
Call a contractor or qualified specialist if the leak keeps returning, the area is soft or rotted, moisture appears near electrical or gas components, the penetration is above safe access, stains are spreading, or musty odors continue after rain. These signs may indicate hidden wall moisture or a deeper building-envelope problem.
Exterior Penetration Inspection Summary
Inspecting exterior penetrations for moisture is about connecting interior clues with exterior wall openings. A stain, damp baseboard, musty smell, or soft trim may not line up perfectly with the source because water can move behind siding, sheathing, and drywall before it appears indoors.
Start inside, then inspect the exterior area near and above the symptom. Look at cables, vents, hose bibs, pipes, utility boxes, fixtures, conduit, abandoned holes, sealant, covers, stains, slope, and surrounding materials. The goal is to find patterns, not to guess or seal every opening.
If you see repeated moisture, failed sealant, loose covers, poor slope, soft materials, or water near utilities, the issue may need more than a basic homeowner inspection. A careful evaluation can help identify the entry point before it becomes a larger hidden moisture problem.