How to Dry Exterior Walls After Water Intrusion
To dry exterior walls after water intrusion, stop the water source first, remove surface water, increase controlled airflow, run dehumidification, expose trapped wet materials when needed, and confirm dryness with moisture readings before closing or repainting the wall.
Exterior walls often stay wet behind the surface because drywall, insulation, sheathing, and framing can hold moisture after the visible water disappears. If drying is delayed, mold can begin developing in as little as 24 to 48 hours—especially in conditions like those explained in why mold forms inside exterior walls.
For broader prevention after a leak, see how to prevent recurring moisture damage. This guide stays focused on the drying steps needed after water has already entered an exterior wall.
What Happens Inside Exterior Walls After Water Intrusion
Water inside an exterior wall rarely stays where it first entered. It spreads through porous materials, follows gravity, and can remain trapped behind surfaces that already look dry.
Most exterior walls contain several materials that react differently to moisture. These include drywall, insulation, wood framing, and exterior sheathing. Each of these materials absorbs water at different rates, making drying more complicated than many homeowners expect.
How Moisture Moves Inside Walls
Once water enters an exterior wall—whether from rain, plumbing leaks, or siding failures—it begins spreading quickly through porous materials. Even a small leak can affect a much larger area than the visible damage suggests.
Moisture typically moves in the following ways:
- Downward movement: Water follows gravity, spreading downward inside wall cavities.
- Sideways movement: Water spreads horizontally through insulation and drywall paper.
- Absorption into materials: Porous materials soak up moisture and retain it.
- Capillary action: Water travels along framing materials and seams.
- Hidden pooling: Moisture collects in insulation or behind sheathing.
This movement means that visible damage on the surface often represents only a portion of the total moisture present. Moisture trapped inside wall cavities may remain hidden unless specifically addressed.
Many recurring moisture problems occur because homeowners dry only the visible area while leaving hidden moisture untreated. This hidden moisture often leads to the long-term dampness explained in why exterior walls stay damp, where materials remain wet despite surface drying.
Why Exterior Walls Dry Slowly
Exterior walls dry more slowly than floors or open surfaces because moisture becomes trapped between layers of materials. Limited airflow inside the wall cavity prevents natural evaporation from occurring efficiently.
Several factors contribute to slow drying:
- Insulation blocking airflow
- Exterior materials preventing evaporation
- Limited air movement inside closed wall spaces
- Humidity levels slowing moisture evaporation
- Cold exterior temperatures reducing drying speed
When airflow is restricted, moisture remains trapped longer than expected. Even after the visible surface appears dry, the interior materials may still contain significant moisture.
Immediate Steps to Take After Water Intrusion
The first few hours after water enters an exterior wall matter most because moisture can move behind the surface before the damage looks serious. Start by controlling the source, removing visible water, and setting up drying conditions before materials stay wet long enough to deteriorate.
Stop the Water Source Immediately
The first step in drying any exterior wall is stopping the source of water intrusion. Drying efforts will fail if moisture continues entering the wall.
Safety note: If water has reached outlets, wiring, electrical panels, sewage, floodwater, or visibly contaminated materials, stop DIY drying and call a qualified professional. Do not run fans, dehumidifiers, or moisture meters near energized wet electrical components.
Common water sources that must be stopped include:
- Roof or siding leaks during storms
- Window or door seal failures
- Broken plumbing lines
- Overflowing gutters directing water toward walls
- Foundation drainage problems
If water intrusion is caused by weather-related issues, temporary protective measures may be necessary until permanent repairs can be completed. These may include covering exposed areas or redirecting water away from vulnerable sections.
Understanding how water entered the wall is essential for preventing repeated damage. Many intrusion pathways follow patterns explained in how water enters homes through structural gaps, which outlines the most common moisture entry points.
Remove Standing Water and Surface Moisture
Once the water source has been controlled, the next step is removing visible water from surfaces. Standing water increases moisture absorption into wall materials and delays drying.
Methods for removing surface moisture include:
- Using towels or absorbent materials to remove water
- Using wet/dry vacuums to extract standing water
- Removing soaked carpets or nearby materials
- Drying flooring near affected walls
- Cleaning moisture from baseboards and trim
Removing visible water reduces the amount of moisture that can spread into wall cavities. Even small puddles near exterior walls can contribute to deeper moisture penetration if left untreated.
At this stage, homeowners should also look for early warning signs such as discoloration or swelling, which may indicate moisture has already entered hidden wall areas.
Increase Airflow as Quickly as Possible
Air movement plays a major role in drying exterior walls. Increasing airflow immediately after water intrusion helps accelerate evaporation and prevents moisture from settling into structural materials.
Effective airflow strategies include:
- Opening windows only when outdoor air is drier than indoor air
- Positioning fans to move air across wet surfaces
- Creating cross-ventilation between rooms
- Removing obstructions that block airflow
- Directing air toward affected wall areas
Fans should be positioned to move air across the wall surface rather than directly into one location. This encourages moisture to evaporate evenly and reduces drying time.
How to Dry Exterior Walls Step by Step
After completing the immediate response steps, the next phase involves drying the wall system itself. This process often requires multiple actions performed in sequence to remove moisture from both visible surfaces and hidden areas.
Drying exterior walls correctly helps prevent the moisture conditions that allow mold to develop. Many drying failures occur because steps are skipped or performed in the wrong order.
Remove Damaged Materials When Necessary
Not all wall materials can be saved after water intrusion. In some cases, removing damaged materials is necessary to allow proper drying and prevent mold growth.
Materials that may require removal include:
- Severely soaked drywall
- Saturated insulation
- Water-damaged baseboards
- Warped trim components
- Wet interior finishes that trap moisture
Drywall that remains wet for extended periods often loses structural strength. When this occurs, removal allows airflow to reach internal materials and improves drying effectiveness.
Removing damaged materials also prevents moisture from becoming trapped behind sealed surfaces. If moisture signs return after surface drying, compare them with the warning patterns described in signs of moisture in exterior walls.
Dry Insulation Inside the Wall Cavity
Insulation is one of the most moisture-sensitive components inside exterior walls. When insulation becomes wet, it traps water between fibers and significantly slows drying.
Depending on the severity of water exposure, insulation may need to be:
- Dried in place only when exposure is light and the cavity can actually dry
- Removed when it is saturated, compressed, contaminated, or still damp after drying begins
- Checked before the wall is closed because wet insulation can keep framing and drywall damp
For a material-specific breakdown, see how to dry insulation after water damage.
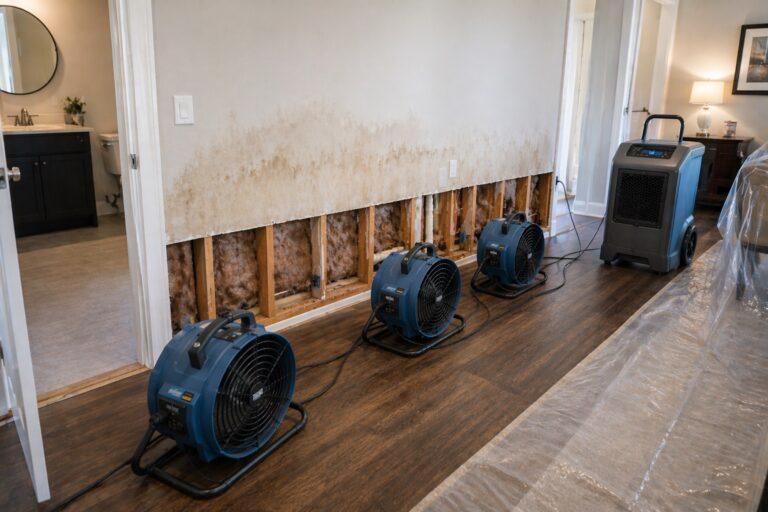
Use Fans and Dehumidifiers Together
Fans and dehumidifiers work best when used together. Fans increase evaporation, while dehumidifiers remove moisture from the air. Using only one of these tools limits drying efficiency.
When using a dehumidifier, keep the drying area as closed as practical so the unit removes moisture from the affected space instead of constantly pulling in humid outdoor air.
Effective drying equipment strategies include:
- Positioning fans to create continuous airflow
- Operating dehumidifiers in enclosed spaces
- Maintaining consistent air circulation
- Monitoring humidity levels regularly
- Adjusting equipment placement as drying progresses
Combining airflow and humidity control helps remove moisture from wall materials more efficiently than natural drying alone.
Homes with large wet areas or high humidity may require multiple fans and dehumidifiers to achieve effective drying conditions.
How Long It Takes Exterior Walls to Dry
One of the most common questions homeowners ask after water intrusion is how long it takes for exterior walls to dry. The answer depends on several factors, including how much water entered the wall, what materials were affected, and how quickly drying began.
Drying timelines vary widely, but understanding typical drying ranges helps set realistic expectations and prevents closing walls too soon. Rushing repairs before materials are fully dry is one of the most common reasons mold develops later.
Drywall Drying Timelines
Drywall absorbs water quickly because its paper surface and gypsum core are highly porous. The amount of moisture absorbed determines whether the drywall can be saved or must be replaced.
Typical drywall drying timelines include:
- Minor wetting: 24 to 72 hours with proper airflow
- Moderate moisture exposure: 3 to 7 days
- Severe saturation: Often requires removal and replacement
Drywall may feel dry to the touch while still holding moisture inside its core, so moisture readings matter more than surface appearance.
Insulation Drying Timelines
Insulation typically dries much slower than drywall because it traps moisture between fibers. The drying time depends heavily on the type of insulation and how much water entered the wall.
Typical insulation drying timelines include:
- Light moisture exposure: Several days with strong airflow
- Moderate wetting: Up to one week
- Heavy saturation: Removal often required
Fiberglass insulation can sometimes be dried if moisture exposure is minor. However, heavily soaked insulation often remains damp even after extended drying attempts.
Cellulose insulation absorbs water more readily than fiberglass and typically requires removal when saturated. Leaving wet insulation inside the wall significantly increases mold risk.
Structural Wood Drying Timelines
Wood framing materials absorb moisture more slowly than drywall but retain water longer once saturated. Structural wood drying timelines vary depending on moisture levels and environmental conditions.
Typical wood drying timelines include:
- Minor moisture exposure: Several days
- Moderate exposure: One to two weeks
- Severe saturation: Multiple weeks
Wood that remains damp for extended periods becomes vulnerable to mold growth and structural weakening. Monitoring moisture levels during drying helps prevent long-term damage.
If wood framing remains wet despite drying efforts, further investigation may be necessary to identify hidden moisture sources.
Tools That Improve Wall Drying Efficiency
Exterior wall drying usually works best with three tool groups: air movement, dehumidification, and moisture monitoring. Air movers help evaporation, dehumidifiers remove moisture from the air, and moisture meters help confirm whether hidden materials are actually drying.
Air Movers and Fans
Air movers—commonly known as high-powered fans—are designed to increase evaporation from wet surfaces. They create strong airflow across wall surfaces, helping moisture evaporate faster.
Effective fan usage includes:
- Positioning fans to move air across affected walls
- Avoiding direct airflow into one fixed point
- Maintaining continuous airflow during drying
- Adjusting fan direction as moisture decreases
- Using multiple fans for larger wet areas
Air movers are particularly effective during the early stages of drying when moisture levels are highest.
Dehumidifiers for Moisture Removal
Dehumidifiers remove moisture from the air, making evaporation more effective. Without dehumidification, moisture released into the air may re-enter wall materials.
Dehumidifiers are especially useful when:
- Indoor humidity levels are high
- Multiple wall areas are wet
- Outdoor conditions limit natural ventilation
- Drying is taking longer than expected
- Persistent damp odors remain
Using dehumidifiers alongside fans creates a controlled drying environment that removes moisture efficiently.
Moisture Meters for Accurate Monitoring
Moisture meters are one of the most valuable tools for confirming whether wall materials are fully dry. Visual inspection alone is not reliable, especially when moisture is hidden inside wall cavities.
Compare readings from the wet area with a similar dry exterior wall in the home. A single number is less useful than seeing whether the affected wall is returning close to normal for that material and location.
Moisture meters help homeowners:
- Detect hidden moisture inside walls
- Track drying progress over time
- Confirm when materials are safe to close
- Identify areas requiring additional drying
- Prevent premature repairs
Using a moisture meter ensures that drying decisions are based on measurable data rather than guesswork. Reliable moisture detection methods are essential for preventing recurring problems and avoiding the mold conditions described in why mold forms inside exterior walls.
Signs Exterior Walls Are Fully Dry
Knowing when an exterior wall is fully dry is critical before reinstalling drywall or sealing wall cavities. Closing walls too early traps moisture and often leads to hidden mold growth.
Reliable indicators of complete drying include measurable and observable changes inside the wall system.
Moisture Meter Readings Returning to Normal
Moisture meter readings provide the most reliable confirmation that drying is complete. Measurements should match normal moisture levels found in unaffected areas of the home.
Key measurement practices include:
- Testing multiple locations along the wall
- Comparing readings to dry reference areas
- Monitoring changes daily during drying
- Confirming consistent readings before sealing walls
- Rechecking after final drying adjustments
Consistent normal readings are a strong sign that materials have returned close to safe moisture levels for that area.
No Lingering Damp or Musty Odors
Odor is not proof that a wall is dry, but lingering damp or musty smells can warn that moisture is still trapped somewhere in the wall system.
Odor-related signs to check include:
- No musty smell returning after fans or dehumidifiers are turned off
- No damp odor coming from baseboards, outlets, trim gaps, or opened wall areas
- No humid smell trapped near the affected wall section
- No odor that worsens when the room is closed overnight
If odors persist after drying efforts, hidden moisture may still be present. Continued drying or further inspection may be necessary.
Common Drying Mistakes That Lead to Mold Problems
Most exterior wall drying failures happen when drying starts too late, stops too soon, or ignores wet materials hidden inside the wall cavity.
Waiting Too Long to Begin Drying
One of the most damaging mistakes is waiting for the wall to look worse before drying it. Moisture can spread behind the surface long before stains, odors, or mold become obvious.
Situations that cause dangerous delays include:
- Ignoring minor leaks or assuming damage is temporary
- Waiting for visible mold before taking action
- Allowing wet materials to remain undisturbed
- Delaying equipment setup after water intrusion
- Postponing repairs after storms or plumbing failures
Even small amounts of water can create hidden moisture conditions that lead to mold growth. Acting quickly is the most effective way to reduce long-term damage and prevent costly repairs.
Closing Walls Before They Are Fully Dry
Sealing walls too soon is one of the most common causes of hidden mold problems. When drywall or insulation is replaced before internal materials are fully dry, moisture becomes trapped inside the wall cavity.
This mistake often results in:
- Hidden mold growth behind new drywall
- Persistent musty odors after repairs
- Recurring staining or discoloration
- Long-term structural deterioration
- Costly rework and material replacement
Using moisture meters and allowing sufficient drying time helps prevent premature wall closure. Confirming dryness before sealing surfaces is essential for preventing recurring problems.
Ignoring Wet Insulation
Insulation is frequently overlooked during drying, but it plays a major role in moisture retention. Wet insulation traps moisture inside the wall cavity and significantly slows drying.
Ignoring wet insulation may lead to:
- Persistent dampness inside walls
- Rapid mold growth within insulation layers
- Reduced insulation performance
- Uneven wall temperatures
- Recurring moisture-related damage
In many cases, removing heavily saturated insulation allows walls to dry more effectively and reduces mold risk.
When Professional Drying Is Necessary
Some water intrusion events exceed the limits of basic drying methods. When moisture levels are high or damage is widespread, professional drying equipment and expertise may be required.
Large Water Intrusion Events
Professional drying is often required when large amounts of water enter exterior walls. These situations may involve severe weather, plumbing failures, or flooding conditions.
Examples of large-scale water intrusion include:
- Storm-related wall leaks
- Flooding affecting multiple wall sections
- Broken plumbing lines inside walls
- Major siding or roofing failures
- Water intrusion affecting multiple rooms
Large water events require rapid moisture removal, controlled drying conditions, and careful moisture monitoring.
Saturated Insulation or Structural Materials
When insulation or structural components become heavily saturated, drying becomes more complex. Professional equipment is often needed to remove moisture from deep inside wall cavities.
Warning signs that professional drying may be necessary include:
- Insulation that remains wet after several days
- Persistent moisture readings from wall materials
- Visible structural swelling or warping
- Multiple damp areas across the wall
- Strong musty odors developing quickly
Moisture That Does Not Improve With Drying Efforts
If drying progress slows or stops despite proper airflow and dehumidification, the wall may still have an active leak, trapped insulation moisture, or a deeper assembly problem. For repeated failures after basic drying, see how to fix persistent exterior wall moisture problems.
Moisture problems that resist drying often relate to underlying conditions similar to those explained in why exterior walls stay damp, where moisture remains trapped despite normal drying efforts.
Frequently Asked Questions About How to Dry Exterior Walls After Water Intrusion
How long does it take to dry an exterior wall after water intrusion?
Drying time depends on how much water entered the wall and how quickly drying began. Minor moisture may dry within 24 to 72 hours, while moderate to severe damage may require several days or even weeks.
Should drywall be removed after water intrusion?
Drywall may need removal if it becomes saturated or remains wet for more than 48 hours. Removing damaged drywall improves airflow and helps prevent mold growth inside the wall cavity.
Can insulation be saved after getting wet?
Lightly damp fiberglass insulation may be salvageable if dried quickly. Heavily saturated insulation often requires removal because trapped moisture increases mold risk.
Do fans alone dry exterior walls effectively?
Fans improve airflow, but they work best when combined with dehumidifiers. Using both tools together speeds drying and reduces moisture retention.
How do I know when an exterior wall is fully dry?
Moisture meter readings matching dry reference areas provide the most reliable confirmation. Surface dryness alone does not guarantee complete drying.
Is an exterior wall dry if the paint feels dry?
No. Paint, drywall paper, or trim can feel dry while insulation, sheathing, or framing inside the wall cavity still holds moisture. Moisture readings are more reliable than touch alone.
Key Takeaways
- Drying exterior walls should begin immediately after water intrusion occurs.
- Moisture spreads quickly inside wall cavities, even when surface damage appears minor.
- Fans and dehumidifiers work best when used together during drying.
- Wet insulation significantly slows drying and increases mold risk.
- Walls should never be sealed until moisture readings confirm dryness.
- Professional drying may be necessary after large water intrusion events.
- Early drying action helps prevent mold growth and long-term structural damage.
One Comment
Comments are closed.