Moisture Levels That Indicate Water Damage (Drywall, Wood & Wall Readings Explained)
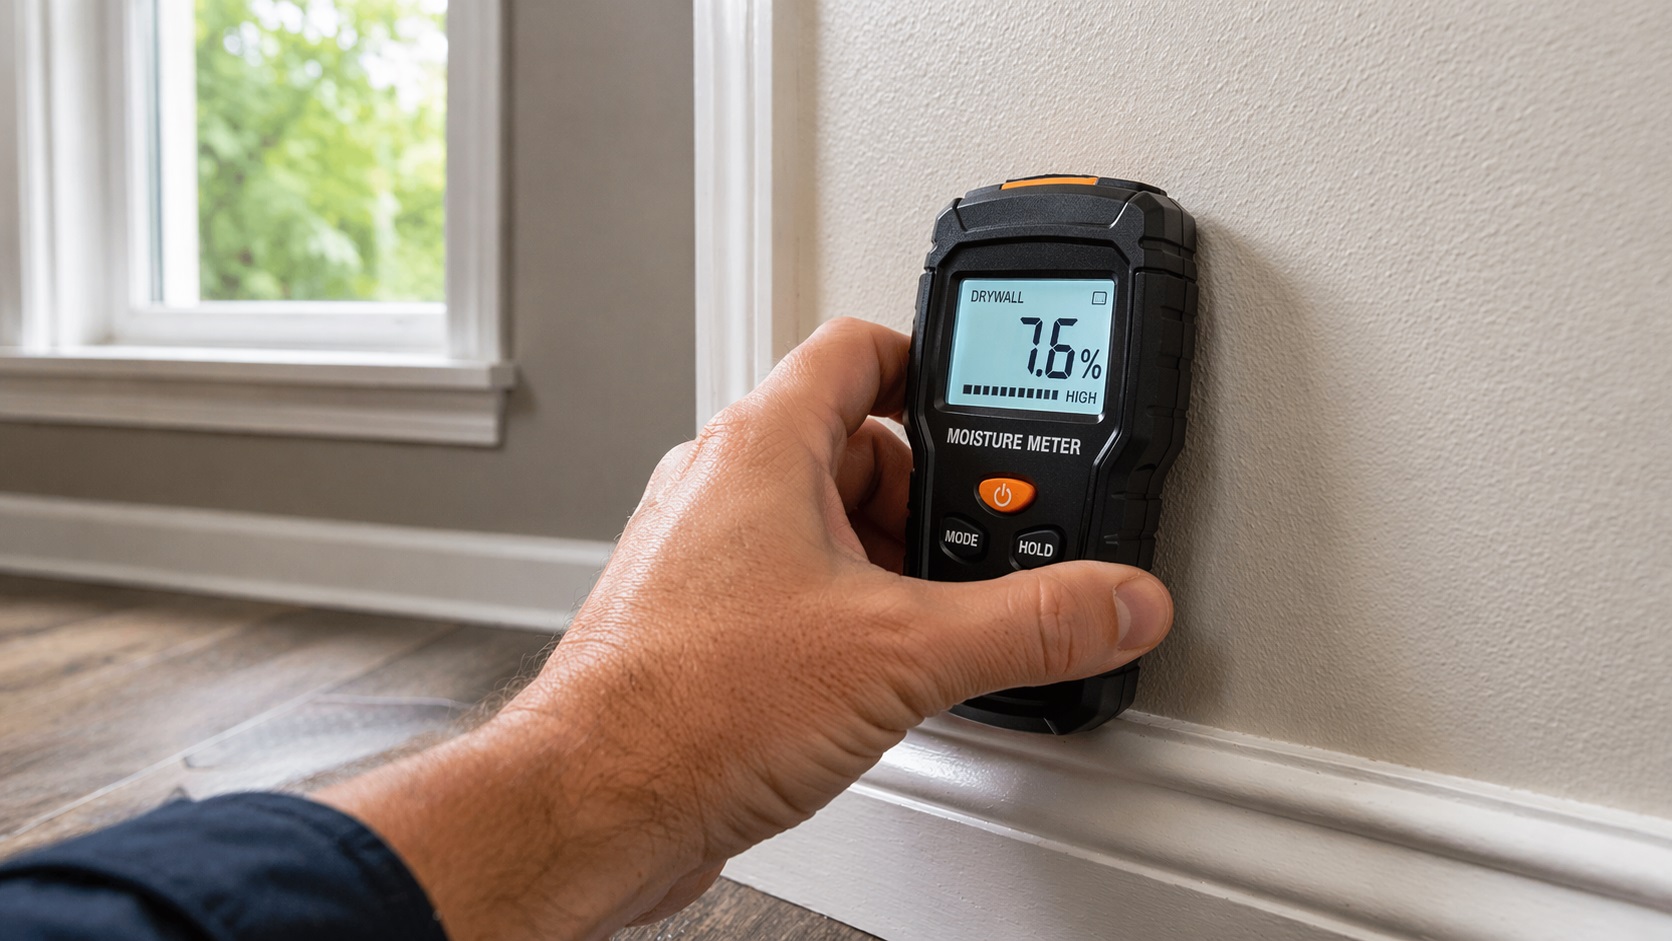
Moisture levels that indicate water damage vary by material, but drywall readings above about 5%, drywall readings near 7%–8%, wood moisture above 16%, and wood moisture above 20% usually deserve attention. The most reliable warning sign is not one number by itself, but a reading that is clearly higher than nearby dry areas.
If you have already noticed warning signs such as staining, musty odors, or soft drywall, it helps to compare what you see with measurable data. Our guide on signs of hidden moisture in walls explains how visual symptoms develop, but numbers provide the confirmation that turns suspicion into certainty.
Use the ranges below as practical warning zones, then compare each reading with nearby dry material before deciding how serious the problem is.
This guide focuses specifically on moisture numbers and safe threshold ranges. For room-by-room moisture checks, wall readings, floor readings, attic moisture, and other location-based inspection topics, use our parent guide to finding hidden moisture in different areas of your home.
What Moisture Level Indicates Water Damage?
The moisture level that indicates water damage depends on the material being tested. However, certain threshold ranges are widely used in building inspection and restoration work to identify elevated moisture and potential damage.
In general, these readings indicate increasing levels of concern:
- Drywall above 5% — Possible moisture damage
- Drywall above 7–8% — Likely water damage
- Wood above 16% — Elevated moisture requiring attention
- Wood above 20% — Serious moisture problem
- Readings higher than nearby dry areas — Investigation recommended
One of the most important principles is comparison. A single reading does not always tell the full story. If one section of wall reads significantly higher than the surrounding areas, it often indicates localized moisture—even when the number itself appears moderate.
Important: If elevated readings appear near electrical outlets, breaker panels, sagging drywall, soft framing, sewage, floodwater, or a spreading mold odor, stop testing the area yourself and call a qualified professional. Moisture readings can confirm risk, but they do not make unsafe materials safe to handle.
Why Moisture Numbers Confirm What Visual Signs Cannot
Visual warning signs are helpful, but they often appear after moisture has already been present for some time. Water can move behind drywall, insulation, and framing without becoming visible on the surface. By the time stains or swelling appear, hidden damage may already be developing inside the wall.
For example, a wall may look completely normal while still holding elevated moisture levels behind the surface. In many cases, readings rise days or weeks before visible symptoms appear. This is why moisture measurements are commonly used after plumbing leaks, roof damage, flooding, or high-humidity events.
If visible symptoms have already developed, combine what you see with the readings you collect. Stains, soft drywall, swelling, and musty odors matter more when the same area also reads higher than nearby dry material.
Drywall Moisture Levels: What’s Normal and What’s Dangerous
Drywall is one of the most commonly affected materials during moisture problems. Because it contains paper backing and porous materials, it can absorb water quickly and hold moisture longer than many homeowners expect.
Drywall Moisture Level Chart
| Moisture Level | Meaning |
|---|---|
| 0%–2% | Normal dry range |
| 3%–5% | Elevated moisture — monitor closely |
| Above 5% | Possible water damage |
| Above 7%–8% | Likely water damage |
These values are widely used as general reference points, but readings should always be interpreted carefully. Environmental conditions, material thickness, and meter type can affect measurements.
Drywall readings above 5% typically deserve attention, especially when compared with nearby dry sections. If readings approach 7% or higher, the risk of hidden damage increases significantly.
Drywall that remains wet for extended periods can weaken, swell, or lose structural strength. Over time, this may lead to cracking, bulging, or surface failure. Moisture trapped inside drywall also creates favorable conditions for mold growth.
If readings continue rising over time, the likelihood of an active moisture source increases. In those cases, locating the source becomes essential. Our guide on how to find hidden water leaks inside walls explains how to trace moisture back to its origin.
Why Small Increases in Drywall Moisture Matter
Even small increases in drywall moisture readings can signal the early stages of water intrusion. Many homeowners assume that only large spikes are dangerous, but gradual increases often reveal slow leaks that develop over weeks or months.
Common causes of rising drywall moisture include:
- Slow plumbing leaks behind walls
- Condensation inside poorly ventilated areas
- Window or roof leaks during storms
- Humidity buildup in enclosed spaces
- Water traveling downward from higher surfaces
Because drywall absorbs moisture quickly, even minor leaks can produce measurable changes before stains or swelling appear.
Wood Moisture Levels: When Framing and Trim Become At Risk
Wood behaves differently from drywall when exposed to moisture. Unlike drywall, wood expands and absorbs water gradually. Because wood framing supports structural loads, elevated moisture levels inside wood can create long-term risks if not addressed early.
Moisture readings in wood are measured as moisture content (MC%), which represents the percentage of water contained within the material. These readings help determine whether wood is dry, slightly damp, or dangerously wet.
Understanding wood moisture levels is especially important when checking:
- Wall framing behind drywall
- Baseboards and trim
- Subfloors beneath flooring
- Window and door framing
- Structural wood inside exterior walls
Wood Moisture Content Chart
| Moisture Level | Meaning |
|---|---|
| 6%–12% | Normal indoor moisture range |
| 12%–16% | Elevated moisture — monitor conditions |
| Above 16% | High risk of moisture-related problems |
| Above 20% | Serious moisture problem likely |
| Above 28% | Possible decay risk if moisture remains |
Wood moisture above 16% often signals conditions that should be investigated. When levels reach 20% or higher, structural materials may remain damp long enough to support mold growth or long-term damage.
Because wood framing is hidden behind drywall, elevated wood moisture may exist even when the wall surface still looks normal.
Why Wood Moisture Levels Are So Important
Wood acts like a sponge when exposed to moisture. Even small increases in moisture content can cause expansion, swelling, and distortion. Over time, repeated exposure weakens wood fibers and reduces structural strength.
Common problems linked to elevated wood moisture include:
- Warped framing components
- Swollen trim and baseboards
- Cracking joints and seams
- Loose fasteners and nails
- Structural weakening in severe cases
These changes often begin slowly and may not become visible until moisture exposure has continued for an extended period.
Relative Moisture Readings: Why Comparisons Matter Most
One of the most misunderstood aspects of moisture testing is the importance of comparison readings. Moisture meters rarely provide meaningful results when used on a single location alone. Instead, they work best when comparing suspicious areas to known dry surfaces nearby.
This method is called relative moisture comparison, and it is widely used to identify hidden moisture problems.
Example of Relative Moisture Comparison
Consider the following scenario:
- Dry wall reading: 1%
- Suspicious wall reading: 6%
Although 6% may not appear extremely high by itself, the difference between 1% and 6% strongly suggests localized moisture. This difference is often more important than the number alone.
Relative comparisons help detect:
- Hidden plumbing leaks
- Moisture intrusion near windows
- Condensation buildup inside walls
- Areas that remain damp after flooding
Comparison readings help separate a normal background reading from a localized wet area.
How to Compare Moisture Readings Correctly
When testing for moisture, always take readings from multiple locations. This helps create a reference range that shows what “normal” looks like inside your home.
Recommended comparison steps include:
- Test a known dry area first
- Record that reading as your baseline
- Test nearby suspicious locations
- Compare differences between readings
- Look for unusually high variations
This comparison-based method improves accuracy and reduces the risk of misinterpreting normal moisture levels as damage.
Acceptable Moisture Levels in Walls and Floors
Different building materials respond differently to moisture. Acceptable levels vary depending on material type, thickness, and environmental conditions.
Understanding general moisture thresholds helps homeowners identify areas that deserve closer attention.
Typical Acceptable Moisture Levels by Material
| Material | Normal Range | Elevated Range | Concern Level |
|---|---|---|---|
| Drywall | 0%–2% | 3%–5% | Above 5% |
| Wood Framing | 6%–12% | 12%–16% | Above 16% |
| Subfloor | 8%–14% | 14%–18% | Above 18% |
| Trim and Baseboards | 6%–12% | 12%–16% | Above 16% |
These ranges provide helpful reference points, but moisture readings should always be evaluated within the context of surrounding conditions. High humidity, seasonal weather changes, and recent leaks can influence readings.
If readings remain elevated across multiple materials, identifying the source becomes the highest priority.
How to Interpret Moisture Meter Readings Correctly
Taking moisture readings is only useful if you understand what the numbers mean. Many homeowners make the mistake of relying on a single reading without considering surrounding conditions, material type, or environmental factors. Proper interpretation turns raw numbers into useful decisions.
If you have not yet confirmed whether moisture exists inside walls, review our guide on how to detect moisture without opening walls before interpreting readings.
Moisture meter readings should always be evaluated alongside location, comparison readings, and known risk factors. When used correctly, these tools provide early warnings that help prevent costly repairs.
Understand the Type of Moisture Meter Being Used
Different moisture meters measure moisture in different ways. Some use pins inserted into materials, while others measure moisture through the surface without penetrating the wall. Both types can provide reliable readings when used correctly.
The most common moisture meter types include:
- Pin meters — Measure moisture between two metal probes inserted into material
- Pinless meters — Detect moisture using electromagnetic signals
- Dual-mode meters — Offer both pin and pinless measurement options
Choosing the right tool affects accuracy and usability. Some meters work better for drywall, while others perform best on wood framing. If you are selecting a device for home use, our guide to the best moisture meters for home use explains which types are most reliable for common household materials.
Account for Environmental Conditions
Moisture readings can change depending on environmental conditions. Humidity, temperature, and airflow all influence how moisture behaves inside materials.
For example:
- High humidity may raise background readings
- Cold weather may slow drying time
- Recent leaks may temporarily elevate readings
- Poor ventilation can trap moisture longer
Because of these factors, moisture readings should be evaluated over time rather than relying on a single measurement. Repeated readings provide a clearer picture of whether moisture is improving or worsening.
Use Multiple Readings for Greater Accuracy
Taking readings from several locations increases reliability. A single high reading may be caused by a temporary condition, but repeated elevated readings across nearby areas often signal an active moisture problem.
For best results:
- Test both suspicious and dry areas
- Compare readings across different wall sections
- Record measurements for future reference
- Monitor changes over several days
This method helps confirm whether moisture is spreading, stabilizing, or drying naturally.
Do not rely on one reading from one spot. Metal corner bead, fasteners, tile backing, dense paint layers, unusual wall materials, and meter calibration differences can distort results. A suspicious reading matters most when the same pattern repeats across several nearby test points or when it is clearly higher than a known dry comparison area.
What Moisture Levels Lead to Mold Growth
Mold growth depends heavily on moisture conditions. While moisture readings inside walls measure water content in materials, indoor humidity levels influence how quickly mold develops in enclosed spaces.
When moisture remains trapped inside walls, insulation, or wood framing, mold growth becomes increasingly likely. Understanding humidity thresholds helps identify when conditions become dangerous.
Indoor Humidity Levels and Mold Risk
| Humidity Level | Risk Level |
|---|---|
| 30%–50% | Ideal indoor humidity range |
| Above 60% | Increased mold risk |
| Above 70% | High mold growth risk |
| Above 80% | Severe moisture risk |
Maintaining humidity levels below 60% is one of the most effective ways to reduce mold risk. When humidity stays high for extended periods, moisture can accumulate inside walls even without visible leaks. If you need to track indoor levels accurately, see our guide to the best hygrometers for home humidity.
If mold growth has already started, the moisture source must be controlled before cleanup will last. This article explains the moisture numbers that signal risk; for cleanup steps after moisture is under control, see our guide on how to remove mold permanently.
How Moisture Levels and Mold Work Together
Moisture inside materials and humidity in the air work together to create mold-friendly conditions. Elevated moisture readings combined with high humidity dramatically increase the likelihood of mold growth.
Risk increases when:
- Moisture levels remain elevated for more than 24–48 hours
- Humidity stays above 60%
- Airflow is limited inside wall cavities
- Organic materials such as drywall or wood remain damp
Mold can begin developing quickly when moisture remains trapped. Our guide on how long mold takes to grow after water damage explains typical growth timelines.
Understanding this relationship helps homeowners respond quickly before minor moisture issues turn into major mold problems.
What High Moisture Readings Mean You Should Do Next
If readings are elevated, the next step is to confirm whether the number is isolated, spreading, or connected to an active moisture source.
Identify the Source of Moisture
The first step is determining where the moisture is coming from. Without addressing the source, drying efforts may only provide temporary improvement.
Common sources include:
- Leaking plumbing lines
- Roof or window leaks
- Condensation buildup
- Exterior water intrusion
- High indoor humidity
Finding the source may require visual inspection, measurement comparisons, or professional evaluation.
Once the source is controlled, monitor whether readings move back toward the normal range for that material. If wall materials remain elevated, use a structured drying process instead of guessing. For wall-specific steps, see our guide on how to dry walls after water damage.
Monitor Readings Until They Stabilize
Moisture problems rarely resolve instantly. Continued monitoring helps confirm whether drying efforts are working.
Watch for:
- Gradually decreasing moisture readings
- Stable humidity levels
- No new visual damage
- No recurring odors
If readings remain elevated despite corrective efforts, professional inspection may be necessary.
Frequently Asked Questions About Moisture Levels and Water Damage
What moisture level is considered dangerous in drywall?
Drywall moisture readings above 5% typically indicate possible water damage, especially if nearby dry areas measure significantly lower. Readings above 7%–8% often suggest likely moisture damage that requires investigation. The most important factor is comparison—if one section of wall reads noticeably higher than surrounding areas, it may signal hidden moisture even when the number itself seems moderate.
What moisture level indicates water damage in wood?
Wood moisture content above 16% is generally considered elevated and should be monitored. Readings above 20% often indicate serious moisture exposure, especially if levels remain high over time. Extended moisture levels above this range can weaken structural materials and increase the likelihood of mold growth.
Is 5% moisture in drywall bad?
A reading of 5% in drywall is not always dangerous, but it should be taken seriously if nearby areas measure significantly lower. For example, if most walls read 1%–2% and one section reads 5%, that difference strongly suggests localized moisture that deserves investigation.
What moisture level causes mold growth?
Mold growth depends on both moisture levels and humidity. Mold is more likely to develop when materials remain damp and indoor humidity stays above 60% for extended periods. When moisture remains trapped inside walls for 24–48 hours or longer, the likelihood of mold increases significantly. If mold is already present, addressing the moisture source becomes the first priority. For complete guidance, see our resource on how to remove mold permanently.
How accurate are moisture meter readings?
Moisture meter readings are generally reliable when used correctly. Accuracy improves when readings are taken from multiple locations and compared with known dry areas. Environmental factors such as temperature, humidity, and material type can affect readings, which is why repeated testing is recommended.
What is a normal moisture reading in walls?
Most interior drywall readings fall between 0% and 2% under normal conditions. Wood materials typically measure between 6% and 12% indoors. Readings outside these ranges may indicate elevated moisture that requires monitoring or further investigation.
Key Takeaways: Understanding Moisture Levels Helps Prevent Costly Damage
Moisture readings provide one of the clearest ways to detect hidden water problems before visible damage appears. While stains and odors can signal trouble, numbers often reveal problems earlier and more accurately.
The most important lessons to remember include:
- Drywall readings above 5% deserve attention
- Wood readings above 16% indicate elevated moisture
- Relative comparisons matter more than single readings
- Humidity above 60% increases mold risk
- Early action prevents expensive repairs
When elevated readings appear, combining measurement with visual inspection creates the most reliable diagnosis. Reviewing both moisture readings and the signs of hidden moisture in walls helps determine whether moisture problems are developing.
If you plan to monitor moisture levels regularly, using reliable equipment makes a major difference. Our guide to the best moisture meters for home use explains which tools provide consistent results across drywall, wood, and structural materials.
If moisture problems have already progressed into visible mold growth, controlling the moisture source is the first step toward cleanup that lasts. You can follow the mold cleanup process in our guide on how to remove mold permanently.
3 Comments
Comments are closed.