How to Dry Crawl Space Structural Wood Safely and Completely
To dry crawl space structural wood safely, first stop the moisture source, remove standing water, remove wet insulation, move air directly across the joists and beams, control humidity, and verify the wood with moisture readings before calling the job finished. Fans alone are not enough if humid air, wet soil, leaks, or trapped insulation keep adding moisture back to the wood.
This guide explains the safe drying sequence for crawl space joists, beams, and subfloor framing. The goal is not just to make the surface look dry, but to lower the moisture inside the wood enough that mold, odor, and structural deterioration are less likely to return.
If the same area keeps getting damp after cleanup, the problem may be part of a larger recurring moisture pattern. The broader prevention steps in How to Prevent Recurring Moisture Damage can help you connect this drying process to long-term moisture control.
Why Proper Drying of Structural Wood Matters
Structural wood inside crawl spaces supports the weight of floors, walls, and furniture above. When moisture remains inside joists or beams, wood fibers begin to weaken gradually. Although this process may take months or years, the long-term effects can lead to costly repairs.
Proper drying protects structural wood from several major risks:
- Mold growth developing on wood surfaces
- Musty odors spreading into living areas
- Wood fibers weakening due to prolonged moisture exposure
- Insulation damage caused by trapped moisture
- Progressive structural weakening if moisture continues long enough
Drying is especially important after leaks, flooding, or persistent humidity exposure. Even after visible water disappears, moisture often remains trapped inside wood fibers. Without proper drying, this hidden moisture can continue supporting mold growth.
Many homeowners first recognize the need for drying after noticing symptoms such as those described in Signs of Mold Growth on Crawl Space Wood, where visible growth signals that moisture has remained long enough to support fungal activity.
Drying crawl space wood can also reduce musty air movement into the home. Humid crawl space air can move upward through floor gaps, duct leaks, and small openings, especially when the crawl space stays damp for long periods.
When Crawl Space Wood Needs Drying
Crawl space structural wood needs drying when the wood itself is holding moisture, not simply when the crawl space feels humid for a day. The clearest signs are damp joists, elevated moisture readings, wet insulation, recent water exposure, or musty odors that remain after cleanup.
Structural wood typically needs drying when:
- Joists or beams feel damp to the touch
- Visible water exposure has occurred
- Leaks have recently been repaired
- Mold growth appears on wood surfaces
- Musty odors develop inside the crawl space
- Moisture readings remain elevated
These symptoms often appear after events such as plumbing leaks, flooding, or prolonged humidity exposure. Even minor leaks can introduce enough moisture to affect structural wood.
Drying is also necessary when moisture conditions persist despite cleanup efforts. For example, standing water may be removed, but wood surfaces remain damp days or weeks later. In these situations, environmental moisture control becomes essential.
When damp conditions remain unresolved, long-term damage patterns may begin to develop. These progressive warning signs are discussed in Signs of Long-Term Crawl Space Moisture Damage, which explains how persistent moisture affects structural components.
Drying should also be considered after seasonal humidity spikes. In some homes, crawl space wood absorbs moisture during humid weather even without leaks. This moisture buildup can accumulate slowly and require controlled drying to reverse.
Before beginning the drying process, it is important to confirm whether moisture is still present inside structural wood. Methods explained in How to Detect Moisture in Crawl Space Framing can help verify moisture levels before initiating drying procedures.
The Safe Sequence for Drying Crawl Space Structural Wood
Drying structural wood requires a specific sequence of steps. Skipping steps or performing them in the wrong order often leads to incomplete drying and recurring moisture problems. Following a proven sequence improves drying efficiency and reduces long-term risks.
Step 1 — Stop All Moisture Sources
Before attempting to dry structural wood, all moisture sources must be eliminated. Drying cannot succeed if water continues entering the crawl space.
Common moisture sources that must be addressed include:
- Active plumbing leaks
- Ground moisture infiltration
- Condensation forming on surfaces
- Roof or foundation drainage issues
- Outdoor humidity entering the crawl space
Stopping moisture sources is the most important step in the drying process. Without eliminating the cause, drying efforts become temporary and ineffective.
Many repeated drying failures come from unresolved crawl space conditions such as ground moisture, humid outdoor air, poor drainage, or condensation. Those causes must be corrected before drying can last.
Once moisture entry has stopped, the crawl space environment becomes suitable for controlled drying. Attempting to dry wood before correcting moisture sources usually leads to wasted time and energy.
Step 2 — Remove Standing Water
If standing water is present in the crawl space, it must be removed before any other drying methods can work effectively. Even shallow water dramatically increases humidity levels and slows evaporation from wood surfaces.
Standing water creates several immediate problems:
- Raises humidity to levels that prevent drying
- Allows moisture to remain trapped beneath structural wood
- Encourages mold growth and odor development
- Slows the evaporation process across the entire crawl space
Water removal methods vary depending on the amount of water present. Minor water accumulation may be removed using wet vacuums or absorbent materials. Larger amounts of water may require pumping equipment to remove water safely and efficiently.
Safety is critical when removing standing water. Do not enter a crawl space with standing water if electrical wiring, outlets, equipment, or extension cords may be in contact with the water. If water levels are significant, contaminated, or returning after removal, stop and have the water source and electrical risk evaluated before continuing.
Once standing water is removed, the crawl space environment becomes more suitable for airflow and humidity control. Without removing pooled water, later drying steps become significantly less effective.
Safety note: Do not blow fans across sewage-contaminated water, flood debris, or widespread mold growth. Air movement can spread contaminated particles through the crawl space. If water may be contaminated, mold covers large areas, or the crawl space has strong sewage odors, stop and use professional cleanup before starting aggressive drying.
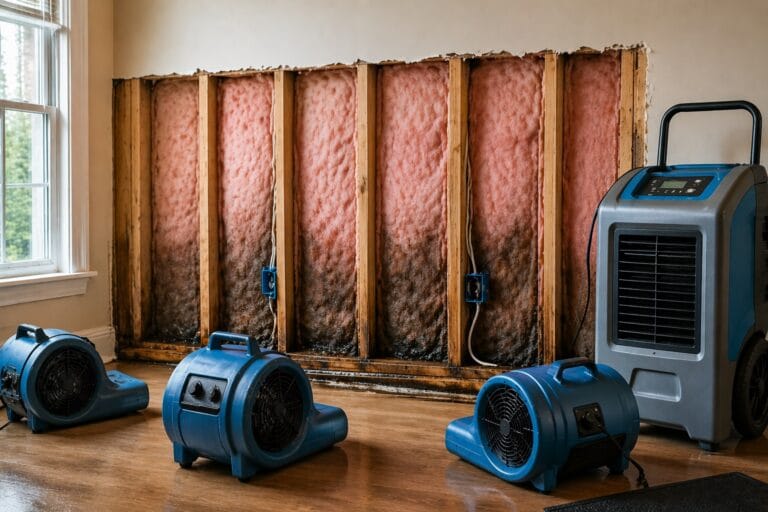
Step 3 — Improve Air Movement Around Structural Wood
Air movement is one of the most powerful tools for drying crawl space structural wood. Moving air across damp surfaces allows moisture to evaporate more quickly from wood fibers.
However, airflow must be applied correctly. Simply placing a fan inside the crawl space without directing air toward damp surfaces often produces limited results.
Effective airflow requires:
- Directing air across joists and beams
- Creating continuous airflow paths
- Allowing moisture-laden air to exit the space
- Maintaining consistent airflow over time
Positioning fans to move air along the length of joists increases drying efficiency. Air should travel across wood surfaces rather than blowing into empty areas of the crawl space.
Cross-ventilation also improves drying performance. When air enters from one side and exits from another, moisture-laden air is replaced with drier air that supports evaporation.
In many crawl spaces, restricted airflow allows damp air to remain around joists, beams, and subfloor materials. Drying works better when air can move across the wood and carry moisture away instead of trapping it in stagnant pockets.
Airflow works best when it is paired with humidity control. Moving air carries moisture away from the wood surface, while drier air allows more moisture inside the wood to migrate outward. If fans only stir humid air inside the crawl space, drying may stall even though air is moving.
Step 4 — Reduce Humidity Inside the Crawl Space
Air movement alone does not remove moisture if humidity remains high. When surrounding air contains excessive moisture, evaporation slows dramatically. Reducing humidity is essential for allowing wood to release stored moisture.
During active drying, the crawl space should generally be kept below about 60% relative humidity, and lower is often better while drying equipment is running. If humidity stays high, the wood may stop drying even when fans are operating.
Humidity reduction methods may include:
- Using dehumidifiers designed for crawl spaces
- Improving ventilation when conditions allow
- Installing vapor barriers over exposed soil
- Sealing air leaks that allow humid air entry
Dry air absorbs moisture from wood more efficiently than humid air. When humidity levels decrease, moisture inside wood fibers migrates toward the surface and evaporates into the surrounding air.
Humidity control also prevents recurring moisture cycles. Without humidity reduction, drying may appear successful temporarily but fail when moisture levels rise again.
In many cases, uncontrolled humidity is the primary reason drying efforts fail. Identifying and correcting humidity problems ensures that drying conditions remain stable throughout the process.
Step 5 — Remove Wet Insulation
Wet insulation is one of the most common reasons structural wood fails to dry completely. Insulation materials, especially fiberglass batts, can absorb and retain moisture for long periods. When insulation stays damp, it presses moisture directly against joists and prevents evaporation.
In many crawl spaces, insulation hides moisture problems rather than solving them. Even when wood surfaces appear dry, moisture trapped between insulation and wood can remain present for weeks.
Wet insulation typically shows warning signs such as:
- Insulation sagging or falling from joist cavities
- Heavy insulation that feels damp to the touch
- Musty odors concentrated near insulation areas
- Discoloration appearing along wood surfaces beneath insulation
Removing wet insulation allows airflow to reach the wood directly. Fiberglass batts that are wet, sagging, dirty, or mold-contaminated usually should not be dried in place against framing. Leaving damp insulation against joists often keeps the wood wet after the rest of the crawl space appears dry.
Step 6 — Monitor Moisture Levels During Drying
Drying should never be based on guesswork alone. Monitoring moisture levels helps confirm whether structural wood is drying properly and prevents stopping the process too early.
Moisture levels can be evaluated using:
- Moisture meters designed for wood measurement
- Visual inspection of wood surfaces
- Observation of odor reduction
- Tracking humidity levels within the crawl space
Moisture meters provide the most reliable confirmation of drying progress. These tools measure the internal moisture content of wood rather than relying on surface appearance.
Learning how to properly evaluate moisture inside structural wood is explained in How to Detect Moisture in Crawl Space Framing, which describes measurement techniques used to verify drying progress.
Take readings from the same joists, beams, and subfloor areas each time so the results can be compared. If readings stop dropping, rise again after equipment is turned off, or remain much higher near one area, the crawl space may still have an active moisture source or trapped wet material.
Do not reinstall insulation, close cavities, or seal materials against the framing until moisture readings confirm that the wood has dried. Covering damp wood too soon can trap moisture and restart mold or decay behind the finished work.
How Long Structural Wood Takes to Dry
The time required to dry crawl space structural wood varies depending on environmental conditions and the severity of moisture exposure. There is no single drying timeline that applies to every situation.
Several factors influence drying time:
- The amount of moisture absorbed into the wood
- The thickness and density of structural components
- The humidity level inside the crawl space
- The strength and direction of airflow
- The presence of insulation or moisture barriers
Under ideal conditions—low humidity and strong airflow—minor moisture exposure may dry within several days. However, moderate moisture exposure may require several weeks of controlled drying.
Severe moisture saturation may require extended drying periods lasting several weeks or even months. In these cases, consistent monitoring becomes essential to prevent incomplete drying.
Stopping drying too early is a common mistake. Wood may appear dry on the surface while internal moisture remains present. This hidden moisture often leads to recurring mold growth and persistent odors.
Extended drying timelines are normal in crawl spaces where airflow and humidity are difficult to control. Patience combined with consistent monitoring produces more reliable drying results.
Common Mistakes That Prevent Proper Drying
Many crawl space drying efforts fail because of simple but critical mistakes. These errors allow moisture to remain trapped inside structural wood, even when drying equipment is used.
Recognizing these mistakes helps homeowners avoid repeating the same ineffective drying cycles.
Starting Drying Before Fixing Moisture Sources
Drying structural wood before stopping active moisture sources is one of the most common failures. If water continues entering the crawl space, drying efforts will only produce temporary results.
This often happens when:
- Leaks are only partially repaired
- Soil moisture continues entering the crawl space
- Condensation conditions remain unchanged
- Humidity levels are not controlled
Moisture sources must always be corrected first. Without eliminating the cause, dampness will return even after temporary drying improvements.
Using Too Few Fans or Improper Fan Placement
Airflow is essential for drying, but inadequate fan placement can prevent proper evaporation. Fans must move air directly across damp surfaces rather than simply circulating air in open space.
Common airflow mistakes include:
- Placing fans too far from damp wood
- Aiming fans toward empty space
- Using a single fan for large crawl spaces
- Running fans intermittently instead of continuously
Proper airflow requires consistent movement across joists and beams. Without this targeted airflow, moisture remains trapped inside wood fibers.
Ignoring Humidity Levels
Many homeowners rely on airflow alone without controlling humidity. When humidity remains high, evaporation slows dramatically and drying stalls.
Humidity-related mistakes include:
- Running fans without reducing humidity
- Leaving crawl spaces open during humid weather
- Failing to install vapor barriers
- Ignoring humidity monitoring tools
High humidity often explains why drying takes longer than expected. Without reducing moisture in the air, wood cannot release stored moisture effectively.
Stopping Drying Too Soon
Stopping drying before wood is fully dry is another frequent mistake. Surface dryness may give the impression that drying is complete, but internal moisture can remain trapped inside wood.
This premature shutdown often leads to:
- Recurring mold growth
- Returning musty odors
- Persistent moisture readings
- Continued structural exposure to moisture
Verifying dryness with proper measurement tools prevents this mistake and ensures drying is complete.
When Drying Requires Professional Equipment
In many cases, basic drying methods are effective. However, certain conditions require specialized equipment or professional assistance to ensure structural wood dries completely.
Professional drying equipment may be needed when:
- Large areas of wood remain damp
- Water exposure lasted several days or longer
- Mold growth is widespread
- Humidity remains difficult to control
- Drying progress appears stalled
Professional evaluation is also important if joists feel soft, show rot, have deep fungal decay, sag, crack, or separate from supports. Drying can stop the moisture cycle, but it does not restore wood that has already lost structural strength.
Professional drying systems typically include high-capacity dehumidifiers and industrial airflow equipment. These tools remove moisture more efficiently than standard household equipment.
When drying continues to fail despite repeated efforts, the situation may indicate deeper moisture problems. In these cases, long-term conditions described in Signs of Long-Term Crawl Space Moisture Damage should be evaluated carefully.
If persistent moisture continues despite controlled drying, repair strategies outlined in How to Fix Persistent Structural Crawl Space Moisture Problems may become necessary.
How to Know When Structural Wood Is Fully Dry
Confirming that structural wood is fully dry is one of the most important parts of the drying process. Without verification, moisture may remain hidden inside wood fibers even when surfaces appear dry.
Reliable confirmation methods include:
- Using moisture meters to measure wood content
- Checking humidity levels inside the crawl space
- Inspecting for remaining odors
- Confirming stable moisture readings over time
Wood is generally considered dry enough for normal service when readings are stable and close to the expected range for that crawl space and climate. As a general guide, readings near 12% to 16% are usually much better than readings that remain in the high teens or above 20%, but the most important sign is that readings stay low and stable for several days instead of climbing again.
Verification ensures that drying efforts produce lasting results. Without measurement confirmation, moisture may return unexpectedly and lead to recurring damage.
Frequently Asked Questions About How to Dry Crawl Space Structural Wood
How long does crawl space structural wood take to dry?
Drying time varies depending on moisture exposure, airflow, and humidity conditions. Minor moisture may dry within several days, while heavier moisture exposure may require several weeks of controlled drying.
Can crawl space wood dry naturally without equipment?
Crawl space wood may dry naturally only when the moisture source is gone, outdoor air is dry enough, insulation is not trapping moisture, and airflow reaches the framing. If humidity stays high or readings do not drop, controlled drying is needed.
Should insulation be removed before drying?
If insulation is wet, removal is usually necessary to allow airflow to reach wood surfaces. Leaving damp insulation in place often prevents proper drying.
What happens if crawl space wood does not dry completely?
Incomplete drying increases the risk of mold growth, odor development, and structural deterioration. Persistent moisture conditions often lead to recurring problems that become more difficult to correct over time.
Is it safe to dry crawl space wood using household fans?
Household fans may help with light surface dampness in a small, clean crawl space, but they are not enough for saturated joists, wet insulation, standing water, contaminated water, or widespread mold. They also should not be used where cords or equipment could contact water.
Conclusion
Crawl space structural wood is not dry just because the surface looks better. A safe drying process stops the moisture source, removes wet materials, moves air across the framing, controls humidity, and confirms progress with repeated moisture readings.
If readings stay high, odors return, insulation remains wet, or wood shows signs of decay, drying should stop being treated as a simple cleanup job. At that point, the crawl space needs deeper moisture investigation or professional equipment before the structure is considered stable.
Key Takeaways
- Stop leaks, ground moisture, condensation, and humidity problems before trying to dry crawl space wood.
- Remove standing water and wet insulation so airflow can reach the joists, beams, and subfloor framing.
- Use airflow and humidity control together; fans alone may only move damp air around.
- Confirm drying with repeated moisture readings instead of relying on surface appearance.
- Use professional help when moisture is contaminated, widespread, persistent, or connected to structural decay.