How to Inspect Crawl Spaces for Moisture Damage
Inspecting a crawl space for moisture damage means checking the soil, vapor barrier, insulation, plumbing, foundation walls, joists, beams, posts, and subfloor for signs of dampness, staining, rot, mold, standing water, or recurring water entry. Crawl space moisture often starts below the home long before it shows up as soft flooring, musty odors, damaged insulation, or indoor air quality problems.
If you suspect moisture but have not confirmed it yet, reviewing signs of moisture in crawl spaces can help identify early warning signals. In cases where moisture has already been detected, understanding why crawl spaces develop moisture problems helps explain what conditions may be present during inspection.
This guide explains how to inspect crawl spaces for moisture damage using a structured, step-by-step approach. It fits within the broader process of finding hidden moisture in different areas of your home, but focuses specifically on what to check before and during a crawl space inspection.
Prepare for Crawl Space Inspection
Before entering, treat the crawl space as a confined, low-clearance area. Check for unsafe air, exposed wiring, standing water, pests, sharp debris, and unstable access before you crawl inside.
Gather Basic Safety Equipment
Basic safety gear matters because crawl spaces can contain sharp debris, exposed fasteners, loose insulation, uneven soil, pests, and airborne dust.
Recommended safety items include:
- Protective gloves to prevent cuts and abrasions
- Knee pads or a crawl board for low-clearance movement
- An N95 mask or respirator if dust, mold, insulation fibers, or strong odors are present
- Safety glasses to protect against debris and insulation
- Protective clothing that covers exposed skin
- A phone or helper outside the crawl space in case you need assistance
Use Proper Lighting Equipment
Crawl spaces often have limited natural light, and moisture stains can disappear in flat, direct light. Use strong lighting from more than one angle so discoloration, sheen, condensation, and surface texture are easier to see.
Effective lighting tools include:
- Bright handheld flashlights
- Headlamps that allow hands-free movement
- Backup lighting sources
- Battery-powered lights for safety
Plan Safe Access Before Entry
Before entering a crawl space, confirm that the access point is safe and unobstructed. Crawl space entry doors should open fully and allow safe movement without forcing entry.
Access preparation includes:
- Clearing debris from access openings
- Checking for visible damage around the entry
- Ensuring enough clearance to move safely
- Confirming stable footing near entry areas
Initial Crawl Space Entry Safety Check
Before beginning a full inspection, perform a safety check immediately after opening the crawl space. This first evaluation determines whether conditions are safe enough to continue.
Never rush this step. Safety checks help prevent injuries and reduce exposure to hazardous conditions.
Do not enter the crawl space if you see standing water near electrical wiring, strong sewage or chemical odors, heavy mold growth, animal infestation, sagging framing, or any condition that makes breathing or movement unsafe.
Check for Air Quality Hazards
Crawl spaces may contain stale air, mold spores, or strong odors. Poor air quality increases health risks and may indicate underlying moisture problems.
Air safety checks include:
- Noticing strong musty or chemical odors
- Watching for visible mold growth near entry areas
- Observing signs of poor ventilation
- Leaving immediately if breathing becomes difficult
If mold is visible near the crawl space entry, compare it with signs of mold growth in crawl spaces before deciding whether the inspection should continue or be handled professionally.
Check for Electrical Hazards
Electrical components in crawl spaces may become dangerous when exposed to moisture. Always check for exposed wiring or water near electrical systems.
Electrical hazard warning signs include:
- Standing water near wiring
- Loose or exposed electrical cables
- Rust or corrosion near electrical fixtures
- Damaged conduit or insulation
If electrical hazards are present, stop the inspection immediately and contact a professional before entering further.
Check for Standing Water Risks
Standing water creates both safety and structural concerns. Water may conceal hazards beneath the surface and increase the risk of electrical shock.
Standing water warning signs include:
- Visible puddles near the entry area
- Muddy or saturated soil
- Water collecting in low areas
- Persistent wet conditions after rainfall
If standing water is present, do not crawl through it, especially if wiring, outlets, HVAC equipment, or unknown debris are nearby. Large water accumulation may indicate serious moisture conditions similar to those described in signs of standing water in crawl spaces.
Inspect Crawl Space Flooring and Soil
Once safety conditions are confirmed, the first inspection zone should focus on crawl space flooring and soil surfaces. These areas often show the earliest signs of moisture entry.
Check for Standing Water or Pooled Moisture
Standing water is one of the clearest indicators of active moisture problems. Note where it collects, whether it is near foundation walls or plumbing lines, and whether the surrounding soil shows older water marks.
Signs to look for include:
- Water pooling in low spots
- Puddles forming near foundation walls
- Muddy areas that remain wet
- Wet surfaces that do not dry between inspections
Standing water typically indicates drainage or structural water entry problems that require immediate attention.
Inspect Soil for Dampness or Saturation
Even when standing water is not visible, soil moisture can still create humidity problems. Damp soil often appears darker and may feel sticky or compacted.
Soil moisture warning signs include:
- Darkened soil patches
- Sticky or muddy surfaces
- Uneven damp areas
- Recurring moisture patterns after rainfall
Persistent soil dampness indicates that moisture is entering from environmental or structural sources. Understanding these sources is easier after reviewing how to detect hidden moisture in crawl spaces, which explains how to confirm hidden moisture conditions.
Inspect Structural Wood Components
Structural wood components support the weight of the home and are among the most important areas to inspect for moisture damage. Wood absorbs moisture gradually, and prolonged exposure can weaken its strength and stability. Careful inspection of beams, joists, and subfloor materials helps identify early damage before structural problems develop.
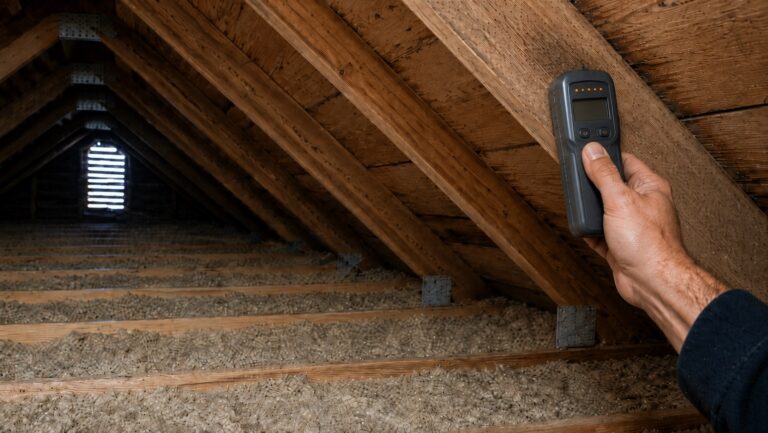
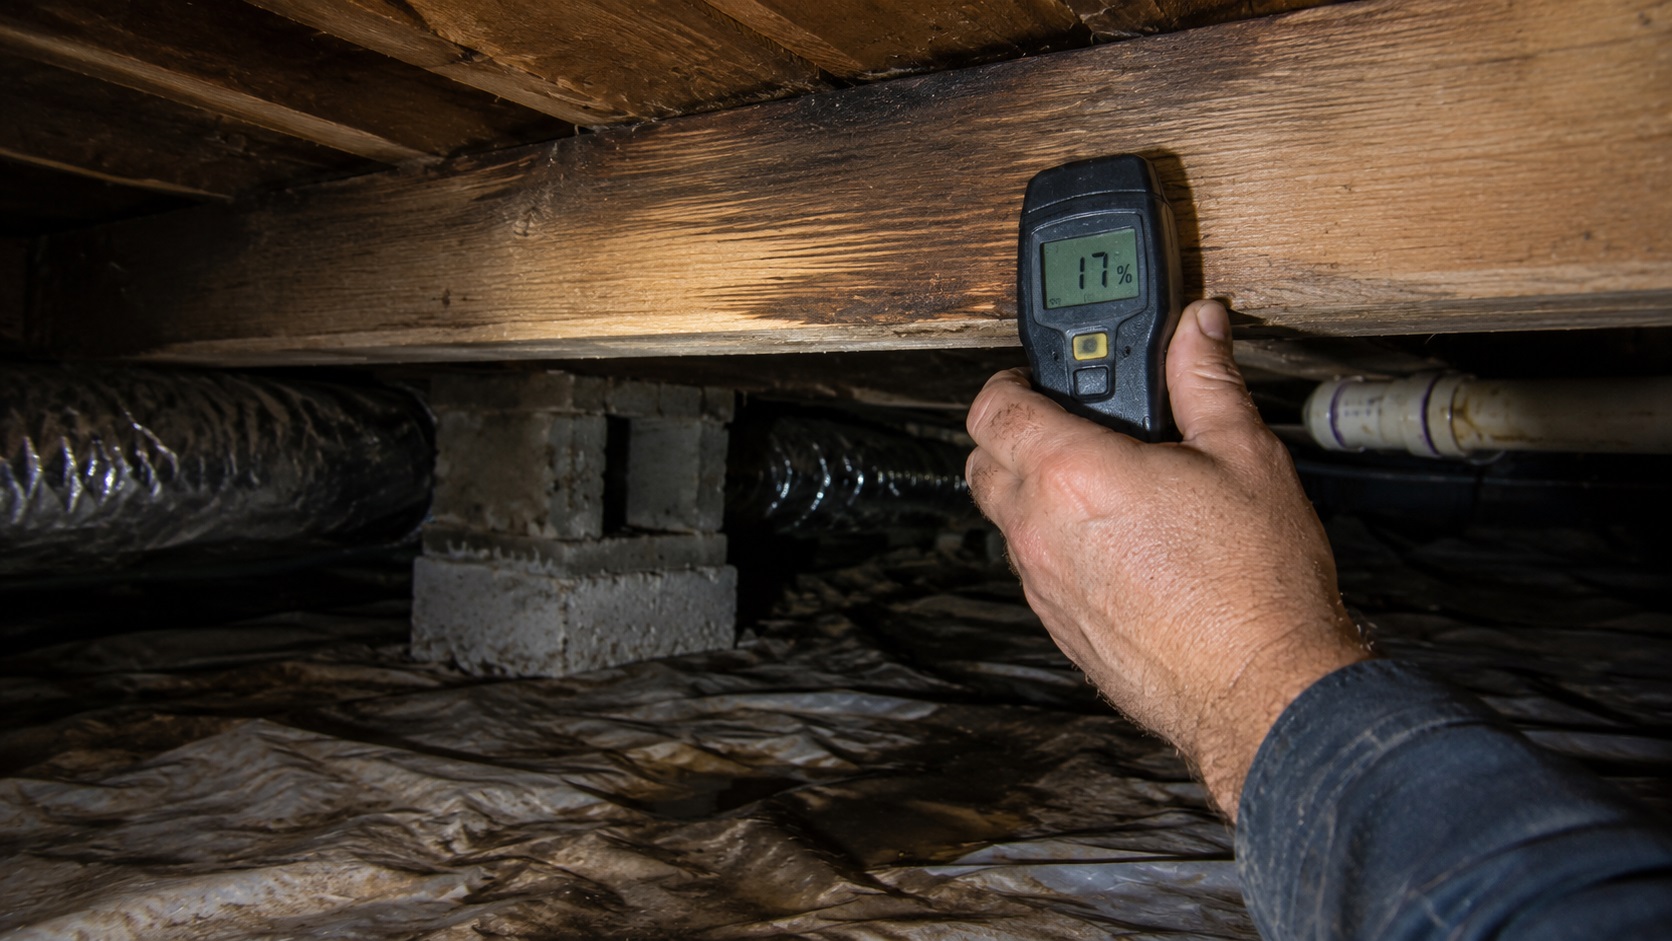
If you use a moisture meter, check several comparable wood locations instead of relying on one reading. Compare suspect joists, beams, posts, and subfloor areas with nearby dry-looking wood so you can tell whether one area is unusually damp. For a deeper tool-based inspection process, see how to detect hidden moisture in crawl spaces.
Inspect Floor Joists for Moisture Damage
Floor joists run horizontally beneath the subfloor and support the flooring above. These components are particularly vulnerable to moisture because they often sit close to insulation and crawl space air.
During inspection, check joists for:
- Dark staining along the bottom or sides of joists
- Soft, punky, or spongy wood when gently probed
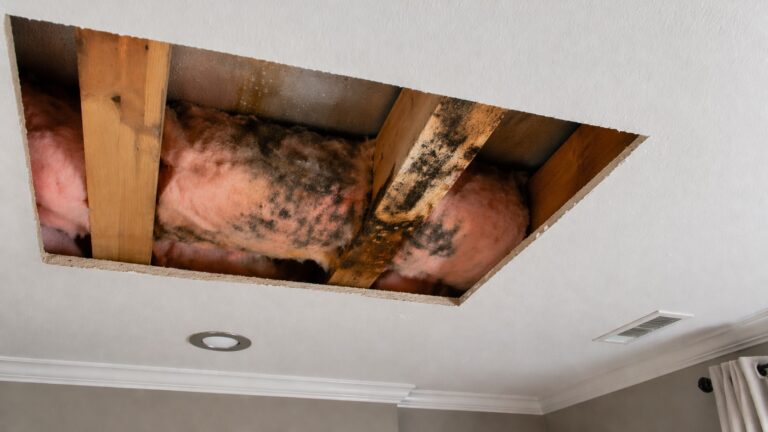
- Visible mold growth or fuzzy surface growth
- Cracking, checking, or splitting wood fibers near damp areas
- Rusty fasteners, corroded hardware, or dark stains around nail points
- Uneven surfaces, sagging patterns, or joists pulling away from supports
Early damage may appear as slight discoloration, while advanced moisture damage may cause wood to weaken or crumble. These changes often match long-term deterioration patterns described in signs of structural moisture problems.
Inspect Support Beams and Posts
Support beams and vertical posts carry major structural loads. Moisture damage in these areas increases the risk of structural instability.
When inspecting beams and posts, look for:
- Water stains running along beam edges
- Deep cracks or splitting wood
- Signs of rot near ground contact points
- Uneven settling or shifting supports
Damage near beam ends or where posts contact soil surfaces often indicates repeated moisture exposure.
Pay special attention to wood posts that sit directly on soil or on damp masonry without a proper separation layer. Moisture often appears first at the bottom of posts, beam pockets, and contact points where wood stays damp longer than surrounding framing.
Inspect Subfloor Materials
The subfloor sits directly above crawl space framing and supports finished flooring inside the home. Moisture affecting the subfloor often leads to visible symptoms inside living areas.
Subfloor inspection should include checking for:
- Darkened or swollen wood panels
- Soft or flexible sections
- Loose fasteners or nail corrosion
- Mold growth on wood surfaces
Subfloor damage frequently leads to warped flooring or soft floor areas inside the home.
Also note any matching symptoms inside the home above the crawl space, such as soft flooring, cupping hardwood, musty odors near floor registers, or stains along lower walls. These interior clues help confirm whether crawl space moisture is affecting the living area.
Inspect Insulation and Vapor Barriers
Insulation and vapor barriers are critical moisture-control components. When these materials fail, moisture can spread quickly into surrounding structures.
Inspect Insulation for Moisture Damage
Insulation can hide moisture damage because the outer face may look only slightly dirty while the back side is damp, compressed, or mold-stained. Do not assume insulation is dry just because the exposed surface looks normal.
During inspection, check insulation for:
- Sagging insulation sections
- Damp or compressed materials
- Water stains or discoloration
- Visible mold patches
Sagging insulation often indicates repeated moisture exposure and may require replacement if damage becomes severe.
Inspect Vapor Barriers for Damage
Vapor barriers protect crawl spaces by limiting moisture movement from soil into the air. When barriers become damaged, moisture can pass through uncovered areas.
Common vapor barrier problems include:
- Tears, punctures, or missing sections in plastic sheeting
- Loose, lapped, or unsealed seams
- Exposed soil at edges, piers, posts, and access openings
- Water or condensation trapped beneath the barrier
- Plastic pulled away from foundation edges or low spots where water collects
Damaged vapor barriers reduce moisture protection and may allow humidity to increase rapidly.
Inspect Plumbing and Mechanical Systems
Plumbing and mechanical systems are common moisture sources. Even minor leaks can create persistent dampness that spreads into surrounding materials.
Check Plumbing Lines for Leaks
Inspect both supply lines and drain pipes carefully. Slow leaks often remain hidden and may create localized moisture problems.
Plumbing inspection should include:
- Checking pipe joints, shutoff valves, and fittings for moisture buildup
- Looking for mineral deposits, green corrosion, or rust-colored stains on pipes
- Inspecting pipe surfaces for condensation
- Watching for recurring damp soil or stained insulation directly beneath pipes
- Checking drain lines after nearby fixtures have recently been used
Localized moisture near plumbing lines often indicates leaks that require immediate repair.
Inspect Ductwork and HVAC Components
HVAC ducts and equipment can create crawl space moisture when cold metal surfaces sweat, duct insulation is missing, or condensate drains fail. Check below these components for drip marks, rust, stained insulation, or damp soil.
HVAC inspection areas include:
- Condensation forming on metal ducts
- Wet insulation surrounding ductwork
- Rust developing on metal surfaces
- Moisture stains near airflow components
Condensation from HVAC systems may create moisture buildup even when no external water intrusion occurs.
Inspect the Foundation Perimeter and Crawl Space Walls
The foundation perimeter is one of the most important inspection zones because it is where external moisture most often enters the crawl space. Careful examination of walls and edges helps identify early signs of water intrusion and long-term moisture exposure.
Check Foundation Walls for Moisture Stains
Moisture entering through foundation walls often leaves evidence even after the wall dries. Look for stain lines, mineral residue, damp mortar joints, and darker areas near the base of the wall.
During inspection, look for:
- Dark vertical streaks on concrete or masonry
- White powdery deposits (efflorescence)
- Uneven discoloration along wall surfaces
- Stains concentrated near the base of walls
Efflorescence occurs when water moves through masonry and leaves behind mineral deposits as it evaporates. This is a strong indicator that moisture has entered the crawl space at some point.
Inspect Wall Corners and Low Areas
Corners and low areas along foundation walls often collect moisture first. These locations may trap water due to limited airflow or poor drainage outside the home.
Common problem indicators include:
- Damp corners after rainfall
- Localized mold growth near wall joints
- Moisture patterns concentrated in specific areas
- Repeated dampness in the same locations
Moisture appearing in corners repeatedly often indicates drainage or structural water entry problems.
Check Around Crawl Space Openings
Crawl space access doors and wall penetrations are frequent entry points for moisture. Over time, seals around these openings may degrade or shift.
Inspection targets include:
- Gaps around access doors
- Damaged weather seals
- Loose framing materials
- Water stains near entry points
If moisture is consistently found near openings, sealing improvements may be necessary to prevent future water entry.
Document Moisture Damage Findings
Documenting crawl space findings helps you tell whether moisture is new, seasonal, spreading, or improving after repairs.
Record Moisture Locations
During inspection, note where moisture or damage appears. Tracking specific locations helps identify recurring patterns and supports future inspections.
Important documentation details include:
- Exact location of moisture signs, using nearby walls, piers, vents, plumbing lines, or access doors as reference points
- Type of damage observed, such as staining, soft wood, wet insulation, standing water, or mold-like growth
- Nearby materials affected, including joists, beams, subfloor, vapor barrier, ductwork, or foundation walls
- Recent weather, plumbing use, humidity conditions, or known leak events before the inspection
Location tracking helps determine whether moisture originates from specific zones such as plumbing areas or foundation corners.
Photograph Visible Damage
Photographs provide valuable visual records of crawl space conditions. Comparing photos from different inspections helps reveal subtle changes that may otherwise go unnoticed.
Photograph key areas such as:
- Water stains and damp zones
- Wood discoloration
- Mold growth
- Damaged insulation
Visual documentation improves communication when professional evaluation becomes necessary.
Track Changes Over Time
Repeated inspections help identify moisture trends. Tracking changes allows homeowners to determine whether moisture conditions are improving, remaining stable, or worsening.
Time-based tracking helps identify:
- Recurring seasonal moisture
- Expanding damage areas
- New moisture locations
- Effectiveness of corrective actions
Evaluate Severity of Moisture Damage
After completing a full inspection, the next step is evaluating the severity of moisture damage. Understanding severity helps determine whether conditions require simple monitoring or immediate professional intervention.
Minor Moisture Damage
Minor damage indicates early moisture exposure without structural weakening. These conditions require attention but may be manageable with preventive measures.
Minor damage indicators include:
- Small damp areas that dry between inspections
- Light surface staining without soft wood
- Slight condensation on pipes, ducts, or vapor barrier surfaces
- Isolated mold-like spotting without widespread growth
Minor damage should be monitored closely to prevent progression.
Moderate Moisture Damage
Moderate damage indicates sustained moisture exposure affecting materials. These conditions often require corrective actions to prevent further deterioration.
Moderate damage indicators include:
- Persistent damp insulation
- Repeated moisture patterns
- Expanding mold growth
- Softened wood surfaces
Moderate damage usually requires corrective measures beyond simple observation.
Severe Moisture Damage
Severe damage indicates advanced moisture exposure that may threaten structural integrity, electrical safety, air quality, or safe access.
Severe damage indicators include:
- Standing water across large areas
- Rotting wood components
- Large mold colonies
- Structural shifting or sagging
Severe conditions require immediate professional attention.
When to Stop and Call a Professional
Some crawl space conditions present safety risks that exceed safe homeowner inspection limits. Recognizing when to stop is an important part of responsible inspection.
Stop inspection and contact a professional if:
- Standing water covers large sections or reaches electrical equipment
- Loose wiring, exposed electrical components, or wet outlets are present
- Strong sewage, chemical, fuel, or musty odors make breathing uncomfortable
- Joists, beams, posts, or subfloor areas appear sagging, rotten, or unstable
- Pest infestation, animal waste, or sharp debris creates safety concerns
At that point, the goal is no longer a homeowner inspection. The crawl space needs a moisture, structural, pest, plumbing, electrical, or remediation professional depending on what hazard is present.
Conclusion
A good crawl space moisture inspection starts with safety, then moves zone by zone through the soil, vapor barrier, insulation, plumbing, foundation walls, joists, beams, posts, and subfloor. The goal is not only to find visible water, but to identify patterns that show where moisture is entering, collecting, or damaging materials.
If you find recurring damp soil, wet insulation, stained framing, soft wood, mold-like growth, standing water, or unsafe conditions, stop treating the inspection as routine. Document the affected areas, compare them over time, and review how to prevent moisture build-up in crawl spaces so the source can be corrected instead of simply monitored.
Key Takeaways
- Start every crawl space inspection with safety, air quality, electrical, and standing water checks.
- Inspect the soil, vapor barrier, insulation, plumbing, HVAC components, foundation walls, joists, beams, posts, and subfloor.
- Look for patterns, not just isolated stains, because repeated moisture often appears in the same low areas, corners, and plumbing zones.
- Use photos, notes, and repeated inspections to track whether crawl space moisture is spreading, improving, or returning seasonally.
- Stop the inspection if standing water, unsafe wiring, strong odors, pests, mold, or unstable framing are present.
- Professional help is needed when moisture damage affects structure, electrical safety, air quality, or safe access.
Frequently Asked Questions About Inspecting Crawl Spaces for Moisture Damage
How often should crawl spaces be inspected for moisture damage?
Crawl spaces should usually be inspected once or twice per year, with extra checks after heavy rain, plumbing leaks, flooding, drainage changes, or new musty odors indoors.
Homes with a history of crawl space moisture may need seasonal photo comparisons so you can tell whether stains, damp soil, or insulation damage are getting worse.
What tools are needed to inspect a crawl space?
Basic crawl space inspection tools include a bright flashlight or headlamp, gloves, protective clothing, knee pads, a camera, and a way to mark or record locations. A moisture meter can help compare suspicious wood with nearby dry-looking wood.
More advanced tools may be needed when hidden water intrusion, mold growth, electrical hazards, or structural damage is suspected.
Is it safe to inspect a crawl space alone?
Inspecting a crawl space alone can be safe when conditions are stable and hazards are minimal. However, caution is always recommended. Crawl spaces may contain hidden risks such as unstable surfaces, electrical hazards, or poor air quality.
When possible, inform another person before entering the crawl space so assistance is available if needed.
What signs indicate serious crawl space moisture damage?
Serious crawl space moisture damage typically includes large areas of standing water, rotting wood, widespread mold growth, or visible structural changes such as sagging supports.
These conditions indicate advanced moisture exposure and usually require professional evaluation to prevent long-term structural failure.
How long does a typical crawl space inspection take?
The length of a crawl space inspection depends on the size of the crawl space and the complexity of the layout. Most basic inspections take between 30 minutes and two hours.
Larger crawl spaces or areas with limited access may require additional time to ensure that all zones are inspected thoroughly.