How to Inspect a Crawl Space Before Encapsulation
Before crawl space encapsulation, inspect for standing water, wet soil, mold, damaged insulation, wood rot, air leaks, open vents, plumbing leaks, and drainage problems. Encapsulation should not begin until active moisture sources and structural concerns are corrected.
This inspection matters because encapsulation seals the crawl space environment. If water, mold, or damaged framing is covered instead of fixed, the new vapor barrier can hide the problem and allow damage to continue behind the system.
This guide explains how to inspect a crawl space before encapsulation and how to decide whether the space is ready, needs repairs, or should be evaluated professionally. Crawl space problems often develop as part of broader moisture risks described in the Structural Moisture Problems in Homes: Causes, Risks, and Repair Guide.
Why Inspection Is Necessary Before Encapsulation
Inspection separates problems encapsulation can help control from problems that must be repaired first. A vapor barrier can reduce ground moisture, but it cannot correct standing water, active leaks, rotten framing, contaminated insulation, or poor exterior drainage.
A crawl space is usually not ready for encapsulation if you find:
- Standing water or muddy soil
- Active plumbing, foundation, or exterior drainage leaks
- Soft, rotten, or visibly damaged framing
- Widespread mold growth or heavy musty odor
- Wet, sagging, or contaminated insulation
- Open vents, loose access doors, or large air gaps that have not been planned for sealing
Preventing Moisture From Being Trapped
One of the primary reasons for inspecting a crawl space is to identify moisture sources before installing vapor barriers and sealing vents.
If standing water or wet soil is present, encapsulation materials may trap moisture inside the sealed environment. Over time, trapped moisture increases humidity and accelerates damage to wood framing and insulation.
Standing water, mud lines, and saturated soil should be treated as readiness failures, not minor issues to cover with a vapor barrier.
Identifying Structural Damage Before Installation
Encapsulation protects structural components from future moisture exposure, but it does not repair damage that already exists. Inspecting framing components helps determine whether repairs are necessary before sealing the crawl space.
Structural inspection should focus on the wood and support components that will be harder to evaluate after the crawl space is sealed:
- Floor joists
- Support beams
- Subfloor panels
- Support posts
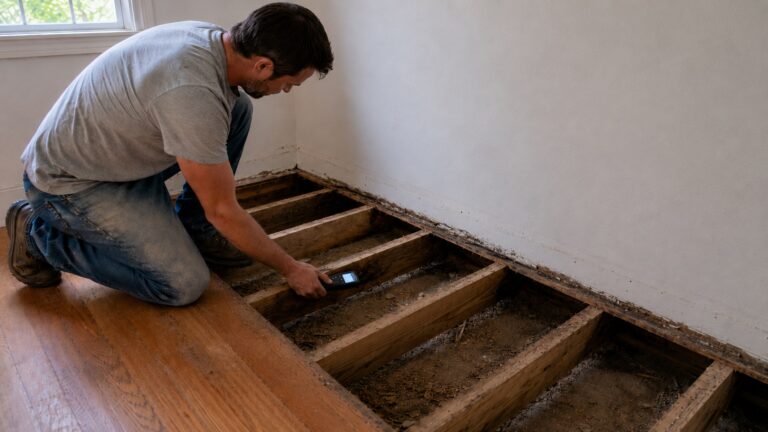
Probe suspicious wood gently with a screwdriver or awl; wood that feels soft, flakes apart, or accepts the tool easily should be evaluated before encapsulation continues.
Damage patterns often resemble those described in Signs of Moisture Damage in Floor Joists, where prolonged humidity weakens wood fibers.
Identifying these problems early prevents encapsulation from covering damaged materials that require repair.
Ensuring Encapsulation Materials Perform Correctly
Encapsulation systems rely on dry surfaces and stable conditions to function effectively. Moisture trapped beneath vapor barriers or inside insulation reduces system performance.
Proper inspection helps ensure:
- Surfaces are dry enough for sealing
- Drainage problems are corrected
- Air leaks are identified
- Humidity levels are evaluated
These preparation steps reduce the likelihood of future mold growth and improve the durability of encapsulation materials.
If you are still evaluating whether encapsulation is the right solution, understanding the system itself is helpful. The full process and function are explained in What Is Crawl Space Encapsulation and How It Works.
Safety Precautions Before Entering a Crawl Space
Crawl space inspection involves physical risks that should not be overlooked. Many crawl spaces contain hazards such as mold exposure, sharp debris, standing water, and electrical risks.
Wear Protective Clothing and Equipment
Protective gear reduces exposure to dust, mold spores, and sharp objects commonly found in crawl spaces.
Recommended protective equipment includes:
- Heavy-duty gloves
- Long-sleeve clothing
- Safety glasses
- N95 mask or respirator, especially if mold, dust, animal waste, or heavy debris is present
- Knee pads
- Durable footwear
Even short inspections expose homeowners to airborne particles and contaminants. Protective gear reduces the risk of respiratory irritation and skin contact with hazardous materials.
Use Proper Lighting for Visibility
Crawl spaces are often poorly lit or completely dark. Proper lighting is essential for identifying damage and avoiding hazards.
Reliable lighting options include:
- Headlamps for hands-free visibility
- High-powered flashlights
- Portable LED lights
Insufficient lighting increases the chance of missing important warning signs such as mold growth or water damage.
Check for Electrical and Water Hazards
Before entering a crawl space, look for potential electrical hazards and standing water. Water and electricity create dangerous conditions that require caution.
Common hazards include:
- Exposed wiring
- Damaged electrical connections
- Standing water near outlets
- Wet equipment or tools
Do not enter if you smell gas, see sewage or contaminated water, find exposed energized wiring, notice animal activity, or feel the floor structure above is unstable. If water is near wiring, outlets, HVAC equipment, or electrical components, stay out until the hazard has been evaluated.
How to Prepare for Crawl Space Inspection
Before entering the crawl space, gather inspection tools, clear the access point, and plan a route. This makes the inspection safer and helps you document moisture, structural, and drainage issues before encapsulation begins.
Gather Essential Inspection Tools
Several basic tools make crawl space inspections easier and more accurate. While professional inspectors use specialized equipment, homeowners can perform meaningful visual inspections with a few simple tools.
Recommended inspection tools include:
- Bright headlamp or flashlight
- Camera or smartphone for documentation
- Moisture meter (optional but helpful)
- Hygrometer to measure humidity
- Notebook or digital checklist
- Measuring tape
Take photos of each wall, corner, pier, plumbing area, wet spot, mold patch, and damaged joist. Label the photos by location so repairs can be compared before and after encapsulation.
If you are unfamiliar with moisture measurement techniques, many of the inspection methods are explained in How to Inspect Crawl Spaces for Moisture Damage, which covers detailed moisture detection practices.
Clear the Crawl Space Entry Area
Before entering the crawl space, ensure the access point is clear and safe. Crawl space doors and hatches often collect debris or become partially blocked over time.
Remove any obstacles that could prevent safe entry, such as:
- Stored materials near access doors
- Loose debris around the opening
- Damaged access panels
- Obstructed pathways
Maintaining clear access helps prevent accidents and allows faster exit if hazards are encountered.
Plan a Systematic Inspection Route
Moving randomly through a crawl space increases the chance of missing important areas. Instead, follow a consistent pattern that covers all sections of the space.
Start at the access opening, move around the perimeter walls, then inspect the center supports, plumbing runs, HVAC equipment, insulation, and subfloor above. Mark each problem area before moving to the next section.
Check for Standing Water or Wet Soil
Standing water and wet soil conditions are among the most critical issues to identify before encapsulation. Moisture trapped beneath vapor barriers creates long-term humidity problems and increases the risk of mold growth.
Inspecting soil conditions helps determine whether drainage repairs are required before encapsulation can begin.
Look for Visible Water Accumulation
Standing water may appear as shallow pools, muddy areas, or saturated soil patches. Even small areas of visible water signal drainage failure or moisture intrusion.
Common locations where water collects include:
- Low spots in crawl space soil
- Areas near foundation walls
- Locations beneath plumbing lines
- Regions near exterior drainage paths
Water accumulation patterns often resemble the conditions described in Signs of Standing Water in Crawl Spaces, where persistent pooling signals serious moisture risk.
If water remains after rainfall or seasonal changes, drainage correction is required before encapsulation.
Identify Signs of Wet or Saturated Soil
Soil may remain saturated even when water is not visibly pooling. Wet soil releases moisture vapor continuously, increasing crawl space humidity.
Indicators of saturated soil include:
- Dark soil coloration
- Sticky or muddy texture
- Water stains along foundation walls
- Damp odors near the ground surface
These signs mean the crawl space may need drainage correction, soil grading improvements, sump protection, or drying time before encapsulation materials are installed.
Check for Evidence of Previous Flooding
Past flooding events often leave visible evidence inside crawl spaces. Even if the area appears dry during inspection, signs of previous flooding may indicate recurring water problems.
Flooding indicators include:
- Sediment deposits along walls
- Water lines on structural materials
- Debris accumulation from moving water
- Discoloration on foundation surfaces
These signs suggest that water intrusion has occurred previously and may return during future rainfall events.
Inspect Structural Wood Components
Structural components carry the weight of the home and must remain strong and stable. Moisture exposure weakens wood over time, making structural inspection one of the most important steps before encapsulation.
Encapsulation protects structures from future moisture but does not repair existing damage.
Examine Floor Joists and Support Beams
Floor joists and beams form the primary support system beneath most homes. These components should be inspected carefully for signs of moisture damage.
Early warning signs include:
- Dark staining on wood surfaces
- Surface mold growth
- Hairline cracks
- Minor warping
These indicators suggest moisture exposure has occurred and may still be active.
Structural warning patterns often follow those described in Signs of Moisture Damage in Floor Joists, where humidity gradually weakens framing materials.
Check Subfloor Panels for Damage
The subfloor forms the base of the flooring system above the crawl space. Moisture exposure can cause subfloor materials to weaken or deteriorate.
Subfloor damage indicators include:
- Delamination or separation of wood layers
- Surface discoloration
- Soft or spongy wood texture
- Sagging areas between joists
Subfloor damage often develops gradually and may not be visible from inside the home until advanced stages.
Inspect Support Posts and Structural Connections
Support posts transfer structural loads from the home to the foundation. These components must remain stable and free from moisture damage.
Look for:
- Rot at the base of wooden posts
- Rust on metal connectors
- Shifting or leaning supports
- Cracked or deteriorating fasteners
Damage to support components increases the risk of structural movement and may require repairs before encapsulation begins.
Look for Mold Growth and Surface Damage
Mold growth is one of the most important conditions to identify before crawl space encapsulation. Encapsulation can reduce future mold risk by controlling moisture, but it does not remove existing mold colonies or make contaminated materials safe.
Even small patches should be documented because they often point to condensation, wet insulation, poor airflow, or recurring soil moisture.
Identify Common Mold Growth Locations
Mold usually appears on materials that remain damp or poorly ventilated. Crawl spaces contain many surfaces where moisture accumulates naturally.
Common mold locations include:
- Floor joists and support beams
- Subfloor panels
- Insulation facing materials
- Foundation walls
- Stored materials or debris
Early mold growth may appear as small dark spots or faint discoloration. More advanced mold may appear fuzzy, patchy, or widespread across surfaces.
These mold patterns often resemble the growth stages described in Signs of Mold Growth in Crawl Spaces, where recurring humidity allows colonies to expand.
Determine Mold Severity Before Encapsulation
Not all mold contamination requires full remediation, but widespread growth must be addressed before encapsulation begins.
Signs that mold removal may be required include:
- Mold covering multiple surfaces
- Strong musty odors throughout the crawl space
- Visible mold extending across structural components
- Recurring mold after previous cleaning attempts
Encapsulation installed over heavy mold contamination may trap spores inside the crawl space and allow growth to continue.
If large areas of contamination are present, cleanup procedures similar to those described in How to Remove Mold Permanently may be necessary before encapsulation begins.
Examine Insulation Conditions
Insulation condition provides valuable clues about crawl space moisture history. Wet or damaged insulation often indicates long-term humidity exposure.
Before encapsulation, insulation should be inspected carefully to determine whether replacement or drying is required.
Look for Sagging or Detached Insulation
Sagging insulation is one of the most common signs of moisture exposure. Fiberglass insulation absorbs moisture and becomes heavy, causing it to detach from joists.
Signs of insulation failure include:
- Sections hanging loosely from framing
- Collapsed insulation layers
- Visible moisture stains
- Mold growth on insulation backing
These conditions often follow the humidity exposure patterns explained in Signs of Moisture in Crawl Spaces, where persistent dampness damages materials.
Check for Insulation Mold Contamination
Mold frequently develops on insulation surfaces exposed to high humidity. Mold growth on insulation indicates that moisture has remained present for extended periods.
Contaminated insulation should not be left in place during encapsulation because it may continue releasing spores into the sealed environment.
Wet, moldy, or rodent-contaminated insulation should usually be removed before encapsulation so damaged material is not sealed inside the crawl space.
Evaluate Insulation Coverage and Condition
Even insulation that appears dry should be evaluated for proper coverage. Gaps in insulation reduce energy efficiency and allow moisture movement.
Look for:
- Missing insulation sections
- Uneven coverage
- Loose insulation attachments
- Compressed or deteriorated material
Correcting insulation problems before encapsulation helps maintain consistent crawl space conditions.
Identify Air Leaks and Vent Conditions
Air leaks, open vents, loose access doors, and utility gaps show where humid outdoor air can enter the crawl space. These areas should be documented before encapsulation because they affect sealing work and humidity control.
Inspect Crawl Space Vents
Traditional crawl spaces use vents to promote airflow, but open vents often introduce humid air into the space.
During inspection, examine each vent for:
- Open or damaged vent covers
- Broken screens
- Gaps around vent frames
- Signs of air movement or debris entry
Vent-related moisture conditions often follow patterns described in Signs of Poor Crawl Space Ventilation, where airflow contributes to condensation and humidity buildup.
Check Around Pipes and Utility Openings
Utility penetrations create common air leak pathways. Gaps around pipes, cables, and duct connections allow outside air to enter the crawl space.
Look for:
- Open gaps around plumbing lines
- Spaces around electrical wiring
- Loose duct connections
- Unsealed wall penetrations
These openings allow humid air to circulate freely and increase condensation risk.
Inspect Access Doors and Panels
Crawl space access doors often contain gaps that allow air infiltration. These openings must be sealed properly during encapsulation.
Inspection should confirm:
- Access panels fit tightly
- No visible daylight appears around edges
- Seals remain intact
- Door materials remain undamaged
Sealing access points improves moisture control and reduces long-term humidity exposure beneath the home.
Evaluate Drainage and Water Entry Risks
Drainage conditions outside and around the crawl space play a major role in long-term moisture control. Even well-installed encapsulation systems can fail if water continues entering the crawl space from surrounding soil or foundation openings.
Inspecting drainage risks helps identify problems that must be corrected before encapsulation begins.
Check Exterior Grading Around the Foundation
Soil grading directs water away from the foundation. Improper grading allows rainwater to flow toward the crawl space, increasing the risk of moisture intrusion.
Look for signs such as:
- Soil sloping toward the foundation
- Water pooling near foundation walls
- Erosion channels directing water toward the home
- Low areas that collect rainfall
Drainage problems can push water toward foundation openings, vents, pipe penetrations, cracks, and low soil areas around the crawl space.
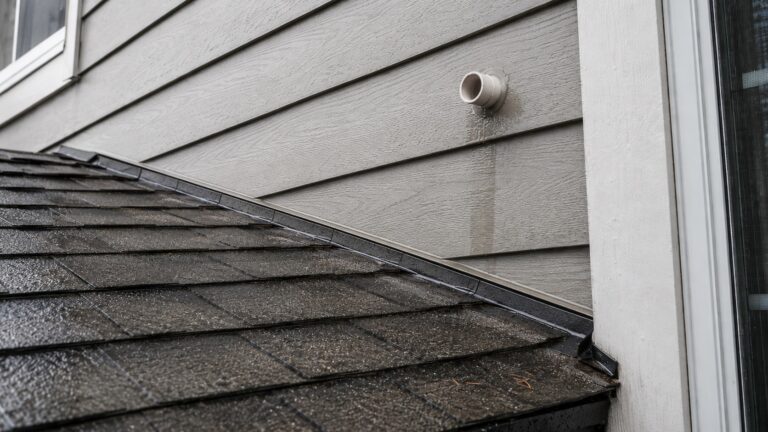
Inspect Gutters and Downspouts
Gutters and downspouts control roof runoff and direct water away from the home. When these systems fail, water accumulates near the foundation and increases crawl space moisture risks.
Check for:
- Clogged or overflowing gutters
- Missing downspout extensions
- Downspouts discharging water near the foundation
- Visible overflow during rainfall
Improving gutter performance reduces the amount of water entering soil surrounding the crawl space.
Look for Foundation Cracks or Entry Points
Foundation openings allow water to enter crawl spaces during heavy rain or seasonal flooding. These entry points may not be obvious without careful inspection.
Inspect for:
- Cracks in foundation walls
- Gaps around pipe penetrations
- Deteriorated sealing materials
- Water stains on foundation surfaces
Water stains, damp soil near the wall, and repeated puddling after storms usually mean water is entering from outside and should be corrected before encapsulation.
Signs Repairs Are Needed Before Encapsulation
Not every crawl space is immediately ready for encapsulation. Some conditions must be repaired before sealing the space. Identifying these problems early prevents system failure and reduces future repair costs.
Encapsulation should only occur after major moisture and structural problems have been addressed.
Active Water Leaks or Ongoing Moisture Entry
Encapsulation cannot stop active water leaks. If water continues entering the crawl space, sealing the area may trap moisture and worsen damage.
Signs that leaks must be repaired include:
- Visible water entering during rainfall
- Persistent wet soil conditions
- Water dripping from pipes
- Recurring standing water after storms
If these conditions are present, encapsulation may still be appropriate later, but the crawl space is not ready until the moisture source is corrected.
Severe Mold Contamination
Heavy mold contamination should be addressed before encapsulation begins. Mold trapped inside sealed crawl spaces may continue spreading if moisture conditions remain favorable.
Large mold colonies may require professional removal to restore safe conditions before encapsulation.
Mold contamination patterns often match those described in Signs of Mold Growth in Crawl Spaces, where extensive growth signals persistent humidity exposure.
Structural Damage Requiring Repair
Encapsulation protects structural materials but does not repair weakened wood or damaged components. If structural damage is already present, repairs must be completed first.
Warning signs that repairs may be necessary include:
- Soft or crumbling wood
- Sagging floors above the crawl space
- Detached or weakened support posts
- Visible structural movement
Ignoring these conditions increases the risk of structural failure over time.
When Professional Inspection Is Recommended
Homeowners can perform a basic visual inspection, but professional evaluation is recommended when the crawl space has standing water, widespread mold, suspected wood damage, electrical hazards, drainage failures, or unclear moisture sources.
When Moisture Problems Are Widespread
If multiple areas of the crawl space show moisture damage, professional inspection is strongly recommended.
Examples of widespread damage include:
- Mold covering large surfaces
- Persistent damp conditions throughout the crawl space
- Standing water across multiple areas
- Structural discoloration affecting many components
These conditions often indicate systemic moisture problems rather than isolated issues.
When Structural Damage Is Suspected
Professional evaluation becomes critical when structural stability is uncertain. Weak or damaged structural components may require engineering assessment before encapsulation.
Structural concerns include:
- Floor sagging or bouncing
- Uneven floor surfaces
- Shifting support posts
- Visible cracking in structural materials
Addressing these risks protects long-term structural stability.
When Moisture Sources Are Difficult to Identify
Hidden moisture sources may require advanced detection methods. Professional inspectors use tools such as moisture meters, thermal imaging devices, and air quality monitors.
These tools help locate concealed leaks and confirm humidity levels that may not be visible during visual inspection.
Frequently Asked Questions About Crawl Space Inspection Before Encapsulation
Can I inspect my crawl space myself?
Yes, homeowners can perform basic visual inspections using proper safety equipment. However, professional inspections are recommended when structural damage or widespread moisture problems are suspected.
What tools help inspect crawl spaces effectively?
Useful tools include a headlamp, flashlight, camera, hygrometer, moisture meter, gloves, and a checklist. Photos and readings are especially helpful when comparing crawl space conditions before and after repairs.
What problems prevent encapsulation from being installed?
Encapsulation should not begin when standing water, active leaks, structural damage, or severe mold contamination are present. These issues must be corrected first.
How long does a crawl space inspection usually take?
A basic homeowner inspection may take 30–60 minutes for a small, accessible crawl space. Larger spaces, tight access, standing water, heavy insulation damage, or structural concerns can make the inspection take several hours or require a professional.
Is professional inspection required before encapsulation?
Professional inspection is not always required for a dry, accessible crawl space. It is strongly recommended when there is standing water, widespread mold, suspected wood rot, electrical risk, sewage, or unclear moisture entry.
Final Inspection Decision
A crawl space should be inspected for water, wet soil, mold, damaged insulation, structural wood damage, air leaks, vent problems, and exterior drainage risks before encapsulation begins.
If the space is dry, structurally sound, and free of active moisture sources, encapsulation can help stabilize conditions. If standing water, mold, rotten wood, or ongoing leaks are present, repairs should come first.
Key Takeaways
- Inspection is essential before installing crawl space encapsulation.
- Standing water and wet soil must be corrected before sealing the crawl space.
- Structural wood components should be evaluated for moisture damage.
- Mold contamination should be addressed before encapsulation begins.
- Air leaks and vent openings allow moisture to enter crawl spaces.
- Drainage conditions around the foundation strongly influence crawl space moisture.
- Professional inspection is recommended when moisture or structural problems are widespread.
One Comment
Comments are closed.