How to Check for Chimney Water Intrusion in Attics
Chimney water intrusion often becomes visible in the attic before it shows up as a major ceiling stain, fireplace leak, or damaged interior wall. Because the chimney passes through the roof system, water that enters around the crown, cap, flashing, mortar joints, or nearby roofing can appear first on attic roof decking, rafters, insulation, or framing near the chimney.
This inspection focuses on what you can see from inside the attic around the chimney. It helps identify evidence of water intrusion, but it does not replace an exterior inspection of the crown, flashing, cap, masonry, and roof surface. The goal is to recognize attic-side warning signs early so the source can be traced before moisture spreads into insulation, ceiling drywall, structural wood, or finished living spaces.
Because chimneys interrupt the roof surface, even a small failure in the crown, flashing, cap, mortar, or roof-to-chimney joint can leave clues inside the attic. This attic inspection is one part of understanding how water enters homes through structural gaps.
Why Chimney Water Intrusion Often Shows Up in the Attic First
The attic sits directly below the roof deck, so it is often the first interior space where chimney-related water intrusion becomes visible. Water entering near the chimney may soak the underside of roof sheathing, darken rafters, drip onto insulation, or follow framing members before it reaches the ceiling below.
A homeowner may not notice anything in the living area at first. The ceiling may look normal while the attic already has damp insulation, rusted nail tips, water trails, or stained sheathing near the chimney. By the time a brown ceiling stain appears below, the leak may have already been active through several rain events.
Chimney water intrusion can also be confusing because the visible stain is not always directly below the entry point. Water may enter at the roof-to-chimney joint, follow sheathing or framing, and drip somewhere else. A stain near the chimney is a clue, not a final diagnosis.
Several chimney-related defects can create attic moisture:
- Loose, rusted, or separated chimney flashing
- Cracks in the chimney crown
- Gaps around the flue or chimney cap
- Deteriorated mortar joints or porous masonry
- Roof covering damage next to the chimney
- Wind-driven rain entering weak chimney transitions
- Water traveling from a nearby roof leak and appearing near the chimney
Because several sources can produce similar attic symptoms, inspect the stain pattern, affected materials, direction of water trails, insulation condition, and weather timing before deciding which exterior chimney details need closer inspection.
Safety Precautions Before Inspecting the Attic
Before entering the attic, treat this as a safety task, not a quick look. Attics can contain exposed framing, loose insulation, nails, low clearances, electrical wiring, poor lighting, extreme heat, and weak walking areas.
Use a bright flashlight or headlamp, wear gloves, long sleeves, eye protection, and a dust mask or respirator if insulation dust, animal debris, or mold-like growth may be present. Bring a phone or camera so you can photograph stains without disturbing materials unnecessarily.
Step only on framing members, attic walk boards, or safe platforms. Do not step between joists onto ceiling drywall. Ceiling drywall is not designed to support body weight, and a misstep can cause serious injury and damage the ceiling below.
Avoid entering the attic if there is active dripping near electrical wiring, visible arcing, wet electrical boxes, strong moldy odor, animal activity, damaged framing, or unstable access. Also avoid attic inspection during extreme heat. If access is unsafe, hire a roofing, chimney, or home inspection professional instead.
If insulation near the chimney looks wet, stained, compressed, or moldy, do not immediately pull it apart with bare hands. Wet insulation can hide stained drywall, damp framing, sharp fasteners, or mold-like contamination. Start with visual inspection and photos, then disturb materials only if it is safe and necessary.
When to Inspect the Attic Around a Chimney
The best time to inspect the attic around a chimney is soon after the weather condition that may have caused the moisture. If you inspect only during a long dry period, older stains may be visible, but active moisture may be harder to confirm.
Inspect the attic around the chimney after heavy rain, wind-driven rain, snow melt, freeze-thaw weather, or any storm that pushed water against the chimney side of the roof. Wind-driven rain is especially useful for testing weak flashing joints, cracked masonry, crown openings, or roof transitions that may stay dry during gentle rainfall.
You should also inspect if you notice indoor clues below or near the chimney. These may include ceiling discoloration, peeling paint, musty odors, damp drywall, brown rings, or recurring stains that appear after storms. Even if the ceiling stain is small, attic inspection can show whether water is collecting above the finished surface.
Good inspection times include:
- Within 24 to 48 hours after heavy rain
- After wind-driven storms
- After snow or ice begins melting near the chimney
- After seeing new ceiling staining below the chimney area
- Before and after chimney flashing or crown repairs
- During annual roof and chimney maintenance
If you are trying to determine whether a stain is active, take photos from the same angle each time you inspect. Mark the date and weather conditions. A stain that grows darker, spreads, smells mustier, or feels damp after rain is more concerning than an old dry stain that remains unchanged through several storms.
Where to Look First Around the Chimney
Once you are safely inside the attic, begin with the area where the chimney passes through or beside the roof structure. Use your flashlight to inspect the roof decking, rafters, framing, insulation, and ceiling material around the chimney. Move slowly and look for changes in color, texture, moisture pattern, and odor.
Start above the chimney-side ceiling area if you know where the interior stain appeared. Then widen your inspection outward. Water may enter near the chimney but travel along framing before dripping, so do not limit your inspection to one small spot.
A useful rule is to trace the highest visible mark first. The lowest stain may only show where water dripped, while the highest stain or first darkened area often gets you closer to the actual entry path.
Check these areas first:
- The underside of roof sheathing directly beside the chimney
- Rafters or trusses that meet near the chimney opening
- Insulation below the chimney-side roof deck
- Ceiling drywall below the chimney area
- The inside face of any chimney chase or masonry surface visible from the attic
- Nail tips, straps, brackets, or metal fasteners near the chimney
- Framing members that show water trails running away from the chimney
Look from several angles. A stain may be invisible when viewed straight on but obvious when the flashlight is held low across the surface. Side lighting can reveal water tracks, raised grain on wood, surface residue, or slight darkening that normal overhead light misses.
If the moisture appears to start high on the roof deck near the chimney and then travel downward, the source may be near the roof-to-chimney joint or upper chimney area. If the staining is widespread across the roof sheathing and not concentrated near the chimney, attic condensation or broader roof moisture may be involved. In that case, compare the findings with common signs of roof condensation in attics before assuming the chimney is the only issue.
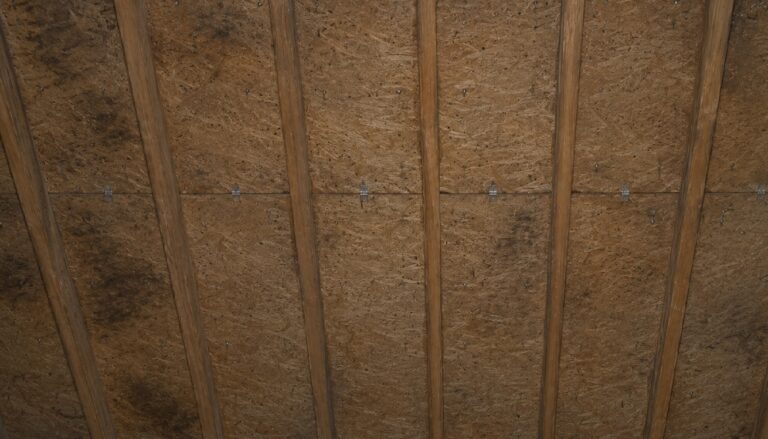
Signs of Water Intrusion on Roof Decking and Framing
Roof decking and attic framing often show the first durable evidence of chimney water intrusion. Wood holds stains, rust marks, and moisture patterns long after the surface has dried. That makes the attic useful for tracing where water has been traveling.
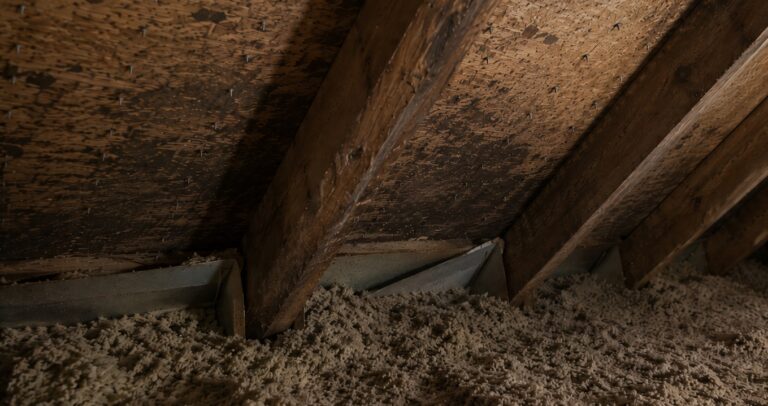
Dark Stains on Roof Sheathing
Dark staining on the underside of roof sheathing near the chimney is one of the most common attic clues. The stain may appear brown, gray, black, or amber depending on the wood, age of the leak, dust, and moisture history. Fresh staining may look darker at the edges or feel slightly cool and damp compared with surrounding wood.
Pay attention to the shape of the stain. A narrow vertical or diagonal trail may suggest water running along the roof deck or framing. A broad, uneven dark area may suggest repeated wetting, wet insulation contact, or condensation. Stains that begin near the chimney penetration deserve closer exterior inspection.
Rusted Nails or Fasteners
Rusted nail tips, screws, straps, or brackets near the chimney can indicate repeated moisture exposure. A single rusty nail may not prove a chimney leak, but a cluster of rusted fasteners near stained sheathing is more meaningful.
Rust is especially useful when the wood is dry at the time of inspection. Metal may show a history of moisture even after the surface has dried. If rust is concentrated near the chimney while nearby roof areas look normal, the chimney area should remain a primary suspect.
Water Trails on Rafters or Trusses
Water does not always fall straight down. It may run along rafters, trusses, blocking, or sheathing seams before dripping. Look for long narrow stains, drip marks, dusty streaks, or darker lines following wood grain.
If a water trail leads back toward the chimney, inspect the roof deck and framing above that point. If the trail leads away from the chimney, the visible moisture may have traveled from another roof defect before appearing near the chimney area.
Soft or Deteriorated Wood
Wood that is soft, swollen, delaminated, crumbly, or visibly deteriorated suggests a longer-term moisture problem. Do not probe aggressively with sharp tools unless you know what you are doing; light pressure with a gloved hand may reveal whether wood feels unusually soft compared with nearby dry framing.
Serious wood deterioration near a chimney should be evaluated professionally. The issue may involve repeated water entry, hidden rot, structural weakening, or a leak that has been active longer than the visible stain suggests.
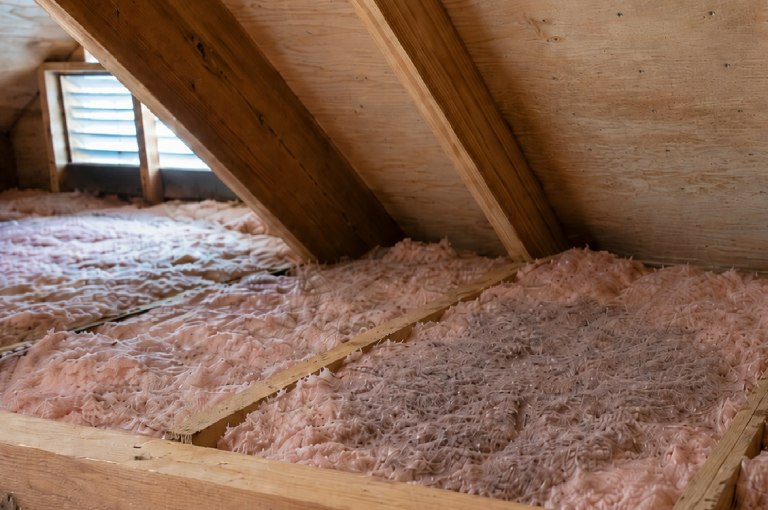
How to Inspect Insulation Around the Chimney
Insulation near the chimney can hide moisture that is not obvious from the roof decking alone. Water may drip from sheathing, run down framing, or collect on top of ceiling drywall before soaking into the insulation. Because insulation can hold moisture against wood and drywall, it deserves careful attention during a chimney water intrusion inspection.
Start with a visual inspection before touching anything. Look for insulation that appears darker, matted, compressed, displaced, crusty, or stained. Wet insulation often loses its loft and may sit flatter than surrounding dry insulation. Fiberglass may look darker or clumped. Loose-fill insulation may appear compacted, uneven, or discolored in the leak area.
Use your flashlight from multiple angles. Moisture patterns in insulation can be subtle, especially if the surface has partly dried. Compare the insulation near the chimney with insulation farther away. If the area around the chimney looks darker, flatter, or more disturbed, water may have been collecting there.
If it is safe to check more closely, use gloves and avoid stirring up dust. Do not grab insulation with bare hands. Gently lift only a small area if needed to check whether the ceiling drywall or framing below is stained or damp. If the insulation is saturated, moldy, contaminated by animals, or near electrical components, stop and call a professional.
Wet insulation near a chimney is more serious than a surface stain alone. It can trap moisture against ceiling materials, reduce thermal performance, hide drywall staining, and keep nearby wood damp. Even if the roof deck looks dry at the moment, damp insulation may show that water has been entering repeatedly or recently.
How to Tell If the Moisture Is Active or Old
One of the most important parts of attic inspection is determining whether the moisture is active or left over from an old leak. A dry stain may look alarming, but it may not be currently leaking. At the same time, an old-looking stain can reactivate during certain storms.
Begin by observing the stain without disturbing it. Active moisture may show darker edges, a cool damp feel nearby, visible droplets, wet insulation, musty odor, shiny surfaces, or fresh water tracks. Old stains are more likely to be dry, dull, stable, and unchanged after rain.
Do not rely on appearance alone. A moisture meter can help compare stained wood with nearby unstained wood, but readings should be interpreted carefully. Surface contamination, wood type, temperature, and meter type can affect results, so the most useful comparison is usually between the stained area and a clearly dry area of the same material nearby.
Photographs are one of the simplest monitoring tools. Take a clear photo of the stain from the same angle and distance after each inspection. Recheck after heavy rain, wind-driven rain, or snow melt. If the stain grows, darkens, spreads, develops a stronger odor, or makes nearby insulation damp, treat it as an active or recurring moisture problem.
If the stain appears dry but is located directly around the chimney, do not ignore it. The leak may only occur under certain conditions, such as rain blowing against one side of the chimney, water pooling near flashing, or snow melting around the chimney base. A stain that stays dry during light rain may still become active during harsher weather.
How to Separate Chimney Water Intrusion From Condensation
Attic moisture near a chimney is often caused by exterior water entry, but condensation can sometimes create confusing symptoms. Before assuming the chimney is leaking, look at the moisture pattern across the attic.
Chimney water intrusion usually has a localized pattern. Staining, damp insulation, rusted fasteners, or water trails are often concentrated near the chimney penetration, roof-to-chimney joint, or chimney-side framing. The marks may be worse on one side of the chimney, especially the side exposed to wind-driven rain.
Condensation is often more widespread. It may appear across large areas of roof sheathing, especially on cold surfaces. You may see many rusted nail tips across the attic, frost patterns in cold weather, damp sheathing away from the chimney, or moisture concentrated where warm indoor air enters the attic through air leaks.
Ventilation and air leakage clues also matter. If bath fans vent into the attic, ductwork is disconnected, insulation is missing, or attic airflow is poor, condensation may be part of the problem. In that case, moisture near the chimney may not be from rain entry at all. It may be one visible area within a broader attic humidity issue.
Weather timing can help separate the two. If moisture appears after wind-driven rain but not during cold dry weather, exterior water intrusion is more likely. If moisture appears during cold weather without rain, especially across multiple roof surfaces, condensation becomes more likely.
Sometimes both problems exist together. A chimney flashing leak may wet one area, while poor attic ventilation causes condensation elsewhere. That is why inspection should compare the chimney area with the rest of the attic before deciding the source. If moisture is widespread instead of chimney-focused, compare your findings with common signs of roof condensation in attics.
Exterior Chimney Problems That Can Cause Attic Moisture
Attic inspection shows where water has been appearing inside, but the source is usually outside. Once attic evidence points toward the chimney area, use the attic clues to decide which exterior detail needs closer inspection: flashing, crown, cap, mortar, masonry, or nearby roofing.
Cracked Chimney Crowns
A cracked chimney crown can allow water to enter from the top of the chimney and move downward into masonry or nearby roof areas. If attic staining appears near the upper chimney area, especially after repeated rain, it may be worth checking whether the crown is cracked, flat, crumbling, or separating around the flue. The next exterior follow-up is to inspect chimney crowns for cracks.
Flashing Gaps or Rusted Flashing
Flashing protects the roof-to-chimney intersection. If step flashing, counterflashing, or sealant joints are loose, rusted, lifted, or poorly integrated with the roof covering, water may enter beside the chimney and show up on attic sheathing or framing.
From inside the attic, flashing-related leaks often appear near the lower sides of the chimney opening or along roof decking close to the chimney base. From outside, they may be associated with separated metal, old patching, rust, missing mortar at counterflashing, or debris trapped against the chimney. When these conditions are present, the next step is usually to inspect chimney flashing for leaks and then decide whether the damage has reached the point where chimney flashing needs replacement.
Damaged Chimney Caps or Flue Openings
A missing, loose, or damaged chimney cap can allow rain to enter the flue area. Depending on chimney design and the location of the opening, water may not always appear directly in the attic, but cap problems can contribute to chimney moisture, odors, rust, and masonry dampness.
If attic moisture is paired with water marks inside the firebox, rusted damper parts, or strong chimney odors after rain, the cap and flue area should be inspected along with the crown and flashing.
Porous Brick, Deteriorated Mortar, or Masonry Absorption
Older masonry can absorb wind-driven rain, especially if mortar joints are cracked, recessed, or deteriorated. Water entering through porous brick or failed mortar may not follow the same pattern as a flashing leak. It may show as damp masonry, staining on the chimney surface, or moisture that appears after long soaking rains.
Masonry absorption is different from a single open gap. It often requires a broader chimney evaluation, especially if the chimney also has spalling brick, loose mortar, efflorescence, or repeated dampness below the crown. If attic evidence points toward the masonry rather than the roof joint, the next step is to inspect chimney mortar for moisture damage.
Nearby Roof Defects
Not every stain near a chimney is caused by the chimney itself. Damaged shingles, failed underlayment, nail pops, valleys, roof penetrations, or upper roof leaks may send water toward the chimney area. If the water trail in the attic seems to begin above or beside the chimney rather than at the chimney opening, widen the inspection area.
When Attic Chimney Moisture Needs Professional Inspection
Some attic moisture clues can be monitored briefly, but others should be inspected professionally. Chimney-related leaks can involve several exterior components at once, including flashing, crown, cap, masonry, roof covering, and framing. If the attic evidence suggests active or recurring water intrusion, do not treat it as a cosmetic stain.
Call a qualified roofing, chimney, masonry, or home inspection professional if you find active dripping, wet insulation, soft wood, repeated staining, mold-like growth, rusted fasteners across the chimney area, or stains that keep returning after repairs. These signs suggest that water may still be entering or that the leak has affected materials beyond the visible surface.
Professional inspection is also important when the exterior chimney cannot be inspected safely. The attic may show the evidence, but the source is usually outside. A professional can inspect the chimney crown, cap, flashing, counterflashing, mortar joints, roof surface, and nearby penetrations to find the actual water-entry path.
Do not ignore attic moisture near electrical components. If water is dripping near wiring, junction boxes, recessed lights, or electrical equipment, avoid contact, stay out of the wet area, and call the appropriate professional. Water and electrical systems should never be treated casually.
Professional help is especially appropriate when:
- Insulation near the chimney is wet, stained, compressed, or moldy.
- Roof sheathing feels soft, swollen, or deteriorated.
- Water stains grow after rain or snow melt.
- Moisture appears only during wind-driven storms.
- Flashing has already been patched but attic stains continue.
- The chimney crown, cap, or mortar joints show visible exterior damage.
- The roof is too steep, high, wet, icy, or fragile to inspect safely.
- Ceiling stains have started appearing below the attic moisture area.
If the attic evidence points to recurring chimney moisture, the goal is not only to dry the affected area. The source must be corrected. Once the source is handled, the attic materials should be checked again to confirm that moisture is no longer returning.
What to Do After You Find Moisture Near the Chimney
If you find evidence of chimney water intrusion in the attic, document it before disturbing materials. Take photos of the stain pattern, wet insulation, roof decking, rafters, fasteners, and the chimney area. If possible, photograph the same area again after the next rain so you can tell whether the stain is changing.
Next, decide whether the pattern is localized or widespread. Localized staining near the chimney points toward the chimney, flashing, or nearby roof area. Widespread attic moisture may suggest condensation, ventilation problems, or a broader roof issue.
Do not simply cover the stain, repaint the ceiling, or replace wet insulation without addressing the source. If water is still entering, new materials can become wet again. The most important step is to identify and correct the water-entry path before finishing cosmetic repairs.
After the source has been repaired, continue monitoring the attic through several rain events. Recheck the area after heavy rain, wind-driven rain, and seasonal weather changes. Long-term prevention depends on confirming that the moisture does not return.
For a broader chimney maintenance strategy, use the attic findings as part of a plan to prevent water leaks around chimneys. For whole-home moisture prevention, chimney inspection should also fit into a larger effort to find, fix, and prevent moisture problems in homes.
FAQ About Chimney Water Intrusion in Attics
Why is my attic wet near the chimney?
Your attic may be wet near the chimney because water is entering through failed flashing, a cracked chimney crown, damaged masonry, a loose cap, nearby roof defects, or wind-driven rain. Condensation can also mimic a leak, especially if moisture is widespread across the attic instead of concentrated near the chimney.
Can chimney flashing leaks show up in the attic?
Yes. Chimney flashing leaks often show up on roof decking, rafters, insulation, or ceiling materials near the chimney. Because flashing protects the roof-to-chimney intersection, gaps or deterioration in that area can allow water to enter the attic before it reaches the living space.
How do I know if chimney water stains are old or active?
Old stains usually stay dry and unchanged through multiple storms. Active stains may darken, spread, smell musty, feel damp nearby, or appear with wet insulation after rain. Photograph the same area after storms to compare changes over time.
Can condensation look like a chimney leak?
Yes. Condensation can create dark sheathing, rusted nail tips, damp insulation, or musty odors. The difference is usually the pattern. Chimney leaks are often localized near the chimney, while condensation is more likely to appear across larger areas of the attic roof deck.
Should wet insulation near a chimney be removed?
Wet insulation near a chimney may need removal if it is saturated, contaminated, moldy, compressed, or keeping nearby ceiling materials damp. However, the water source should be corrected first. If insulation is heavily wet, close to wiring, or has mold-like growth, professional evaluation is safer.
When should I call a professional for attic moisture near a chimney?
Call a professional if you see active dripping, wet insulation, repeated stains, soft wood, mold-like growth, rusted fasteners, exterior chimney damage, or unsafe roof access. Professional inspection is also wise if previous repairs did not stop the moisture.
Final Attic Chimney Leak Check
A good attic chimney inspection should answer three questions: where is the highest visible moisture clue, is the staining localized near the chimney or widespread across the attic, and does the area change after rain? If the evidence points to active or recurring moisture, the next step is an exterior inspection of the chimney crown, flashing, cap, masonry, and surrounding roof surface.
Quick Chimney Attic Inspection Checklist
- Chimney water intrusion often appears in the attic before it becomes visible inside the living space.
- Inspect roof decking, rafters, insulation, fasteners, and ceiling materials around the chimney.
- Water stains near the chimney do not always prove the exact entry point because water can travel along framing.
- Localized staining near the chimney suggests a chimney, flashing, crown, or nearby roof issue.
- Widespread attic moisture may point to condensation or ventilation problems instead of a chimney leak alone.
- Wet insulation, active dripping, soft wood, recurring stains, or unsafe access should be handled professionally.

2 Comments
Comments are closed.