How to Inspect Dishwasher Hoses for Leaks (Step-by-Step Inspection Guide)
Dishwasher hoses are one of the most common sources of hidden water leaks. Because these hoses carry pressurized water in and wastewater out, even minor wear or loose connections can lead to slow moisture buildup beneath or behind the appliance. Inspecting dishwasher hoses regularly helps identify early warning signs before moisture spreads into cabinets, flooring, or subfloor materials.
Many homeowners first suspect a hose problem after noticing damp flooring, cabinet swelling, or musty odors near the appliance. If you have already seen early warning signs, compare them with the signs of water leaks under dishwashers to confirm whether hose inspection should be your next step. For broader plumbing leak damage patterns, see how plumbing leaks cause structural damage.
To inspect dishwasher hoses, turn off power, shut off the water supply, check the supply hose at the shutoff valve, follow the visible hose path, inspect the dishwasher inlet connection, examine the drain hose and clamps, and look for moisture trails, residue, cracks, bulging, corrosion, or softened nearby materials.
Where Dishwasher Hoses Are Located
Before inspecting hoses, it helps to understand where they are typically located. Most dishwashers use two main hoses: a water supply hose that brings clean water into the unit and a drain hose that removes wastewater after each cycle.
Water Supply Hose Location
The water supply hose connects the household water supply to the dishwasher. This hose carries pressurized water and is one of the most common sources of hidden leaks.
In most installations, the supply hose is located under the kitchen sink. It typically connects to a small shutoff valve mounted along the sink cabinet wall. From there, the hose runs through a cabinet opening toward the dishwasher base.
Common places to locate the supply hose include:
- Under the kitchen sink near the water shutoff valve
- Inside the cabinet wall leading toward the dishwasher
- Behind the dishwasher near the lower rear panel
Because this hose remains under constant water pressure, small weaknesses may eventually allow moisture to escape. Early inspection helps detect these issues before visible leaks occur.
Drain Hose Location
The drain hose removes wastewater from the dishwasher after each wash cycle. Unlike the supply hose, the drain hose operates intermittently, carrying water only during draining phases.
Most drain hoses are also routed through the cabinet under the sink. They typically connect to either the garbage disposal unit or a dedicated drain connection on the sink plumbing.
Common drain hose locations include:
- Attached to the garbage disposal inlet
- Connected to the sink drain pipe
- Looped upward beneath the sink before descending to the drain
The upward loop in the drain hose helps prevent wastewater from flowing backward into the dishwasher. Because the loop is held in a raised position, nearby bends and clamps should be checked for cracks, sagging, or loosening.
Hidden Hose Sections Behind the Dishwasher
Some hose sections run behind the dishwasher itself. These hidden sections are more difficult to inspect but remain important when investigating persistent moisture problems.
If repeated dampness appears despite visible hose connections looking dry, the hidden hose sections behind the appliance may require closer inspection. For a broader appliance-level investigation beyond hose inspection, review how to detect hidden dishwasher leaks before moving the appliance.
Tools You May Need for Dishwasher Hose Inspection
Most hose inspections require only basic household tools. Simple equipment allows homeowners to inspect connections safely without damaging surrounding components.
Before beginning inspection, gather the following items:
- Flashlight or headlamp for visibility in tight spaces
- Dry cloth or paper towels for moisture detection
- Adjustable wrench for checking fittings (if necessary)
- Screwdriver for removing toe-kick panels
- Protective gloves to prevent cuts or abrasions
Use strong lighting around the shutoff valve, toe-kick opening, hose clamps, and cabinet pass-throughs because small leaks often show first as residue, staining, or damp wood rather than active dripping.
Step-by-Step Dishwasher Hose Inspection Process
A structured inspection process makes it easier to identify small hose leaks before they become serious problems. Following a consistent sequence ensures that no important connection points are overlooked.
This step-by-step method focuses on visual inspection and moisture detection. It helps homeowners safely examine both supply and drain hoses without unnecessary disassembly.
Step 1 — Turn Off Power to the Dishwasher
Before beginning any inspection, always turn off power to the dishwasher. This reduces the risk of electrical hazards when working near water connections.
Power can usually be turned off at:
- The dishwasher circuit breaker in the electrical panel
- A wall switch controlling the dishwasher outlet
- The plug beneath the sink, if accessible
Never inspect hoses while the dishwasher is running or while your hands are near electrical components, standing water, or damp wiring. If you see active leaking near wiring, stop and call a professional.
Step 2 — Shut Off the Water Supply
After disconnecting power, turn off the water supply feeding the dishwasher. This prevents pressurized water from escaping if a connection is disturbed during inspection.
The shutoff valve is typically located under the kitchen sink. Rotate the valve clockwise until it stops.
Step 3 — Inspect the Supply Hose at the Shutoff Valve
The first inspection point should always be the supply hose connection at the shutoff valve. This location experiences constant water pressure and is one of the most common sources of slow leaks.
Use a flashlight to examine the connection carefully. Look for signs of moisture, corrosion, or mineral buildup.
Important signs to check include:
- Water droplets forming around the connection
- White mineral residue indicating slow leakage
- Rust forming around metal fittings
- Moisture on nearby cabinet surfaces
Even small deposits or discoloration may signal early leak development.
Do not overtighten fittings during inspection; excessive force can damage threads, washers, or plastic components and create a new leak.
Step 4 — Follow the Supply Hose Toward the Dishwasher
After inspecting the shutoff connection, trace the supply hose along its entire visible length. This step helps identify damage caused by friction, bending, or long-term stress.
Pay attention to areas where the hose:
- Contacts cabinet edges
- Passes through wall openings
- Bends sharply around corners
- Appears flattened or twisted
Damage in these areas often develops slowly and may not produce visible water until failure becomes more advanced.
Step 5 — Inspect the Dishwasher Inlet Connection
The supply hose connects directly to the dishwasher inlet near the base of the appliance. This connection point may be hidden behind a lower panel or toe-kick cover.
If accessible, inspect this area carefully for moisture buildup or loose fittings.
Do not force the dishwasher out of the cabinet if the hose, wiring, flooring, or countertop clearance resists movement. Stop and call a qualified appliance technician or plumber if the inlet connection cannot be inspected safely.
Signs of potential problems include:
- Damp insulation near the connection
- Water stains on surrounding surfaces
- Loose threaded fittings
- Visible corrosion around the connection
This connection often experiences vibration during operation, making it vulnerable to gradual loosening.
Step 6 — Inspect the Drain Hose Connection
Next, move to the drain hose connection beneath the sink. This hose typically connects to either a garbage disposal inlet or a sink drain pipe.
Drain hose connections should be checked for looseness or deterioration.
Look for:
- Moisture accumulation beneath the connection
- Loose or misaligned hose clamps
- Cracks forming near hose ends
- Staining along cabinet surfaces
Drain hose failures often appear during draining cycles, making this area especially important to inspect.
Step 7 — Examine Hose Clamps and Fasteners
Hose clamps hold connections securely in place. Over time, clamps may loosen due to vibration or corrosion.
Check each clamp carefully for:
- Rust or corrosion
- Visible looseness
- Misalignment along the hose
- Signs of slipping from the connection point
Loose clamps are one of the most frequent causes of slow hose leaks.
Step 8 — Look for Moisture Trails or Residue
Leaks often leave behind visible clues even when water is not actively dripping. These clues help identify areas where moisture has previously escaped.
Common moisture indicators include:
- White mineral deposits along hose surfaces
- Water streaks on cabinet walls
- Damp or softened wood near connections
- Mold or mildew residue around joints
If any of these signs appear, further investigation may be necessary to determine whether the hose is still leaking.
Common Signs of Dishwasher Hose Damage
Recognizing physical damage patterns helps identify failing hoses before they rupture. Most hose problems develop gradually, so cracks, bulging, corrosion, abrasion, and loose fittings should be checked before the next wash cycle.
Cracks Along Hose Surfaces
Cracks are among the earliest visible signs of hose failure. They often appear in areas where the hose bends repeatedly or experiences mechanical stress.
Small cracks may initially release only tiny amounts of water. However, they usually expand over time if left unaddressed.
Look for:
- Fine splits along plastic hose surfaces
- Visible breaks near connection points
- Dry or brittle hose materials
- Moisture forming near cracked sections
Even minor cracking increases the risk of sudden rupture during future wash cycles.
Bulging or Swollen Hose Sections
Bulging hose sections are one of the most serious warning signs of internal hose failure. A hose that appears swollen or stretched indicates that the internal structure has weakened. This condition often develops before a sudden rupture occurs.
Bulging typically happens when internal pressure pushes against weakened hose walls. Over time, the material stretches outward, creating a visible bulge along the surface.
Look for:
- Raised or swollen areas along the hose
- Uneven hose thickness in certain sections
- Soft or flexible spots where the hose feels weaker
- Moisture forming near swollen areas
Bulging hoses should always be treated as high-risk components. Even if no visible leaks are present, this condition indicates that the hose is structurally compromised.
Corrosion Around Metal Connections
Corrosion at metal fittings is another common indicator of slow moisture leaks. Over time, even small water exposure can cause rust formation around threaded connections and clamps.
Corrosion weakens connection integrity and may lead to gradual seepage or sudden failure.
Signs of corrosion include:
- Rust-colored deposits around fittings
- White mineral buildup near connection threads
- Pitting or rough surfaces on metal components
- Discoloration along surrounding cabinet materials
Corrosion often indicates that moisture has already been escaping from the connection area, even if no active dripping is visible.
Abrasion or Wear From Contact With Cabinet Edges
Abrasion damage occurs when hoses rub against cabinet surfaces or sharp edges. This repeated friction slowly wears away the outer hose material, creating thin spots that may eventually leak.
Areas where hoses pass through tight openings are especially vulnerable to abrasion damage.
Inspect for:
- Flattened sections where the hose touches cabinet edges
- Scraped or worn outer hose surfaces
- Sharp bends causing tension at contact points
- Visible thinning of hose material
Even minor abrasion damage can weaken hose strength over time. Preventing friction between hoses and surrounding surfaces helps reduce long-term failure risks.
Loose or Misaligned Hose Connections
Loose connections are one of the most frequent causes of hidden dishwasher hose leaks. Vibration from regular dishwasher operation gradually loosens fittings, especially when connections were not fully secured during installation.
Misaligned connections may also create uneven pressure along hose joints, increasing leak risk.
Watch for:
- Connections that appear tilted or uneven
- Gaps between hose ends and fittings
- Moisture pooling near connection points
- Clamps that appear shifted from their original position
Loose fittings often cause slow leaks that worsen gradually. Regular inspection helps detect these problems before water spreads into surrounding materials.
Hidden Moisture Clues Around Dishwasher Hoses
Not all hose leaks produce visible dripping water. Many release small amounts of moisture that show up first as residue, softened cabinet materials, musty odor, or staining near the hose path.
Look for Mineral Deposits or Residue
Mineral deposits often form when water evaporates after escaping from a small leak. These deposits appear as white or chalky residue along hose surfaces or nearby materials.
Mineral buildup is a reliable indicator that moisture has previously escaped, even if the leak is no longer active.
Check for:
- White residue on hoses or fittings
- Crust-like deposits near connections
- Dry streaks running along cabinet surfaces
- Powdery buildup on nearby materials
These deposits frequently appear before visible dripping becomes noticeable.
Check Surrounding Materials for Softness
Wood and composite materials absorb moisture easily. Soft or weakened materials near hoses often indicate repeated exposure to small leaks.
Press gently along nearby surfaces to check for:
- Soft cabinet flooring beneath the sink
- Swollen wood edges near hose paths
- Flexible or weakened particle board
- Uneven flooring near appliance edges
If surfaces feel soft or unstable, moisture may already be affecting structural materials.
Watch for Musty Odors Near Hose Locations
Musty odors often develop when moisture remains trapped in enclosed spaces. Even small leaks can create persistent dampness that supports mold growth.
Odors are often strongest near:
- Cabinet openings beneath the sink
- The toe-kick area beneath the dishwasher
- Floor seams near hose connections
- Rear cabinet corners
If odors appear alongside visible moisture signs, further investigation may be necessary to determine the source of hidden dampness.
How Often to Inspect Dishwasher Hoses
Routine inspection reduces the risk of unexpected hose failures. Most hoses show warning signs before leaking significantly, making periodic inspection an effective preventive measure.
Recommended Inspection Frequency
For most households, inspecting dishwasher hoses every six months provides adequate protection against unnoticed leaks.
More frequent inspections may be necessary if:
- The dishwasher is used daily
- The home has experienced previous leaks
- Older hoses are still installed
- Moisture problems have occurred nearby
Frequent inspections allow homeowners to detect early wear patterns before damage becomes severe.
Inspect After Major Changes or Repairs
Dishwasher hoses should always be inspected after significant home changes that may affect appliance positioning or plumbing stability.
Important inspection times include:
- After installing a new dishwasher
- Following plumbing repairs
- After replacing flooring
- After moving appliances during renovations
Movement and installation changes can place stress on hose connections, increasing the chance of leaks.
When Hose Inspection Reveals a Leak or Damage
If inspection reveals moisture, visible damage, or loose connections, the next step is to prevent further water exposure while deciding whether the hose, fitting, clamp, or appliance connection needs professional repair or replacement. Identifying damage early significantly reduces the risk of structural deterioration beneath the dishwasher.
Even small hose leaks should be taken seriously. Water escaping from pressurized hoses can spread quickly into surrounding materials, especially when leaks go unnoticed between wash cycles.
Temporary Steps to Limit Further Moisture Exposure
If you discover signs of leakage during inspection, limiting water exposure should become the immediate priority. These temporary steps help reduce damage risk until proper repairs can be completed.
- Keep the dishwasher turned off until the problem is resolved.
- Leave the water supply valve closed if moisture continues to appear.
- Dry surrounding surfaces thoroughly to reduce moisture spread.
- Monitor the area for new dampness over the following days.
Taking a photo of the hose connection and nearby damp area can also help you compare whether moisture is spreading, drying, or returning after the dishwasher remains off.
Do not keep running the dishwasher to “test” a suspected hose leak. A small drip at a pressurized supply line can release more water during a cycle and spread moisture under flooring before it becomes visible from the front of the appliance.
If moisture has already spread into flooring or cabinet materials, early drying measures become important. In those situations, reviewing how to dry flooring after dishwasher leaks can help reduce long-term damage risks.
When Visible Damage Requires Further Evaluation
Some hose damage may appear minor but still indicate developing failure. Cracks, bulging sections, or loose fittings should not be ignored, even if water is not actively dripping.
Situations that require further evaluation include:
- Repeated moisture appearing near the same connection
- Visible cracking along hose surfaces
- Bulging or swollen hose sections
- Corrosion forming around fittings
- Loose clamps that no longer hold securely
These signs indicate that the hose system may fail under continued use. Early recognition helps prevent sudden leaks that cause widespread damage.
Bulging hoses, cracked hose walls, active dripping, or corrosion around pressurized fittings should be treated as replacement-level warning signs rather than minor cosmetic wear.
Why Early Detection Prevents Larger Problems
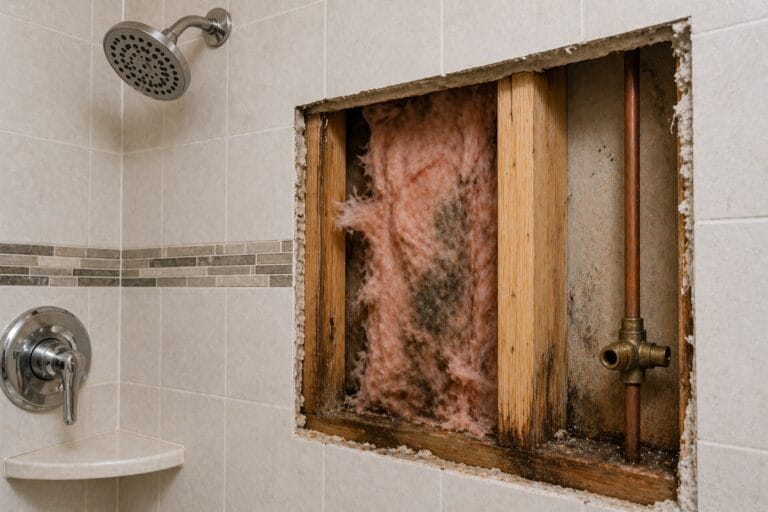
Most dishwasher hose failures begin gradually. If slow leakage continues, moisture can spread beneath flooring, weaken nearby materials, increase repair costs, and create conditions where mold may develop.
If musty odors, dark staining, or recurring dampness appear behind the appliance, review the signs of mold behind dishwashers before assuming the issue is limited to the visible hose connection.
Frequently Asked Questions About Inspecting Dishwasher Hoses
How often should dishwasher hoses be inspected?
Most households benefit from inspecting dishwasher hoses every six months. Homes with older appliances or previous leak history may require more frequent inspections. Regular inspection helps identify early signs of wear before leaks develop.
Can dishwasher hoses leak without visible cracks?
Yes. Many hose leaks occur at connection points rather than along the hose itself. Loose fittings, worn seals, and corrosion may allow moisture to escape without obvious cracks.
Are dishwasher hoses difficult to access?
Most hose connections are accessible beneath the kitchen sink. Some sections behind the dishwasher may require partial appliance movement, but many inspection steps can be completed without removing the unit.
What causes dishwasher hoses to fail over time?
Hose failure typically results from repeated pressure, vibration, heat exposure, and aging materials. Over time, these stresses weaken hose walls and fittings.
For a deeper explanation of mechanical causes, see why dishwashers develop hidden leaks.
Should older dishwasher hoses be replaced preventively?
Older hoses are more likely to develop cracks or connection failures. Periodic inspection helps determine whether replacement may be necessary before major leaks occur.
What should I do if moisture keeps returning after inspection?
Recurring moisture often indicates a hidden leak, a loose connection behind the appliance, or moisture trapped under nearby flooring. Stop using the dishwasher until the source is confirmed, especially if cabinet materials or flooring feel soft.
Final Dishwasher Hose Inspection Checklist
Before finishing the inspection, confirm each of these areas is dry, secure, and free of visible damage:
- Water supply hose at the shutoff valve
- Visible supply hose path through the cabinet
- Cabinet pass-throughs where hoses rub against edges
- Dishwasher inlet fitting behind the lower access panel or toe-kick area
- Drain hose connection at the garbage disposal or sink drain
- Drain hose high loop and nearby bends
- Hose clamps, fasteners, and threaded fittings
- Cabinet floor, nearby flooring, and toe-kick area for dampness or soft spots
- White residue, rust, mineral deposits, staining, musty odor, or recurring moisture
If any item on the checklist shows moisture, corrosion, bulging, cracking, softness, or recurring dampness, keep the dishwasher off and leave the water supply closed until the source is confirmed.
3 Comments
Comments are closed.