How to Inspect for Hidden Bathroom Leaks (Step-by-Step Detection Guide)
To inspect for hidden bathroom leaks, start with the sink cabinet, toilet base, supply lines, shower seams, tub edges, nearby walls, flooring, and any ceiling below the bathroom. Look for dampness, stains, musty odors, swelling, soft materials, residue around fittings, and moisture that appears after fixture use.
Bathrooms contain multiple water connections, making them one of the most common locations for concealed leaks. Even minor moisture buildup behind fixtures or beneath flooring can lead to long-term structural damage if left undetected. For the broader plumbing damage system behind these problems, see how plumbing leaks cause structural damage.
Many hidden bathroom leaks eventually cause symptoms in surrounding structures. In some cases, moisture from bathroom leaks may travel downward and create ceiling water damage below a bathroom, especially when the leak is above a finished ceiling.
Before You Start the Bathroom Leak Inspection
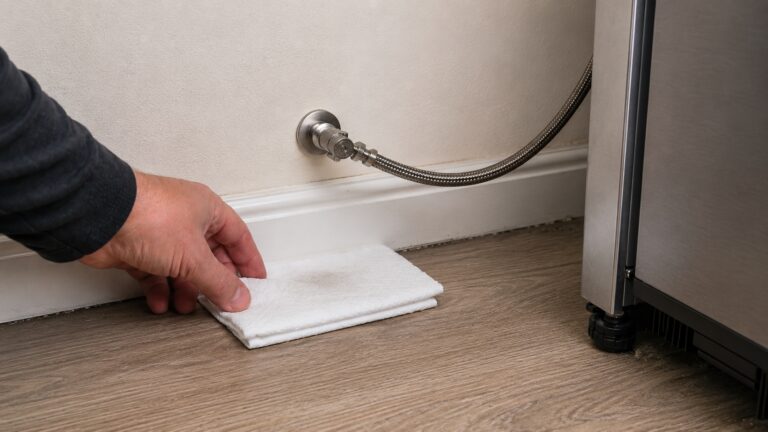
Use a flashlight, dry paper towel, and your hand to check each fixture area. Wipe suspicious pipe joints, supply connections, drain fittings, floor seams, and toilet-base edges with the paper towel. If the towel picks up moisture, staining, or residue after the fixture is used, treat that area as a possible active leak point.
- Inspect after normal fixture use, not only when the bathroom has been dry for hours.
- Compare suspicious areas with nearby dry materials.
- Check below the bathroom if there is a finished ceiling underneath.
- Document recurring moisture so you can identify patterns over time.
Early Signs of Hidden Bathroom Leaks
Before beginning a detailed inspection, certain warning signs often indicate the presence of hidden moisture. Recognizing these early indicators helps confirm whether further investigation is necessary.
Musty Odors in Bathrooms
Musty smells frequently develop when moisture remains trapped inside enclosed bathroom spaces. These odors often signal hidden water exposure behind walls or beneath fixtures.
Common odor-related warning signs include:
- Persistent damp smells near sinks or tubs
- Odors that worsen after shower use
- Lingering musty smells in closed cabinets
- Strong odors near bathroom corners
Musty odors usually indicate moisture accumulation that may not yet be visible.
Unexplained Moisture or Dampness
Damp areas appearing without an obvious cause often signal hidden leaks. These areas may feel wet or humid even when surfaces appear dry.
Watch for:
- Damp surfaces near fixtures
- Moisture forming on nearby walls
- Unexpected wet spots on floors
- Condensation appearing repeatedly
Unexplained moisture typically indicates water movement within concealed areas.
Recurring Water Stains
Water stains that appear repeatedly often suggest hidden leaks inside bathroom structures. These stains may form slowly and expand over time.
Typical stain indicators include:
- Small discoloration spots forming gradually
- Stains appearing after regular bathroom use
- Darkening patches near fixtures
- Moisture stains returning after cleaning
Recurring stains usually signal ongoing moisture entry.
How to Inspect Bathroom Sink and Vanity Areas
Sink and vanity areas are among the most common locations for hidden bathroom leaks. Multiple pipe connections exist beneath sinks, increasing the risk of concealed moisture problems.
Run water at the faucet, open the cabinet, and check the supply lines, shutoff valves, P-trap, drain tailpiece, cabinet floor, and back wall while the sink is in use.
Checking Pipes Under Sinks
Pipe connections beneath sinks frequently develop slow leaks that may go unnoticed for extended periods. These leaks often create moisture buildup inside cabinets.
Inspect pipes carefully for:
- Moisture forming along pipe surfaces
- Water droplets collecting near connections
- Damp areas beneath pipe joints
- Signs of corrosion or residue buildup
Pipe moisture often indicates small leaks that worsen over time.
A simple paper towel test can help confirm the source. Wipe each connection dry, run the faucet for one minute, then press the towel against the supply valves, trap joints, and drain fittings. New wet marks on the towel show where moisture is forming.
Inspecting Cabinet Surfaces
Cabinet interiors often reveal early moisture damage caused by hidden leaks. Because cabinets enclose plumbing components, trapped moisture may accumulate quickly.
Look for:
- Dark stains on cabinet flooring
- Swollen or warped wood panels
- Soft cabinet surfaces
- Peeling cabinet finishes
Cabinet damage frequently signals long-term moisture exposure.
Looking for Moisture Around Drain Connections
Drain connections are common leak points due to repeated movement and pressure changes. These connections should be inspected closely during leak checks.
Watch for:
- Moisture forming around drain fittings
- Wet areas beneath sink drains
- Water collecting near connection points
- Residue buildup indicating slow leaks
Drain connection leaks often develop gradually and remain hidden inside cabinets.
How to Inspect Toilets for Hidden Leaks
Toilets are another common source of hidden bathroom leaks. Because toilets connect directly to water supply lines and drain systems, even minor failures can allow moisture to escape into surrounding materials.
Inspect the toilet after flushing and again after several minutes. Check the base, floor edge, supply line, shutoff valve, tank bolts, and the wall or floor behind the toilet for fresh moisture.
Checking Around Toilet Bases
The base of the toilet is one of the most common leak locations. Moisture around this area often indicates problems with seals or hidden connections beneath the fixture.
Inspect carefully for:
- Dampness forming around the toilet base
- Discoloration on nearby flooring
- Soft spots developing near the base
- Moisture appearing after flushing
Moisture around the base often indicates a concealed leak beneath the fixture.
Do not caulk over recurring moisture at the toilet base until the source is identified. Sealing the edge can trap water under the toilet and hide damage in the subfloor.
Inspecting Water Supply Connections
Water supply lines deliver pressurized water to the toilet and can develop small leaks over time. These leaks may appear as slow drips or moisture buildup.
Look for:
- Water droplets forming along supply lines
- Damp connections near shutoff valves
- Residue buildup around fittings
- Localized moisture near connection points
Supply line moisture often indicates slow leaks that worsen gradually.
Identifying Slow Toilet Leaks
Some toilet leaks develop slowly and remain difficult to detect without close observation. These leaks may allow moisture to spread beneath flooring without obvious signs.
Watch for:
- Recurring damp spots near toilets
- Flooring discoloration developing gradually
- Musty odors forming near toilet areas
- Moisture appearing without visible drips
Slow leaks frequently cause long-term hidden damage beneath bathroom fixtures.
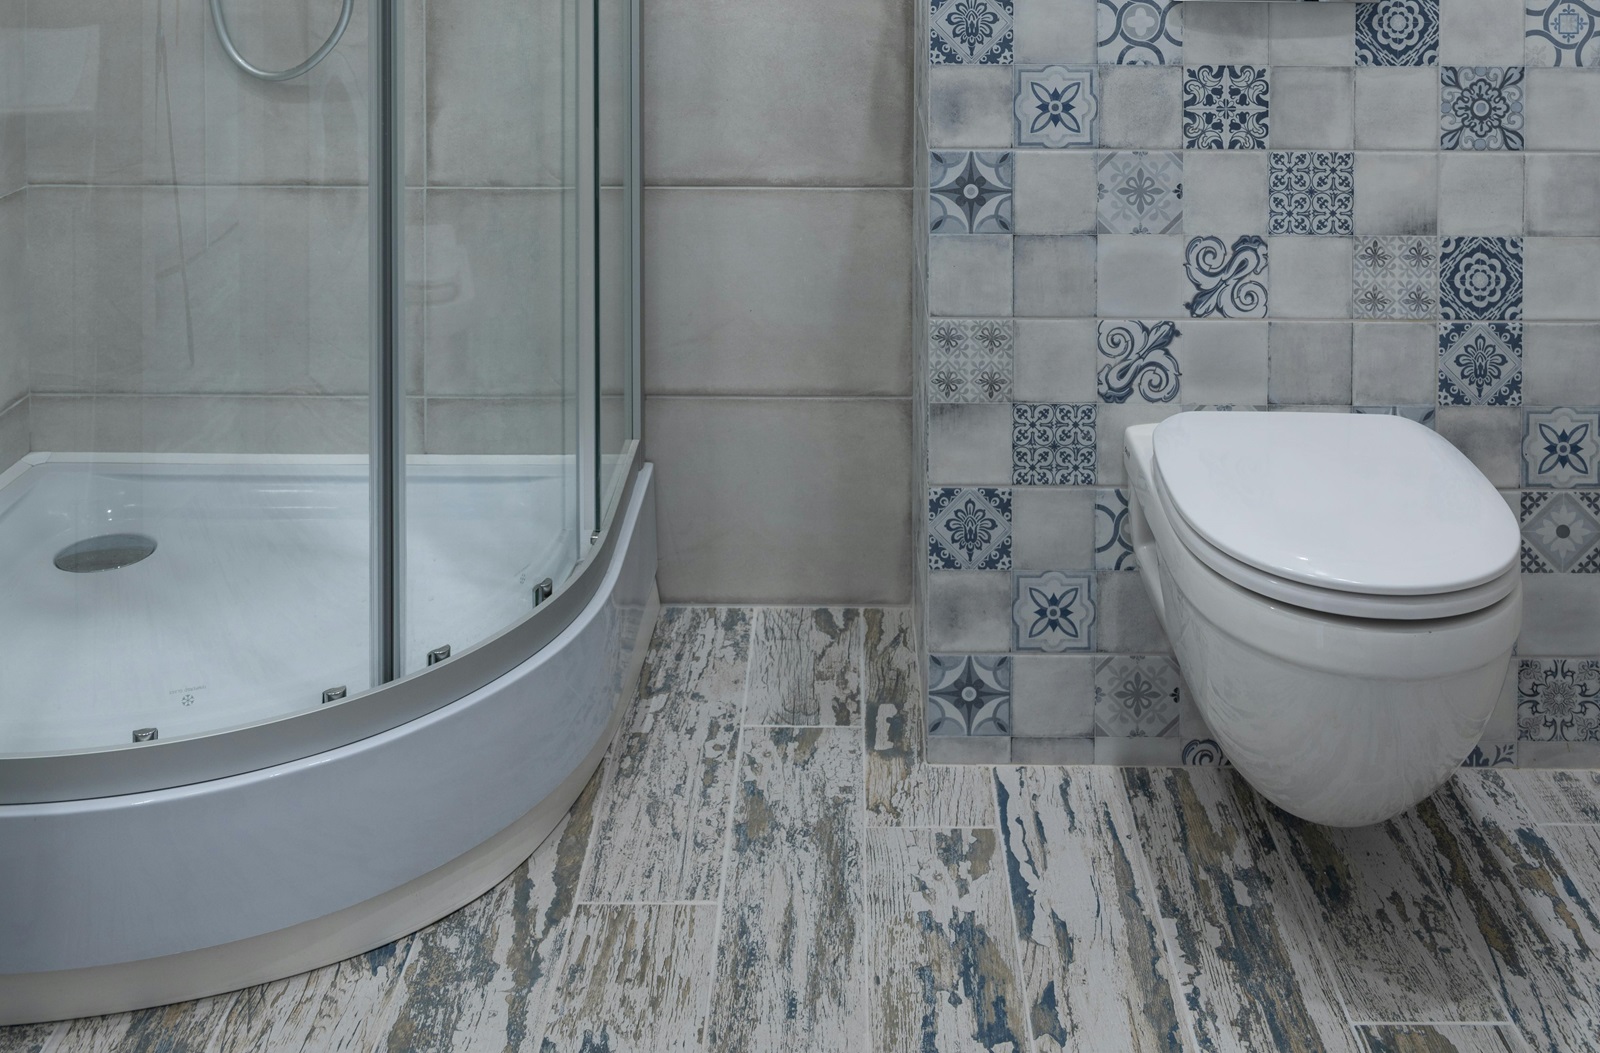
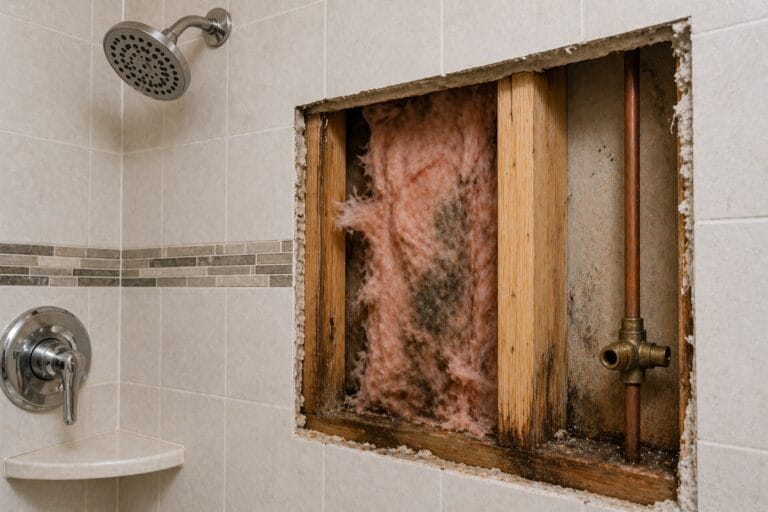
How to Inspect Showers and Bathtubs
Showers and bathtubs experience frequent water exposure, making them vulnerable to hidden leaks. Moisture often enters through seams, joints, or worn seal materials.
Inspect these areas after a normal shower or bath, not only when the surfaces are completely dry. Fresh moisture patterns often reveal leaks that disappear after the room airs out.
Checking Shower Wall Seams
Shower wall seams form transition points where water may enter concealed areas. These seams require careful inspection for signs of moisture intrusion.
Look for:
- Darkened seams between wall panels
- Moisture collecting along joint lines
- Discoloration forming around seams
- Repeated dampness after shower use
Seam-related moisture often indicates hidden water entry behind wall surfaces.
Inspecting Tub Edges and Surrounds
Bathtub edges and surrounding materials may develop leaks when water repeatedly enters small gaps. These areas often show early signs of hidden moisture.
Inspect carefully for:
- Moisture forming along tub edges
- Discoloration near surrounding materials
- Soft surfaces near tub connections
- Recurring damp spots after bathing
Tub edge leaks often allow water to spread into nearby flooring or wall materials.
Looking for Moisture Around Shower and Tub Fixtures
Moisture often appears around shower handles, tub spouts, trim plates, panels, and surround edges before the leak source is obvious.
Watch for:
- Damp areas forming around visible components
- Water stains near fixture edges
- Dark spots appearing near corners
- Moisture developing after repeated use
Hidden moisture behind fixtures often spreads into adjacent structural materials.
How to Inspect Bathroom Walls for Moisture
Bathroom walls frequently conceal hidden leaks because water can travel behind surfaces without becoming immediately visible. Moisture entering through fixtures, seams, or plumbing connections may remain trapped inside wall cavities.
Focus on areas near fixture openings, seams, corners, and lower wall sections where moisture is most likely to collect.
Checking Wall Surfaces Near Fixtures
Wall surfaces located near sinks, showers, and toilets are especially vulnerable to moisture exposure. These areas should be inspected regularly for subtle changes.
Look for:
- Discoloration forming near plumbing fixtures
- Dark patches appearing on wall surfaces
- Paint changes developing near seams
- Moisture forming along wall edges
Wall discoloration often indicates hidden moisture behind the surface.
Inspecting Wall Paint and Drywall
Paint and drywall materials often show early signs of moisture damage. When water becomes trapped behind walls, visible changes typically develop over time.
Watch for:
- Bubbling or peeling paint
- Soft or weakened drywall sections
- Cracks forming near moisture-prone areas
- Uneven wall textures developing gradually
Surface damage usually signals moisture buildup inside concealed wall spaces.
If you use a moisture meter, compare the suspicious area with a dry area on the same wall. A single reading is less useful than a pattern of higher readings near a fixture, seam, or plumbing path.
How to Inspect Bathroom Floors for Hidden Leaks
Bathroom floors frequently reveal hidden leak problems because water naturally settles downward. Moisture trapped beneath flooring materials can weaken surfaces and create structural concerns.
Check the floor after showers, baths, toilet flushing, and sink use so you can connect moisture patterns to a specific fixture.
Checking Floor Surfaces for Soft Spots
Soft flooring areas often indicate prolonged moisture exposure beneath the surface. These weakened sections may appear normal at first but gradually lose structural strength.
Inspect flooring carefully for:
- Soft or spongy areas underfoot
- Uneven floor surfaces
- Localized depressions forming gradually
- Areas that flex when stepped on
Soft flooring usually signals moisture trapped below the surface.
Inspecting Flooring Seams
Floor seams provide pathways where water may enter beneath flooring materials. These seams should be examined for signs of moisture intrusion.
Look for:
- Discoloration along flooring joints
- Seams separating slightly
- Dark lines forming between floor panels
- Moisture collecting along seam edges
Seam damage often indicates water infiltration beneath flooring materials.
How to Inspect Ceilings Below Bathrooms
Ceilings located below bathrooms often reveal hidden leak problems originating from above. Moisture that escapes from bathroom fixtures frequently travels downward and accumulates in ceiling materials.
Recognizing these signs helps confirm hidden leaks that may not be visible inside the bathroom itself. Many of these symptoms resemble patterns described in signs of ceiling water damage, especially when moisture spreads into ceiling structures below.
Checking Ceiling Stains Below Bathrooms
Ceiling stains beneath bathrooms frequently indicate water movement from plumbing fixtures or surrounding materials.
Watch for:
- Yellow or brown stains forming on ceilings
- Expanding ring patterns
- Localized discoloration near bathroom areas
- Stains appearing after bathroom use
Ceiling stains often represent early warning signs of hidden leaks above.
Monitoring Moisture Patterns After Use
Observing ceiling conditions after bathroom use helps identify recurring moisture patterns linked to fixture activity.
Look for:
- Damp spots appearing after showers
- Moisture forming following sink use
- Wet areas developing after toilet flushing
- Repeated dampness in consistent locations
Recurring moisture patterns usually indicate ongoing hidden leaks.
Hidden Leak Warning Signs That Require Immediate Attention
Some hidden bathroom leak symptoms indicate rapidly worsening moisture conditions. Recognizing these warning signs early helps prevent widespread damage to flooring, walls, and nearby structural components.
Immediate action is often necessary when moisture spreads quickly or structural materials begin weakening.
Stop using the fixture if moisture spreads quickly, flooring becomes soft, water appears near electrical components, or the leak source is unknown. These signs can indicate active water movement into materials that should not be covered, painted, or sealed until the source is found.
Rapid Moisture Spread
Moisture that spreads beyond its original location often signals an active and worsening leak. These conditions typically indicate that water continues entering concealed spaces.
Watch for:
- Stains expanding across large surfaces
- New moisture areas appearing nearby
- Dampness spreading into adjacent rooms
- Moisture forming in previously dry locations
Rapid moisture spread usually indicates an ongoing leak that requires immediate investigation.
Structural Changes in Bathroom Materials
Structural damage suggests that moisture exposure has progressed beyond early stages. These warning signs indicate weakening materials that may lead to further deterioration.
Common structural indicators include:
- Warped cabinetry or flooring
- Cracked wall surfaces
- Separation between fixtures and surrounding materials
- Soft or weakened structural components
Structural changes often signal long-term moisture exposure inside hidden areas.
When Professional Inspection Becomes Necessary
Although many hidden bathroom leaks can be identified through visual inspection, some situations require professional evaluation. Persistent moisture patterns or unknown leak sources often indicate more complex problems.
Persistent Moisture Conditions
Moisture that remains present despite repeated cleaning or drying attempts often signals concealed water entry points.
Professional inspection may be necessary when:
- Moisture returns repeatedly in the same location
- Stains expand despite monitoring
- Structural materials show progressive deterioration
- Multiple leak indicators appear simultaneously
Persistent moisture usually indicates that the underlying leak source has not been fully identified.
Unknown Leak Sources
Hidden leak sources may remain difficult to locate without specialized inspection tools. These situations often involve concealed plumbing components or inaccessible spaces.
Professional assistance becomes valuable when:
- No visible leak source can be identified
- Moisture appears far from plumbing fixtures
- Water patterns remain inconsistent
- Leaks occur only under specific conditions
A professional may use moisture meters, access panels, pressure testing, or targeted fixture testing to confirm the leak without unnecessary demolition.
Frequently Asked Questions About Hidden Bathroom Leaks
What causes hidden bathroom leaks?
Hidden bathroom leaks commonly develop from worn pipe connections, deteriorated seals, fixture movement, or damaged plumbing components. Repeated water use increases the likelihood of gradual moisture intrusion.
Can hidden bathroom leaks spread into nearby rooms?
Yes. Water from hidden leaks often travels along structural materials, spreading into surrounding walls, ceilings, or floors before becoming visible.
How often should bathrooms be inspected for hidden leaks?
Routine inspections are commonly performed several times per year, especially after noticing unusual moisture patterns or recurring dampness.
Are musty odors always caused by hidden leaks?
Not always. However, persistent musty odors in bathrooms frequently indicate trapped moisture that may result from concealed water entry.
Can hidden bathroom leaks lead to mold growth?
Yes. Hidden bathroom leaks can keep wall cavities, flooring, cabinets, or ceiling materials damp long enough for mold to develop. This article focuses on finding the leak signs; mold cleanup should be handled separately once the moisture source is corrected.
What to Do After You Find Signs of a Hidden Bathroom Leak
If you find dampness, staining, soft flooring, musty odors, or moisture that returns after fixture use, do not cover the area with caulk, paint, flooring, or trim until the source is identified. Recheck the fixture during use, compare nearby materials, and document where moisture appears.
Call a plumber, restoration contractor, or qualified inspector when the source is unclear, moisture keeps returning, materials feel soft, or stains appear in a ceiling below the bathroom.
Key Takeaways
- Hidden bathroom leaks often begin with subtle moisture indicators.
- Sink cabinets and pipe connections are common leak locations.
- Toilets, showers, and tubs frequently develop concealed moisture problems.
- Wall and floor changes often signal moisture trapped behind surfaces.
- Ceiling stains below bathrooms may indicate leaks above.
- Rapid moisture spread signals worsening leak conditions.
- Persistent or unknown leaks may require professional inspection.
One Comment
Comments are closed.