
Whole-Home Moisture Inspection Guide
A whole-home moisture inspection helps you find early warning signs before dampness turns into mold, material damage, structural moisture, or recurring repairs. Moisture does not always begin where it becomes visible. It can hide behind walls, under flooring, inside cabinets, in attics, below crawl spaces, around windows, near HVAC equipment, or inside insulation before the damage becomes obvious.
The goal of a home moisture inspection is not to tear open walls or diagnose every repair yourself. The goal is to inspect the most moisture-prone areas in a logical order, recognize signs that deserve closer attention, document what you find, and decide whether the issue can be monitored or needs professional inspection.
Quick inspection order: Start with odors, stains, humidity, and recent water events. Then check bathrooms, kitchens, laundry rooms, and utility areas. After that, inspect walls, ceilings, floors, trim, basements, crawl spaces, attics, windows, doors, HVAC equipment, and ventilation paths. Finish by documenting whether each clue appears active, old, recurring, weather-related, plumbing-related, humidity-related, or still unclear.
Use this guide as a whole-house walkthrough. For a deeper room-by-room moisture guide, see how to find hidden moisture in different areas of your home. For broader repair and prevention planning, you can also use the main guide to find, fix, and prevent moisture problems in your home.
Why a Whole-Home Moisture Inspection Matters
Moisture problems often start small. A faint musty smell, a slightly swollen baseboard, a small stain under a window, a damp cabinet floor, or condensation on a cold surface may seem minor at first. But these early clues can point to leaks, trapped humidity, poor ventilation, hidden condensation, basement seepage, crawl space moisture, or exterior water entry.
A whole-home moisture inspection matters because moisture-prone zones often interact. Bathrooms create steam, kitchens and laundry rooms contain plumbing and appliances, basements and crawl spaces are close to soil moisture, attics can hide roof leaks or condensation, and HVAC systems can create water problems when drains, ducts, or airflow fail.
Inspecting the whole home helps you separate isolated problems from patterns. One damp wall may point to a local leak. Several damp rooms may point to humidity, ventilation, basement moisture, crawl space moisture, or HVAC performance. A stain after rain may suggest exterior water entry, while a musty smell in closed rooms may point to poor airflow or hidden damp materials.
A good inspection helps you answer three important questions:
- Is the moisture visible, hidden, or only suspected?
- Is the problem isolated to one area or showing up in several places?
- Is the moisture old, active, recurring, or connected to weather, plumbing, humidity, or HVAC use?
What to Look for Before You Start
Before inspecting individual rooms, take a few minutes to look for whole-home clues. These early observations help you decide where to spend the most time. Moisture inspection is about patterns, not one clue by itself. A stain, odor, humidity reading, or damp surface becomes more useful when you connect it to location, timing, and material behavior.
Musty Odors
A musty odor is one of the most common early signs of hidden moisture. It may come from damp drywall, carpet padding, insulation, cabinets, crawl spaces, basements, HVAC systems, closets, or wall cavities. A musty smell does not always mean visible mold is present, but it does mean moisture may be supporting microbial growth or keeping materials damp.
Pay attention to where the odor is strongest. Is it near a bathroom, basement stairway, crawl space access, cabinet, closet, HVAC vent, exterior wall, or laundry area? Does it get worse after rain, after the air conditioner runs, after showers, or when the room has been closed for a while? Odor timing can help separate humidity, leaks, poor airflow, and lower-level moisture.
Stains, Swelling, and Surface Changes
Look for physical changes in materials. Moisture often changes the shape, color, texture, or feel of surfaces before obvious water appears.
Common surface clues include:
- Brown or yellow stains on ceilings or walls
- Bubbling, peeling, or blistering paint
- Soft drywall or sagging ceiling areas
- Swollen baseboards or trim
- Cupped, lifted, or soft flooring
- Darkened cabinet bases or toe kicks
- Rust on metal fixtures, fasteners, or HVAC components
- White powdery deposits on masonry or concrete
- Visible mold spots or recurring discoloration
Do not assume a stain is old just because it is dry when you touch it. Some moisture sources appear only during rain, plumbing use, cooling cycles, or seasonal humidity changes. Mark suspicious areas and recheck them later under the conditions that may trigger the moisture.
Some clues can be false alarms when they do not change, spread, smell musty, feel soft, or match a moisture pattern. Old paint shadows, previous repairs, harmless surface dust, furniture marks, and isolated scuffs can look suspicious. Treat a clue as more important when it changes over time, appears with odor, follows rain or water use, affects soft or swollen materials, or reads differently from the same material nearby.
Humidity and Condensation
Humidity and condensation can reveal moisture problems even when no leak is visible. Condensation on windows, cold pipes, ductwork, basement walls, or exterior wall corners suggests that warm, moist air is contacting cooler surfaces. If this happens repeatedly, it can lead to mold, staining, paint damage, and damp materials.
High indoor humidity can also make other moisture problems worse. It slows drying after small leaks, keeps closets and corners damp, and allows musty odors to persist. If several rooms feel damp or condensation appears in multiple locations, test indoor humidity levels instead of guessing.
Recent Leaks, Storms, or Repairs
Think about recent events before starting the room-by-room inspection. A storm, roof leak, plumbing leak, overflowing appliance, basement seepage event, HVAC drain backup, or recent repair can guide where you inspect first.
Ask yourself:
- Did the moisture appear after rain or snowmelt?
- Did it appear after using a sink, toilet, shower, washer, dishwasher, or refrigerator water line?
- Did it appear during cooling season or when the HVAC system was running?
- Was the area recently cleaned, painted, repaired, or dried?
- Does the problem return in the same place?
If the inspection is happening because one problem keeps coming back, document the history before moving through the house. Recurring moisture often gives stronger clues than a one-time stain.
Tools That Help With a Home Moisture Inspection
You can perform a useful first inspection with simple tools. The goal is not to replace professional testing. The goal is to make your observations more accurate and organized. A flashlight, camera, hygrometer, moisture meter, paper towels, gloves, and basic safety items can help you identify patterns without opening walls unnecessarily.
Flashlight and Camera
A bright flashlight helps reveal subtle surface changes. Shine it along walls, trim, cabinet floors, baseboards, ceilings, and flooring at an angle. This can make swelling, bubbling paint, stains, texture changes, and warped materials easier to see.
A camera or phone is useful for documentation. Take photos of stains, cracks, wet areas, mold spots, condensation, swollen trim, and moisture readings. Include dates when possible. If a stain expands after storms or a cabinet gets damp after sink use, photos help you compare changes over time.
Hygrometer
A hygrometer measures relative humidity. It is useful during a whole-home inspection because it helps you compare rooms instead of relying on how the air feels. Place readings in bathrooms, bedrooms, basements, crawl-space-adjacent rooms, kitchens, closets, and HVAC areas.
If one room has higher humidity than the rest of the house, look for local moisture sources or poor airflow. If several rooms have high humidity, the issue may involve ventilation, HVAC performance, basement moisture, crawl space moisture, or outdoor air infiltration. For tool options, see this guide to hygrometers for home humidity.
Moisture Meter
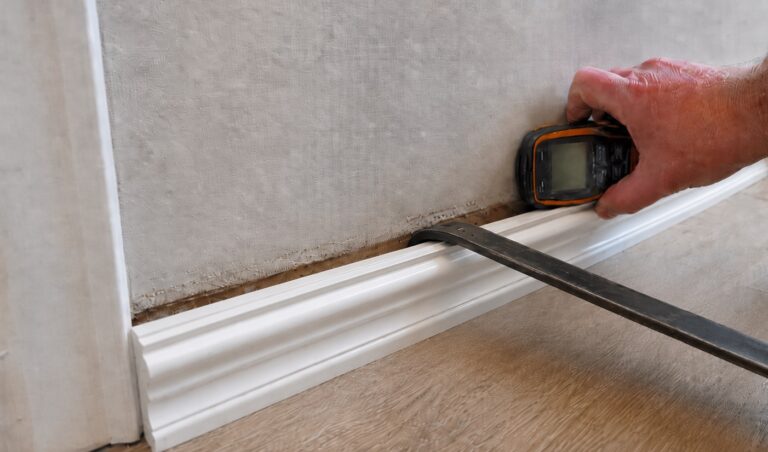
A moisture meter can help you compare suspicious materials with nearby dry areas. It can be useful on accessible drywall, wood trim, subfloors, cabinets, and some flooring materials. A meter can help confirm whether a stain is still damp, whether moisture is spreading, or whether one area reads differently from similar materials nearby.
Use moisture meters carefully. A high reading tells you that a material may be damp, but it does not automatically identify the source. The moisture could come from a leak, condensation, seepage, trapped water, or high humidity. For help interpreting readings by material, see this guide to moisture levels that indicate water damage. If you are choosing a tool, compare options in this guide to moisture meters for hidden water damage.
Paper Towels, Gloves, and Basic Safety Items
Paper towels can help confirm small accessible leaks under sinks, around toilets, near appliance connections, and below shutoff valves. Place a dry paper towel under a suspicious connection, run the fixture briefly, and check whether the towel becomes wet. This is not a full plumbing test, but it can help identify simple visible leaks.
Wear gloves when checking damp cabinets, crawl space access areas, basement corners, or dirty HVAC spaces. Do not disturb moldy materials, wet insulation, sagging ceilings, or electrical areas. If you see active water near wiring, outlets, panels, fixtures, or appliances, stop the inspection in that area and call a qualified professional.
Stop the inspection if you find sagging materials, unsafe flooring, sewage or floodwater, strong mold growth, active water near electricity, or a crawl space that looks unstable, contaminated, or difficult to exit safely.
Inspect Moisture-Prone Rooms First
Start your whole-home moisture inspection in the rooms most likely to produce or collect water. Bathrooms, kitchens, laundry rooms, and utility areas combine plumbing, drains, appliances, humidity, cabinets, flooring seams, and hidden wall cavities. These rooms often reveal early moisture problems before the rest of the home does.
Inspect these areas slowly. Look under cabinets, around fixtures, near floor edges, behind accessible appliances, along baseboards, and below nearby ceilings if the room is on an upper level.
Bathrooms
Bathrooms are high-risk areas because they contain plumbing, drains, wet surfaces, steam, caulk joints, grout lines, ventilation fans, and enclosed cavities. Begin by checking around toilets, sinks, tubs, showers, vanities, baseboards, and walls near plumbing fixtures.
Look for:
- Soft flooring around toilets, tubs, or showers
- Swollen baseboards or trim near wet areas
- Musty smells inside vanity cabinets
- Water marks below sink plumbing
- Peeling paint or bubbling drywall near showers
- Mold near ceilings, corners, exhaust fans, or grout lines
- Loose caulk around tubs, shower edges, or backsplashes
- Stains on the ceiling below an upstairs bathroom
Run the sink briefly while watching the drain, trap, supply lines, and cabinet floor. Flush the toilet and check around the base. After a shower, look for water escaping around doors, curtains, tub edges, and wall corners. If the exhaust fan is weak, noisy, or unused, bathroom humidity may be staying high long after showers.
Bathroom moisture can come from active leaks, failed caulk, damaged grout, poor ventilation, loose toilet seals, or water escaping from normal use. If you suspect hidden leaks, use a more focused guide to inspect hidden bathroom leaks.
Kitchens
Kitchens combine sink plumbing, dishwasher connections, refrigerator water lines, ice makers, food spills, cabinet bases, flooring seams, and exterior walls. Start under the sink because small drips often stain or soften cabinet floors before they appear elsewhere.
Check:
- Sink cabinet floors and back panels
- Supply lines and shutoff valves
- Drain traps and garbage disposal connections
- Dishwasher edges and nearby flooring
- Refrigerator water line areas
- Toe kicks and base cabinets
- Flooring seams near appliances
- Walls behind or beside appliances if accessible
Use a flashlight inside cabinets and along the floor line. Look for dark stains, swollen particleboard, warped cabinet bottoms, peeling laminate, musty odors, or signs that someone previously covered damage with shelf liner. A dry cabinet today does not prove the problem is gone if the leak only happens during dishwasher cycles or sink use.
Laundry Rooms
Laundry rooms deserve careful inspection because washer hoses, drain lines, utility sinks, dryer ventilation, and floor drains can all create moisture problems. A small supply hose drip or drain backup can wet flooring and walls before the problem becomes obvious.
Look behind and around the washer if you can do so safely. Check supply valves, hose connections, drain hose placement, wall stains, floor softness, baseboards, and nearby closets or rooms. If the washer is on an upper level, inspect the ceiling below for stains or soft spots.
Dryer ventilation also matters. A disconnected, crushed, clogged, or poorly vented dryer duct can add moisture to the laundry room and nearby walls. If the room feels humid after drying clothes, inspect the dryer vent path and exterior termination.
Utility Rooms and Mechanical Areas
Utility rooms may contain water heaters, boilers, HVAC equipment, condensate drains, humidifiers, floor drains, softeners, sump pumps, and plumbing manifolds. These areas often have small leaks that go unnoticed because they are not part of daily living space.
Check around water heater pans, drain valves, pipe connections, condensate lines, pump areas, floor drains, nearby walls, and flooring. Look for rust, mineral deposits, damp concrete, puddle marks, musty odors, water stains, or corrosion. If a water heater, HVAC unit, or boiler shows active leakage, do not ignore it because mechanical equipment can fail suddenly after slow warning signs.
Inspect Walls, Ceilings, Floors, and Trim
After checking moisture-producing rooms, move through the rest of the home and inspect building materials. Walls, ceilings, flooring, baseboards, trim, doors, and closets often reveal moisture movement from plumbing, roofing, windows, foundations, exterior walls, or humidity.
Use your senses carefully. Look for stains, swelling, texture changes, odors, soft spots, gaps, cupping, bubbling, or materials that look different from surrounding areas. Compare similar materials. A single swollen baseboard matters more when nearby trim is flat and dry.
Walls
Wall moisture can come from plumbing, roof leaks, exterior water entry, condensation, window leaks, or humidity trapped behind furniture. Inspect walls near bathrooms, kitchens, laundry rooms, windows, exterior corners, chimneys, roof lines, plumbing chases, and basement stairways.
Look for discoloration, bubbling paint, peeling wallpaper, soft drywall, nail pops, swollen trim, musty odor, or cold damp patches. Do not press hard on softened drywall or cut into walls during a first inspection. If the wall is soft, sagging, moldy, or near electrical components, stop and get professional help.
If wall symptoms are subtle, compare them with common signs of hidden moisture in walls before deciding whether the area needs monitoring or further testing.
Ceilings
Ceiling stains often point to water from above, but the source is not always directly over the stain. Water can travel along framing, pipes, insulation, or ceiling materials before appearing below. Inspect ceilings under bathrooms, kitchens, laundry rooms, attics, roof valleys, chimneys, vents, skylights, and HVAC equipment.
Look for yellow or brown stains, rings, sagging drywall, peeling paint, bubbling texture, cracks, soft spots, or recurring discoloration. A stain that grows after rain suggests roof or exterior entry. A stain that grows after shower use, toilet use, washer use, or sink use may point toward plumbing.
Do not poke or cut a sagging ceiling. Waterlogged ceiling materials can collapse, and hidden water may be near wiring or fixtures.
Floors and Subfloors
Floor moisture may show up as cupping, lifting, buckling, soft spots, dark seams, loose tiles, warped laminate, musty carpet, damp padding, or squeaks near wet areas. Floors near bathrooms, kitchens, laundry rooms, exterior doors, basements, crawl spaces, and appliances deserve close attention.
Walk slowly and feel for soft or springy areas. Look along seams, transitions, thresholds, and edges. If a floor feels soft near a toilet, shower, tub, dishwasher, washer, refrigerator, or exterior door, moisture may have reached the subfloor.
Floor symptoms can remain after the surface dries. If flooring is cupped, lifted, or soft, the issue may be below the visible surface rather than only on top of it.
Baseboards, Trim, and Interior Doors
Baseboards and trim often show moisture early because they sit close to floors, wall cavities, window openings, and exterior edges. Inspect for swelling, gaps, staining, peeling paint, softened corners, separated caulk, darkened lower edges, and musty odors near trim.
Interior doors can also give clues. A door that suddenly sticks, swells, or rubs after rain or humid weather may point to humidity, shifting, or moisture around the frame. Door trim near bathrooms, exterior walls, basements, and laundry rooms should be checked carefully.
Closets and Closed Rooms
Closets and closed rooms often trap moisture because airflow is limited. A closet on an exterior wall, near a bathroom, above a crawl space, or below an attic can develop musty odors or mold before open rooms show problems.
Open closet doors and inspect corners, floors, baseboards, shoes, stored boxes, clothing, and exterior-facing walls. Look for stale air, musty odor, dark spots, condensation, damp cardboard, or items that feel cool and clammy. Avoid storing boxes directly against exterior walls if that area has repeated moisture or condensation.
Inspect Lower-Level Moisture Sources
Lower levels matter because damp soil, foundations, crawl spaces, basements, slab edges, and drainage problems can affect odors, humidity, flooring, framing, and insulation above them.
Basements
Basements should be inspected for water entry, condensation, seepage, foundation cracks, slab moisture, sump pump issues, and humidity. Start at the floor-wall joint, corners, exterior-facing walls, window wells, sump areas, floor drains, utility penetrations, and areas below downspouts or poor grading outside.
Look for damp concrete, dark stains, peeling paint, efflorescence, musty odors, rust, mold spots, swollen trim, wet carpet, condensation on cold surfaces, and water marks on stored items. White powdery deposits on masonry may indicate repeated moisture movement through concrete or block walls.
Basement moisture patterns often change with weather. If dampness appears after rain, snowmelt, or high groundwater, the source may involve exterior drainage, foundation cracks, hydrostatic pressure, window wells, or sump pump performance. For a deeper basement system overview, see this guide on how to waterproof basements and control water intrusion.
Crawl Spaces
Crawl spaces can affect the whole home because they sit below floors, framing, insulation, ducts, plumbing, and air leakage paths. Moisture in a crawl space may show up upstairs as musty odors, cold floors, high humidity, moldy smells, pest activity, damp insulation, or wood decay.
Do not enter a crawl space that appears unsafe, contaminated, moldy, flooded, or structurally damaged. Inspect from the access point first with a flashlight. If the area is safe and accessible, look for standing water, damp soil, missing vapor barriers, wet insulation, condensation, rusted metal, moldy joists, soft wood, plumbing leaks, and foundation wall dampness.
If you find damp soil, wet insulation, condensation, or musty wood odors, use a more focused guide to detect hidden moisture in crawl spaces. Do not disturb moldy insulation or crawl under areas that appear unsafe.
Slabs, Garages, and Storage Areas
Concrete slabs, garages, and storage areas can hide moisture because they often have less finished material. Inspect slab edges, exterior-facing walls, garage corners, stored boxes, shelving, water heater areas, utility penetrations, and places where rainwater may enter under doors.
Look for damp concrete, musty stored items, rust, stains, peeling coatings, efflorescence, swollen cardboard, or flooring that fails near slab edges. Moisture in these areas may come from poor drainage, vapor movement through concrete, plumbing leaks below slabs, condensation, or rain blowing under doors.
Inspect Upper-Level Moisture Sources
Upper areas can hide roof leaks, attic condensation, insulation moisture, ventilation problems, and plumbing leaks from upstairs rooms. Because water can travel downward, upper-level moisture may appear as ceiling stains, wall discoloration, musty rooms, damp insulation, or recurring mold in corners.
Attics
Attics should be inspected carefully because they can hide roof leaks, condensation, ventilation problems, bathroom fan discharge, duct sweating, insulation moisture, and mold on sheathing. Start by looking from the attic access before stepping inside. Do not walk on ceiling drywall or insulation.
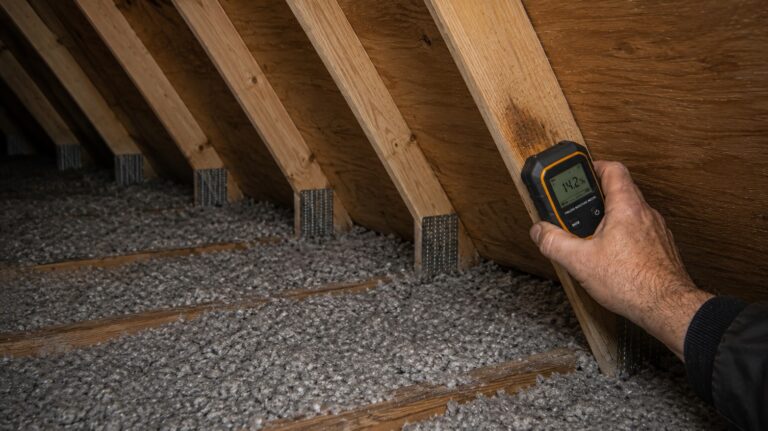
Use a flashlight to inspect roof sheathing, rafters, trusses, insulation, vents, chimneys, plumbing penetrations, exhaust fans, ductwork, and areas above ceiling stains. Look for dark sheathing, wet insulation, rusted nails, mold-like spotting, water trails, daylight at roof gaps, damaged venting, or compressed insulation.
If bathroom fans vent into the attic instead of outdoors, they can add moisture to insulation and roof sheathing. If ducts are poorly insulated, condensation may form on the duct exterior. If roof ventilation is blocked, humid air may linger and condense on cold roof surfaces.
Roof Framing and Sheathing
Roof framing and sheathing deserve attention because moisture can damage wood before it reaches finished ceilings. Check around chimneys, roof valleys, skylights, vents, plumbing stacks, bath fan ducts, ridge areas, and eaves.
Signs of concern include dark streaks, water stains, soft wood, black spotting, rusted fasteners, damp insulation, and stains that line up with penetrations or valleys. Compare older stains with recent moisture. A dry stain may still deserve monitoring if it appears after storms.
Roof and attic moisture can be difficult to interpret because leaks and condensation can appear similar. Rain-related staining near penetrations, chimneys, roof valleys, or flashing areas may point toward water entry. Uniform moisture on cold sheathing, especially in winter, may point toward condensation. For deeper attic-specific inspection, see this guide to detect hidden moisture in attics.
Inspect Windows, Doors, and Exterior Openings
Windows, doors, and exterior openings are common moisture entry points because they interrupt the wall system. Water can enter through failed seals, flashing gaps, siding details, trim joints, window wells, threshold gaps, and worn weatherstripping. Condensation can also collect on cold glass, frames, sills, and corners.
Windows
Inspect window glass, frames, sills, trim, lower corners, wall areas below windows, and nearby flooring. Look for condensation, staining, swollen trim, peeling paint, soft drywall, mold spots, failed caulk, damaged sills, or dark lines at corners.
Try to separate leakage from condensation. Moisture that appears during cold weather on glass or frames may be condensation. Moisture that appears below a window after rain may point to exterior water entry. Moisture in lower corners may involve both condensation and small leaks.
For a more focused window inspection, see this guide on how to detect moisture around window frames.
Exterior Doors
Exterior doors can leak around thresholds, weatherstripping, trim, flashing, siding transitions, and lower corners. Inspect floors near doors, baseboards, door frames, lower trim, thresholds, and nearby walls.
Look for staining, swelling, peeling paint, soft flooring, darkened trim, gaps, drafts, musty odor, or water marks after wind-driven rain. Door leaks can be intermittent, so inspect after storms if you suspect water entry.
Exterior Wall Penetrations
Exterior wall penetrations include hose bibs, dryer vents, utility lines, exterior outlets, wall vents, cable penetrations, light fixtures, and places where different materials meet. These areas can allow water behind siding or into wall cavities if they are poorly sealed, damaged, or flashed incorrectly.
Inside the home, look near exterior penetrations for staining, swelling, odors, peeling paint, or damp drywall. Outside, look for gaps, failed sealant, missing trim details, loose siding, cracks, or areas where water can collect. If symptoms appear inside near an exterior penetration after rain, the exterior wall system may need closer inspection.
Inspect HVAC, Ventilation, and Airflow
HVAC and ventilation systems affect moisture because they move air, remove humidity, produce condensate, and influence temperature differences across surfaces. A home can have moisture problems even without a plumbing or roof leak if humidity, airflow, condensate drainage, or duct insulation is failing.
HVAC Condensate Areas
Air conditioners and high-efficiency equipment often produce condensate. If the drain line, drain pan, pump, or nearby floor area fails, water can collect near equipment or inside walls and ceilings.
Inspect around indoor HVAC equipment, condensate pans, drain lines, pumps, nearby flooring, utility closets, attic units, and ceilings below air handlers. Look for water stains, rust, algae, damp insulation, full drain pans, musty odors, or previous overflow marks.
If water is near electrical components, stop inspecting that area and call an HVAC professional. Do not remove panels or reach into equipment unless you are qualified to do so.
Ductwork and Registers
Ducts and registers can show condensation when warm, humid air contacts cold metal or poorly insulated duct surfaces. This can happen in attics, crawl spaces, basements, utility rooms, or rooms with poor airflow.
Look for condensation on ducts, rusted registers, stained ceilings near vents, moldy odors from supply air, damp insulation around ducts, or water marks near ceiling registers. If condensation appears repeatedly around ducts or vents, the issue may involve humidity, insulation, air leaks, airflow imbalance, or equipment performance.
Bathroom, Kitchen, and Dryer Ventilation
Ventilation problems often show up as persistent humidity, condensation, mold near ceilings, damp walls, peeling paint, or musty odors. Bathroom fans, kitchen ventilation, and dryer vents should move moist air outdoors, not into attics, wall cavities, crawl spaces, or closed rooms.
Check whether bathroom fans are used, whether they seem weak, and whether moisture remains long after showers. Inspect kitchen ventilation if cooking creates persistent condensation. Check dryer vents for disconnection, crushing, clogging, or indoor discharge.
If ventilation is weak, the moisture problem may not be a hidden leak. It may be repeated moisture accumulation from normal daily activities that cannot dry fast enough.
How to Document What You Find
Documentation turns a moisture inspection from guesswork into useful evidence. A stain, odor, or reading means more when you know where it is, when it appears, and whether it changes after rain, plumbing use, HVAC operation, or humidity shifts.
Record:
- The room and exact location
- The visible sign, odor, reading, or material change
- The date and recent weather
- Recent plumbing, appliance, shower, laundry, or HVAC use
- Humidity readings if available
- Moisture meter readings compared with nearby dry areas
- Photos from the same angle over time
- Whether the area is spreading, drying, recurring, or unchanged
When using a moisture meter, compare similar materials instead of relying on one number by itself. A suspicious baseboard should be compared with another baseboard of the same type. A stained drywall area should be compared with nearby drywall that appears dry. Differences are often more useful than isolated readings.
Photos are especially useful for slow changes. A small stain may look the same from memory, but a photo taken after each storm, shower, or appliance cycle can show whether it is expanding, darkening, or changing texture.
How to Tell Whether Moisture Is Active, Old, or Recurring
A whole-home moisture inspection should help you decide whether a clue is old, active, or recurring. This matters because old stains may need monitoring, while active or recurring moisture needs source tracing and repair.
Signs Moisture May Be Active
Active moisture may appear as dampness, darkening, softness, spreading stains, condensation, puddles, wet odors, or changing moisture readings. It may show up after rain, after plumbing use, during cooling cycles, after showers, or when humidity rises.
Active moisture often changes. A stain gets darker. A cabinet floor becomes damp after sink use. A ceiling mark grows after rain. A basement wall feels wet after storms. A room smells mustier when the HVAC system runs. These timing clues help narrow the source.
Signs Moisture May Be Old
Old moisture signs may include dry stains, stable discoloration, previous repair marks, inactive water rings, or older damage that does not change over time. However, old stains should not be ignored until you confirm they are stable.
Mark or photograph the area, then recheck it after likely trigger conditions. If a ceiling stain does not change after rain, plumbing use, or humidity shifts, it may be old. If it grows, darkens, softens, or smells musty, the source may still be active.
Signs Moisture May Be Recurring
Recurring moisture returns after cleaning, drying, painting, caulking, or repair. It may come back in the same corner, cabinet, wall, ceiling, floor edge, basement area, crawl space, or window opening.
Recurring moisture is important because it often means the source was not fixed. The visible surface may have been cleaned or dried, but the leak, humidity source, seepage path, ventilation problem, or exterior entry point may still be present. If this pattern fits your home, see this guide on why moisture problems keep returning.
What to Do After the Inspection
After a whole-home moisture inspection, group your findings by pattern. Do not treat every stain or odor as a separate mystery until you look at timing, location, and possible sources.
Ask:
- Are the signs concentrated near plumbing?
- Do they appear after rain?
- Are they strongest in lower levels?
- Are they strongest in upper levels or attic areas?
- Do they appear in several rooms at once?
- Do they follow humidity, condensation, or HVAC patterns?
- Do they return after cleanup or repair?
Sort each finding into one of four groups: monitor if the clue is dry, stable, and isolated; recheck under trigger conditions if it may appear after rain, showers, appliance use, or HVAC cycles; trace the source if the area is damp, spreading, soft, or recurring; and call a professional if the moisture is structural, electrical, contaminated, mold-related, hidden inside materials, or connected to roofing, foundation, crawl space, plumbing, or HVAC problems.
If the signs are subtle, compare them with common patterns used to identify hidden moisture problems throughout your home. Hidden moisture often appears first as odor, swelling, discoloration, condensation, or material changes before active water is visible.
If you find a clear active leak, stop focusing on broad inspection and address the source. If you find several weak clues but no obvious source, continue documenting conditions and consider targeted professional inspection. If you find mold, structural softness, electrical risk, contaminated water, sagging ceilings, or widespread dampness, do not treat the inspection as a DIY repair plan.
When a Moisture Inspection Requires Professional Help
A homeowner inspection can reveal warning signs, but professional tools and experience may be needed when the source is hidden, unclear, active, structural, electrical, contaminated, or recurring.
Call a professional if you find:
- Active water near electrical wiring, outlets, fixtures, panels, or appliances
- Sagging ceilings, soft structural materials, or unsafe flooring
- Large, spreading, or recurring mold growth
- Moisture that returns after drying, painting, caulking, or repair
- Repeated musty odors with no visible source
- Basement seepage, foundation cracks, or standing water
- Water connected to sewage, floodwater, contaminated runoff, or an unknown source
- Crawl space moisture with mold, damaged wood, or unsafe access
- Roof leak symptoms that require roof access
- HVAC water problems involving drain pans, electrical components, or duct condensation
The right professional depends on the pattern. A plumber may be needed for fixture or pipe leaks. A roofer may be needed for roof, flashing, or attic leak symptoms. A waterproofing or crawl space specialist may be needed for foundation, seepage, drainage, or crawl space water. An HVAC technician may be needed for condensate, duct, airflow, or humidity problems. A mold remediation professional may be needed when mold is widespread, recurring, or inside materials.
FAQs About Whole-Home Moisture Inspections
How often should I inspect my home for moisture?
A basic moisture inspection should be done at least a few times per year, especially before and after wet seasons. It is also smart to inspect after major storms, plumbing leaks, appliance overflows, roof repairs, basement seepage, or any time you notice musty odors, condensation, stains, or swelling.
What is the first place to check for hidden moisture?
Start with the area most likely to contain water sources or moisture exposure. Bathrooms, kitchens, laundry rooms, basements, crawl spaces, windows, exterior walls, and HVAC areas are usually the highest-risk places. If you already see a stain or smell an odor, start near that area and then check what is above, below, behind, and outside it.
Can I inspect for moisture without opening walls?
Yes. A first inspection should usually be non-invasive. Look for odors, stains, swelling, soft materials, condensation, humidity readings, moisture meter patterns, and changes after rain or water use. Opening walls should not be the first step unless there is a clear need or a professional recommends it.
Do I need a moisture meter for a home inspection?
A moisture meter is helpful but not always required. It can confirm whether suspicious materials are damp and help compare affected areas with nearby dry areas. However, it does not identify the source by itself. Moisture readings need to be interpreted with timing, location, material type, and surrounding conditions.
How do I know if a moisture stain is old or active?
An old stain usually stays the same size, color, and texture over time. An active stain may darken, expand, feel damp, smell musty, bubble paint, soften drywall, or change after rain, plumbing use, HVAC operation, or humidity changes. Photograph the area and recheck it under the same conditions that may have caused the stain.
What should I compare during a whole-home moisture inspection?
Compare similar materials in different rooms. A suspicious wall, cabinet floor, baseboard, ceiling area, or flooring seam is more meaningful when it looks, smells, feels, or reads differently from the same type of material nearby. Write down the location, timing, recent weather, recent water use, humidity reading, and whether the clue changes after rain, showers, appliance use, or HVAC operation.
What does it mean if several rooms show small moisture signs?
Several small signs in different rooms may point to a whole-home pattern rather than separate leaks. Compare humidity readings, ventilation, HVAC operation, basement or crawl space moisture, recent weather, and whether the signs appear on exterior walls, lower levels, upper ceilings, or closed rooms. If the pattern is widespread or recurring, source tracing is more useful than cleaning each spot separately.
When should a moisture inspection be done by a professional?
Use a professional when moisture is active, hidden, recurring, near electrical systems, affecting structural materials, connected to roof or foundation problems, or associated with significant mold growth. Professional inspection is also useful when you find symptoms in several areas and cannot tell whether they are connected.
Key Takeaways
- A whole-home moisture inspection helps you find early warning signs before dampness becomes mold, material damage, or recurring repair work.
- Start with whole-home clues such as musty odors, stains, swelling, humidity, condensation, recent storms, leaks, and repairs.
- Inspect high-risk rooms first, including bathrooms, kitchens, laundry rooms, utility rooms, and appliance areas.
- Check visible materials such as walls, ceilings, flooring, baseboards, trim, closets, basement surfaces, crawl spaces, attics, windows, doors, HVAC areas, and ventilation paths.
- Use photos, dates, humidity readings, moisture meter readings, weather notes, and water-use patterns to tell whether moisture is old, active, recurring, or spreading.
- Call a professional when moisture is active, hidden, recurring, structural, electrical, mold-related, contaminated, or connected to roofing, foundation, crawl space, plumbing, or HVAC problems.
Conclusion
A whole-home moisture inspection is most useful when it helps you connect clues instead of guessing from one stain, odor, or damp surface. Inspect the highest-risk areas, document what changes, compare symptoms with weather and water use, and decide whether the next step is monitoring, source tracing, repair, or professional evaluation.
2 Comments
Comments are closed.