How to Detect Moisture Around Window Frames
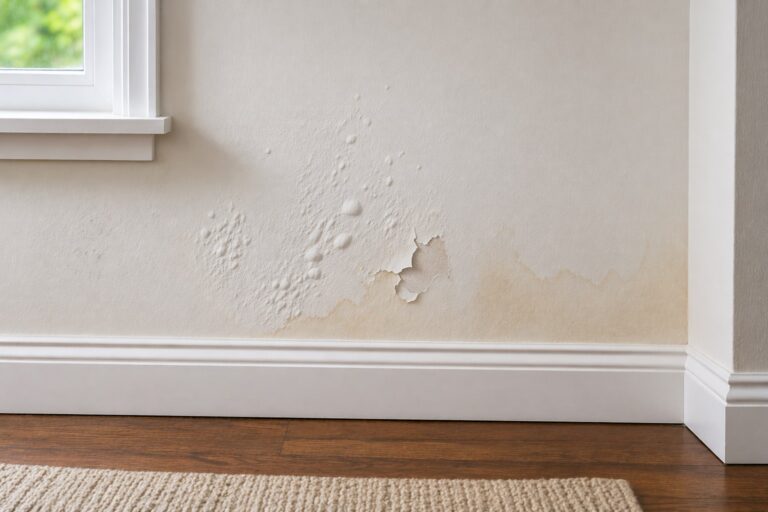
Moisture around window frames is not always obvious at first. A window can look mostly normal while water is already affecting the trim, drywall, sill, caulk line, or framing pocket around the opening. The earliest signs are often subtle: a small stain near one corner, paint that starts to bubble, wood trim that feels slightly swollen, or a damp smell that seems strongest near the window.
To detect moisture around window frames, inspect the areas where water usually collects: the lower corners, sill joint, side trim, top corners, and drywall immediately beside the frame. Look for staining, peeling paint, soft drywall, swollen wood, separated caulk, musty odor, or moisture meter readings that are higher than nearby dry wall areas. The goal is to confirm whether moisture is present, where it is concentrated, and whether the pattern suggests condensation, exterior water intrusion, or moisture hidden behind the trim.
This is a detection guide, not a window repair guide. If you confirm moisture, the next step is to understand the source and severity before deciding whether drying, sealing, or professional inspection is needed. For the broader window and door moisture cluster, see how windows and doors cause hidden moisture problems.
Why Moisture Around Window Frames Is Often Missed
Window moisture is easy to miss because the most visible surface is not always the wettest part of the assembly. Painted trim, caulk, vinyl frames, sealed wood, and drywall paint can hide the first stages of moisture absorption. A surface may feel dry after wiping it down while the back side of the trim, the drywall edge, or the framing around the window still holds moisture.
This is especially common when moisture comes from small repeated events instead of one obvious leak. A little condensation every morning, light rain entering around a weak seal, or occasional wind-driven water can wet the same area again and again. Over time, the repeated wetting matters more than the amount of water visible at any one moment.
Moisture Can Hide Behind Trim
Interior window trim covers the joint between the window unit and the surrounding wall. That makes it useful visually, but it also means trim can hide moisture that has entered behind the casing. The front of the trim may look acceptable while the back side is damp or stained.
Common hidden moisture zones around window frames include:
- The lower corners where the side trim meets the sill
- The inside edge where the casing meets the window frame
- The drywall edge directly beside the frame
- The underside of the sill or stool
- The top corners after rain or wind-driven water
- The wall cavity around the rough window opening
These areas should be inspected carefully because moisture often collects at joints, corners, and material transitions. A small stain at the bottom of the frame may be the only visible clue that water is entering from above or moving behind the trim.
Surface Dryness Can Be Misleading
A dry surface does not always mean the material behind it is dry. Moisture can wick into drywall paper, wood trim, MDF casing, insulation, or framing around the window opening. Painted surfaces may dry quickly, but porous materials behind them can remain damp longer.
This is why moisture detection should not rely on one quick glance. A better approach is to compare the suspect area with nearby dry areas. Check whether the paint texture, trim shape, wall firmness, smell, and temperature feel different around the window than they do on an interior wall with no window opening.
If the moisture appears to extend away from the window and into the surrounding wall, compare your findings with broader signs of hidden moisture in walls. That helps separate a window-specific moisture issue from a larger wall moisture problem.
Early Warning Signs of Moisture Around Window Frames
The first step in detecting moisture is knowing what early material changes look like. Moisture rarely affects every part of a window evenly. It usually shows up at corners, seams, lower edges, or places where water is trapped against porous materials.
Inspect slowly in good lighting. Then use a flashlight held at a low angle across the wall and trim. Side lighting makes raised paint, swollen trim edges, uneven drywall, and small stains easier to see.
Paint Bubbling or Peeling Near the Frame
Paint bubbling near a window frame is one of the most common early signs of moisture. It often appears where drywall meets the trim, along the lower corners, or just below the sill. Bubbling happens when moisture pushes against the paint layer or weakens the bond between paint and the surface underneath.
Look for these signs:
- Small raised blisters in painted drywall
- Paint peeling along the trim edge
- Wrinkled paint near the sill
- Cracked paint along caulk lines
- Paint that feels soft, rubbery, or loose when pressed lightly
Paint damage does not prove an active leak by itself. Old condensation, past leaks, poor surface preparation, or previous repairs can also cause paint failure. The important question is whether the paint damage is changing, returning, or appearing with other moisture signs.
Water Stains Around Window Corners
Water stains near window corners are important because they can show where moisture is collecting. These stains may appear yellow, tan, brown, gray, or slightly darker than the surrounding wall. The location and pattern of the stain often reveal more than the color alone.
- Bottom-corner stains often suggest water is collecting near the sill or running down behind the side trim.
- Top-corner stains may suggest water is entering from above, especially after rain.
- Vertical streaks beside the frame may suggest water is traveling downward behind the trim.
- Wide, diffuse stains may suggest repeated condensation or damp drywall rather than one direct drip.
If stains appear mostly around the sill, use this article as the broader frame check and compare it with how to inspect window sills for moisture damage for the more specific lower-window inspection.
Swollen or Soft Window Trim
Wood and MDF trim can absorb moisture and change shape before the wall looks badly damaged. Swelling may appear as raised edges, open trim joints, rough texture, or casing that no longer sits flat against the wall.
Check the lower corners carefully. These are common moisture collection points because water moves downward and often settles where the side casing meets the sill. Compare the suspect trim with dry trim on another window or interior doorway.
- Soft trim may indicate repeated wetting.
- Raised grain can suggest wood has absorbed moisture.
- Open miter joints can indicate swelling and movement.
- Darkened trim edges can suggest water has been trapped behind paint or caulk.
Use light pressure only. Do not gouge the trim with a screwdriver or knife during a basic inspection. The goal is to detect differences, not create damage.
How to Physically Check for Moisture Around Window Frames
Visual inspection is the first step, but physical checking often confirms what your eyes suggest. Moisture affects how materials feel, respond to pressure, and hold their shape. These physical checks help determine whether moisture is currently present or if past moisture has weakened materials.
Before beginning, make sure the surface is clean and free of dust or debris that could hide important signs. Perform these checks slowly and compare the suspect window area with another window or wall that appears dry. Differences between locations often reveal more than the absolute condition of one surface.
Use Gentle Pressure to Detect Soft Materials
Softness is one of the most reliable indicators of hidden moisture. Dry materials such as painted drywall and wood trim should feel firm and consistent. Moisture weakens internal fibers and causes surfaces to compress more easily under pressure.
Focus your pressure checks on:
- Lower corners of the window frame
- The sill where water tends to collect
- Side trim joints and seams
- The drywall edge beside the frame
- The bottom section of vertical trim
Press gently using your fingertips rather than tools. If the surface dents easily, feels spongy, or produces a faint cracking sound, moisture damage may already be present beneath the surface. Always compare the suspect area with a dry section nearby to confirm whether the softness is unusual.
Do not seal, paint, caulk, or cover a soft area until the moisture pattern is understood. Covering the surface can trap dampness behind trim or drywall and make the damage harder to detect later.
If softness appears concentrated near the sill area, compare your findings with how to inspect window sills for moisture damage instead of expanding this frame-focused inspection into a full sill-damage guide.
Feel for Temperature Differences
Moisture often makes surfaces feel cooler than surrounding materials. This happens because damp materials transfer heat differently than dry ones. Even small temperature differences can indicate moisture accumulation behind trim or drywall.
Run your hand slowly along the sides and bottom of the window frame. Pay attention to areas that feel noticeably cooler than adjacent wall sections. Temperature differences are especially noticeable during cold weather or when condensation is likely.
If temperature differences appear mainly during winter or high humidity seasons, condensation may be contributing to the problem. Understanding how condensation forms around windows is important when interpreting these findings. See why windows develop condensation and mold for a detailed explanation of how temperature and humidity interact around window assemblies.
Check Caulk Lines and Frame Edges
Caulk lines are common entry points for moisture. Over time, caulk can crack, shrink, or separate from the surfaces it seals. These openings allow moisture to move into the gap between the window frame and wall.
Inspect caulk lines along:
- The sides of the window frame
- The top frame edge
- The joint between the sill and vertical trim
- The drywall-to-trim seam
Look for:
- Hairline cracks in caulk
- Gaps between caulk and surface edges
- Caulk that appears brittle or separated
- Discoloration near cracked seal lines
Even small gaps can allow repeated moisture intrusion. These openings may not allow visible dripping, but they can allow enough moisture to cause long-term damage.
Inspect the Surrounding Wall for Expansion
Moisture rarely stays confined to the exact location where it first appears. Once materials absorb water, the affected area often expands gradually. The drywall or trim may appear slightly uneven or swollen compared with surrounding surfaces.
Look for these physical indicators:
- Trim edges that no longer align cleanly
- Slight bulging of drywall near the frame
- Uneven seams between trim pieces
- Minor separation where materials once fit tightly
If these signs appear alongside staining or odor, the moisture problem may be expanding beyond the visible frame. At this stage, continuing inspection into adjacent materials becomes important to prevent hidden structural damage.
Tools That Help Detect Moisture Around Window Frames
Visual and physical checks come first, but simple tools can help confirm whether moisture is hidden beneath paint, trim, or drywall. Use tools to support patterns you already see rather than replacing careful observation.
Using a Moisture Meter Around Window Frames
A moisture meter is one of the most effective tools for detecting hidden moisture. These devices measure moisture content inside materials such as drywall, wood trim, and framing. By comparing readings from suspect areas with readings from dry areas, you can confirm whether moisture is present.
The most useful reading is usually the comparison, not one isolated number. Check the suspect corner, then check a dry interior wall and another dry window frame. A consistent difference between the suspect area and the dry comparison areas is more meaningful than a single reading by itself.
When using a moisture meter:
- Take a baseline reading from a dry interior wall
- Measure along the window frame edges
- Test the lower corners carefully
- Compare readings between multiple points
- Look for readings that remain consistently higher than nearby dry surfaces
Higher readings concentrated around one area usually indicate moisture intrusion rather than simple surface humidity.
Using a Flashlight to Reveal Surface Changes
A standard flashlight is an effective diagnostic tool when used correctly. Hold the flashlight at a shallow angle across the wall and trim surface rather than pointing it directly at the surface. This angled lighting creates shadows that reveal subtle texture changes.
This method helps expose:
- Raised paint bubbles
- Fine cracks along trim edges
- Slight surface swelling
- Hidden staining patterns
- Uneven drywall surfaces
Flashlight inspections are especially useful during evening hours or in rooms with limited natural light.
Using Temperature Checks as a Supporting Clue
Temperature checks can support your inspection, especially when one area feels cooler than nearby dry materials. An infrared thermometer may help confirm that pattern, but temperature differences should not be treated as proof of moisture by themselves.
Scan the thermometer along:
- Vertical trim edges
- Lower frame corners
- The sill area
- Adjacent drywall sections
Temperature differences should be compared across multiple points rather than relying on a single reading. Consistent cooler readings in one location may indicate trapped moisture.
How to Tell the Difference Between Condensation and Leaks
A key part of detecting window-frame moisture is deciding whether the pattern suggests condensation or water intrusion. Condensation usually forms when warm indoor air contacts a cooler window surface, while leaks usually follow rain, snow melt, or wind-driven storms. Timing, location, and recurrence often reveal which source is more likely.
Signs the Moisture Is Likely Condensation
Condensation usually appears in predictable seasonal patterns. It often forms during colder months when indoor humidity is high and window surfaces are cooler than surrounding walls.
Common condensation indicators include:
- Moisture forming on the glass itself
- Water droplets appearing in the morning and drying later in the day
- Dampness along the sill without visible exterior damage
- Moisture appearing across multiple windows in the same room
- Higher moisture during cold weather or humid indoor conditions
Condensation usually affects interior surfaces first, especially lower corners and sills. If condensation continues for long periods, it can still cause damage to trim, paint, and drywall. Understanding the mechanics behind condensation helps determine whether humidity control may be part of the solution. For a deeper explanation of these patterns, review why windows develop condensation and mold, which explains how temperature and humidity differences create repeated moisture cycles.
Signs the Moisture Is Likely a Leak
Leaks often follow weather patterns rather than indoor humidity conditions. Moisture may appear after rainfall, snow melt, or wind-driven storms. Unlike condensation, leaks usually create localized damage that grows over time.
Typical leak indicators include:
- Stains that appear after rainstorms
- Moisture concentrated in one specific window
- Water marks forming along the top frame or side seams
- Paint failure that worsens after outdoor weather events
- Persistent dampness that does not dry fully between events
If moisture appears only after storms or continues spreading downward from the upper frame, water intrusion from outside becomes more likely. This pattern suggests that water is entering somewhere above the visible damage and moving along internal surfaces before appearing near the frame.
Where Moisture Around Window Frames Usually Starts
Moisture around window frames usually starts at predictable joints, corners, and seams. Checking those areas first makes hidden moisture easier to find.
Top Frame Intrusion Points
The top edge of the window frame is one of the most common places where moisture first becomes visible. Water may be entering from above due to siding gaps, roof runoff, flashing failure, or wind-driven rain, but this detection guide should focus on the visible pattern rather than the repair method. Once inside, water often travels downward along framing members before becoming visible.
Look for:
- Stains forming near the top corners of the frame
- Vertical streaks running downward from upper trim
- Paint damage that appears first near the top
- Moisture appearing shortly after storms
Top-entry moisture often becomes visible lower down due to gravity. This is why bottom damage does not always mean the entry point is at the bottom.
Side Seam Moisture Entry
The vertical sides of window frames contain multiple joints where trim meets drywall or where the window meets surrounding materials. These seams can develop small gaps over time as materials expand, contract, and settle.
Signs of side-entry moisture include:
- Stains running along one vertical edge
- Paint cracking along trim seams
- Local swelling of side trim
- Dark lines forming beside the frame
Side seam moisture can travel downward and collect at the sill, making lower damage appear worse than the original entry location.
Bottom Sill Accumulation Areas
The sill collects moisture from multiple sources. Water from condensation, small leaks, or interior humidity can accumulate here. Because the sill is horizontal, moisture often remains longer in this location than in vertical sections.
Inspect the sill carefully for:
- Soft wood or MDF near corners
- Dark stains along the inside edge
- Paint lifting near the sill joint
- Persistent dampness in the same area
If moisture appears concentrated at the sill, a more focused inspection may be needed. The guide on how to inspect window sills for moisture damage explains lower-window moisture patterns in more detail.
When Moisture Detection Indicates a Bigger Problem
Some moisture findings remain minor and stable, while others indicate expanding damage. Recognizing the difference helps homeowners decide whether continued observation is safe or whether professional inspection should be considered.
Stop the inspection and get professional help if the wall feels soft over a wide area, trim is crumbling, the window no longer feels stable, water appears during active rain, or a strong musty odor continues after the surface dries.
Signs Moisture Is Spreading Beyond the Frame
Moisture that spreads outward from the frame into surrounding wall materials often signals a developing structural concern. This usually occurs when moisture remains present for extended periods or enters repeatedly from the same location.
Watch for:
- Stains spreading into the wall beside the window
- Soft drywall extending beyond trim edges
- Musty odor increasing over time
- Multiple materials showing damage simultaneously
- Recurring moisture in the same location
Early identification helps prevent deeper damage before the affected area becomes harder to inspect or dry.
Signs Structural Materials May Be Weakening
When moisture continues affecting materials, structural components may begin losing strength. Wood framing can soften, drywall can crumble, and trim joints can loosen. These changes may remain hidden until pressure reveals the weakness.
Look for:
- Trim that pulls away from the wall
- Persistent softness when pressed gently
- Visible cracks forming near frame corners
- Unusual movement in trim or casing
- Repeated paint failure in the same location
At this stage, continued monitoring alone may not be sufficient. Professional inspection may be required to determine the full extent of the damage.
When to Call a Professional About Window Moisture
Some window moisture patterns can be monitored, but others need professional evaluation because the visible damage may not show how far moisture has traveled behind trim or drywall.
Persistent Moisture That Returns After Drying
If moisture returns after drying the surface several times, the underlying source has not been corrected. This pattern often indicates that water is entering from outside or accumulating within the wall cavity.
Professional inspection may be appropriate when:
- The same area becomes damp repeatedly
- Moisture returns after rainfall or seasonal weather changes
- Drying efforts only provide temporary improvement
- Water stains gradually expand despite cleaning
- The problem persists across multiple seasons
Persistent moisture should be taken seriously because repeated wetting cycles can weaken nearby materials and increase the likelihood of hidden mold growth.
Visible Structural Changes or Material Failure
Structural changes around window frames often indicate that moisture has been present long enough to weaken surrounding materials. At this stage, surface inspection alone may not reveal the full extent of the damage.
Professional evaluation is recommended when you notice:
- Trim pulling away from the wall
- Cracks forming near frame joints
- Soft drywall that extends beyond the frame
- Repeated paint failure after repainting
- Sections of trim that shift or flex easily
These conditions suggest that moisture has moved beyond surface layers and may have reached framing components.
Strong or Persistent Musty Odor Near Windows
A persistent musty odor near a window frame is a strong indicator that moisture has remained trapped long enough to support microbial growth. Even if visible mold is not obvious, odor alone can signal hidden moisture behind trim or inside the wall cavity.
If odor becomes stronger over time or spreads into nearby rooms, further inspection becomes more important. Mold-related concerns should be addressed promptly because odor often indicates that moisture is still present somewhere within the structure.
How to Monitor Moisture After Detection
Detecting moisture is only the first step. Monitoring the affected area over time helps determine whether the problem is improving, remaining stable, or worsening. Tracking moisture patterns helps separate temporary moisture from ongoing intrusion.
Track Changes in Stain Size and Color
Water stains often reveal changes in moisture levels over time. Marking the edge of a stain lightly with pencil allows you to monitor whether it grows or fades.
Pay attention to:
- Stains becoming darker or more defined
- Edges spreading outward
- New stains appearing nearby
- Old stains remaining unchanged despite drying
Growing stains usually indicate continued moisture exposure. Stable stains that do not expand may represent older damage rather than an active leak.
Watch for Seasonal Patterns
Some moisture patterns appear only during certain times of the year. Cold weather condensation and heavy rainfall seasons often reveal weaknesses that remain hidden during dry months.
Observe whether moisture appears:
- During winter temperature drops
- After major storms
- During periods of high indoor humidity
- When heating or cooling systems change conditions
Recognizing seasonal patterns helps distinguish between condensation-related moisture and intrusion-related moisture.
Use Repeated Moisture Meter Checks
If a moisture meter is available, repeated measurements provide valuable confirmation of drying progress or moisture persistence. Taking readings from the same location at regular intervals helps reveal whether moisture levels are decreasing.
Consistent readings that remain elevated suggest continued moisture presence. In those cases, the source may still be active and require further investigation.
FAQ: Detecting Moisture Around Window Frames
How can I tell if moisture is inside my window frame?
Moisture inside a window frame often reveals itself through secondary signs such as swelling trim, soft drywall, recurring stains, or musty odors. Using a moisture meter to compare readings between suspected and dry areas helps confirm whether hidden moisture exists.
Can moisture exist without visible stains?
Yes. Moisture can remain inside materials without producing visible staining, especially in early stages. Softness, odor, temperature differences, or slightly raised paint may appear before discoloration develops.
Should I always use a moisture meter?
A moisture meter is helpful but not always required. Visual inspection, touch testing, and monitoring patterns over time can reveal moisture problems. However, a meter provides more reliable confirmation when used correctly.
Why does moisture keep returning around my window?
Recurring moisture usually indicates that the source has not been corrected. This may involve exterior water entry, condensation cycles, or trapped humidity. Monitoring when moisture appears helps identify the most likely cause.
Is condensation around windows always safe?
Condensation is common but not always harmless. Repeated condensation can damage paint, drywall, and trim over time. If moisture appears frequently or causes visible damage, further investigation is necessary.
Where should I check first for hidden window moisture?
The lower corners of the frame and sill are usually the best starting points. These areas collect moisture from multiple directions and often show the earliest signs of repeated exposure.
Conclusion: Detecting Moisture Early Prevents Larger Problems
Moisture around window frames rarely begins as a major failure. Most problems start small, developing gradually through repeated wetting and drying cycles. Detecting moisture early allows homeowners to observe patterns, confirm whether the source is active, and prevent structural materials from weakening over time.
Careful visual inspection, gentle physical checks, and the use of simple tools provide reliable ways to identify moisture before severe damage occurs. When detection confirms recurring moisture, addressing the source becomes the next step in protecting the surrounding structure.
If mold or recurring dampness becomes part of the concern, long-term control still depends on correcting the moisture pattern rather than only cleaning or repainting the visible surface. For prevention-focused next steps around this same area, see how to prevent mold around windows.
Key Takeaways
- Moisture around window frames often develops gradually and may be hidden behind trim or drywall.
- Early signs include paint bubbling, staining, swollen trim, and soft drywall near the frame.
- Physical inspection and moisture detection tools help confirm whether moisture is present.
- Condensation and leaks produce different patterns that can be identified through observation.
- Persistent or spreading moisture often indicates deeper structural involvement.
- Early detection reduces the risk of long-term damage and mold development.
7 Comments
Comments are closed.