Signs of Chimney Flashing Failure Around the Chimney Base
Chimney flashing failure is one of the most common ways water enters around the chimney base. Flashing is supposed to protect the joint where the chimney passes through the roof, but when the metal lifts, rusts, separates, cracks, or pulls away from masonry, rainwater can find a path into the attic, ceiling, or wall system below.
The difficult part is that flashing leaks are not always obvious from inside the house. A homeowner may notice a ceiling stain near the chimney, damp attic insulation, musty odor after rain, or rusted metal around the chimney area before seeing active dripping. By the time water appears indoors, the flashing may have been failing for a while.
The strongest warning pattern is exterior flashing damage near the chimney base combined with rain-related ceiling stains, damp attic materials, or musty odor near the chimney area.
Why Chimney Flashing Failure Causes Hidden Leaks
The chimney is a major interruption in the roof surface. Rainwater running down the roof has to be directed around the chimney instead of into the joint where masonry meets roofing. Chimney flashing is the metal water-control detail that helps make that happen.
A proper flashing system usually uses several pieces working together. Step flashing protects the sides, apron flashing protects the lower side, and counterflashing helps cover the upper edges where metal meets the chimney. On some chimneys, a cricket or saddle helps divert water around the uphill side. If any part of that system fails, water may enter where the roof and chimney meet.
This is why chimney flashing matters so much in moisture control. It protects one of the most vulnerable structural gaps in the roof system. For more context on why openings like chimneys, flashing transitions, and exterior penetrations become leak paths, see how water enters homes through structural gaps.
Flashing failure often causes hidden leaks because water does not always drip straight down. It may enter at the chimney base, run along roof decking, soak insulation, follow framing, or stain ceiling drywall several inches away from the actual opening. That is why a ceiling stain near a chimney may point to flashing failure even when the flashing problem is not visible from inside the room.
Small flashing defects often show up during wind-driven rain, long soaking storms, or snowmelt because water is pushed sideways or held near the chimney base longer than during a light shower.
Visible Signs of Failed Chimney Flashing
Some flashing problems can be seen from the ground with binoculars or from a safe vantage point. Homeowners should not climb onto the roof to inspect chimney flashing unless they are trained and equipped to do so safely. Still, visible clues around the chimney base can help you know when professional inspection is needed.
Common visible signs of failed chimney flashing include:
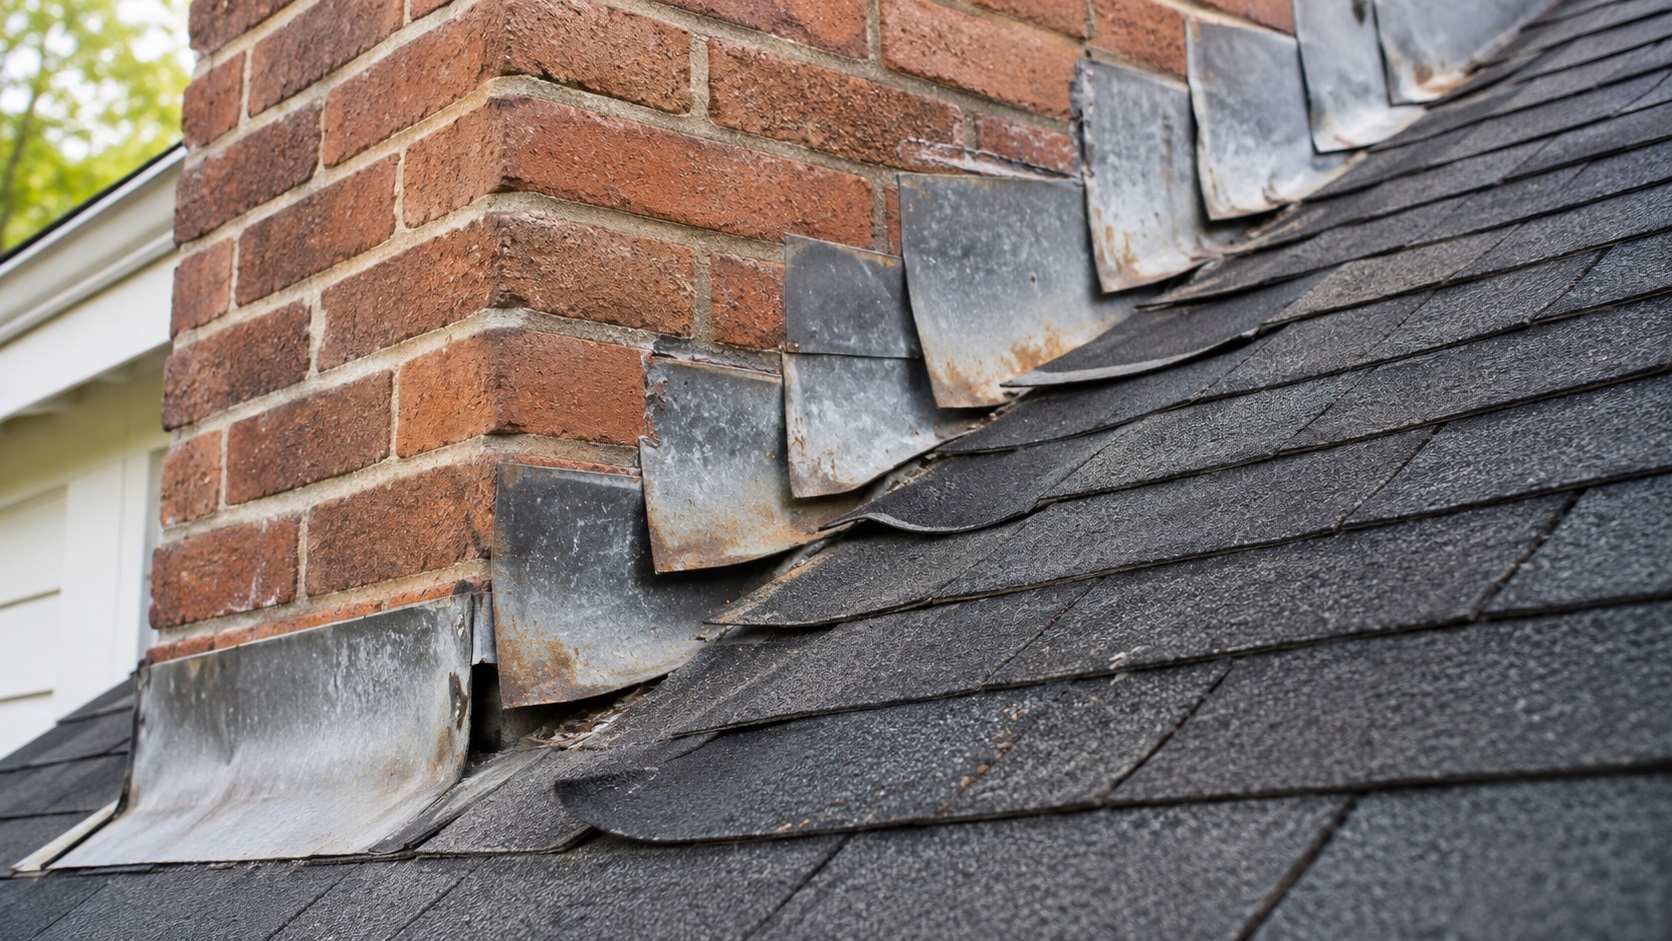
- rust on metal flashing around the chimney base.
- flashing that is lifted, bent, warped, or pulled away.
- gaps between the flashing and the chimney masonry.
- cracked, missing, or separated sealant.
- counterflashing that appears loose or pulled out of mortar joints.
- roof cement or tar patches that are cracked, peeling, or brittle.
- open corners where flashing pieces meet.
- damaged shingles near the chimney base.
- water stains or dark streaks below the flashing line.
- debris buildup behind or beside the chimney.
The most concerning signs are not just cosmetic age. Prioritize gaps, lifted edges, loose counterflashing, open corners, rust-through, and stains that appear after rain.
Rust is a warning sign, but it does not always prove an active leak by itself. Light surface rust may show age and exposure. Rust becomes more serious when the metal is thin, flaking, rusted through, separated at seams, or paired with ceiling stains, attic dampness, or visible gaps.
Lifted or separated flashing is more urgent because it can create a direct water path. If the flashing edge has pulled away from the chimney or roof surface, wind-driven rain can get underneath it. Once water gets under flashing, it may reach roof decking, framing, attic insulation, or ceiling drywall.
Cracked sealant around flashing should also be taken seriously, but it should not be misunderstood. Sealant is not the entire flashing system. A bead of caulk may cover a joint, but proper flashing should rely on metal overlaps, correct placement, and durable water-shedding details. Cracked caulk may be a symptom of movement, age, or a deeper flashing problem.
Heavy roof cement around a chimney base is another warning sign. It often means someone tried to stop a leak in the past. Roof cement may temporarily slow water entry, but if it is cracked, brittle, peeling, or separating from the metal or masonry, water may be getting underneath it.
If the visible flashing issues appear along with stains or dampness inside the house, compare those symptoms with the broader signs of water leaks around chimneys. Flashing is a common source, but it should be evaluated with the full chimney moisture pattern.
If the clearest damage is concentrated at the lower brick, siding, or roofline interface, also compare it with the signs water is entering around the chimney base.
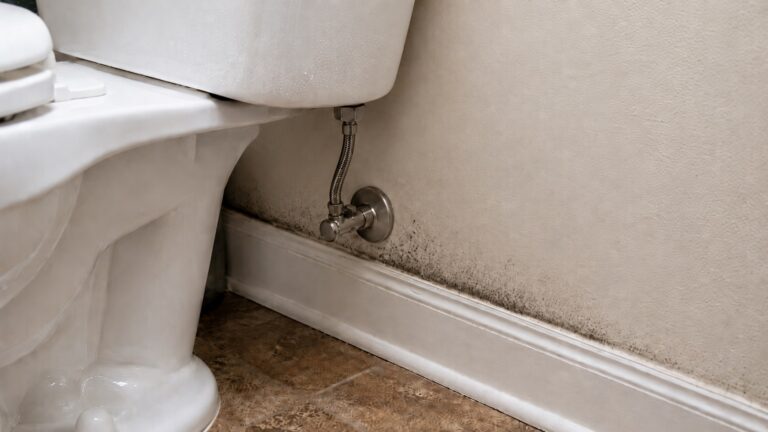
Ceiling and Wall Stains Near the Chimney
Interior stains near a chimney are one of the most common clues that flashing may be failing. When water enters at the roof-to-chimney joint, it can travel along roof decking, framing, insulation, or ceiling materials before becoming visible inside the room below.
Look for stains that appear:
- near the chimney chase or fireplace wall.
- beside the chimney rather than directly under it.
- after heavy rain, wind-driven rain, or snowmelt.
- as brown, yellow, gray, or tan rings on the ceiling.
- along ceiling seams or drywall joints near the chimney.
- with bubbling paint, peeling texture, or soft drywall.
- repeatedly after storms even if the stain dries between rains.
A flashing leak does not always create active dripping. Water may enter slowly, soak insulation, dampen ceiling materials, and leave a stain without ever dripping into the room. That is why recurring discoloration near a chimney should not be ignored just because the ceiling feels dry at the moment.
Wall stains can also appear near the chimney chase or fireplace area. If water enters around the chimney base and follows framing or masonry downward, it may show as peeling paint, damp drywall, staining beside the fireplace, or musty odor near the chimney wall.
These symptoms suggest a chimney-area leak, but they do not prove flashing failure by themselves. Chimney crown damage, deteriorated mortar, cap problems, nearby roof leaks, and condensation can create similar stains. Flashing becomes more likely when interior stains line up with visible metal gaps, rust, lifted flashing, or damp attic materials near the chimney base.
If ceiling damage is already spreading or softening, the leak may have been active longer than it appears from the room below. For more detail on that progression, see hidden chimney leaks that cause ceiling damage.
Attic Signs of Chimney Flashing Leaks
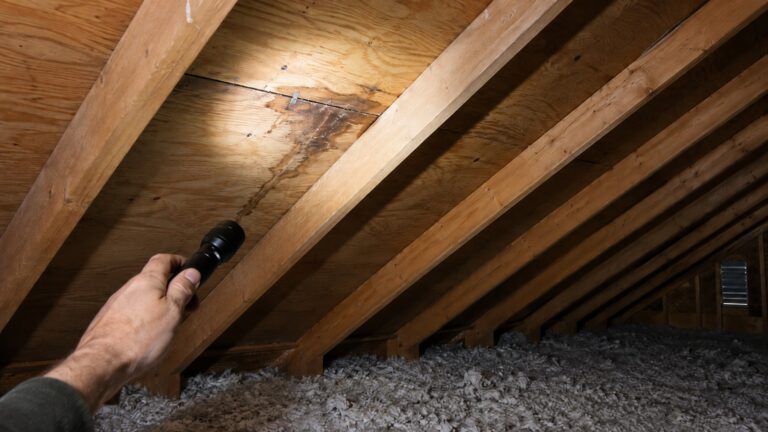
The attic often gives the clearest evidence of chimney flashing failure because it is closer to the roof penetration. If water is entering at the flashing, it may wet roof decking, rafters, insulation, or framing around the chimney before the ceiling below shows a stain.
If your attic is safely accessible, inspect the chimney area from inside the attic with a flashlight. Do not step on ceiling drywall, disturb wet insulation unnecessarily, or touch electrical components. If the area is difficult to reach, unsafe, or heavily contaminated, leave the inspection to a professional.
Attic signs that may point to chimney flashing leaks include:
- damp insulation around the chimney penetration.
- dark staining on roof decking near the chimney base.
- water trails running down rafters or sheathing.
- rusted roofing nails near the chimney area.
- musty odor concentrated around the chimney.
- wood that looks darker or feels damp after rain.
- stains that begin at the roof-to-chimney joint.
- matted, clumped, or discolored insulation beside the chimney.
Damp insulation near the chimney is especially important because it can hold water against wood and ceiling materials. Even if the ceiling below has not stained yet, wet insulation around the chimney may show that flashing is allowing water into the roof assembly.
Dark roof decking near the chimney base is another important clue. Old stains may remain after a past repair, but staining that becomes damp after rain or appears with a musty odor suggests current moisture. Rusted nails nearby can support the pattern because metal often reacts to repeated moisture exposure.
Attic moisture should still be interpreted carefully. Condensation, ventilation problems, and nearby roof leaks can sometimes mimic flashing leaks. The flashing becomes more suspicious when dampness is concentrated around the chimney penetration and appears after rain. If you need a more focused attic process, see how to check for chimney water intrusion in attics.
Why Caulk and Roof Cement Patches Are Warning Signs
Caulk, sealant, tar, and roof cement around chimney flashing should be viewed carefully. A small amount of sealant may be part of certain chimney details, but flashing should not depend only on surface caulk to keep water out. Proper flashing works by directing water over layered metal and away from the roof-to-chimney joint.
When old patches crack, peel, separate, or become the only visible barrier against water, they may be hiding a flashing problem instead of solving it.
Warning signs include:
- thick roof cement smeared around the chimney base.
- black tar patches that are cracked or brittle.
- sealant that has pulled away from masonry or metal.
- caulk gaps where counterflashing meets brick or mortar.
- patches that look uneven, layered, or repeatedly reapplied.
- water stains below areas that were previously patched.
- flashing edges hidden under roof cement instead of properly lapped.
Old roof cement can sometimes hide the actual flashing condition. Metal may be rusted, separated, or poorly overlapped underneath the patch. If water gets under the cement, the patch can trap moisture against the roof surface or chimney base instead of keeping the area dry.
This does not mean every patched chimney is actively leaking. Some patches may have been added years earlier, and the area may currently be dry. The concern increases when old patch material appears cracked, loose, wet, or paired with ceiling stains, attic dampness, or musty odor after rain.
Caulk-only fixes are especially risky when the flashing has moved, lifted, or separated. Sealant may temporarily slow the leak, but it will not restore proper step flashing, counterflashing, apron flashing, or water-shedding geometry. If the flashing system itself has failed, the durable solution usually requires proper flashing repair rather than another surface patch.
For a broader explanation of how flashing details fail and begin allowing water into roof assemblies, see why roof flashing failures cause leaks.
How to Tell Flashing Failure From Other Chimney Leak Sources
Chimney flashing failure is common, but it is not the only reason water appears near a chimney. Before assuming the flashing is the source, compare whether the symptoms begin at the roof-to-chimney joint, the chimney top, the masonry face, or another nearby roof area.
Flashing failure usually points to the roof-to-chimney joint. The strongest clues are visible metal gaps, lifted flashing, rusted-through flashing, loose counterflashing, cracked roof cement, damp attic materials near the chimney base, and ceiling stains that appear after rain.
Chimney crown damage usually points to the top of the chimney. A cracked or deteriorated crown can allow water to enter from above and move down through the chimney structure. This may cause masonry dampness, fireplace-area moisture, odor, or water movement inside the chimney rather than only at the roofline. If the top of the chimney appears damaged, compare your symptoms with the signs of chimney crown damage.
Mortar and brick problems create a different pattern. Deteriorated mortar joints, cracked brick, or absorbent masonry may let water enter through the chimney walls themselves. These leaks may become worse after long soaking rains, and they may show as damp masonry, white mineral deposits, interior staining, or moisture odors. If the masonry looks deteriorated, review the signs that chimney mortar is allowing water in.
A missing or damaged chimney cap can allow water to enter from the top of the flue. That type of problem may show as water in the firebox, rusted damper parts, damp flue odors, or moisture inside the fireplace rather than only ceiling stains near the roof-to-chimney joint.
Nearby roof leaks can also mimic chimney flashing failure. Damaged shingles, roof valleys, vent penetrations, or roof decking may allow water to travel along framing and appear near the chimney. This is why the location of a ceiling stain is a clue, not a complete diagnosis.
The most convincing flashing-failure pattern is a combination of evidence: visible flashing deterioration outside, rain-related stains inside, and attic dampness concentrated around the chimney penetration. When those clues appear together, the flashing should be inspected before the leak causes deeper damage.
When Chimney Flashing Failure Needs Professional Repair
Chimney flashing failure should be repaired professionally when the flashing is no longer directing water away from the roof-to-chimney joint. This is especially important when the problem has already caused ceiling stains, attic moisture, soft drywall, or repeated leaks after rain.
Professional repair is usually needed when you see:
- flashing that has pulled away from the chimney.
- counterflashing that is loose, missing, or separated from mortar joints.
- rusted-through flashing or metal that is visibly deteriorating.
- open gaps at flashing corners.
- cracked or peeling roof cement patches around the chimney base.
- water stains below or beside the chimney after rain.
- damp attic insulation near the chimney penetration.
- dark, wet, or soft roof decking around the chimney.
- active dripping during storms.
- repeated leaks after previous caulk or roof cement repairs.
Flashing repair is not just about covering a gap. The repair may need to restore the layered relationship between roofing, step flashing, counterflashing, apron flashing, and masonry. If those pieces are not integrated correctly, water can continue entering even after the visible opening is covered.
Do not seal over damp, soft, or stained materials without finding the water source first. Covering the area too soon can hide active moisture and allow hidden damage to continue.
A professional should also check whether the leak has already affected nearby materials. Wet insulation, stained roof decking, soft ceiling drywall, and musty odor may indicate that the flashing problem has been active long enough to cause hidden moisture damage. If ceiling materials have already been affected, the issue may overlap with hidden chimney leaks that cause ceiling damage.
What to Check First If Chimney Flashing May Be Failing
If you suspect chimney flashing failure, start by documenting the symptoms. Take photos of ceiling stains, damp attic insulation, visible flashing gaps, rust, old roof cement patches, or water marks near the chimney. If the stain changes after rain, take updated photos so the pattern is easier to explain to a contractor.
Do not climb onto the roof to test or pull at flashing. Chimney areas can be dangerous, especially when shingles are wet, steep, aged, or damaged. A homeowner’s first response should be safe observation, interior documentation, and attic checks only if the attic can be accessed safely.
If the attic is accessible, look near the chimney penetration for damp insulation, dark roof decking, water trails, rusted nails, or musty odor. These signs can help confirm whether water is entering near the flashing area. Avoid disturbing wet insulation or stepping on ceiling drywall. For a safer inspection sequence before any roof-level work, see how to inspect chimney flashing for leaks.
Do not rely on another layer of caulk or roof cement as a permanent solution. A temporary patch may reduce water entry briefly, but it can also hide the real problem and delay proper repair. If flashing has separated, rusted, lifted, or failed at the chimney base, the flashing detail itself should be evaluated.
After repair, monitor the same ceiling, attic, and chimney areas during future rain. A flashing repair is successful only if the area stays dry through the weather patterns that previously caused symptoms. If moisture keeps returning, the problem may involve another chimney detail, roof area, or broader moisture pathway. In that case, use a larger strategy to find, fix, and prevent moisture problems instead of treating each stain as an isolated event.
FAQ
What does failed chimney flashing look like?
Failed chimney flashing may look rusted, lifted, bent, loose, separated from masonry, covered with cracked roof cement, or open at corners. You may also see gaps between the flashing and chimney or stains below the chimney base.
Can chimney flashing failure cause ceiling stains?
Yes. When flashing fails, water can enter at the roof-to-chimney joint and travel into attic or ceiling materials. The stain may appear beside the chimney, near the chimney chase, or along a ceiling seam after rain.
Is rusted chimney flashing always leaking?
No. Light surface rust does not always mean an active leak. Rust becomes more concerning when the metal is thin, flaking, rusted through, separated, or paired with ceiling stains, attic dampness, or visible gaps.
Can I fix chimney flashing with caulk?
Caulk may temporarily cover a small gap, but it is not a reliable substitute for properly installed flashing. If metal flashing has lifted, separated, rusted, or lost its water-shedding shape, the flashing system should be professionally repaired.
How do I know if the leak is flashing or chimney masonry?
Flashing leaks usually center around the roof-to-chimney joint and often show attic dampness near the chimney base. Masonry leaks more often involve cracked brick, deteriorated mortar, white deposits, damp masonry, or water entering through the chimney structure itself.
Should I inspect chimney flashing from the roof?
Most homeowners should not inspect chimney flashing from the roof. Wet shingles, steep slopes, and chimney areas can be dangerous. Use safe ground-level observation and attic checks, then call a professional for roof-level inspection.
When does chimney flashing need replacement instead of another patch?
Chimney flashing may need replacement when it is rusted through, loose, separated from masonry, bent, missing, repeatedly patched, or still leaking after caulk or roof cement repairs. A professional can determine whether a localized repair or full flashing replacement is needed.
Chimney Flashing Warning Signs to Remember
- Chimney flashing protects the vulnerable joint where the chimney passes through the roof.
- Rust, lifted metal, gaps, cracked sealant, and loose counterflashing are common signs of flashing failure.
- Ceiling stains near the chimney may point to flashing failure, but other chimney or roof problems can mimic the same symptom.
- Attic signs such as damp insulation, dark roof decking, and water trails near the chimney are important clues.
- Old caulk, tar, or roof cement patches may indicate a temporary repair or ongoing flashing problem.
- Most homeowners should avoid roof-level flashing inspection and call a professional when leaks repeat or materials are wet.
4 Comments
Comments are closed.