How to Inspect Roof Decking From the Attic
You can inspect roof decking from the attic by checking the underside for stains, dampness, sagging, swollen panels, rusty nail tips, water tracks, wet insulation, and visible deterioration. This inspection is most useful after leaks, storms, unexplained ceiling stains, or attic moisture problems because it shows where water may be reaching the roof deck from below.
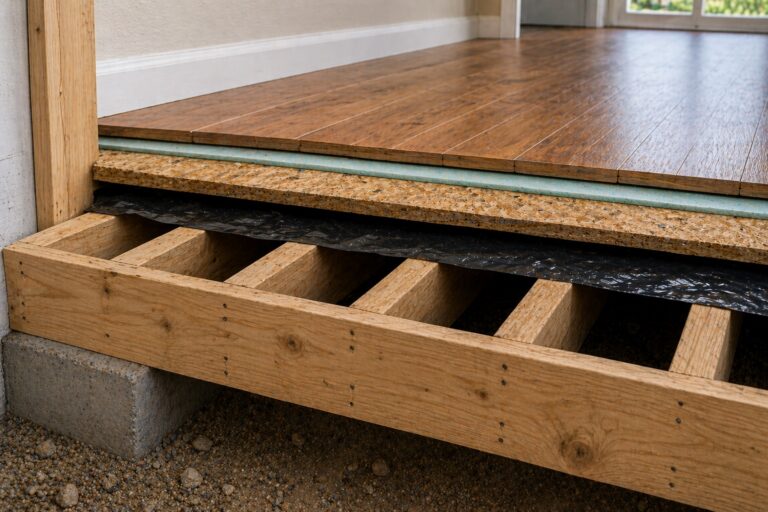
Roof decking is the plywood, OSB, or plank surface attached to rafters or trusses beneath the roof covering. From the attic, you are looking at the underside of that decking. You may not be able to see the shingles, underlayment, flashing, or top surface of the deck, but you can still find important clues about moisture movement and roof deck condition.
This article focuses only on safe attic-based inspection. It cannot reveal every problem hidden above the decking, but it can help you separate old staining, active moisture, condensation clues, and visible decking damage that deserves follow-up. If you are comparing this with other common roofing material failures, roof decking damage deserves special attention because the deck is the structural surface beneath the roof covering.
How to Inspect Roof Decking From the Attic
To inspect roof decking from the attic, start with safe access, use bright lighting, and look for moisture clues on the underside of the roof sheathing. Begin above any ceiling stains or known leak areas, then check common roof trouble spots such as chimneys, valleys, skylights, vent pipes, eaves, and roof-wall intersections.
During the inspection, look for:
- dark stains on the underside of plywood or OSB
- damp or shiny areas after rain
- sagging sheathing between rafters or trusses
- swollen OSB edges or delaminated plywood
- rusty nail tips
- water tracks along rafters or sheathing seams
- wet, compressed, or stained insulation
- musty odors or mold-like surface growth
- daylight near penetrations, gaps, or damaged areas
The goal is to gather evidence, not to make a final structural diagnosis from one quick look. Some serious roof deck problems are visible from inside the attic, but others remain hidden beneath shingles and underlayment until roof work begins. If you find symptoms that suggest rot or deterioration, use a symptom-focused guide on signs roof decking is rotten to interpret what you are seeing.
What an Attic Inspection Can and Cannot Show
An attic inspection can show stains, underside deterioration, sagging, rusty nail tips, wet insulation, and water trails. It can also show whether the pattern is localized near one roof penetration or spread across a wider attic area.
It cannot show the top surface of the roof decking because that side is covered by shingles or another roof covering, underlayment, flashing details, and sometimes ice-and-water membrane. Some damage is only discovered during tear-off or professional roof inspection.
Use attic findings as one part of the broader process of finding and preventing moisture problems in homes, not as the only decision point. A dry stain may be old, while a normal-looking underside can still hide top-side damage beneath a failed valley, flashing detail, or roof covering.
Before You Start: Attic Safety Rules
Attic inspection can be useful, but it must be done safely. Many attics do not have finished floors. The visible surface between framing members may be drywall ceiling material, not a walking surface. Stepping in the wrong place can damage the ceiling or cause a fall.
Follow these safety rules before inspecting roof decking from the attic:
- Do not step on drywall: Walk only on framed walking surfaces, joists, boards, or stable platforms designed to support weight.
- Use strong lighting: A headlamp or bright flashlight helps you inspect without awkward movement.
- Avoid exposed wiring: Do not touch loose wires, junction boxes, or electrical components.
- Stay away from active water near electrical components: If you see dripping near wiring, fixtures, junction boxes, or equipment, leave the attic and call a professional.
- Do not inspect during storms: Wait until conditions are safe, especially if water is actively entering.
- Watch for heat: Attics can become dangerously hot, especially in warm weather.
- Avoid disturbing insulation: Move carefully and do not scatter insulation unless necessary for safe viewing.
- Protect yourself: Wear gloves, long sleeves, eye protection, and a mask if the attic is dusty or has insulation fibers.
- Stop if access feels unsafe: If the attic is cramped, unstable, too hot, or difficult to navigate, call a professional instead.
Do not walk on the roof to check for soft decking. If the roof deck is weak, walking on it can be dangerous. Attic inspection should help you identify clues from safer access points, not encourage risky roof movement.
Tools to Bring for an Attic Roof Decking Inspection
You do not need complicated equipment for a basic attic roof decking inspection. Good lighting, photo documentation, and basic protection from attic dust and insulation matter more than specialty tools.
Helpful tools include:
- Flashlight or headlamp: A headlamp keeps both hands free while you move carefully.
- Phone or camera: Photos help document stains, damp areas, and roof locations for later comparison.
- Gloves: Gloves protect your hands from rough wood, insulation, and debris.
- Dust mask or respirator: Use protection if the attic is dusty or if mold-like growth may be present.
- Eye protection: This helps when looking upward near insulation, dust, or debris.
- Notepad or phone notes: Record the location of stains, weather conditions, and whether the area felt damp or dry.
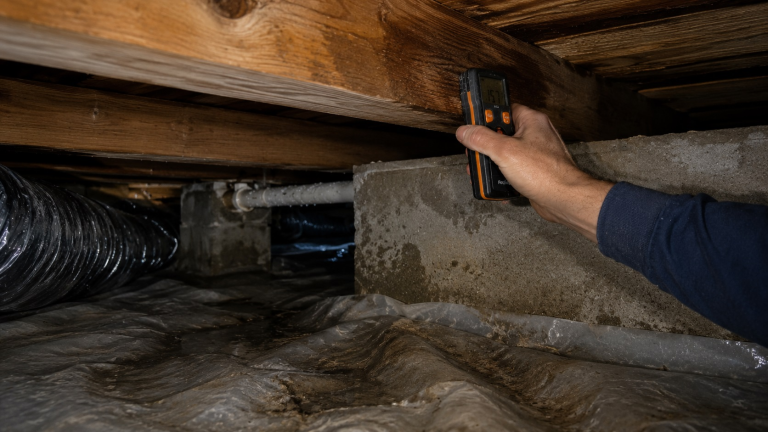
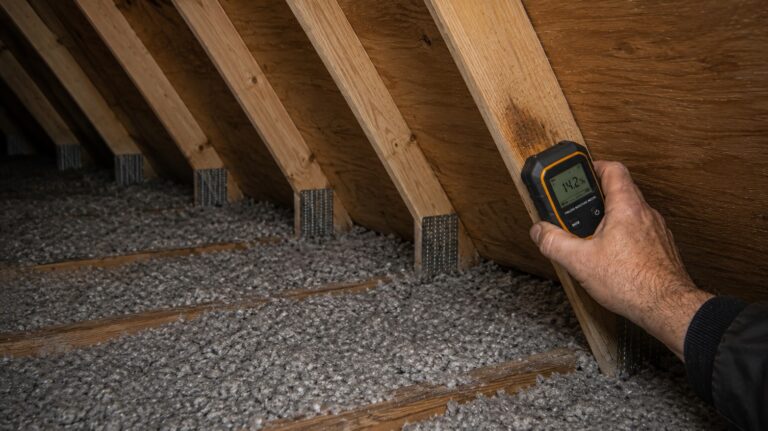
- Moisture meter, if available: A meter can help compare suspicious areas, but it should not be treated as the only proof of damage.
A moisture meter can be useful, but it has limits. Readings can vary depending on the material, the meter type, surface conditions, and technique. Use it as a clue alongside visible signs such as staining, dampness, sagging, swelling, and wet insulation.
Start Below Interior Leak Signs
The best place to begin an attic roof decking inspection is above any interior sign of water damage. If you have a ceiling stain, bubbling paint, damp drywall, peeling texture, or a recurring drip mark, go to the attic area above that room first. This gives you the most logical starting point for tracing moisture back toward the roof deck.
Do not assume the leak is directly above the ceiling stain. Water can travel along rafters, trusses, insulation, underlayment, and the underside of roof decking before it drips into the living space several feet from the original entry point.
When you reach the attic area above the interior symptom, look for clues such as:
- wet or compressed insulation
- dark staining on roof sheathing
- stained rafters or truss members
- rusty nail tips
- water tracks running along wood surfaces
- musty odor near the affected area
- active dripping after rain
If you are not sure whether the interior mark is roof-related, compare the attic findings with the signs of roof leaks inside the house. Interior symptoms help narrow the search, but attic clues help show where the moisture may be traveling.
Inspect Common Roof Decking Trouble Spots
After checking above the interior symptom, inspect the areas where roof decking problems commonly begin. Roof decking often becomes stained or damaged near roof details that interrupt the main roof surface. These areas are more vulnerable because they rely on flashing, sealants, underlayment transitions, or drainage paths to keep water moving correctly.
Chimneys
Chimneys are common leak locations because they require flashing where the chimney passes through the roof. From the attic, inspect the roof decking and framing near the chimney chase or masonry. Look for dark stains, water trails, damp insulation, musty odors, or daylight around gaps.
Roof Valleys
Valleys collect and channel large amounts of water during rain. If valley flashing, shingles, or underlayment fail, moisture can reach the roof deck. From inside the attic, look along the underside of the valley line for stains, dampness, or sagging sheathing.
Vent Pipes and Roof Penetrations
Plumbing vent pipes, exhaust vents, and other roof penetrations are common moisture entry points. Look for circular stains, rusty fasteners, damp insulation, or water marks around the penetration. Even a small flashing failure can repeatedly wet the same section of decking.
Skylights
Skylights can leak around flashing, curbs, seals, or roof transitions. From the attic, inspect the framing and decking around the skylight opening. Look for dark corners, swollen wood, musty smells, water tracks, or staining that runs downward from the skylight area.
Eaves and Lower Roof Edges
Eaves and lower roof edges can show moisture from wind-driven rain, ice dams, gutter problems, or water backing up under the roof covering. Inspect the lower edge of the roof deck for staining, swelling, wet insulation, or darkened sheathing.
Ridges and Ventilation Areas
Ridge areas can show moisture patterns related to ventilation, condensation, or ridge vent problems. If the underside of the roof deck is dark across a broad area near the ridge, the issue may not be one simple leak. It may involve attic airflow, indoor humidity, or condensation patterns, which should be evaluated separately from a localized roof leak.
Check the Underside of Roof Decking for Stains and Dampness
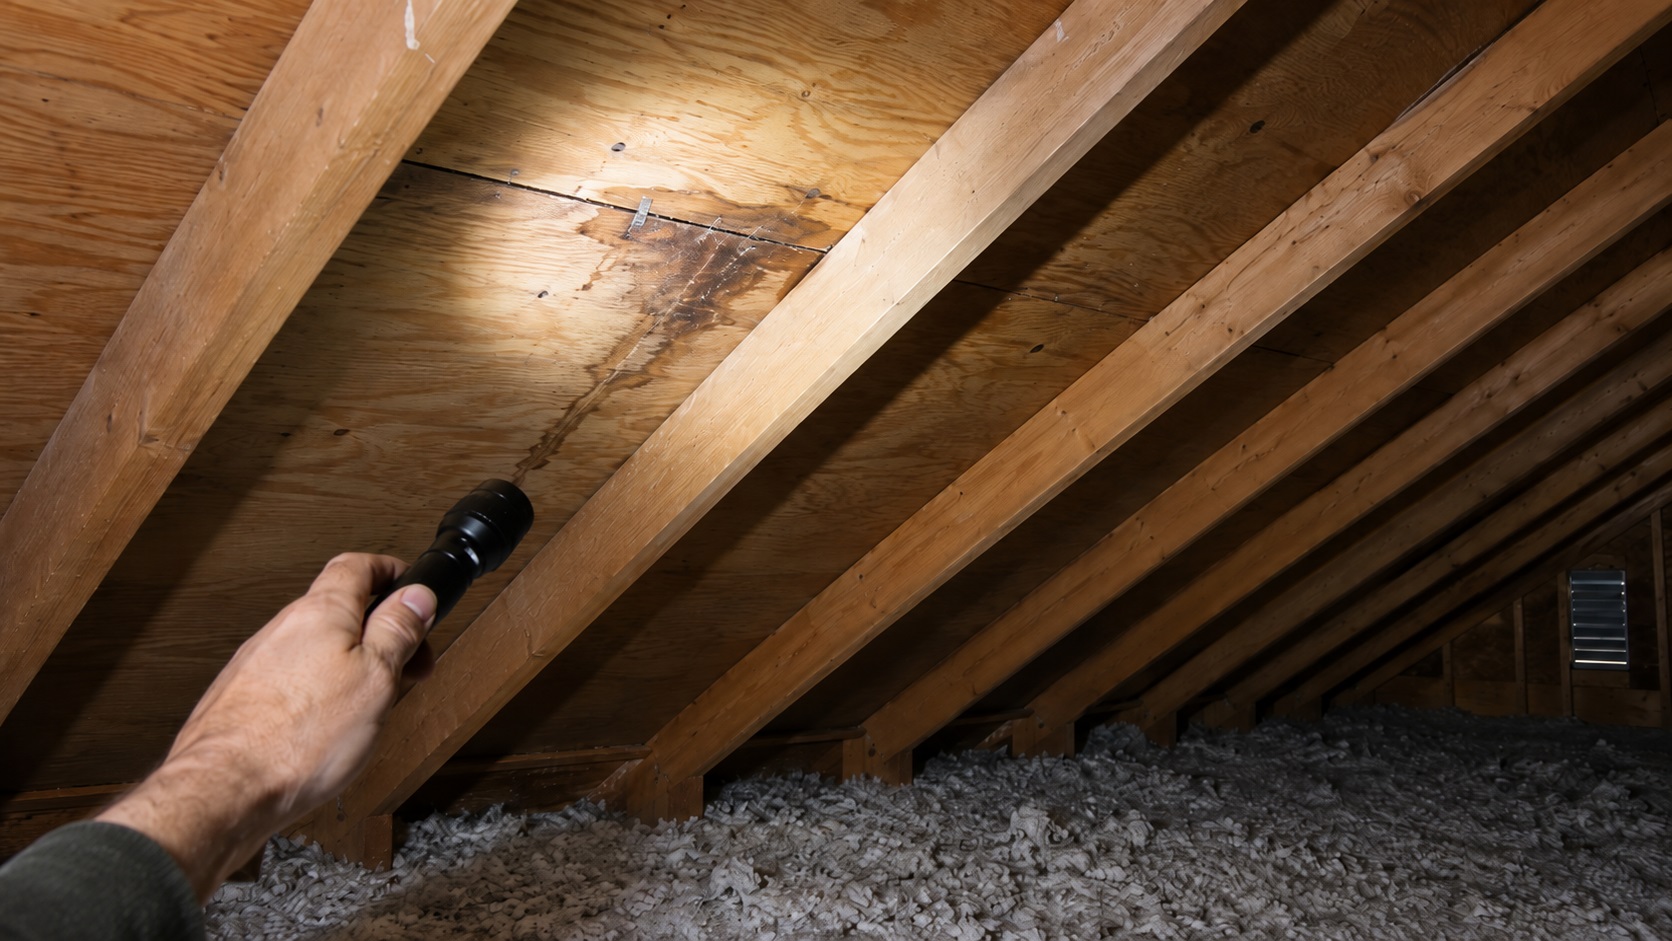
The underside of the roof decking is the main surface you are inspecting from the attic. Look slowly across the plywood, OSB, or planks for changes in color, texture, shape, and moisture. A flashlight held at an angle can make stains, swelling, and uneven surfaces easier to see.
Dark stains may show past or current moisture exposure. Fresh dampness may appear darker, shinier, or cooler than nearby dry wood. Old stains may be dry and stable, while active problems may look darker after rain, spread over time, or appear with wet insulation below.
A simple way to sort the clues is this: old stains are usually dry and unchanged, active leaks usually change after rain, and condensation problems often show up as widespread nail rust, damp sheathing, or moisture beads across many areas instead of one clear entry point.
When checking stains, pay attention to:
- Location: Is the stain near a chimney, valley, vent, skylight, eave, or roof-wall intersection?
- Shape: Is it a small drip mark, a long water track, or a broad area of darkened sheathing?
- Direction: Does the stain run along a rafter, down a sheathing seam, or outward from a penetration?
- Activity: Does it look damp after rain, or does it appear old and dry?
- Material condition: Is the decking still flat and firm, or does it look swollen, sagging, or deteriorated?
Stains should be interpreted carefully. A dry stain may only show where an old leak occurred. A damp stain, spreading stain, or stain paired with soft-looking sheathing is more concerning. If the stain pattern is part of a larger hidden moisture issue, compare it with broader signs of hidden roof moisture.
Look for Active Dampness After Rain
If it is safe to inspect after rain, active dampness can help separate old stains from current problems. Do not inspect during a storm or while water is actively dripping in a way that creates electrical or footing hazards. But once conditions are safe, checking the attic after rainfall can reveal areas that looked dry during normal conditions.
Active dampness may show up as:
- wet insulation below the roof deck
- darkened sheathing that looks freshly damp
- water beads on nail tips
- drips along rafters or trusses
- shiny water tracks on wood surfaces
- fresh stains below vents, chimneys, valleys, or skylights
If moisture appears only after rain, the source may be a roof leak, flashing problem, valley issue, penetration leak, or water entry point above the attic. If moisture appears during cold weather without rain, or if it is spread across many nail tips or broad sheathing areas, condensation may be involved.
Look for Sagging, Swollen Edges, Delamination, and Material Breakdown
After checking for stains and dampness, look for changes in the shape and surface of the roof decking. These clues matter because they can show that moisture has affected the material itself, not just left a surface mark.
From the attic, watch for:
- Sagging between rafters or trusses: The decking may dip where it should stay flat.
- Swollen OSB edges: OSB may look raised, rough, fuzzy, or expanded after repeated moisture exposure.
- Delaminated plywood: Plywood layers may separate, peel, bubble, or split.
- Crumbly or flaky areas: Wood fibers may look broken down instead of solid.
- Uneven panel seams: Moisture-damaged decking may lift or distort at edges.
Do not push, pry, step on, or aggressively probe suspicious roof decking from an unsafe position. If you can see sagging, swelling, delamination, or crumbling from a safe location, that is enough reason to document the area and get a professional opinion. If the concern is whether the decking can remain under a new roof, review when roof decking must be replaced after the inspection.
Inspect Nails, Rafters, and Insulation Around the Decking
The roof decking is not the only attic surface that can reveal moisture problems. Nails, rafters, trusses, and insulation often show clues before the damage is obvious from inside the living space.
Rusty Roofing Nail Tips
Roofing nail tips often protrude through the underside of the deck. If many nail tips are rusty, dark, or wet, moisture may be collecting on the underside of the roof sheathing. Localized rust near one vent or flashing area may suggest a leak. Widespread rust across many nails may suggest condensation or attic humidity problems.
Stained Rafters or Trusses
Water often follows framing. A stain on a rafter may lead back toward the source, even if the ceiling stain below is several feet away. Look for streaks, drip marks, darkened wood, or water trails that run downward from roof penetrations or deck seams.
Wet or Compressed Insulation
Insulation below roof decking can hold moisture and hide the path of a leak. Wet insulation may look darker, flattened, clumped, or compressed. If insulation below a stained roof deck is damp, the moisture problem may be active or recent.
Avoid digging through insulation unless you can do so safely and without disturbing wiring or creating a fall hazard. In many cases, visible staining, dampness, and compressed insulation are enough evidence to justify a professional inspection.
Trace Moisture Patterns Back Toward the Source
When inspecting roof decking from the attic, assume water may have traveled before it became visible. A ceiling stain may sit several feet away from the roof entry point because water can run along a rafter, follow a nail, move across sheathing seams, or soak into insulation before it drips.
When tracing moisture, work backward from the visible clue:
- Start at the ceiling stain or wet insulation.
- Look upward toward the roof deck above that area.
- Follow water tracks along rafters, seams, or nail lines.
- Check nearby roof penetrations, valleys, chimneys, skylights, and vents.
- Compare localized stains with broader condensation patterns.
A localized stain near a chimney, vent pipe, skylight, or valley often points toward a leak-prone roof detail. A broad pattern of dark sheathing, rusty nails, or dampness across large roof areas may suggest condensation or poor attic ventilation instead of one isolated leak.
If the source is not obvious, do not guess based only on the first stain you see. A dedicated guide on how to detect hidden roof leaks can help connect attic clues with exterior roof conditions.
Document Stains, Dampness, and Decking Changes
Good documentation helps you compare changes after future storms and explain the attic findings clearly to a roofing professional.
Document these details:
- Photos: Take clear pictures of stains, damp insulation, rusty nails, sagging, or swollen decking.
- Location: Note the room below, nearby roof features, and attic framing references.
- Date: Record when the inspection was done.
- Weather conditions: Note whether it rained recently, snow melted, or humidity was high.
- Moisture activity: Record whether the area looked dry, damp, wet, or actively dripping.
- Change over time: Recheck safely after future rain if the first inspection is inconclusive.
Photos are especially useful when roof decking damage is discovered later during roof work. They can help connect interior symptoms, attic moisture, and roof-level repairs into one clearer picture.
When Attic Findings Need Professional Inspection
Get a professional inspection when attic findings suggest active moisture, structural weakness, or damage beyond what you can see safely. A small dry stain may be something to monitor, but dampness, sagging, swelling, repeated leaks, or suspected rot should not be ignored.
Call a roofing professional when you find:
- active dripping or fresh dampness after rain
- sagging roof decking between rafters or trusses
- swollen OSB or delaminated plywood
- widespread dark staining across roof sheathing
- wet or compressed insulation below the deck
- rusty nails across large attic areas
- musty odors with visible moisture signs
- recurring ceiling stains below the same roof area
- unsafe attic access that prevents a complete inspection
A professional can inspect the roof surface, flashing details, underlayment, attic side, and exposed decking if roof work is underway. If the problem appears active or recurring, review when to hire a roofing contractor for moisture problems.
FAQ About Inspecting Roof Decking From the Attic
Can you inspect roof decking from the attic?
Yes. You can inspect the underside of roof decking from the attic for stains, dampness, sagging, rusty nails, water tracks, wet insulation, and visible material deterioration. However, you cannot see the top surface under shingles and underlayment from inside the attic.
What does wet roof decking look like from the attic?
Wet roof decking may look darker, shinier, or freshly stained compared with dry areas. You may also see wet insulation, water beads on nail tips, drip marks along rafters, or dark streaks on the underside of plywood or OSB.
Can rotten roof decking be visible from inside the attic?
Sometimes. Severe rot may show as sagging, swelling, crumbling, delamination, dark staining, or obvious material breakdown. But some top-side damage may remain hidden until the roof covering is removed, so attic inspection is not always conclusive.
Should I use a moisture meter on roof decking?
A moisture meter can help compare suspicious areas, but it should not be the only basis for repair decisions. Use readings alongside visible clues such as dampness, staining, swelling, sagging, wet insulation, and recent weather conditions, and compare suspicious spots with nearby dry-looking decking.
Is it safe to inspect roof decking from inside the attic?
It is only safe if attic access is stable, visible, and easy to navigate from proper support. Do not step on drywall, touch wiring, inspect during storms, or enter cramped or overheated attic spaces. If access is unsafe, call a professional.
Conclusion
Inspecting roof decking from the attic can reveal stains, active dampness, sagging, swollen edges, rusty nail tips, wet insulation, and water movement without walking on the roof. The most useful findings are patterns: where the stain begins, whether it changes after rain, whether the decking is still flat, and whether the problem is localized or widespread.
The main limits are safety and visibility. The attic cannot show every problem hidden under shingles or underlayment, so active dampness, sagging, material breakdown, wet insulation, or recurring leak patterns should lead to a professional roof evaluation.
Key Takeaways
- You can inspect the underside of roof decking from the attic, but not the top surface under the roof covering.
- Start above interior leak signs, then check chimneys, valleys, vents, skylights, eaves, and ridge areas.
- Look for dark stains, active dampness, sagging, swollen OSB, delaminated plywood, rusty nails, and wet insulation.
- Water can travel before it drips, so the visible ceiling stain may not be directly below the leak source.
- Localized stains often suggest a leak-prone detail, while widespread dampness may suggest condensation or ventilation problems.
- Document photos, dates, weather conditions, and locations before calling a roofer.
- Do not step on drywall, touch wiring, walk on suspected soft roof areas, or enter an unsafe attic.
- Call a professional when the attic shows active dampness, sagging, swollen decking, material breakdown, or recurring leak patterns.