How to Detect Hidden Roof Leaks
Hidden roof leaks are difficult to find because the stain inside the house is often not directly below the entry point. Water can enter near shingles, flashing, valleys, chimneys, or roof penetrations, then travel along roof decking, rafters, insulation, or ceiling framing before it finally appears indoors.
To detect a hidden roof leak, start near the indoor symptom, inspect the attic above it, look for wet insulation or stained roof decking, then follow moisture paths upward to the highest visible wet point. That uppermost wet area usually gives the best clue to where water is entering the roof system.
If you are not sure the indoor symptoms are roof-related, first compare them with these signs of roof leaks inside the house. Once the symptoms fit a roof leak pattern, use a systematic inspection instead of patching random roof areas.
Why Roof Leaks Are Often Hard to Locate
Roof leaks are hard to locate because water follows the easiest path, not the shortest path. The visible stain may be several feet away from the actual opening.
Water Rarely Travels Straight Down
After entering through damaged shingles, flashing, or roof penetrations, water usually spreads across the underside of the roof decking. It may travel along plywood seams or follow the slope of rafters before dripping downward.
This movement allows water to reach areas far from the original entry point. A ceiling stain may appear several feet—or even rooms away—from the actual roof leak location.
Framing and Insulation Redirect Water Paths
Roof framing components such as rafters and joists act like channels that guide water movement. Instead of falling vertically, water follows the surfaces of these materials until gravity forces it to drip from a lower point.
Insulation also plays a major role. Wet insulation absorbs moisture like a sponge and releases it slowly. This can delay visible signs of leakage, making detection more difficult.
Small Leaks Can Remain Hidden for Long Periods
Some roof leaks are small enough to remain unnoticed for weeks or months. Instead of producing visible dripping, these leaks may slowly dampen insulation or wood framing.
Even a small leak should be traced because trapped attic moisture can eventually lead to insulation damage, wood decay, or mold growth. For the mold side of the problem, see why roof leaks cause mold growth.
Tools That Help Detect Hidden Roof Leaks
Most hidden roof leak inspections only require a few basic tools: strong light, safe access, protective gear, and a way to confirm whether stained materials are still damp.
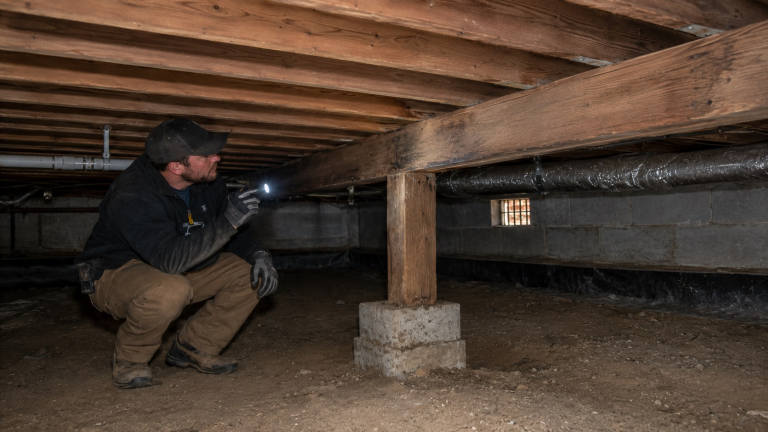
Flashlight
A bright flashlight is one of the most important tools for leak detection. Attics and roof cavities are often poorly lit, making moisture trails difficult to see without focused lighting.
Use a high-output flashlight to scan wood surfaces, insulation, and roofing materials. Moisture often reflects light differently than dry surfaces, making damp areas easier to identify.
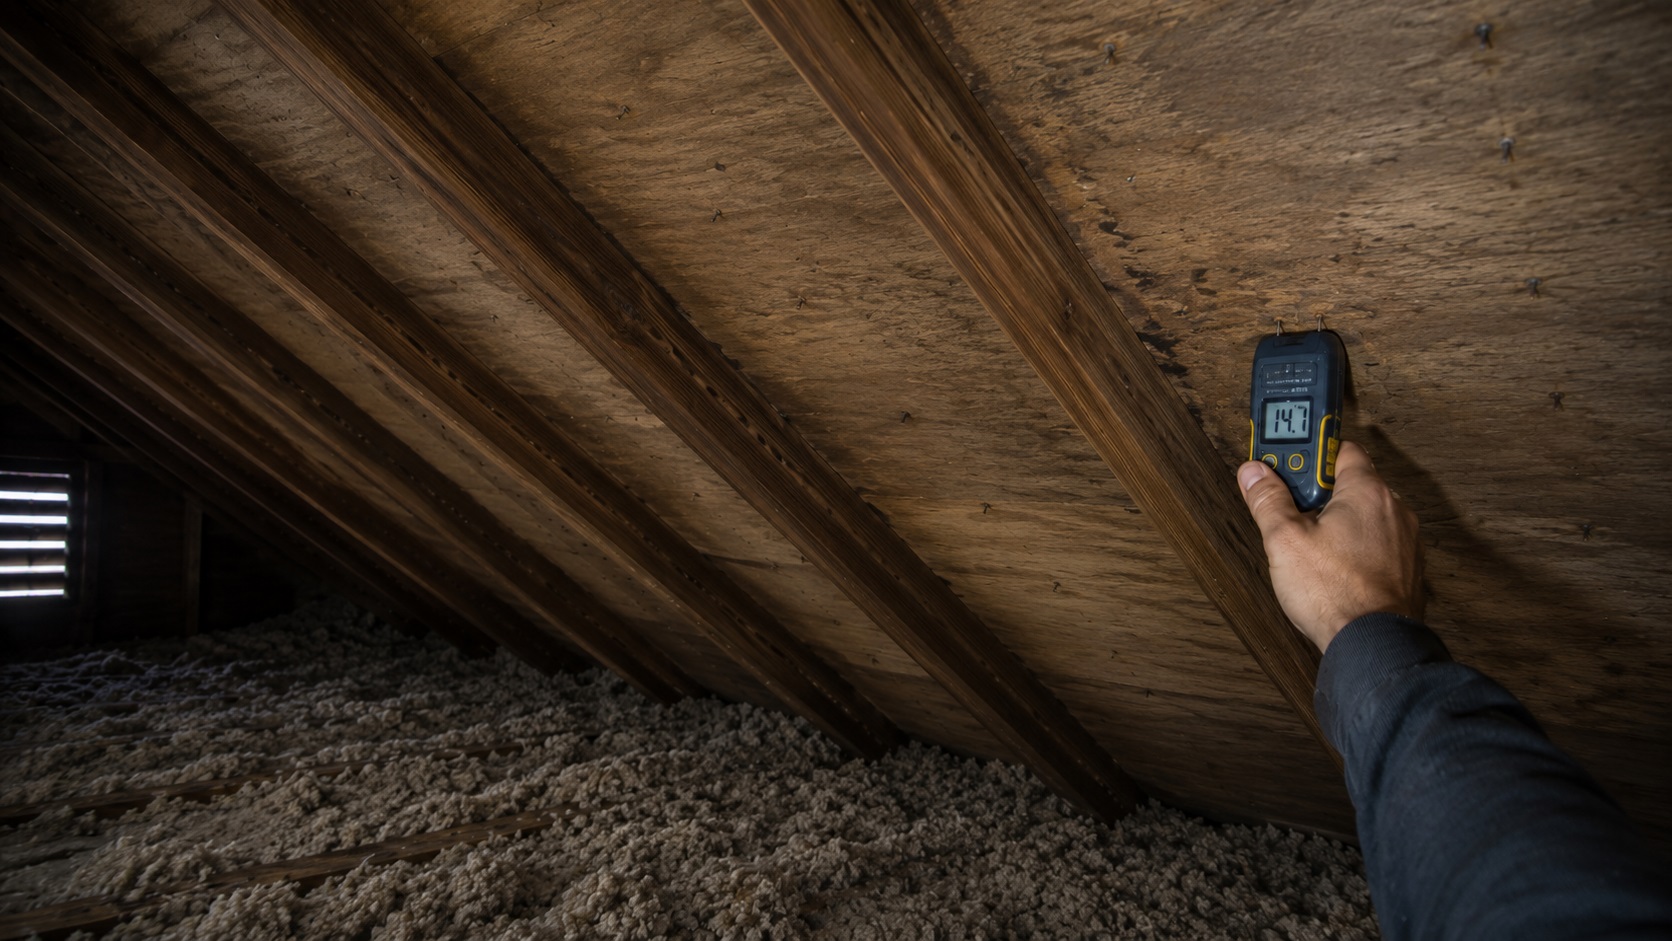
Moisture Meter
A moisture meter allows homeowners to measure moisture levels inside wood and drywall. This tool helps confirm whether materials that appear dry still contain hidden moisture.
Take comparison readings on nearby dry framing first, then compare them with stained or suspect areas so you are not relying on one isolated number.
Moisture meters are especially helpful when stains have dried but moisture remains trapped inside building materials. Using this tool can help confirm suspected leak paths before opening surfaces unnecessarily.
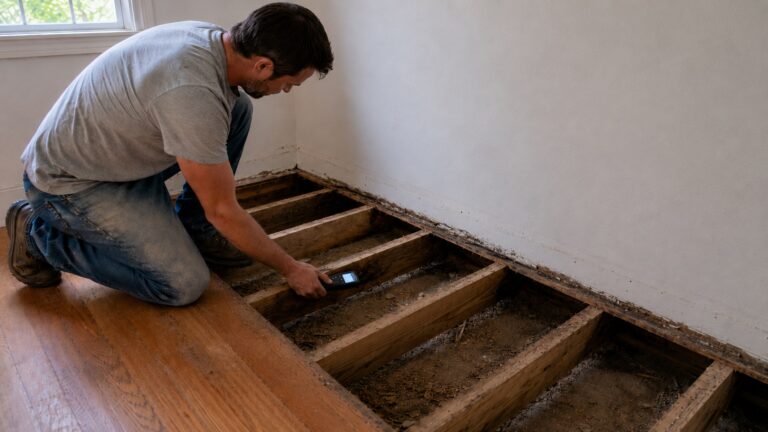
Inspection Mirror
An inspection mirror can help you check behind framing, near roof edges, or around penetrations where your line of sight is blocked. It is most useful in crowded attics or low-clearance spaces.
Safe Attic Access and Protective Gear
Safe attic access often requires a sturdy ladder, strong lighting, gloves, eye protection, and stable footing on supported framing or walking boards.
Never attempt leak detection in unsafe conditions. If structural damage is suspected or footing appears unstable, professional inspection is recommended.
How to Inspect an Attic for Hidden Roof Leaks
The attic is the most important place to inspect when trying to detect hidden roof leaks. Most leaks become visible in the attic before they appear in finished ceilings or walls. A careful attic inspection allows you to identify moisture trails, locate entry points, and confirm whether the leak is coming from the roof system.
Before entering the attic, wait until conditions are safe. Never inspect during lightning storms, never step on unsupported ceiling drywall, and avoid any area where water is near wiring, light fixtures, or electrical boxes. If the attic has limited lighting, bring a strong flashlight and move slowly only on supported framing or safe walking surfaces.
Start Near the Area of the Indoor Stain
Begin by locating the attic area above the ceiling stain or suspected leak. Use the indoor stain as a starting point, not as proof that the roof opening is directly above it.
However, remember that water rarely drips straight down. If nothing appears directly above the stain, expand the inspection outward along nearby rafters and roof decking.
In many cases, the visible indoor stain is only the final location where water collected before soaking through the ceiling surface.
Look for Wet or Compressed Insulation
Insulation often provides the earliest visual clue of hidden roof leaks. Wet insulation appears darker, heavier, or flattened compared to surrounding dry material. Blown-in insulation may look matted or clumped, while fiberglass batts may sag, compress, or hold a darker line where water has traveled.
Do not dig aggressively through insulation with bare hands. Wear gloves, avoid disturbing suspected moldy or contaminated material, and gently check whether the insulation feels damp, heavy, or unusually dense. Follow wet areas upward toward the roof deck or nearby framing to locate the likely source.
Wet insulation that remains untreated can trap moisture against wood surfaces, increasing the risk of decay and hidden mold development.
Check Roof Decking for Dark Stains or Water Trails
The underside of roof decking frequently shows the first clear evidence of moisture intrusion. Look for:
- Dark streaks or staining patterns
- Shiny wet areas reflecting flashlight light
- Water trails running along wood grain
- Dark spotting, surface growth, or discoloration near repeated wet areas
Water trails usually point toward the origin of the leak. These streaks form as water repeatedly flows along the same path, carrying dust and debris that stain the wood.
If mold growth is visible, it may indicate long-term moisture exposure. Reviewing why roof leaks cause mold growth can help explain why damp roof materials should not be ignored.
Inspect Nails and Fasteners for Moisture
One of the most reliable signs of active leaks is moisture collecting on nail tips that penetrate the roof decking. These nails often become visible from inside the attic ceiling.
During rain, wet nail tips can indicate active moisture from above. In cold weather, however, isolated droplets on nail tips can also come from condensation, so compare them with nearby stains, wet decking, or repeated rain-related patterns before assuming every wet nail is a roof leak.
This sign is especially useful when other surfaces appear mostly dry but moisture is still present.
Follow Rafters Upward to Trace Water Paths
Rafters act like channels that guide water movement across the roof structure. If water is visible on a rafter, follow the path upward along the wood surface.
The highest point where moisture appears is often close to the leak entry location. This tracing method is one of the most effective ways to locate hidden roof leaks.
If moisture paths become difficult to follow, additional inspection of roof materials may be required. Learning how to inspect roof areas for leak damage can help identify damage patterns that contribute to leaks.
How to Trace Water Paths Inside the Roof
Tracing water movement is the most critical part of detecting hidden roof leaks. Simply identifying wet materials is not enough—you must determine where the water entered the structure.
Always Move Upward, Not Downward
When tracing a leak, follow moisture upward toward the highest visible wet point. Moving downward only leads to areas where water has already collected, not where it entered.
This principle helps narrow down the leak location quickly and prevents unnecessary damage from exploratory cutting or removal.
Look for Repeating Patterns of Moisture
Leaks often create consistent pathways through building materials. If the same surfaces appear wet repeatedly after rainfall, those surfaces likely lie along the main water route.
Repeated moisture patterns indicate long-term leak activity rather than a single accidental event.
Identify Horizontal Movement Across Roof Surfaces
Water frequently travels horizontally across the underside of roof decking before dripping downward. This horizontal movement allows moisture to bypass insulation gaps or structural obstacles.
Watch for water trails that run parallel to roof slopes or along plywood seams. These patterns often point directly toward the leak origin.
Check Roof Penetration Areas Carefully
Roof penetrations are among the most common leak entry points. These include:
- Vent pipes
- Chimneys
- Skylights
- Roof-mounted equipment
- Antenna mounts
Examine these areas closely for gaps, damaged flashing, cracked sealant, or visible deterioration.
If damage spreads into multiple structural areas, reviewing signs of water damage from roof leaks can help determine whether the leak has already affected surrounding materials.
How to Detect Roof Leaks During Rain
One of the most effective times to detect hidden roof leaks is during active rainfall. Water movement becomes visible in real time, making it easier to trace leak paths and identify entry points. However, this method must be done carefully to avoid safety risks.
Never climb onto a roof during rain. Instead, conduct leak detection from inside the attic whenever possible. Wet roof surfaces are extremely slippery and dangerous.
Inspect the Attic Shortly After Rain Begins
Entering the attic soon after rainfall starts increases the chances of seeing active water movement. Fresh leaks often appear as droplets forming along rafters, nails, or decking seams.
Look for:
- Active dripping water
- New wet streaks forming on wood surfaces
- Moisture collecting on insulation
- Shiny water trails reflecting light
These early signs help identify the exact moment water enters the structure, making leak paths easier to trace.
Use Flashlight Reflection to Identify Moisture
Water reflects light differently than dry wood. Shine your flashlight across surfaces at an angle instead of pointing it directly at them. This angled lighting helps highlight wet areas that might otherwise blend into surrounding materials.
Slow scanning improves detection accuracy. Move methodically from one section of the attic to another, watching for changes in texture or reflectivity.
Observe Drip Patterns Carefully
Drip patterns often reveal the direction of water travel. If droplets are forming repeatedly in one area, follow nearby surfaces upward to identify where moisture first appears.
Fresh dripping water typically forms near the leak entry location. Following these drip points upward helps narrow down the source.
Check the Same Areas After the Rain Stops
Some leaks slow or stop once rainfall ends. Returning to the attic after the storm allows you to compare wet and dry areas. Surfaces that remain wet longer than surrounding materials may lie along the main water path.
Repeated inspection over multiple rain events often reveals patterns that lead directly to the leak source.
How to Identify Leak Entry Points
Once water paths are traced, the next step is identifying where water enters the roof system. Most hidden roof leaks begin at predictable locations where materials join together or where openings exist.
Inspect Roof Valleys
Roof valleys carry large volumes of water during rainfall. If flashing inside a valley becomes damaged or clogged with debris, water can overflow beneath roofing materials.
Valleys should be inspected for:
- Accumulated debris
- Damaged flashing
- Missing or loose shingles
- Rust or corrosion
Valley failures often lead to recurring leaks during heavy storms.
Check Around Chimneys
Chimney flashing failures are a common source of hidden roof leaks because the chimney-to-roof joint must shed water from several directions. In this article, focus on whether attic moisture points toward the chimney area; detailed flashing failure causes belong in a separate flashing-focused guide.
Look for:
- Cracked sealant
- Loose flashing sections
- Rust or separation lines
- Visible gaps between flashing and masonry
Even small gaps can allow significant water entry during prolonged rainfall.
Inspect Vent Pipe Boots
Vent pipes pass through the roof surface and rely on rubber or metal boots to prevent water entry. Over time, these boots can crack, shrink, or deteriorate.
Signs of vent boot failure include:
- Cracked rubber collars
- Loose flashing bases
- Water trails below vent locations
Vent-related leaks are among the most frequent causes of hidden roof moisture.
Examine Skylights and Roof Windows
Skylights introduce additional joints into the roof system. These joints must remain properly sealed to prevent water intrusion.
Inspect skylights for:
- Damaged flashing
- Worn seals
- Condensation buildup
- Water stains along edges
Skylight leaks may produce staining that spreads outward from the window frame.
Inspect Roof Edges and Flashing Connections
Roof edges, dormers, and wall intersections depend on flashing to redirect water safely. If flashing becomes loose or damaged, water may enter beneath roofing materials.
Understanding common roofing material failures that allow water into the roof system can help you connect attic leak evidence with likely exterior weak points.
Signs the Leak Source Has Been Found
Identifying moisture paths is helpful, but confirming the exact leak entry point is essential before repairs begin. Several indicators suggest that the true source has been located.
Visible Daylight Through Roof Materials
If daylight is visible through the roof structure, an opening likely exists. Even small gaps allow water entry during storms.
These openings should be repaired as soon as possible to prevent continued moisture intrusion.
Concentrated Moisture at a Single Location
When water trails converge at one specific point, that location is often the entry source. Concentrated moisture patterns provide strong evidence of leak origin.
Areas directly above this point should be inspected externally once conditions are safe.
Damaged or Soft Roof Decking
Roof decking that feels soft, spongy, or deteriorated indicates long-term moisture exposure. This often confirms that the leak source has existed for an extended period.
Severe decking damage increases the risk of structural weakening and should be addressed promptly.
When DIY Leak Detection Is No Longer Safe
While many homeowners can locate simple roof leaks, there are situations where attempting to detect hidden roof leaks without professional help becomes dangerous. Safety should always take priority over finding the source quickly.
If any of the conditions below are present, stop the inspection and contact a qualified roofing professional.
When Structural Damage Is Visible
If rafters, decking, or ceiling framing appear cracked, severely warped, or weakened, walking through the attic may not be safe. Water damage can reduce the strength of wood components, increasing the risk of collapse.
Signs of structural concern include:
- Deep wood rot
- Severely sagging roof decking
- Cracked or split rafters
- Large areas of soft wood
If these conditions are present, avoid placing weight on affected areas. Structural inspections often require specialized tools and experience.
When Electrical Components Are Wet
Water near wiring, electrical boxes, or lighting components creates a serious safety hazard. Moisture can lead to short circuits, fire risk, or electric shock.
If you notice water dripping near electrical equipment, turn off the affected circuit if it is safe to do so. Avoid touching wet wires or electrical components.
Leaks affecting electrical systems should be handled by professionals familiar with both roofing and electrical safety standards.
When the Leak Covers a Large Area
If moisture appears across wide sections of the attic or multiple rooms show signs of water intrusion, the roof may have widespread damage. Large-scale leaks often indicate failure of major roofing components.
In these cases, professional inspection becomes necessary to evaluate overall roof condition and determine repair scope.
When Access Conditions Are Unsafe
Attics with limited clearance, unstable flooring, poor ventilation, or steep access points can increase the risk of injury. Never attempt leak detection if you cannot safely move within the attic.
If safe movement is not possible, professional inspection is the safest solution.
Common Mistakes That Make Hidden Roof Leaks Harder to Find
Many homeowners unintentionally make leak detection more difficult by focusing on the wrong areas or using ineffective methods. Avoiding these mistakes improves accuracy and prevents unnecessary damage.
Assuming the Leak Is Directly Above the Stain
One of the most common errors is assuming the visible ceiling stain sits directly below the leak entry point. Water often travels several feet before dripping through the ceiling.
Always inspect areas above and beyond the visible stain, following moisture paths instead of relying on assumptions.
Ignoring Small Moisture Signs
Minor staining, faint odors, or slightly damp insulation may appear harmless but often indicate early-stage leaks. Small moisture problems frequently grow into larger ones if left unaddressed.
Recognizing signs of water damage from roof leaks helps identify how minor moisture conditions can spread through structural materials.
Stopping the Inspection Too Early
Finding wet insulation or wood is only the beginning of leak detection. The real goal is locating the entry point where water first enters the roof system.
Stopping at the first wet area may leave the true source unresolved, allowing the leak to continue.
Overusing Sealants Without Finding the Source
Applying sealant or patch materials without identifying the leak origin often leads to temporary fixes rather than permanent solutions.
Proper detection ensures repairs target the actual entry point rather than nearby areas.
Why Hidden Roof Leaks Should Be Traced Early
Hidden roof leaks should be traced early because the first visible stain is often only the final sign of a longer moisture path. Wet insulation can hold water against wood, repeated wetting can damage roof decking or framing, and concealed damp areas can support mold growth.
For a fuller look at visible damage patterns, see signs of water damage from roof leaks. For the mold side of the problem, see why roof leaks cause mold growth.
Frequently Asked Questions About Detecting Hidden Roof Leaks
Can roof leaks exist without visible water indoors?
Yes. Many leaks remain hidden inside attic spaces or insulation before visible dripping occurs. Moisture can accumulate gradually before showing visible signs.
Why can a hidden roof leak take more than one inspection to find?
Some leaks only appear during wind-driven rain, heavy rainfall, or repeated wetting. If the attic is dry during the first inspection, recheck the same stain area after the next rain and compare whether the same rafters, nails, insulation, or decking seams become damp again.
Can attic insulation hide leaks?
Yes. Insulation absorbs moisture and may conceal water trails. Wet insulation often delays visible signs inside finished rooms.
Why do roof leaks appear far from the entry point?
Water follows framing surfaces, roof slopes, and structural seams before dripping downward. This allows moisture to travel several feet before becoming visible.
Should leak detection always be done during rain?
No. Rain can make attic moisture paths easier to see, but you should inspect only from a safe interior location and never climb onto a wet roof. If the attic is unsafe, wait for safe conditions or call a roofing professional.
What to Do After You Find the Likely Leak Source
After you find the likely leak source, document the location, moisture path, and nearby roof features before repairs begin. Photos of stained decking, wet insulation, roof penetrations, valleys, or flashing areas can help a roofer confirm the source instead of guessing from the ceiling stain alone.
Do not cover stains, add insulation, or seal interior surfaces until the roof entry point has been corrected and damp materials have been checked. A systematic inspection improves repair accuracy and helps prevent the same hidden leak from returning.
Key Takeaways
- Hidden roof leaks often travel through framing before becoming visible indoors.
- Attic inspections provide the most reliable method for locating hidden leak sources.
- Following moisture paths upward is essential for accurate leak tracing.
- Safety hazards such as electrical moisture or structural damage require professional evaluation.
- Early leak detection prevents costly structural damage and mold growth.
5 Comments
Comments are closed.