Can You Remove Mold From Ceiling Drywall or Does It Need Replacing?
Mold on ceiling drywall is not always a simple surface-cleaning problem. Small mold spots on firm, painted drywall can often be cleaned carefully, but soft, sagging, crumbling, wet, or repeatedly moldy ceiling drywall usually needs to be removed and replaced. The main question is not only how to clean the mold, but whether the drywall is still sound enough to save.
Ceiling drywall deserves special caution because mold may be on the painted surface, inside the drywall paper, in the gypsum core, or above the ceiling in damp insulation or framing. A bathroom humidity spot may only need careful surface cleaning, while mold connected to a roof leak, plumbing leak, sagging drywall, or musty ceiling cavity may require removal instead of cleaning.
This guide focuses on the clean-or-replace decision for moldy ceiling drywall. If the mold is only a light surface problem on a stable painted ceiling, start with how to clean mold from ceilings. If the drywall itself may be damaged, this article explains when cleaning is reasonable and when replacement is safer.
Quick Answer: Can Mold Be Removed From Ceiling Drywall?
Yes, mold can sometimes be removed from ceiling drywall, but only when the growth is small, surface-level, and the drywall remains firm, dry, and structurally sound. If the drywall is soft, sagging, swollen, crumbling, wet inside, or repeatedly moldy, replacement is usually the safer choice.
Cleaning is typically possible when:
- The mold covers a small area, generally under 10 square feet.
- The mold appears limited to the painted surface.
- The drywall remains firm and structurally sound.
- No sagging, swelling, or water bulging is visible.
- The moisture source has been corrected.
Replacement is usually necessary when:
- The ceiling drywall feels soft or crumbles when touched.
- Sagging sections appear overhead.
- Mold covers a large portion of the ceiling.
- The same area becomes moldy repeatedly.
- Mold appears around a spreading water stain.
Clean or Replace Moldy Ceiling Drywall?
| Ceiling Condition | Usually Cleanable? | Why It Matters |
|---|---|---|
| Small mold spots on firm painted drywall | Usually yes | The mold may be limited to the surface if the drywall is dry and stable. |
| Light bathroom ceiling mold from humidity | Often yes | Condensation mold may be cleaned if ventilation is improved afterward. |
| Soft, sagging, swollen, or crumbling drywall | No | The drywall may be structurally weakened or contaminated beyond the surface. |
| Mold around a spreading water stain | Usually no | A leak may have pushed moisture into the drywall, insulation, or framing above. |
| Mold that returns in the same ceiling spot | Usually no | Recurring mold often means moisture remains inside or above the ceiling. |
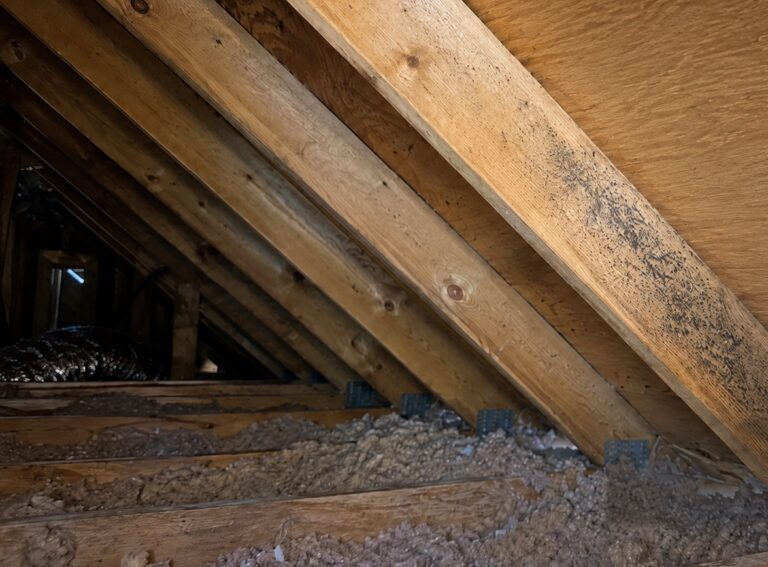
Before beginning any removal process, it is critical to determine whether mold may also exist above the ceiling. Hidden contamination often spreads into insulation and framing materials. Reviewing these signs of mold inside ceiling cavities can help identify deeper problems that may require additional attention.
Why Ceiling Drywall Is Different From Other Ceiling Surfaces
Ceiling drywall is made with a gypsum core covered by paper facing. Mold may begin on the painted surface, but moisture can also move into the paper layer or deeper into the drywall. Once drywall paper becomes moldy, soft, or damaged, surface cleaning may no longer solve the problem.
Ceiling drywall also carries overhead risk. If the material has been weakened by water, gravity can cause sagging, falling debris, or sudden surface failure. That is why the condition of the drywall matters as much as the size of the visible mold patch.
A firm painted bathroom ceiling with light speckling is very different from ceiling drywall below a roof leak or plumbing leak. The first may be a cleaning and ventilation problem. The second may be a removal, drying, and repair problem.
Moisture Sources That Make Ceiling Drywall Harder to Save
Mold develops on ceiling drywall when moisture remains trapped overhead. Ceiling surfaces are particularly vulnerable because warm, moist air naturally rises and condenses against cooler materials.
Before cleaning or replacing the drywall, identify the likely moisture source so the same ceiling area does not become moldy again.
Roof Leaks Above the Ceiling
Roof leaks are one of the most common reasons ceiling drywall becomes difficult to save. Even small roof failures can allow water to enter insulation and drywall layers. Over time, moisture spreads across ceiling materials and creates ideal conditions for mold growth.
Common roof-related warning signs include:
- Circular or irregular ceiling stains.
- Discoloration spreading outward.
- Musty odors near ceiling areas.
- Staining that worsens after rain.
When mold appears near a roof leak, the drywall may not be the only affected material. Insulation, roof sheathing, rafters, or ceiling framing may also need inspection.
Plumbing Leaks From Upper Floors
Homes with multiple levels are especially vulnerable to ceiling mold caused by plumbing leaks. Water from damaged pipes, leaking drains, or overflowing fixtures often travels downward into ceiling cavities.
Typical plumbing-related causes include:
- Pipe leaks inside walls.
- Overflowing bathtubs or sinks.
- Leaking drain lines.
- Hidden water seepage from upper-floor bathrooms.
If ceiling mold develops beneath bathrooms, kitchens, laundry rooms, or plumbing fixtures, a plumbing leak should be strongly considered before cleaning the drywall.
Bathroom Humidity and Poor Ventilation
Bathrooms frequently experience ceiling mold due to steam buildup. Without proper ventilation, warm air condenses on ceiling surfaces and keeps drywall damp.
Common bathroom humidity problems include:
- Missing or ineffective exhaust fans.
- Short ventilation run times.
- High humidity after showers.
- Closed bathroom doors trapping moisture.
Humidity-related mold is more likely to be cleanable when the drywall is still firm and the mold remains on the painted surface. If the same bathroom ceiling spot keeps returning after cleaning, the problem may involve poor ventilation, damp drywall paper, or hidden moisture above the ceiling.
Attic Condensation and Ventilation Problems
Improper attic ventilation can allow warm indoor air to become trapped above ceilings. As temperatures change, condensation may form inside attic spaces and eventually dampen ceiling drywall from above.
This moisture often develops slowly, allowing mold to grow unnoticed for long periods. If ceiling mold appears near attic areas, insulation, ventilation, air leaks, and roof sheathing may need to be checked before deciding whether the drywall can be saved.
Is Mold on Ceiling Drywall Dangerous?
Mold on ceiling drywall is concerning because it may involve both air quality and material failure. If moisture has weakened the drywall, the ceiling may sag, shed debris, or hide contamination above the visible surface.
Potential risks associated with ceiling drywall mold include:
- Airborne mold particles falling into living spaces.
- Respiratory irritation and allergy symptoms.
- Structural weakening of ceiling materials.
- Spread of mold into insulation and framing.
Overhead mold is especially concerning because gravity can cause contaminated particles, dust, or cleaning residue to fall downward during cleanup. This increases exposure risk compared with mold on lower wall surfaces.
If mold odors are present even when visible growth is limited, hidden contamination may exist above the drywall surface. In these situations, reviewing why mold smells occur without visible mold can help determine whether deeper moisture problems are contributing to the issue.
When Moldy Ceiling Drywall Can Be Cleaned Instead of Replaced
Not all ceiling mold requires drywall replacement. In many cases, surface mold can be cleaned safely if the underlying drywall remains intact, dry, and structurally sound.
Cleaning is usually appropriate when the following conditions are present:
- Mold growth appears as surface spots or light patches.
- The drywall remains firm and does not crumble.
- No sagging or structural damage is visible.
- The affected area is relatively small.
- The moisture source has already been corrected.
In these cases, the drywall is still acting like a stable finished surface. The goal is to remove surface mold without soaking the paper face, damaging the paint, or driving moisture deeper into the gypsum core.
When Ceiling Drywall Must Be Replaced Instead of Cleaned
Some ceiling mold situations require drywall replacement rather than cleaning. Attempting to clean severely damaged drywall can increase safety risks and delay necessary repairs.
Replacement is typically required when:
- The drywall surface feels soft or spongy.
- Sagging areas appear overhead.
- Mold covers a large portion of the ceiling.
- Water damage has occurred repeatedly.
- Structural cracks or bulging are visible.
These signs mean the problem is no longer just visible mold on the surface. The drywall may have absorbed water, lost strength, or allowed mold to move into the paper facing or ceiling cavity. Cleaning the outside may leave damaged material in place.
These conditions often indicate deeper damage inside the ceiling structure. In such cases, the wet area must be dried before new drywall is installed. For deeper water exposure, how to dry ceilings after water damage explains the drying step in more detail.
Safety Checks Before Cleaning or Removing Moldy Ceiling Drywall
Before cleaning mold from ceiling drywall, check safety first. Overhead cleanup creates more exposure risk than wall cleanup because dust, debris, and mold particles can fall directly toward your face, eyes, and clothing.
Do not begin cleaning until the ceiling is stable and the moisture source has been corrected. If the drywall is sagging, cracked, bulging, or wet to the touch, stop and have the area evaluated before attempting cleanup.
Confirm the Moisture Source Has Been Fixed
Before cleaning, confirm that the ceiling is no longer being exposed to water, condensation, or trapped humidity. Otherwise, the mold may return even if the visible surface looks clean at first.
Common sources to verify include:
- Roof leaks above the ceiling.
- Plumbing leaks from upper floors.
- Bathroom exhaust fan problems.
- Attic condensation or poor ventilation.
- Hidden moisture trapped in insulation.
If the source is unclear, cleaning the visible mold may only create temporary improvement, and the same ceiling area may become moldy again.
Protect the Room Below the Ceiling
Because the work area is overhead, mold particles and cleaning residue can fall onto the floor and nearby surfaces. Protecting the room reduces the chance of spreading contamination.
Before cleaning, consider these preparation steps:
- Move furniture away from the work area.
- Cover flooring with plastic sheeting.
- Remove curtains, rugs, or fabric items nearby.
- Keep children and pets out of the room.
- Avoid strong airflow while scrubbing.
Once cleaning is finished, dispose of contaminated coverings carefully so particles are not spread through the rest of the home.
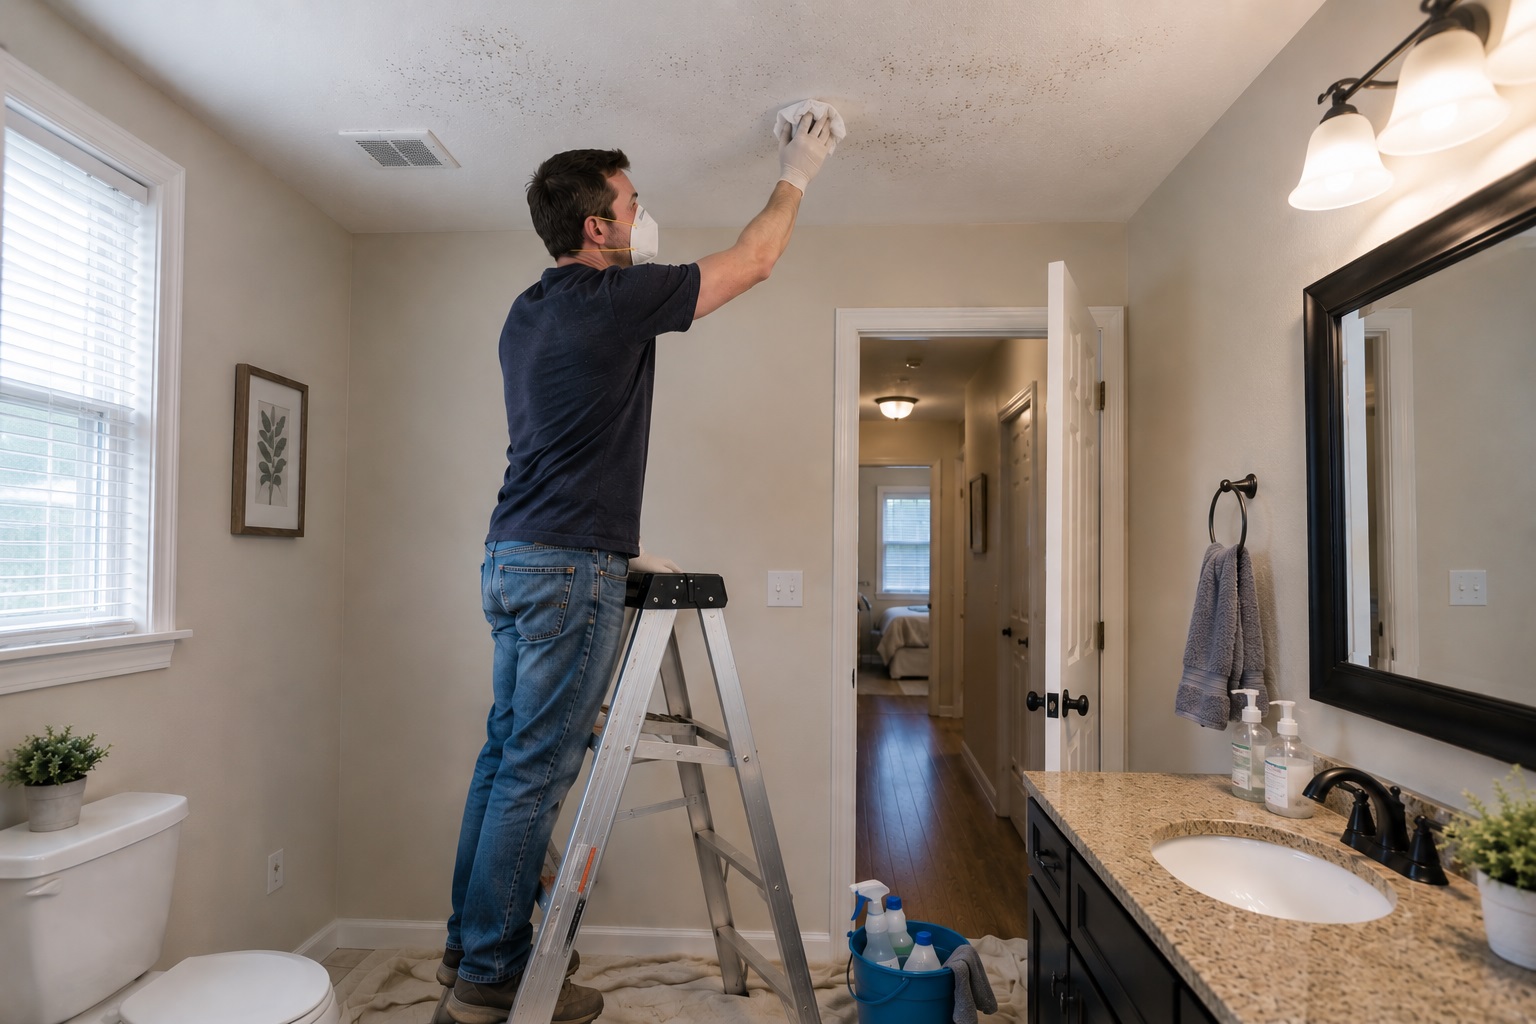
Wear Protective Gear
Overhead cleaning increases exposure risk. Mold particles can fall downward while you work, so eye and respiratory protection are especially important.
Basic protective gear should include:
- Disposable gloves.
- Safety goggles or sealed eye protection.
- An N95 respirator or better.
- Long sleeves and washable clothing.
Do not clean overhead mold without eye protection. Even a small amount of debris can irritate the eyes or expose you to contaminants.
Do not mix cleaning chemicals, and avoid combining bleach with ammonia-based cleaners. If fumes become strong or breathing becomes uncomfortable, leave the room and improve ventilation before continuing.
Use a Stable Ladder or Platform
Ceiling mold removal often requires working from a ladder. Make sure your ladder is stable, positioned on level flooring, and tall enough so you do not have to overreach.
Avoid cleaning from unstable chairs, stools, or furniture. Overreaching while scrubbing overhead increases the risk of falls and poor cleaning control.
How to Clean Small Surface Mold From Ceiling Drywall
If the drywall is firm, dry, and only lightly affected on the surface, careful cleaning may be possible. This process is for small surface mold only. Do not use these steps on drywall that is soft, sagging, wet, crumbling, swollen, or moldy because of an active leak.
Step 1: Lightly Dampen the Moldy Area
Before scrubbing, lightly dampen the affected area with a mold-cleaning solution applied to a cloth, sponge, or low-mist sprayer. This helps reduce airborne particles while cleaning without soaking the drywall.
Do not saturate the drywall. Excess moisture can push water deeper into the gypsum core and make the problem worse. Ceiling drywall should be damp enough to control dust, not wet enough to drip.
Avoid spraying cleaner directly overhead in a way that causes dripping. Drips can run across the ceiling, spread residue, and increase exposure to your eyes and face.
When drywall becomes heavily saturated, the gypsum core can weaken and lose strength. This increases the risk of surface failure, sagging, or hidden mold developing deeper inside the ceiling material.
Step 2: Gently Scrub the Surface
Use a soft brush, sponge, or cloth to gently remove surface mold. Avoid aggressive scraping because drywall paper can tear easily when damp.
Work slowly and carefully. Heavy scrubbing can damage the ceiling surface and create loose debris. If the drywall begins to crumble or peel, stop cleaning because the material may no longer be salvageable.
Step 3: Wipe Away Residue
After scrubbing, wipe the area with a clean damp cloth to remove residue. Use light pressure and avoid spreading mold outward beyond the original affected area.
Replace cloths as they become dirty. Reusing contaminated cloths can spread mold particles across clean areas of the ceiling.
Step 4: Dry the Ceiling Thoroughly
Drying is one of the most important steps in ceiling drywall mold removal. Mold returns quickly if moisture remains inside the surface.
After cleaning, improve drying by:
- Increasing gentle airflow in the room.
- Running a dehumidifier if humidity is high.
- Using the bathroom exhaust fan after showers.
- Keeping the area exposed until fully dry.
Ceiling drywall can dry more slowly than wall surfaces, especially if insulation above the ceiling remains damp. If the area stays damp or the odor returns, hidden moisture may still be present.
Step 5: Inspect the Ceiling After Cleaning
After the area dries, inspect the ceiling carefully. Successful cleaning should leave the surface firm, dry, and free from visible mold.
Watch for warning signs after cleanup:
- Mold spots returning within days or weeks.
- Musty odors near the ceiling.
- Paint bubbling or peeling.
- New stains spreading outward.
- Softness when lightly pressed.
If any of these signs appear, the problem likely extends deeper than the surface.
What to Do If Ceiling Drywall Needs to Be Replaced
If the drywall is soft, sagging, wet, crumbling, or repeatedly moldy, replacement is usually safer than surface cleaning. The damaged section should not simply be painted over or cleaned from below while moisture remains above the ceiling.
Before new drywall is installed, the moisture source must be corrected and the ceiling cavity should be dry. Damp insulation, wet framing, or trapped moisture above the drywall can cause mold to return even after the visible ceiling surface has been replaced.
If the mold appears after a roof leak, plumbing leak, or repeated water stain, inspect above the ceiling when possible. The drywall may be only the visible part of a larger moisture problem.
Replacement should focus on removing damaged material, not just hiding the stain. New drywall should not be installed until the leak has been repaired, damp materials have dried, and any affected insulation or framing has been evaluated.
Avoid tearing out moldy ceiling drywall without a plan for dust control and debris containment. Cutting or breaking drywall overhead can release mold particles, gypsum dust, and contaminated insulation into the room below. If the affected area is large, wet, sagging, or connected to hidden cavity mold, professional removal is usually safer.
How to Keep Mold From Returning After Cleaning or Replacing Ceiling Drywall
Removing mold from ceiling drywall is only part of the solution. Most recurring ceiling mold problems come from ongoing moisture, weak airflow, or incomplete drying above the drywall. Correcting those conditions reduces the chance that mold will return after cleanup or replacement.
Improve Bathroom and Kitchen Ventilation
Bathrooms and kitchens generate large amounts of moisture, especially during showers and cooking. Because warm air rises, ceilings in these rooms are often the first place condensation forms.
To reduce moisture buildup:
- Use exhaust fans during and after showers.
- Run ventilation for at least 20–30 minutes after bathing.
- Keep bathroom doors slightly open when possible.
- Clean exhaust fan vents regularly to maintain airflow.
Control Indoor Humidity Levels
High humidity allows mold to grow even when leaks are not present. Keeping humidity within safe levels reduces the chance of mold returning.
Most homes benefit from maintaining indoor humidity below 50–55 percent. If humidity remains elevated, mold growth becomes more likely on ceilings and other surfaces.
If humidity problems persist, reviewing these signs of high humidity in a house can help identify moisture patterns that contribute to ceiling mold growth.
Inspect Roofing and Plumbing Regularly
Routine inspections help detect small leaks before they create major problems. Many ceiling mold issues begin with slow leaks that remain unnoticed for weeks or months.
Regular inspection points include:
- Roof flashing and vent seals.
- Attic insulation for damp areas.
- Pipes running through upper floors.
- Bathroom and kitchen plumbing connections.
Addressing leaks early prevents moisture from accumulating inside ceiling cavities.
Ensure Ceilings Dry Completely After Water Exposure
After any leak or spill, drying ceiling materials quickly is essential. Moisture trapped above drywall supports hidden mold growth even after visible water disappears.
Proper drying methods vary depending on the severity of the water damage. For deeper moisture exposure, reviewing how to dry ceilings after water damage can help reduce the chance of long-term mold development.
When to Seek Professional Help
Some ceiling drywall mold situations exceed safe homeowner cleaning limits. Attempting to clean large, wet, sagging, or structurally compromised drywall can increase exposure risk and delay necessary removal or repair.
Professional help may be necessary when:
- The affected area exceeds about 10 square feet.
- Ceiling drywall shows sagging or structural damage.
- Mold spreads rapidly after cleaning.
- Strong odors persist despite visible cleanup.
- Water damage affects insulation or framing above the ceiling.
In these cases, professionals can evaluate hidden contamination, remove unsafe materials, and determine whether ceiling drywall, insulation, or framing needs further work.
If your ceiling is firm, painted, and only lightly spotted from humidity, the broader guide on how to clean mold from ceilings may be the better starting point.
FAQ: Removing Mold From Ceiling Drywall
Can moldy ceiling drywall be cleaned, or does it need replacing?
Moldy ceiling drywall can often be cleaned when the growth is small, surface-level, and the drywall remains firm and dry. If the drywall is soft, sagging, crumbling, swollen, wet, or repeatedly moldy, replacement is usually safer than cleaning.
How do I know if mold is inside the ceiling drywall?
Possible signs include soft or sagging drywall, spreading stains, musty odors, bubbling paint, recurring mold in the same spot, or mold that appears after a roof or plumbing leak. These signs may mean moisture has moved beyond the painted surface.
How long does it take mold to return after cleaning?
Mold can return within days if moisture conditions remain unresolved. If mold reappears quickly after cleaning, it usually indicates hidden moisture or incomplete drying inside the ceiling structure.
Is ceiling mold more dangerous than wall mold?
Ceiling mold presents additional risks because contaminated particles can fall downward into living areas. It may also indicate moisture problems above the ceiling, which can affect insulation and structural components.
What causes mold on bathroom ceilings?
Bathroom ceiling mold is most often caused by humidity and condensation. Poor ventilation allows steam to collect on ceiling surfaces, creating conditions that support mold growth.
Will painting over mold fix the problem?
No, painting over mold does not eliminate the problem. Paint may temporarily hide stains, but mold will continue growing underneath if moisture conditions remain. Proper cleaning and moisture control are necessary for lasting results.
Conclusion: The Right Choice Depends on the Drywall Condition
Mold on ceiling drywall should be handled based on the condition of the material, not just the size of the visible stain. Small surface mold on firm, dry, painted drywall may be cleanable, but soft, sagging, wet, crumbling, or repeatedly moldy drywall usually needs replacement.
The safest approach is to fix the moisture source first, then decide whether the drywall is still sound enough to clean. If moisture has moved into the drywall, insulation, or framing above the ceiling, surface cleaning alone may leave the real problem behind.
For broader mold cleanup strategy beyond ceiling drywall, how to remove mold permanently explains how source control, safe cleanup, and prevention work together.
Key Takeaways
- Small surface mold on firm, dry, painted ceiling drywall can often be cleaned carefully.
- Soft, sagging, swollen, crumbling, wet, or repeatedly moldy ceiling drywall usually needs replacement.
- Ceiling drywall mold may indicate hidden moisture above the ceiling, especially after roof leaks, plumbing leaks, or attic condensation.
- Do not soak ceiling drywall while cleaning because excess moisture can weaken the gypsum core and paper face.
- Fixing the moisture source is necessary before cleaning, repainting, or installing new drywall.