How to Dry Ceilings After Water Damage (Safe Drying Methods Explained)
To dry a ceiling after water damage, stop the water source first, protect the area below, drain any trapped water safely, then use steady airflow, dehumidification, and moisture checks until the ceiling cavity is dry. Do not rely on surface appearance alone, because drywall, insulation, and framing can stay wet above the visible ceiling.
Fast drying matters because wet ceiling materials can weaken, sag, and support mold growth if moisture remains trapped. In many cases, mold can begin developing within 24 to 48 hours, especially when insulation or paper-faced drywall stays damp.
This guide explains the safest drying sequence, when ceiling materials can be saved, when they should be removed, and how to confirm that the ceiling is actually dry before painting or repairing it.
For broader prevention after the ceiling is dry, see how to prevent recurring moisture damage, which is the parent guide for long-term water damage prevention.
What Happens When Ceilings Get Wet
When water enters a ceiling cavity, it can spread through drywall, insulation, seams, and wood framing before the full damage is visible below. That is why ceiling drying must address the hidden cavity, not just the stained surface.
How Water Moves Through Ceiling Materials
Drywall ceilings absorb water through the paper facing and gypsum core, while insulation above the ceiling can hold moisture long after the stain below stops growing.
Water movement typically follows this pattern:
- Initial moisture entry — Water enters through leaks or condensation.
- Material absorption — Drywall and insulation soak up moisture.
- Moisture spreading — Water travels along framing and seams.
- Structural weakening — Materials soften and lose strength.
- Mold risk increases — Damp materials create ideal growth conditions.
Why Ceiling Drying Takes Longer Than Expected
Many homeowners assume that ceilings dry naturally over time. However, ceiling cavities often trap moisture, slowing evaporation and increasing mold risk.
Several factors make ceiling drying more difficult than surface drying:
- Limited airflow — Ceiling cavities have restricted ventilation.
- Hidden insulation — Insulation retains moisture internally.
- Gravity effects — Water collects in low points.
- Layered materials — Multiple materials hold moisture simultaneously.
- Cool temperature zones — Slower evaporation occurs in cooler spaces.
Because moisture can remain trapped inside materials, surface dryness does not always mean internal dryness. In many cases, ceilings that appear dry still contain hidden moisture capable of supporting mold growth.
If the ceiling was recently soaked, review how long mold takes to grow after water damage to understand why drying delays matter.
Immediate Steps to Take After Ceiling Water Damage
The first few hours after discovering ceiling water damage are the most important. Acting quickly reduces the amount of moisture that enters ceiling materials and improves the chances of successful drying.
These immediate response steps help limit damage and reduce the likelihood of mold development.
Step 1 — Stop the Source of Water
The most critical first step is stopping the water source. Drying efforts cannot succeed if moisture continues entering the ceiling cavity.
Common actions include:
- Turning off leaking plumbing fixtures
- Shutting off water supply valves
- Placing temporary coverings over roof leaks
- Clearing clogged gutters causing water backup
- Repairing damaged roofing materials
If the source of water cannot be identified immediately, ongoing moisture exposure may continue damaging ceiling materials.
Step 2 — Protect the Area Below the Leak
Before beginning drying procedures, protect surrounding furniture and flooring from additional damage. Water may continue dripping even after the primary leak stops.
Protective actions include:
- Placing buckets under leaking areas
- Moving furniture away from affected zones
- Covering belongings with waterproof materials
- Removing rugs or fabrics from the area
- Drying visible water puddles immediately
Limiting secondary damage helps reduce repair costs and simplifies cleanup.
Step 3 — Relieve Trapped Water Safely
If water becomes trapped inside ceiling materials, it may form bulging or sagging areas. These pockets of trapped water place stress on ceiling structures and increase collapse risk.
Signs of trapped water include:
- Bulging ceiling sections
- Water-filled bubbles in paint
- Sagging ceiling panels
- Dripping from seams or fixtures
If the ceiling is bulging, sagging, or dripping near lights, wiring, or electrical fixtures, do not stand under it or puncture it casually. Turn off power to the affected area if it can be done safely, keep people out from under the damaged section, and call a professional if the ceiling looks unstable.
Important safety reminder:
- Turn off power to affected lights, fans, or ceiling fixtures before working nearby.
- Do not stand directly under a bulging or sagging ceiling.
- Wear eye protection, gloves, and a mask if water or wet debris may fall.
- Do not handle sewage, floodwater, or visibly contaminated water as a simple drying project.
- Call a professional if the ceiling is soft, cracking, heavily sagging, or near electrical components.
Once the area is safe and excess water is controlled, begin active drying right away.
Step-by-Step Ceiling Drying Process
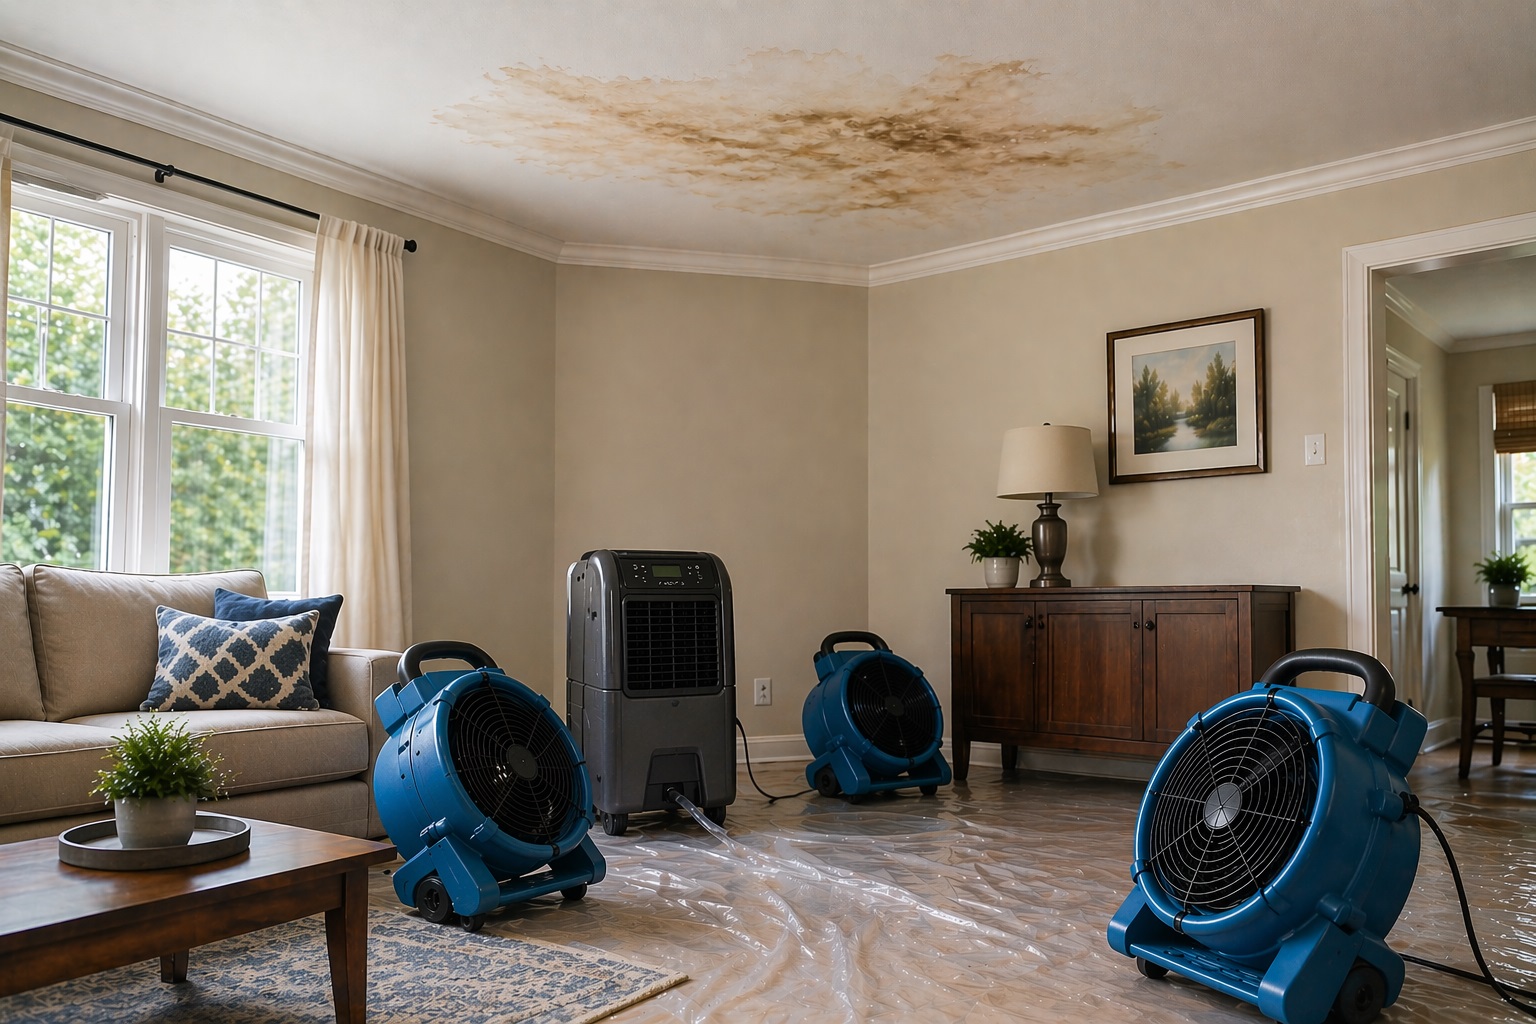
Once the water source has been stopped and the area is safe, begin active drying. Ceiling drying requires controlled airflow, humidity reduction, and moisture monitoring because water can remain trapped above the visible surface. Similar drying principles are used in wall restoration, as explained in how to dry walls after water damage.
Step 4 — Increase Air Circulation Immediately
Air movement plays a critical role in ceiling drying. Moving air helps evaporate moisture from damp materials and speeds up the drying process.
Ways to improve air circulation include:
- Opening windows when outdoor humidity is low
- Turning on ceiling fans or portable fans
- Creating cross-ventilation between rooms
- Keeping interior doors open to allow airflow
- Running ventilation fans in bathrooms and kitchens
Air circulation should begin as soon as water exposure occurs. Delayed airflow allows moisture to soak deeper into materials, making drying slower and less effective.
Step 5 — Position Fans Correctly for Ceiling Drying
Fan placement significantly affects drying efficiency. Improper positioning may leave hidden moisture trapped inside ceiling cavities.
For best results, fans should be positioned to direct airflow across the ceiling surface rather than directly upward. This creates steady air movement that removes moisture from the surface.
Recommended fan placement techniques:
- Place fans at floor level angled toward the ceiling
- Use multiple fans for larger affected areas
- Direct airflow across wet ceiling sections
- Avoid blocking airflow with furniture
- Keep fans running continuously during drying
Continuous airflow prevents moisture from settling back into ceiling materials.
Step 6 — Use Dehumidifiers to Remove Moisture From the Air
Dehumidifiers are one of the most effective tools for drying ceilings. While fans move air, dehumidifiers remove moisture from the environment, preventing humidity from slowing evaporation.
Using a dehumidifier helps:
- Reduce indoor humidity levels
- Speed up evaporation from wet materials
- Prevent condensation from reforming
- Limit mold growth risk
- Shorten overall drying time
Place the dehumidifier near the affected area but not directly beneath dripping water. Empty the collection tank regularly to maintain efficiency.
If indoor humidity remains high during drying, follow the guidance in best dehumidifier settings to prevent mold so the room stays dry enough for moisture to leave the ceiling materials.
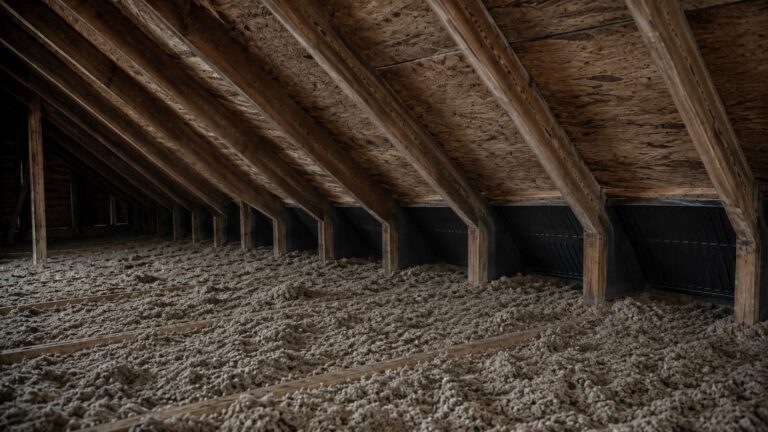
Step 7 — Remove Wet Insulation if Necessary
Wet insulation slows drying and often retains moisture long after surrounding materials appear dry. In many cases, insulation must be removed to allow proper airflow inside ceiling cavities.
Signs insulation should be removed include:
- Insulation that feels damp or heavy
- Insulation with visible staining
- Persistent musty odors near insulation
- Compressed or flattened insulation layers
- Insulation that remains wet after extended drying
Removing wet insulation improves airflow and prevents hidden mold growth inside the ceiling structure. For detailed insulation recovery steps, see how to dry insulation after water damage.
Step 8 — Create Access Points for Deep Drying
For significant ceiling saturation, drying may require access to the cavity above the drywall. This may mean opening attic access, removing damaged sections, or having a restoration professional create controlled drying openings.
Common access techniques include:
- Removing damaged ceiling panels
- Cutting small inspection openings
- Opening attic access points
- Allowing airflow into enclosed spaces
- Exposing damp structural materials
Creating access points allows trapped moisture to evaporate more efficiently and reduces the likelihood of mold formation inside hidden cavities.
Fan and Dehumidifier Setup Tips
Fans and dehumidifiers work best when they move moisture out of the ceiling area instead of simply blowing damp air around the room.
Best Fan Types for Ceiling Drying
The best fan depends on the size of the wet area and whether the moisture is limited to the surface or trapped above the ceiling.
Effective fan options include:
- High-velocity air movers — Provide strong airflow across large surfaces.
- Box fans — Useful for medium-sized drying areas.
- Oscillating fans — Help distribute airflow evenly.
- Ceiling fans — Improve overall room air circulation.
For larger wet areas, combining air movers with a dehumidifier usually works better than relying on one fan.
How Many Fans Should Be Used?
Use enough fans to keep air moving across the entire affected section, not just the center of the stain.
General placement guidelines:
- Use at least one fan for small localized leaks
- Use two to three fans for medium ceiling sections
- Use additional fans for large rooms
- Ensure airflow reaches all affected areas
- Rotate fan positions if needed
Insufficient airflow may leave hidden moisture trapped inside ceiling materials.
Optimal Dehumidifier Settings During Drying
Proper dehumidifier settings maximize moisture removal efficiency. Maintaining appropriate humidity levels supports faster drying and reduces mold risk.
Recommended humidity targets:
- Maintain indoor humidity between 30% and 50%
- Monitor humidity levels daily
- Empty water tanks regularly
- Keep doors and windows closed during operation
- Continue running until materials are fully dry
Maintaining low humidity levels throughout the drying process prevents moisture from reabsorbing into ceiling materials.
How Long Ceiling Drying Takes
Ceiling drying may take anywhere from one day to two weeks depending on saturation, insulation, airflow, humidity, and whether the ceiling cavity has been opened for drying. The main mistake is stopping when the surface looks dry instead of confirming the materials are dry.
Typical Ceiling Drying Timeframes
Most ceiling drying projects fall within predictable ranges when proper airflow and humidity control are used.
- Minor moisture exposure: 24 to 72 hours
- Moderate water damage: 3 to 7 days
- Severe saturation: 7 to 14 days or longer
These timeframes assume that fans and dehumidifiers are operating continuously. Without active drying equipment, moisture may remain trapped inside materials for significantly longer.
Factors That Affect Drying Speed
Several variables influence how quickly ceiling materials dry. Recognizing these factors helps explain why drying times vary widely between homes.
Key drying factors include:
- Amount of water exposure — Larger leaks require longer drying times.
- Type of ceiling materials — Drywall absorbs moisture faster than some alternatives.
- Presence of insulation — Insulation retains water and slows evaporation.
- Indoor humidity levels — Higher humidity slows moisture removal.
- Air circulation efficiency — Strong airflow improves drying speed.
- Temperature conditions — Warmer environments promote faster evaporation.
Homes located in humid environments may require extended drying periods to fully remove moisture from ceiling cavities.
Signs Ceiling Materials Are Fully Dry
Determining when ceiling materials are completely dry is critical. Many homeowners stop drying too soon because the ceiling surface appears dry, even though moisture remains inside hidden layers.
Proper drying confirmation prevents long-term structural damage and mold growth.
Visual Signs of Complete Drying
Visible changes often provide the first confirmation that drying is progressing successfully.
Reliable visual indicators include:
- Stains stop expanding or darkening
- Ceiling paint remains stable without bubbling
- No visible damp patches remain
- No sagging or soft areas remain
- Ceiling surfaces return to normal color
Moisture Testing for Accurate Dryness Confirmation
Moisture testing is the most reliable way to confirm that ceiling materials are dry. Compare readings from the wet area with nearby unaffected ceiling materials, because a normal baseline is more useful than judging the stain by sight alone. For equipment guidance, see best moisture meters for detecting hidden water damage.
Moisture testing typically involves:
- Measuring moisture levels at multiple ceiling locations
- Comparing readings to dry baseline areas
- Monitoring readings daily
- Confirming moisture levels stabilize over time
- Ensuring readings fall within safe ranges
Odor Changes During the Drying Process
Odor patterns often change as moisture levels decrease. A reduction in musty odors usually indicates successful drying progress.
Positive odor changes include:
- Musty smells fade instead of becoming stronger.
- No new damp or earthy odors appear near the ceiling.
- Odors do not return when the room is closed up overnight.
If musty odors remain despite visible drying progress, hidden moisture may still be present inside ceiling cavities. In such cases, reviewing early warning indicators in Signs of Mold Inside Ceiling Cavities can help identify unresolved problems.
When Ceiling Materials Must Be Replaced
Not every wet ceiling can be saved. Replacement is usually safer when drywall has lost strength, insulation remains wet, mold appears, or the water source was contaminated.
Signs Drywall Cannot Be Salvaged
Drywall ceilings are particularly vulnerable to moisture damage. Once drywall absorbs large amounts of water, it may lose strength permanently.
Replacement is typically required when:
- Drywall becomes soft or crumbly
- Large sagging areas develop
- Water saturation persists for several days
- Mold growth becomes visible
- Paint continues peeling despite drying
- The ceiling was exposed to sewage, floodwater, or contaminated water
Replacing damaged drywall removes contaminated materials and restores structural stability.
When Insulation Should Be Removed
Wet insulation is one of the most common hidden sources of ongoing moisture problems. Because insulation holds water internally, it often fails to dry completely.
Insulation replacement is recommended when:
- Insulation remains damp after several days
- Visible staining appears on insulation surfaces
- Musty odors persist inside ceiling cavities
- Insulation becomes compressed or heavy
- Mold growth appears within insulation layers
Removing damaged insulation allows proper airflow and reduces the risk of concealed mold growth.
Structural Damage That Requires Professional Repair
In severe cases, water damage weakens structural components such as ceiling joists and support beams. Structural damage should always be addressed by qualified professionals.
Serious structural warning signs include:
- Large ceiling sagging sections
- Cracks forming in structural framing
- Persistent moisture despite drying efforts
- Cracking, spreading seams, or signs the ceiling may collapse
- Visible mold growth on wood framing
Ignoring structural damage can create long-term safety hazards.
Common Ceiling Drying Mistakes to Avoid
Many ceiling drying problems occur not because homeowners ignore water damage, but because drying steps are incomplete or done incorrectly. Avoiding common mistakes can significantly improve drying success and reduce the risk of mold growth.
Stopping Drying Too Soon
One of the most frequent mistakes is stopping drying efforts once the ceiling surface looks dry. Unfortunately, internal moisture often remains trapped inside drywall, insulation, or framing materials.
Risks of stopping drying too early include:
- Hidden mold growth inside ceiling cavities
- Recurring musty odors
- Delayed structural damage
- Reappearance of stains
- Long-term moisture retention
Drying should continue until moisture readings confirm safe levels throughout the ceiling structure.
Using Too Few Fans or Improper Placement
Insufficient airflow significantly slows drying. Many homeowners use only one fan, assuming it will dry the entire ceiling area. However, uneven airflow often leaves moisture trapped in certain sections.
Common airflow mistakes include:
- Using a single fan in large rooms
- Directing airflow straight upward
- Blocking airflow with furniture
- Turning fans off periodically
- Not rotating fan positions
Consistent airflow across the entire affected area is essential for removing trapped moisture.
Failing to Control Indoor Humidity
High humidity levels slow evaporation and reduce drying efficiency. Without humidity control, moisture removed from ceiling materials may simply return to surrounding surfaces.
Humidity-related mistakes include:
- Leaving windows open during humid weather
- Not using dehumidifiers
- Ignoring humidity measurements
- Allowing condensation to continue forming
- Stopping dehumidifier use prematurely
Maintaining controlled humidity levels supports faster and more reliable drying.
How to Reduce Mold Risk While the Ceiling Dries
To reduce mold risk while the ceiling dries, keep humidity controlled, monitor moisture readings, and remove materials that stay wet or contaminated.
Monitor Conditions Throughout the Drying Process
Drying is not a one-time action. Continuous monitoring ensures moisture removal remains effective throughout the process.
Important monitoring steps include:
- Checking moisture readings daily
- Watching for new stains or sagging
- Monitoring humidity levels
- Inspecting surrounding areas
- Adjusting airflow as needed
Ongoing observation helps identify problems early before mold develops.
Remove Materials That Cannot Be Fully Dried
Some ceiling materials cannot be safely dried after heavy water exposure. Leaving them in place can keep the ceiling cavity damp and increase mold risk.
Materials commonly requiring removal include:
- Severely saturated drywall
- Wet insulation
- Mold-contaminated materials
- Warped ceiling panels
- Water-damaged wood components
If mold becomes visible during the drying process, follow proper remediation procedures outlined in How to Remove Mold Permanently.
Frequently Asked Questions About Drying Ceilings After Water Damage
Can a wet ceiling dry on its own?
In most cases, ceilings do not dry completely without active airflow and humidity control. Natural drying often leaves hidden moisture trapped inside materials, increasing mold risk.
How long should fans run during ceiling drying?
Fans should operate continuously until moisture levels return to safe ranges. This often requires several days or longer depending on damage severity.
Do I need a dehumidifier to dry a ceiling?
While not always required for minor leaks, dehumidifiers significantly speed drying and reduce moisture levels. They are strongly recommended for moderate to severe water damage.
Should I paint over water-damaged ceiling areas?
Painting over damp surfaces traps moisture and may lead to mold growth. Ceilings should only be painted after they are fully dry and stable.
What happens if ceiling water damage is ignored?
Ignoring water damage can lead to mold growth, structural weakening, sagging ceilings, and costly repairs.
How do I know if mold has started during drying?
Common signs include musty odors, discoloration, or visible spots forming on ceiling surfaces. If these signs appear, reviewing Signs of Mold Inside Ceiling Cavities may help identify early symptoms.
Final Check Before Repairing or Painting the Ceiling
Before repairing or painting a water-damaged ceiling, confirm that the leak has stopped, the ceiling is structurally stable, wet insulation has been removed or dried, and moisture readings match nearby unaffected materials.
Do not seal stains, repaint drywall, or close ceiling openings while moisture remains trapped above the surface. If the ceiling still smells musty, feels soft, shows new staining, or tests damp, continue drying or have the cavity inspected before finishing the repair.
Key Takeaways
- Dry ceilings quickly after water damage to reduce mold and structural risk.
- Stop the leak before starting any drying work.
- Use fans and dehumidifiers continuously until moisture readings confirm drying.
- Do not trust surface dryness if insulation or ceiling cavities may still be wet.
- Remove wet insulation or damaged drywall when it cannot be dried safely.
- Do not paint or repair the ceiling until hidden moisture has been ruled out.