How to Detect Moisture Under Kitchen Floors
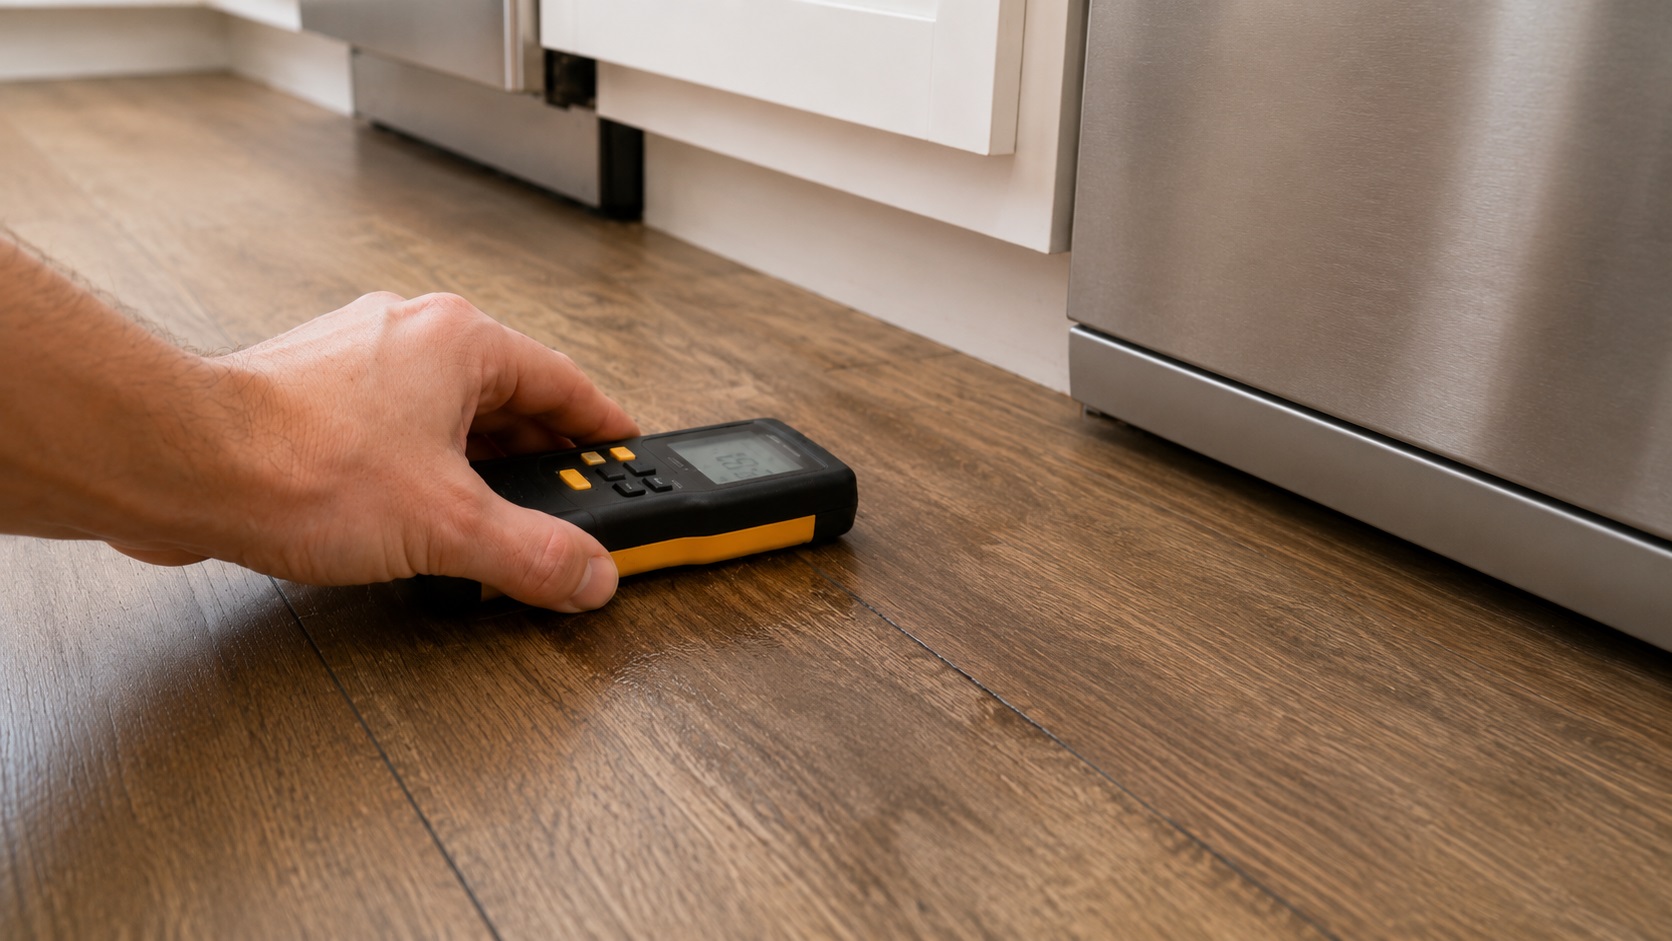
To detect moisture under kitchen floors, start by checking high-risk areas near sinks, dishwashers, refrigerators, floor seams, cabinet bases, and transitions. Then compare readings from suspected areas with a dry baseline area using a moisture meter, infrared thermometer, and careful visual inspection.
Many homeowners first notice symptoms such as soft flooring, swelling seams, or persistent odors. If you’ve already observed warning signs described in signs of water damage under kitchen flooring, the next step is confirming whether moisture is actually present beneath the surface.
This guide explains practical, realistic methods for detecting hidden moisture under kitchen floors using tools and techniques available to most homeowners. It focuses on confirming moisture presence—not repairing or removing flooring.
If you suspect moisture problems in multiple areas of your home, this overview on how to find hidden moisture in different parts of your home explains where hidden water commonly develops and how to identify risk zones.
Why Detecting Moisture Early Matters
Most kitchen floor moisture problems start as small, repeated leaks from appliances, plumbing, spills, or damaged seams. Because water can move under finished flooring before the surface changes, early testing helps confirm the problem while the affected area is still limited.
Detecting moisture early provides several important advantages:
- Prevents damage from spreading to subfloor layers
- Reduces the risk of mold growth beneath flooring
- Allows targeted repairs before structural weakening occurs
- Helps identify small leaks before they become larger problems
- Protects cabinets and nearby wall framing
Hidden Moisture Can Spread Away From the Leak Source
Water under kitchen flooring often moves through seams, joints, underlayment, and porous subfloor materials. A slow dishwasher leak, for example, may show the highest readings several feet from the appliance if water has followed a seam or low spot beneath the finished floor.
Detecting Moisture Is Different From Inspecting Flooring
For this article, detection means confirming whether moisture is present. Inspection means tracing the source, checking damage depth, and deciding whether flooring or subfloor materials need to be opened.
If detection confirms moisture but the source remains unclear, more detailed steps described in how to inspect kitchen flooring for hidden moisture may be necessary.
Common Tools Used to Detect Moisture Under Kitchen Floors
Several tools can help detect hidden moisture beneath kitchen flooring. Each tool provides different types of information, and combining multiple methods often improves accuracy.
Moisture Meters
Moisture meters are one of the most reliable homeowner tools for detecting hidden water beneath flooring materials. They are most useful when you compare a suspected wet area with a similar dry area of the same flooring material.
There are two main types of moisture meters commonly used in residential environments.
Pin-Type Moisture Meters
Pin-type moisture meters use small metal probes that penetrate the surface of materials. These probes measure electrical resistance, which changes based on moisture content.
Pin meters are commonly used to test:
- Wood subfloors
- Cabinet bases
- Exposed wood edges
- Trim materials near flooring
These meters provide useful readings when testing materials that allow direct probe contact. However, they are not effective when testing through finished surfaces such as tile or sealed laminate.
Proper use involves testing multiple locations rather than relying on a single reading. Comparing results helps determine whether moisture is concentrated in specific areas.
Pinless Moisture Meters
Pinless moisture meters scan without penetrating the material. They do not prove the exact depth or source of water, but they are useful for finding suspicious areas that read differently from nearby dry flooring.
Pinless meters are commonly used to:
- Scan large flooring areas quickly
- Compare moisture levels across different locations
- Identify suspicious zones beneath flooring
- Locate patterns of moisture spread
These meters are especially useful for detecting moisture beneath laminate or engineered flooring where inserting pins may damage the surface.
It is important to understand that pinless meters typically provide relative readings rather than exact moisture percentages. Their main value lies in comparing readings between dry and suspected areas.
Metal fasteners, foil-backed materials, thick adhesives, uneven subfloor layers, and some flooring transitions can affect readings, so suspicious results should be confirmed with a second method whenever possible.
Infrared Thermometers
Infrared thermometers measure surface temperature differences. Moist areas often appear cooler than dry areas because evaporation removes heat from wet materials.
This tool helps identify:
- Areas where moisture may be present
- Unexpected cooling patterns beneath flooring
- Temperature differences near appliances
- Hidden moisture zones that require further testing
Infrared thermometers do not measure moisture directly. Instead, they highlight areas that may require additional confirmation using moisture meters.
Visual Detection Tools
Visual inspection remains one of the simplest and most effective detection methods. Many moisture problems produce visible changes before major structural damage occurs.
Basic visual tools include:
- Flashlights for inspecting dark areas
- Inspection mirrors for tight spaces
- Paper towels to test for dampness
- Careful observation of seams and edges
Humidity Indicators
Humidity indicators do not confirm moisture under flooring, but they can show whether the kitchen environment is making drying harder. Use them as supporting evidence, not as proof of hidden floor moisture.
Humidity monitoring can reveal:
- Areas with elevated moisture levels
- Conditions that promote mold growth
- Poor airflow zones that trap moisture
- High-risk environments beneath cabinets
Although humidity indicators provide useful supporting data, they should not be used alone to confirm moisture beneath flooring.
How to Test Different Areas of the Kitchen Floor
Detecting moisture under kitchen floors requires testing the right locations. Water rarely spreads evenly. Instead, it moves outward from specific sources such as plumbing connections, appliance fittings, or damaged seals. Testing predictable risk areas improves accuracy and helps identify patterns of moisture movement.
Start with the most likely water source, then test outward in a grid pattern so you can see whether readings fade, spread, or follow a seam.
Around Kitchen Sinks
Kitchen sinks are one of the most common sources of hidden moisture beneath flooring. Supply lines, drain connections, and garbage disposals can develop slow leaks that release water beneath cabinets.
When testing near sinks, focus on:
- The cabinet floor directly beneath plumbing connections
- Edges where cabinets meet the floor
- The flooring immediately in front of sink cabinets
- Side panels and toe-kick areas
If cabinet floors show elevated moisture readings, water may already be spreading beneath surrounding flooring. In many cases, reviewing signs of water damage under kitchen sinks can help confirm related symptoms.
Near Dishwashers
Dishwashers create frequent water exposure during normal operation. Even minor leaks from door seals or supply lines can produce repeated moisture beneath the flooring.
When testing near dishwashers, check:
- The flooring directly in front of the appliance
- Cabinet edges next to the dishwasher
- The area beneath adjacent cabinetry
- Seams where flooring panels meet
Test before a dishwasher cycle, shortly after the cycle ends, and again several hours later. A reading that rises after use suggests an active appliance-related moisture source rather than old moisture alone.
Behind Refrigerators
Refrigerator water lines and ice maker connections are common sources of slow leaks. Because these leaks occur behind appliances, moisture often spreads unnoticed until damage becomes visible.
Key testing zones include:
- The floor behind the refrigerator
- The edges along rear walls
- The flooring beside the appliance footprint
- Adjacent cabinet corners
Refrigerator leaks often produce gradual moisture buildup that spreads outward from the initial source.
If readings are highest behind or beside the refrigerator, the water line, ice maker connection, or rear condensation area should be checked next. The article on how to inspect refrigerator water connections explains that inspection step in more detail.
Along Floor Edges and Transitions
Water frequently travels beneath flooring and accumulates along edges or transitions. These areas often trap moisture due to limited airflow.
Test areas such as:
- Floor edges near walls
- Transitions between rooms
- Baseboard junctions
- Areas where flooring changes direction
Moisture detected along edges often indicates migration from another source rather than a direct leak at that location.
How to Confirm Moisture Without Removing Flooring
Many homeowners assume flooring must be removed to confirm moisture beneath it. In reality, several reliable detection methods allow confirmation without dismantling materials.
These methods rely on comparison testing rather than single measurements.
Use Baseline Comparison Testing
Baseline testing involves measuring moisture in a known dry area before testing suspected areas. This comparison helps identify abnormal readings.
Follow these steps:
- Test a dry section of flooring away from appliances
- Record the baseline reading
- Test suspected moisture zones
- Compare differences between readings
Relative differences between readings are often more useful than absolute values.
Perform Multi-Point Testing
Testing only one location may produce misleading results. Moisture spreads unevenly, so multiple readings provide better accuracy.
Multi-point testing includes:
- Testing several spots within each risk zone
- Recording readings across multiple locations
- Mapping moisture patterns
- Repeating tests over time
Patterns of increasing readings often indicate moisture movement beneath flooring layers.
Repeat Testing Over Time
Moisture levels can change based on appliance use, humidity, and temperature conditions. Repeating tests helps confirm whether moisture is temporary or ongoing.
Recommended retesting intervals include:
- After appliance use
- Following cleaning activities
- During humid weather
- After suspected leaks
Consistent readings across multiple tests suggest persistent moisture requiring further investigation.
How to Interpret Moisture Readings Accurately
Moisture detection tools produce numbers or relative values, but those results need careful interpretation. Misreading them can lead to unnecessary repairs or overlooked damage.
Understand That Materials Affect Readings
Different flooring materials produce different readings. Wood-based materials naturally absorb moisture, while tile surfaces may show lower readings even when moisture exists beneath them.
Factors influencing readings include:
- Material type
- Surface density
- Ambient humidity
- Temperature changes
- Surface coatings
Comparing readings between similar materials improves accuracy.
Look for Patterns, Not Single Numbers
One elevated reading does not always confirm widespread moisture damage. Instead, consistent patterns across multiple locations provide stronger confirmation.
Reliable patterns may include:
- Increasing readings near appliances
- Clusters of elevated measurements
- Repeated high readings in the same location
- Moisture spreading outward from a source
Pattern recognition helps identify both the presence and direction of moisture movement.
Use Multiple Detection Methods
Using more than one detection method improves reliability. Moisture meters, visual inspection, and temperature testing each provide different information.
Combining methods allows:
- Cross-verification of readings
- Improved accuracy
- Reduced false positives
- Better understanding of moisture behavior
When multiple methods point to the same location, moisture presence becomes more likely.
Signs Your Detection Results Require Further Inspection
Detecting moisture under kitchen flooring is only the first step. In many cases, detection confirms that moisture exists but does not reveal exactly where the water is coming from or how far the damage has spread. Certain detection results should trigger more detailed inspection before damage becomes worse.
If moisture readings or observations suggest deeper problems, following structured procedures described in how to inspect kitchen flooring for hidden moisture may be necessary to locate the exact source.
Moisture Readings Continue to Increase
One of the most concerning detection patterns occurs when moisture readings increase over time. This often indicates that water is still entering the flooring system.
Warning signs include:
- Higher readings during repeated testing
- Moisture spreading into nearby areas
- Previously dry areas becoming damp
- New soft spots appearing over time
Increasing readings usually signal an active leak or ongoing moisture source that requires immediate attention.
Moisture Appears in Multiple Locations
Elevated readings across several areas often indicate widespread migration beneath the flooring surface. This pattern suggests that water has moved beyond its original entry point.
Look for:
- Elevated readings across wide sections of flooring
- Moisture detected along cabinet bases
- Changes spreading toward adjacent rooms
- Visible signs appearing in multiple locations
Widespread moisture increases the risk of structural damage and mold growth.
Persistent Moisture Near Appliances
Moisture repeatedly detected near appliances often indicates hidden plumbing or connection failures.
Focus especially on:
- Dishwasher supply lines and drain hoses
- Refrigerator water lines
- Sink plumbing connections
- Garbage disposal fittings
If appliance-related moisture is suspected, detection results should be treated as an early warning of mechanical failure.
Musty Odors Appear Alongside Elevated Readings
Moisture combined with musty odors often suggests prolonged moisture exposure. This combination increases the likelihood of microbial growth beneath the flooring surface.
If odors develop along with confirmed moisture readings, reviewing why kitchen floors develop mold after leaks can help explain how mold risk increases over time.
When Detection Confirms Serious Moisture Risk
Some detection results indicate higher risk levels that require faster action. Understanding these warning patterns helps prevent severe structural damage.
Consistently High Moisture Readings
Repeatedly elevated readings across multiple locations typically indicate significant moisture accumulation beneath the flooring.
High readings may indicate:
- Active water intrusion
- Saturated subfloor materials
- Hidden leaks beneath appliances
- Long-term moisture exposure
When readings remain high after repeated testing, moisture problems are unlikely to resolve without intervention.
Visible Damage Appearing Alongside Moisture
Detection results become more serious when moisture readings are accompanied by visible damage.
Examples include:
- Swollen flooring seams
- Soft or sagging areas
- Dark stains spreading across surfaces
- Warped cabinet bases
If visible damage is present along with confirmed moisture, the situation should be treated as an active structural concern.
Symptoms such as swelling or softness often match the warning signs described in signs of water damage under kitchen flooring.
Moisture Patterns That Follow Structural Lines
Water often travels along structural paths such as seams, joints, or framing members. When moisture readings follow predictable lines, it typically indicates hidden migration beneath flooring layers.
Common structural patterns include:
- Moisture following plank seams
- Readings aligned with cabinet bases
- Wet zones extending from appliance footprints
- Moisture appearing along wall junctions
Pattern-based detection helps identify how moisture spreads and where it may originate.
Common Detection Mistakes to Avoid
Incorrect detection practices can produce misleading results. Avoiding common mistakes improves accuracy and prevents unnecessary damage or repairs.
Testing Only One Location
Testing a single location rarely provides enough information to confirm moisture patterns. Water moves unpredictably beneath flooring, so relying on one reading increases the risk of inaccurate conclusions.
Instead:
- Test multiple locations in suspected areas
- Compare readings across similar materials
- Record readings for reference
- Repeat tests when conditions change
Ignoring Edge and Transition Areas
Moisture often accumulates along edges where airflow is limited. Testing only the center of the floor may overlook hidden moisture along walls or cabinets.
Always include:
- Baseboard edges
- Cabinet toe-kicks
- Transition strips
- Wall junctions
Edge testing improves the likelihood of detecting hidden moisture pathways.
Misinterpreting Single High Readings
A single elevated reading does not always confirm major damage. Some materials naturally show higher readings due to environmental conditions.
To improve accuracy:
- Compare readings to known dry areas
- Repeat measurements at different times
- Use multiple detection tools when possible
- Look for consistent patterns rather than isolated values
Correct interpretation helps prevent unnecessary floor removal or repairs.
When Moisture Detection Should Lead to Immediate Action
Not every detection result requires urgent repairs, but recurring moisture, soft flooring, or moisture near structural components should be treated as higher-risk.
Water Continues to Reappear After Drying
If moisture disappears temporarily but returns later, it usually indicates an active leak or recurring water source. Temporary drying without addressing the source often leads to repeated moisture buildup.
Watch for:
- Moisture returning after cleaning or drying
- Damp areas appearing after appliance use
- Recurring soft spots beneath flooring
- Repeated musty odors in the same location
Recurring moisture strongly suggests that water intrusion is ongoing and requires further investigation.
Flooring Feels Increasingly Soft
Soft flooring often signals subfloor weakening caused by prolonged moisture exposure. If softness becomes more noticeable over time, damage may already be affecting structural materials beneath the surface.
Soft flooring combined with confirmed moisture readings should be treated as a high-risk condition.
Moisture Appears Near Structural Components
Moisture detected near walls, cabinet bases, or structural supports increases the risk of long-term damage. These areas are more difficult to repair once deterioration begins.
If moisture appears in these locations, immediate inspection becomes more important to prevent further spread.
What to Do After Moisture Is Detected
Once moisture is confirmed, the next step is not simply drying the surface. First identify whether the source is an appliance leak, plumbing connection, damaged flooring seam, recurring spill area, or trapped moisture from a previous leak.
If the source is unclear, move from basic detection to a more detailed floor inspection. If the source is known, stop the water exposure before relying on drying, sealing, or mold-prevention steps.
For longer-term prevention after the source is corrected, see how to prevent mold under kitchen flooring.
Frequently Asked Questions About How to Detect Moisture Under Kitchen Floors
How do you detect moisture under kitchen floors?
Moisture under kitchen floors can be detected using moisture meters, infrared thermometers, and visual inspection techniques. Testing multiple locations and comparing readings improves accuracy and helps identify moisture patterns.
Can moisture exist under flooring without visible damage?
Yes. Moisture often spreads beneath flooring before visible damage appears. Early detection tools help identify hidden moisture before swelling, staining, or soft spots develop.
What tools are most reliable for detecting moisture?
Moisture meters are generally the most reliable homeowner tools. Pin-type meters test exposed materials, while pinless meters scan surfaces to identify hidden moisture zones.
How often should moisture testing be repeated?
Testing should be repeated if symptoms persist, after appliance use, or when humidity levels change. Repeated testing helps confirm whether moisture problems are temporary or ongoing.
Does detecting moisture mean mold is present?
Not always. Moisture detection confirms the presence of water but does not guarantee mold growth. However, prolonged moisture exposure increases the risk of mold formation over time.
Conclusion
The best way to detect moisture under kitchen floors is to test likely leak zones, compare them with dry baseline areas, repeat readings over time, and look for patterns instead of relying on one suspicious spot.
If readings stay elevated, spread across multiple areas, or return after drying, treat the problem as active moisture and move to a more detailed inspection before sealing, covering, or ignoring the floor.
For broader room-by-room moisture detection guidance, see how to find hidden moisture in different parts of your home.
6 Comments
Comments are closed.