How to Document Mold Damage for Insurance Claims Step by Step
Documenting mold damage for an insurance claim is not just about taking one close-up photo of mold. Strong documentation should show where the mold is, how large the affected area is, what materials are damaged, what water source caused it, and when the problem was discovered.
This matters because mold coverage is usually tied to the cause of the moisture. Mold that appears after a sudden covered water event may be handled differently from mold caused by long-term humidity, seepage, condensation, poor ventilation, or neglected leaks. Documentation can support a mold claim, but it does not guarantee coverage. Your insurer will still review the policy, the water source, exclusions, coverage limits, and the evidence.
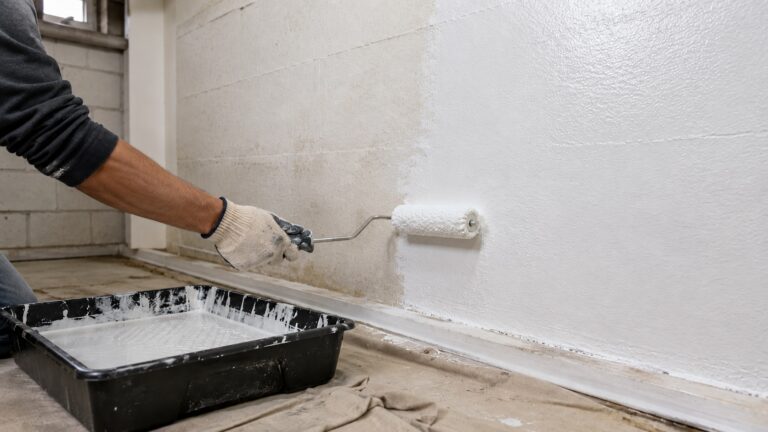
The goal is to create a clear record before cleanup, demolition, or remediation removes important evidence. At the same time, mold should be documented safely. Do not scrape, sand, tear out, or disturb moldy materials just to get better photos. Documentation should support safe cleanup, not create more exposure or spread contamination.
If you are still trying to understand whether the mold itself may be covered, start with whether home insurance covers mold damage and what mold damage insurance typically covers. This guide focuses on the documentation process once mold damage may be part of an insurance claim.
Mold Insurance Documentation Checklist
- Take wide, medium, and close-up photos before cleanup when it is safe.
- Photograph the suspected moisture source, not just the mold patch.
- Create a dated timeline showing discovery, insurer contact, inspections, cleanup, and repairs.
- List damaged building materials and personal belongings separately.
- Save plumber, roofer, restoration, mold remediation, testing, and repair records.
- Do not disturb moldy materials just to get better evidence.
What Your Mold Claim File Needs to Show
Mold claims can be difficult because the visible mold is only part of the story. A useful claim file should show the mold, the moisture source, the affected materials, the timeline, and the steps taken after discovery.
For insurance purposes, the source of the moisture is often more important than the mold itself. A mold patch after a sudden pipe burst may be evaluated differently from mold caused by months of seepage, condensation, humidity, or slow leakage.
That is why your photos, videos, notes, and reports should connect the visible mold to the surrounding water damage. Show the leak, stain, wet floor, damaged cabinet, roof path, basement seepage point, or other moisture condition that helps explain why the mold appeared.
When mold is part of a broader water damage claim, the documentation should fit into the full claim process. A separate guide on how to file a water damage insurance claim can help with the larger sequence of insurer contact, adjuster inspection, receipts, estimates, and repair records.
Step 1: Make Sure the Area Is Safe Before Documenting
Before taking photos or videos, make sure you can document the mold without putting yourself at unnecessary risk. Mold may be present alongside wet electrical materials, sagging ceilings, contaminated water, unstable drywall, or hidden structural damage.
Do not enter unsafe areas just to get better evidence. Photos from a doorway or a safe distance are better than putting yourself in contact with mold, sewage, electrical hazards, or unstable materials.
Avoid disturbing large mold areas
Do not scrape, brush, sand, vacuum, or tear out moldy materials just to expose more mold for photos. Disturbing mold can spread particles into the air and contaminate nearby rooms.
If mold appears across a large area, is inside wall cavities, affects insulation, or has spread under flooring, document what you can safely see and contact a qualified professional. Mold inside porous or enclosed materials often requires more than surface cleaning, and opening those areas without containment can spread contamination.
For cleanup decisions, use how to remove mold permanently as the broader mold-removal hub rather than treating documentation as a cleanup method.
Avoid electrical, water, and ceiling hazards
Do not walk into standing water near outlets, appliances, extension cords, electrical panels, or wet mechanical equipment. Do not stand under a sagging ceiling or remove wet ceiling materials without proper precautions. If sewage, floodwater, or electrical hazards may be involved, document from a safe distance and wait for qualified help.
If mold appears after a basement flood, roof leak, plumbing break, or sewage backup, the mold may not be the only hazard. Water damage can create electrical risks, contaminated surfaces, slippery floors, and unstable materials.
Use distance photos when needed
If the area looks unsafe, take photos from a safe distance. A photo from a doorway, hallway, stair landing, or adjacent room can still show the affected area, room context, and visible damage.
You can also take video while narrating what you see from a safe location. For example, you can say, “This is the basement wall near the sump pit. The lower drywall is stained, and there is visible mold along the baseboard.” That type of narration can help preserve details without entering the contaminated area.
Step 2: Photograph the Mold Clearly
Good mold photos should show four things: room context, affected surface, close-up detail, and scale. Do not rely only on close-ups, because they rarely show where the mold is located or how far the damage extends.
Use a simple pattern: wide photos, medium photos, close-up photos, and source photos.
Take each set before cleanup, after materials are opened if hidden mold is found, and after remediation if professionals perform the work.
Take wide room photos
Start with wide photos of the entire room or area. Show the wall, floor, ceiling, cabinet, basement corner, bathroom area, or window area where the mold appears. Include nearby doors, windows, fixtures, appliances, baseboards, or furniture when they help identify the location.
Wide photos help show whether the mold is isolated or part of a larger water damage pattern.
Take medium photos of the affected surface
Next, take medium-distance photos that show the full affected surface. For example, photograph the entire stained section of drywall, the whole cabinet base, the full section of moldy baseboard, or the entire ceiling area around a roof leak stain.
Medium photos show size and spread, especially when mold follows a water path along trim, flooring, ceiling seams, wall corners, or cabinet edges.
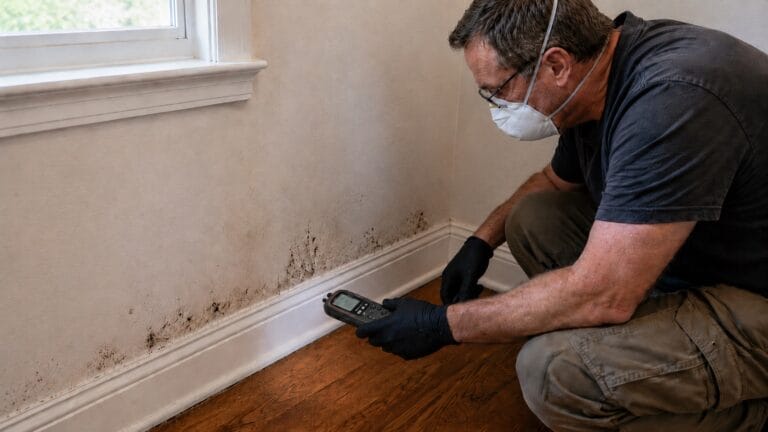
Take close-up mold photos
After wide and medium photos, take close-ups of the mold itself. Make sure the photos are clear, in focus, and well lit. Avoid using filters or editing the color in a way that changes the appearance of the damage.
If possible, take photos from more than one angle. Mold can look different depending on lighting, surface texture, and moisture conditions.
Show scale without touching the mold
It can help to show scale, but do not place objects directly onto moldy surfaces. Instead, hold a ruler, tape measure, or common object near the affected area without touching it. You can also take a photo that includes nearby trim, tile, outlet covers, cabinet doors, or flooring seams to show size.
If mold covers multiple sections, photograph each section separately and then take a wider photo showing how the sections relate to each other.
Photograph surrounding water damage
Mold photos are stronger when they also show the water damage around the mold. Photograph stains, damp materials, peeling paint, swollen trim, warped flooring, soft drywall, wet insulation, damaged cabinets, and waterline marks.
This helps connect the mold to the moisture event. For the broader water-damage photo process, use how to photograph water damage for insurance claims as the dedicated photo guide.
Step 3: Document the Water Source
Mold documentation is much stronger when it shows why the mold appeared. Insurance companies usually want to understand the moisture source, because mold coverage often depends on whether the original water damage was covered.
Do not focus only on the mold patch. Look for the water stain, leak path, wet material, failed pipe, roof entry point, appliance connection, basement seepage area, or hidden moisture condition that may explain the growth.
Document pipe leaks
If the mold appears near plumbing, photograph the pipe, valve, drain, fitting, supply line, wall penetration, cabinet base, or ceiling area connected to the leak. Take photos before and after a plumber opens the area if the wall, ceiling, or cabinet must be accessed.
Ask the plumber for a written description of the leak source. A report that explains whether a pipe burst suddenly or leaked slowly can be important because the insurance company may evaluate those situations differently.
Document roof leaks
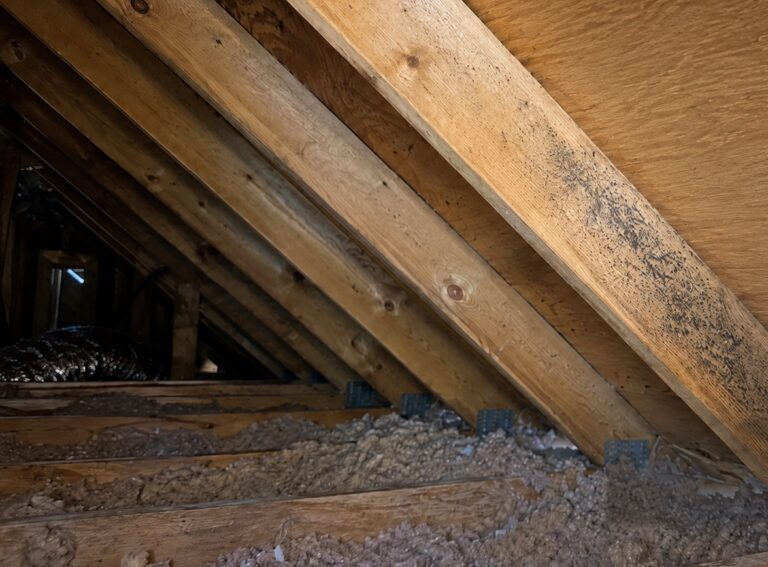
If mold appears on ceilings, attic materials, upper walls, or roof framing, document the interior damage and any visible roof-related evidence. Take photos of ceiling stains, wet insulation, attic sheathing, rafters, vents, flashing areas, chimney areas, skylights, or roof penetrations when accessible and safe.
A roofer’s inspection report can help connect interior mold to storm damage, flashing failure, roof deterioration, or another roof source. Save the report, photos, estimate, and any written explanation of where water entered.
Document appliance leaks
Appliances can cause mold under flooring, behind cabinets, and along baseboards. If a dishwasher, refrigerator water line, washing machine, ice maker, or water heater is involved, photograph the appliance, supply connections, drain lines, surrounding flooring, nearby walls, and any water path.
Do not move a heavy appliance in a way that spreads water or mold unless it is safe. If a contractor or plumber moves it, take photos of what is found behind or underneath it.
Document basement water or seepage
Basement mold often comes from repeated dampness, seepage, humidity, sump issues, or flooding. Photograph foundation walls, floor cracks, the cove joint where the wall meets the floor, window wells, sump pits, floor drains, wet carpet, lower drywall, baseboards, and stored belongings.
Basement mold claims can be difficult because groundwater, seepage, and floodwater are often treated differently from sudden indoor leaks. If the mold followed a basement water event, compare the situation with whether insurance covers basement flood damage before assuming the claim will be handled like a plumbing leak.
Document hidden moisture paths
Mold may appear far from the original water source. Water can travel behind drywall, along framing, under flooring, above ceilings, behind cabinets, or along baseboards before mold becomes visible.
Photograph the full path when possible. For example, if a second-floor bathroom leak caused mold on the ceiling below, document the bathroom, the ceiling stain, the wall or floor path, and the lower room. If a roof leak caused mold in a closet, document the attic or roof area as well as the closet wall.
Step 4: Create a Mold Damage Timeline
A mold damage timeline helps explain when the water problem happened, when mold was discovered, when the insurer was contacted, and when cleanup or remediation began. This matters because mold claims often turn on timing.
The timeline does not need to be complicated. A simple dated list is better than trying to reconstruct everything from memory later.
Record when the water damage happened or was discovered
Write down when you first noticed the water damage or the condition that may have caused mold. Include the date and approximate time if possible.
Examples include:
- “May 3, 8:00 a.m. — noticed water under kitchen sink.”
- “May 4, afternoon — plumber found leaking dishwasher supply line.”
- “May 5, morning — saw dark spotting behind baseboard after trim was removed.”
- “May 6 — contacted insurance company and received claim number.”
If you do not know when the leak began, say when you discovered the visible damage. Avoid guessing beyond what you know.
Use phrases like “first noticed,” “first photographed,” “plumber inspected,” and “cleanup began” so the timeline separates facts from assumptions.
Record when mold was first noticed
Write down when you first saw or smelled possible mold. Include whether it was visible before materials were opened or discovered after a contractor removed drywall, flooring, cabinets, or trim.
If mold was found during restoration or demolition, ask the contractor to note where it was found and what materials were affected.
Record when professionals inspected the area
Keep track of when plumbers, roofers, restoration companies, mold remediation professionals, adjusters, or inspectors visited the home. Write down what each person found and what reports, estimates, or photos they provided.
Professional findings can help support the timeline, especially when mold was hidden behind materials.
Record when cleanup or remediation began
Note when drying, demolition, cleanup, or remediation began. If emergency mitigation had to start before the adjuster inspected the damage, document why it was necessary and what photos were taken first.
This helps show that you acted to prevent further damage while still preserving evidence.
Step 5: List Damaged Materials and Belongings
A mold claim file should include a clear list of damaged building materials and personal belongings. Mold can affect both the structure of the home and the contents inside it.
Do not rely only on photos. A written list helps organize the claim and makes it easier to compare the insurer’s estimate, remediation scope, and repair invoices.
List damaged building materials
Write down each building material affected by mold or moisture. Common examples include:
- Drywall
- Baseboards and trim
- Cabinet bases
- Flooring
- Carpet padding
- Subflooring
- Insulation
- Ceiling materials
- Wood framing
- Sheathing
- Doors or built-ins
For each item, note the room, visible damage, and whether the material was cleaned, dried, removed, or replaced.
List damaged personal property
If mold affected belongings, create a separate personal property list. Include furniture, rugs, stored boxes, clothing, books, electronics, tools, decorations, documents, and other contents.
Photograph each item when practical. Note where it was located, whether it was wet, whether mold was visible, and whether it was cleaned, discarded, or saved for inspection.
Identify porous materials
Porous materials often matter in mold claims because they can absorb moisture and support mold growth below the surface. Examples include drywall, carpet padding, insulation, particleboard, upholstered furniture, cardboard boxes, and some wood products.
If these materials were affected, document them carefully before disposal. Porous materials may be harder to clean than nonporous surfaces, and remediation companies may recommend removal depending on the extent of contamination.
Document items removed for safety
Sometimes damaged materials or belongings must be removed quickly because they are wet, contaminated, unstable, or unsafe. If this happens, photograph the items before removal and keep disposal records when possible.
If a contractor removes moldy drywall, flooring, cabinets, insulation, or contents, ask for photos and a written explanation of what was removed and why.
Step 6: Save Reports, Estimates, and Receipts
Photos show what the damage looked like, but reports and receipts explain what happened, who inspected it, what was removed, and what cleanup or repair may cost. Keep every mold-related document in one place so the insurer can connect the mold condition to the moisture source.
Save plumber or roofer reports
If a plumber, roofer, or other contractor identified the water source, ask for a written report or invoice that describes what they found. A useful report may explain whether the moisture came from a burst pipe, appliance leak, roof leak, drain issue, basement seepage, or long-term leak.
The wording does not need to be complicated. Even a clear invoice note such as “replaced failed dishwasher supply line” or “found active leak at roof flashing” can help connect the mold to a specific source.
Save restoration records
If a water damage restoration company inspected or dried the area, save their moisture readings, drying logs, photos, equipment records, demolition notes, and affected-material lists.
Restoration documentation may show which walls, floors, cabinets, ceilings, or cavities were wet and how the drying process was handled.
Save mold remediation estimates
A mold remediation estimate can help document the scope of mold cleanup. It may identify affected rooms, containment needs, materials to remove, cleaning steps, air filtration, disposal, and reconstruction-related concerns. Ask the company to separate mold remediation from reconstruction when possible so the scope is easier to review.
Save the original estimate, any revised estimates, and the final invoice. If the cost is significant, compare the scope with how much mold remediation costs so you understand what factors may be driving the price.
Save testing or inspection reports if used
Mold testing is not always required for an insurance claim, especially when visible mold and water damage are already documented. However, testing or inspection reports may help in some situations, such as hidden mold, disputed contamination, post-remediation clearance, or uncertainty about the affected area.
If testing is performed, save the full report, not just a summary. Include who performed the test, where samples were taken, the date, the reason for testing, and how the results relate to the damaged area.
Save cleanup and emergency receipts
Keep receipts for emergency cleanup, temporary repairs, protective supplies, drying equipment, storage, disposal, professional inspections, and remediation work. Also save receipts for temporary measures used to prevent more damage.
Whether every expense is reimbursable depends on the policy and claim decision, but keeping receipts gives the insurer a clearer record of what you did and when you did it.
Step 7: Document Remediation Without Doing Unsafe Cleanup
Mold remediation can remove important evidence, so ask for before, during, and after documentation. The record should show the original condition, the materials removed, the work performed, and the final result. Do not disturb moldy materials yourself just to create more documentation.
Take before photos
Before remediation starts, photograph the affected area from multiple distances. Capture the room, the mold location, nearby water damage, damaged materials, and any visible moisture source.
If a contractor is handling the work, ask them to take their own photos before containment, demolition, or cleaning begins. Professional photos may be helpful because contractors often document areas homeowners cannot safely access.
Ask for during-remediation documentation
During remediation, important evidence may appear after materials are opened. Mold may be found behind drywall, under flooring, behind cabinets, inside insulation, or along framing.
Ask the remediation company to document these findings with photos and notes. The record should show what was found, where it was located, and what materials were removed.
Keep removal and disposal records
If mold-damaged materials are removed, keep a list of what was removed. This may include drywall, baseboards, flooring, insulation, cabinets, carpet padding, contents, or other porous materials.
If the materials must be discarded quickly, photos and contractor notes become even more important. Do not rely only on a verbal explanation after the materials are gone.
Save after-cleanup records
After remediation, save the final invoice, work summary, photos, and any clearance or post-remediation documentation if used. The final record should show what work was performed and whether the area was ready for drying, repair, or reconstruction.
After-cleanup documentation is not only useful for insurance. It also helps you confirm that the mold issue was addressed before new materials are installed.
Step 8: Organize Your Mold Claim File
A mold claim can involve many pieces of information: photos, videos, reports, receipts, timelines, estimates, adjuster notes, emails, and repair records. Organizing the file from the beginning makes the process easier to manage.
Use a folder, cloud drive, spreadsheet, or notebook. The format matters less than consistency. The goal is to make it easy to find the evidence later.
Create a simple folder structure
Separate your claim file into clear sections. For example:
- Photos and videos
- Timeline and notes
- Insurance communication
- Plumber, roofer, or contractor reports
- Restoration and drying records
- Mold remediation estimates and invoices
- Damaged materials and belongings list
- Receipts and expenses
This structure makes it easier to submit information when the insurer asks for it.
Name files clearly
Use clear file names instead of leaving photos with random camera numbers. For example, use names such as “2026-05-03-kitchen-cabinet-mold-before-cleanup,” “bathroom-wall-water-stain,” or “plumber-report-leaking-supply-line.”
Clear file names help you and the adjuster understand what each file shows without guessing.
Keep a communication log
Write down each insurance-related conversation. Include the date, time, person’s name, phone number or email, and a short summary of what was discussed.
This is useful if instructions change or if you need to remember what the insurer said about cleanup, inspection, documentation, or remediation.
Update the file as new information appears
Mold claims can change as walls are opened, flooring is removed, or professionals inspect hidden areas. Add new photos, reports, and estimates as they become available.
If additional mold or water damage is discovered after the first inspection, document it immediately and notify the insurer before covering it back up.
Common Mistakes That Weaken Mold Claim Documentation
Mold documentation mistakes usually happen when homeowners clean too quickly, photograph too little, discard materials too soon, or focus only on the visible mold instead of the full moisture story.
Cleaning mold before taking photos
Cleaning before documentation can make it harder to show the original condition. If the mold is wiped away, painted over, sprayed, or removed before photos are taken, the insurer may have less evidence of location, size, material damage, and severity.
If cleanup is urgent, take photos and videos first when it is safe. If professionals remove materials before the adjuster arrives, ask them to document the condition before removal.
Only taking close-up photos
Close-up photos are useful, but they do not show where the mold is located or how far the damage extends. A close-up image of mold on drywall may not show whether it was behind a cabinet, under a window, near a pipe, or below a roof leak.
Use wide, medium, and close-up photos. The wide photos show room context. The medium photos show the affected surface. The close-ups show visible mold detail.
Failing to document the water source
Mold claims often depend on the source of moisture. If your photos only show mold but not the leak, water stain, wet flooring, damaged cabinet, basement seepage point, or roof leak path, the claim file may be incomplete.
Show the connection between the mold and the water event with evidence such as a failed pipe, appliance line, ceiling stain, roof leak area, wet baseboard, soaked carpet padding, or restoration moisture readings.
Throwing away damaged materials too soon
Damaged drywall, carpet padding, insulation, cabinet pieces, trim, or belongings may need to be removed for safety or remediation. But throwing everything away before photos, notes, and contractor documentation can weaken the record.
If materials must be discarded, photograph them first. Ask the contractor to note what was removed, where it came from, and why it could not be saved.
Disturbing mold unnecessarily
Do not tear into moldy drywall, pull up moldy flooring, scrape growth, or remove insulation just to create more dramatic evidence. Disturbing mold can spread contamination and may create unnecessary health and cleanup risks.
If hidden mold is suspected, document the visible warning signs and call the appropriate professional. Hidden mold behind walls, under floors, or inside insulation should be inspected and handled carefully.
Not saving professional reports
Verbal explanations are easy to forget and difficult to submit. If a plumber, roofer, restoration company, or remediation contractor identifies the source or scope of the damage, ask for written notes, reports, estimates, or invoices.
These records can help support the timeline, water source, material damage, and cleanup need. They may also help if the claim is delayed, limited, or disputed.
Waiting too long to contact the insurer
Delaying the claim can create problems, especially if mold spreads or materials are removed before the insurer knows about the loss. Contact your insurer or agent promptly and ask what documentation they need.
If you are worried about mistakes that could affect a mold claim, review how to avoid insurance claim denials for mold damage before making major cleanup or repair decisions.
Frequently Asked Questions
Should I clean mold before the insurance adjuster sees it?
You should document the mold before cleaning when it is safe to do so. Take wide, medium, and close-up photos, record the water source, and contact your insurer. If emergency cleanup is necessary for safety or to prevent further damage, photograph the area first and keep contractor records.
What photos should I take of mold damage?
Take wide photos of the room, medium photos of the affected surface, close-up photos of the mold, photos showing scale, and photos of surrounding water damage. Also photograph the suspected moisture source, such as a pipe leak, roof stain, appliance connection, basement seepage area, or wet flooring.
Do I need mold testing for an insurance claim?
Not always. Visible mold, water source evidence, photos, contractor reports, and remediation documentation may be enough in many cases. Mold testing may help when contamination is hidden, disputed, or part of a professional remediation scope, but it is not a universal requirement for every claim.
Should I save mold-damaged materials?
Save or photograph mold-damaged materials before disposal when practical and safe. If drywall, insulation, flooring, cabinets, or belongings must be removed, ask the contractor to document what was removed and where it came from.
How do I prove mold came from water damage?
You support the connection by documenting the mold, the water source, the moisture path, the timeline, and professional findings. Photos of stains, leaks, wet materials, plumber reports, roof reports, restoration records, and remediation notes can all help show how the mold developed.
What if mold is found after drywall, flooring, or cabinets are opened?
Document the newly exposed area immediately. Take wide, medium, and close-up photos, note who opened the material, record the date, and ask the contractor to describe what was found and what materials were affected. Notify the insurer before the area is covered back up.
Should a mold remediation company document the damage?
Yes. Ask for before, during, and after documentation. Their records may show affected materials, containment areas, removed materials, moisture conditions, and the final cleanup scope.
What receipts should I keep for mold damage?
Keep receipts for inspections, emergency cleanup, drying equipment, mold remediation, testing if used, temporary repairs, disposal, storage, protective supplies, and reconstruction. Also keep invoices from plumbers, roofers, restoration companies, and other professionals who inspected or repaired the moisture source.
Final Mold Claim Documentation Steps
Before cleanup changes the evidence, make sure your file connects the visible mold, the moisture source, the affected materials, and the timeline. Save photos, videos, written notes, reports, receipts, and remediation records in one organized folder.
Documentation does not guarantee coverage, but it can make the claim clearer. After the claim process begins, make sure the leak, seepage, humidity, or water damage condition is corrected before final repairs are completed so the mold does not return.
One Comment
Comments are closed.