How to Dry Areas Affected by HVAC Condensation
To dry areas affected by HVAC condensation, first stop the moisture source, remove standing water, increase airflow, run a dehumidifier, and expose damp materials that may be holding moisture behind trim, flooring, insulation, or drywall. The visible water is only part of the problem; condensation can soak into building materials and continue causing damage after the surface feels dry.
If the moisture came from an overflowing pan or drain line, reviewing why HVAC drain lines overflow can help explain one common cause. Once the area is wet, however, the priority is drying the affected materials quickly, confirming that hidden moisture is no longer present, and preventing the same moisture problem from returning.
This guide explains how to dry HVAC condensation damage step by step, how different materials respond to moisture, and how to recognize when drying efforts are working—or failing. For broader long-term prevention, review how to prevent recurring moisture damage.
Why Fast Drying Matters After HVAC Condensation
Drying is not just about removing visible water. It is a time-sensitive process that determines whether moisture causes lasting damage or can be safely resolved. Most building materials begin absorbing water immediately, and the longer moisture remains, the deeper it penetrates.
The Critical 24–48 Hour Window
After condensation exposure, there is a limited window where drying can prevent further problems. Within the first 24 hours, moisture is often still near the surface and easier to remove. Between 24 and 48 hours, water begins to move deeper into materials such as drywall and wood.
After this period, conditions become more favorable for mold growth, especially in areas with limited airflow. If moisture is not fully removed, mold can begin forming even before it becomes visible. If you are already noticing odor or spotting, reviewing signs of mold growth from HVAC condensation can help you assess whether drying may already be incomplete.
How Moisture Spreads Beyond the Surface
Water from HVAC condensation does not stay confined to one location. It spreads through materials in several ways:
- Drywall absorbs moisture through its paper surface and internal core
- Wood pulls in water through pores and grain structure
- Insulation traps moisture between fibers
- Flooring materials absorb water from below and along seams
This means that even small leaks can affect a larger area than expected. By the time moisture is visible, surrounding materials may already be damp.
Why Incomplete Drying Leads to Bigger Problems
Many homeowners assume that once a surface feels dry, the problem is resolved. In reality, internal moisture may still be present. This trapped moisture creates ideal conditions for mold and can weaken materials over time.
- Hidden moisture allows mold to develop out of sight
- Repeated dampness leads to structural weakening
- Odors may persist even after visible water is gone
Drying must remove moisture from both the surface and the interior of affected materials. Without thorough drying, problems often return later, even if the area initially appears normal.
Immediate Steps to Take After Finding Moisture
Once you discover moisture from HVAC condensation, your priority is to stop further water exposure and begin drying immediately. Delays allow moisture to spread deeper into materials, increasing the risk of mold and structural damage.
Safety note: Do not step into standing water near electrical equipment, outlets, extension cords, or the air handler. If water has reached electrical components, ceiling fixtures, sewage, floodwater, or contaminated water sources, stop DIY drying and call a qualified professional.
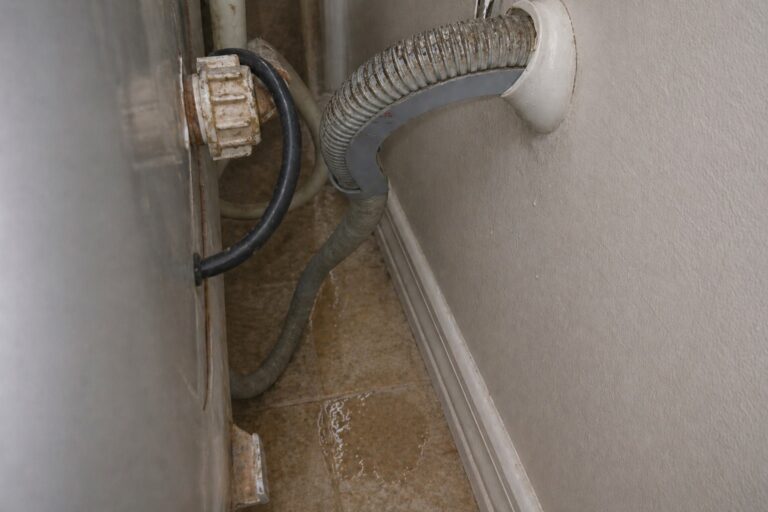
Step 1: Stop the Moisture Source
Drying will not be effective if condensation continues. Before anything else, identify and stop the source of moisture.
- Turn off the HVAC system if active leaking is occurring
- Check for a full or overflowing drain pan
- Look for a clogged, disconnected, cracked, or poorly sloped condensate drain line
- Confirm whether water is still dripping or forming
If the source is unclear, reviewing how to detect HVAC condensation leaks can help identify hidden or ongoing moisture.
Step 2: Remove Standing Water
Standing water is the fastest way for moisture to spread into surrounding materials. Removing it quickly reduces how much water is absorbed.
- Use towels or absorbent materials for small areas
- Use a wet/dry vacuum for larger amounts of water
- Focus on low points where water collects
Even a small amount of water can soak into flooring or drywall if left untreated, so removal should begin as soon as possible.
Step 3: Increase Airflow Immediately
Air movement is essential for evaporation. Without airflow, moisture remains trapped in materials and dries much more slowly.
- Use fans to circulate air across wet surfaces
- Open doors and access panels to improve air movement
- Position airflow to reach affected areas directly
Airflow alone does not remove moisture from the air, but it improves evaporation speed when combined with dehumidification. Do not aim fans directly at visible mold, because strong airflow can spread spores before the area is contained or cleaned.
Step 4: Reduce Indoor Humidity
Lowering humidity is critical for effective drying. If the air is already saturated with moisture, evaporation slows dramatically.
- Use a dehumidifier to remove moisture from the air
- Limit activities that add humidity, such as cooking or showering
- Keep windows closed if outdoor humidity is high
Dehumidification allows moisture to leave materials instead of being reabsorbed. During active drying, use a hygrometer and aim for indoor humidity around 45–50% if the equipment can maintain it safely.
Step 5: Expose Hidden Moisture Areas
Moisture often spreads into areas that are not immediately visible. Exposing these areas helps speed up drying and prevents hidden damage.
- Remove baseboards if moisture has reached lower walls
- Lift carpet edges where possible and check whether the padding underneath is wet
- Inspect areas behind furniture or stored items
Do not remove trim, open wall areas, or disturb materials that show visible mold, sagging, electrical exposure, or severe deterioration. In more complex cases, moisture may extend into walls or ceilings. If you suspect hidden water, learning how to find hidden moisture in different areas of your home can help locate problem areas.
How to Dry Different Materials Affected by HVAC Condensation
Different materials absorb and release moisture at different rates. Using the right approach for each surface improves drying effectiveness and reduces the risk of long-term damage.
Drying Drywall
Drywall is highly absorbent, especially along cut edges, lower wall sections, and areas behind baseboards.
- Use fans and dehumidifiers to draw moisture out gradually
- Remove baseboards if the lower wall is wet and hidden moisture is suspected
- Check for soft, swollen, crumbly, or sagging areas
If drywall becomes soft, warped, sagging, or moldy, drying alone is usually not enough and the damaged section may need to be removed.
Drying Wood and Structural Materials
Wood can often be saved if drying begins early.
- Maintain steady airflow across surfaces
- Allow gradual drying to prevent warping
- Monitor for changes in shape or texture
Wood that remains damp for extended periods may develop odors or begin to weaken.
Drying Insulation
Insulation is difficult to dry because it traps moisture within its structure.
- Inspect for dampness or compression
- Remove sections that remain wet
- Replace materials that cannot dry completely
Wet insulation can hold moisture long enough to support mold growth, even if surrounding materials appear dry.
Drying Flooring and Subfloors
Flooring materials require careful attention because moisture often spreads underneath the surface.
- Lift carpet and padding to allow airflow underneath
- Use fans to dry exposed subfloors
- Check for warping in wood or laminate materials
If moisture remains trapped below flooring, damage can continue even after the surface appears dry. Carpet padding, laminate seams, and the edges of wood flooring are common places where HVAC condensation moisture lingers.
Tools That Help Speed Up Drying
The right drying tools help remove moisture more efficiently. Using only one method often leaves moisture behind, especially in porous materials.
Fans for Air Movement
Fans help move air across damp surfaces and increase evaporation.
- Use box fans or air movers where possible
- Direct airflow across surfaces, not just into the room
- Reposition fans as drying progresses
Air movement is most effective when paired with humidity control.
Dehumidifiers for Moisture Removal
Dehumidifiers remove moisture from the air, which helps damp materials release moisture more quickly.
- Use the largest practical dehumidifier for the affected area
- Empty the tank regularly or use continuous drainage
- Keep the unit running until humidity stabilizes
Without dehumidification, moisture may simply evaporate into the air and settle back into nearby materials.
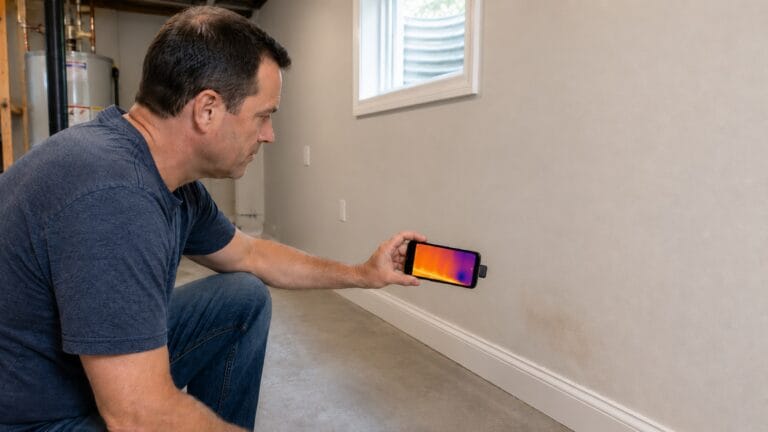
Moisture Meters for Checking Progress
A moisture meter can help confirm whether drywall, trim, wood, or subfloor areas are still holding moisture. Use readings as a comparison tool: check the affected area, then compare it with a similar dry area nearby. If readings stay elevated after drying, moisture may still be trapped inside the material.
Wet/Dry Vacuums for Standing Water
Wet/dry vacuums are helpful when HVAC condensation has produced enough water to pool on surfaces.
- Use them before placing fans
- Focus on low spots and flooring seams
- Do not use standard household vacuums on water
Removing liquid water first makes the rest of the drying process more effective.
How to Know If Drying Is Working
Drying progress should be evaluated by more than surface appearance. Materials may look dry before internal moisture is fully removed.
Signs Drying Is Progressing Well
- Surfaces feel dry and firm
- Musty odors are fading
- Humidity levels are decreasing
- No new stains or damp spots appear
Consistent improvement over time is a good sign that drying is working.
Warning Signs Drying Is Not Enough
- Dampness returns after fans are turned off
- Odors persist or worsen
- Materials feel soft, swollen, or weak
- Discoloration continues spreading
These signs suggest that moisture may still be present inside materials or that the HVAC condensation source has not been fully corrected.
The Risk of Hidden Moisture
Even when surfaces appear dry, moisture may still be present inside walls, insulation, or flooring layers.
If the affected area continues to smell musty, feels cool or damp, or shows recurring discoloration, further inspection may be necessary. Reviewing how to detect HVAC condensation leaks can help determine whether moisture is still active.
When Materials Cannot Be Saved
Some materials cannot be safely dried after HVAC condensation exposure. Replacement may be needed when moisture has softened, warped, compressed, contaminated, or mold-damaged the material.
Saturated Drywall
Drywall may need replacement if it:
- Feels soft or crumbly
- Bulges or sags
- Shows mold growth
- Remains damp after drying efforts
Once drywall loses structural integrity, drying will not restore it fully.
Wet Insulation
Insulation often needs replacement when it becomes saturated or compressed. Wet insulation loses performance and may hold moisture against framing or drywall.
If insulation remains damp after drying efforts, replacement is usually safer than leaving it in place.
Warped Flooring
Flooring may not return to normal if moisture causes swelling, buckling, or separation.
- Laminate may swell at seams
- Wood flooring may cup or buckle
- Carpet padding may retain moisture underneath
If flooring remains distorted after drying, replacement or repair may be necessary.
How to Prevent Mold After HVAC Condensation
Preventing mold after HVAC condensation depends on removing moisture quickly and preventing it from returning. Even small amounts of residual moisture can allow mold to develop if conditions remain favorable.
Keep Moisture Levels Low
- Continue using dehumidifiers until humidity stabilizes
- Maintain consistent airflow in previously affected areas
- Avoid introducing additional moisture during drying
Controlling humidity helps ensure that materials remain dry after the initial drying process.
Monitor for Recurring Moisture
Recurring dampness is a sign that the original issue has not been fully resolved.
- Check previously affected areas regularly
- Look for new stains or damp spots
- Pay attention to returning odors
If moisture returns, it may indicate an unresolved system issue. Reviewing how to fix persistent HVAC condensation issues can help address long-term causes.
Watch for Early Mold Signs
Even after drying, it’s important to remain alert for early mold indicators.
- Small spots appearing on surfaces
- Musty odors returning over time
- Discoloration in previously damp areas
If these signs appear, it may indicate that drying was incomplete or moisture has returned. In that case, reviewing signs of mold growth from HVAC condensation can help confirm whether mold is developing.
When to Call a Professional
While many small moisture issues can be handled by homeowners, some situations require professional evaluation to prevent further damage.
Large or Widespread Moisture Exposure
- Water affects multiple rooms or large areas
- Drying equipment cannot keep up with moisture levels
- Moisture extends into structural components
- Ceiling drywall is sagging, bubbling, or holding water overhead
These conditions often require specialized drying equipment and expertise.
Hidden Moisture You Cannot Access
- Moisture suspected behind walls or ceilings
- Persistent dampness without visible source
- Recurring issues despite drying efforts
Hidden moisture can continue causing damage even when surfaces appear dry. Professionals can use specialized tools to detect and address these conditions.
Signs of Mold Development
- Visible mold growth on surfaces
- Strong, persistent musty odors
- Mold returning after cleaning
Once mold begins to develop, addressing both the moisture source and contamination becomes more complex.
Frequently Asked Questions About How to Dry Areas Affected by HVAC Condensation
How long does it take to dry HVAC water damage?
Drying time depends on the extent of moisture and the materials affected. Small areas may dry within 24–48 hours, while larger or hidden moisture can take several days or longer.
Can drywall dry on its own after an HVAC leak?
Drywall can dry if moisture exposure is minimal and airflow is sufficient. However, heavily saturated drywall often requires removal to prevent mold growth.
Do I need a dehumidifier after condensation damage?
Usually, yes. A dehumidifier helps remove moisture from the air so damp drywall, flooring, wood, and trim can release moisture instead of reabsorbing it. Small surface-only condensation may dry with airflow, but deeper moisture usually dries better with dehumidification.
How can I tell if HVAC condensation moisture is still trapped?
Moisture may still be trapped if the area feels cool or damp, smells musty, shows returning stains, has elevated moisture meter readings, or becomes damp again after fans are turned off.
Should I keep running fans after the surface feels dry?
Yes, in many cases. Keep fans and dehumidification running until damp materials feel firm, odors fade, humidity stabilizes, and moisture readings are close to similar dry areas nearby.
Conclusion
Drying areas affected by HVAC condensation requires more than wiping up visible water. The source must be stopped, standing water removed, airflow increased, humidity lowered, and hidden materials checked before the area can be considered dry.
Minor condensation moisture can often be resolved when drying starts quickly and the affected materials remain firm, clean, and stable. If drywall softens, insulation stays damp, flooring warps, odors persist, or moisture readings remain elevated, drying may be incomplete and professional evaluation may be needed.
Quick Drying Checklist for HVAC Condensation
- Stop the HVAC moisture source before starting cleanup
- Remove standing water before placing fans
- Run fans and a dehumidifier together, not separately
- Check carpet padding, baseboards, drywall edges, insulation, and subfloor areas
- Use a moisture meter or compare suspect areas with nearby dry materials
- Call a professional if ceiling drywall sags, odors persist, mold appears, or materials stay damp