How to Inspect Refrigerator Water Connections
To inspect refrigerator water connections, pull the appliance forward slowly, check the shutoff valve, follow the water line, examine each fitting, and look for dampness, mineral buildup, kinks, abrasion marks, or floor staining behind the refrigerator. These small warning signs often appear before an ice maker or water dispenser line becomes an obvious leak.
The most important areas to check are the wall or floor shutoff valve, the tubing between the valve and appliance, the fitting at the refrigerator inlet, and any place where the line bends, rubs, or becomes pinched. A good inspection is mostly visual, but a flashlight, dry paper towel, and phone camera can make subtle moisture easier to spot.
Many refrigerator moisture problems begin at small plumbing connection points before obvious floor damage appears. This article focuses on inspecting the supply valve, tubing path, compression fittings, and refrigerator inlet connection. For the broader structural risks caused by appliance plumbing leaks, see how plumbing leaks cause structural damage.
Why Refrigerator Water Connections Require Regular Inspection
Refrigerator water lines stay under pressure and are rarely visible after installation. Movement, vibration, pressure cycles, and tight clearances can loosen fittings or stress tubing long before water becomes visible on the kitchen floor.
Regular inspection matters because early warning signs are usually small: a chalky ring around a fitting, a damp spot under the valve, a kinked tube, or staining along the flooring seam behind the appliance.
Water damage beneath refrigerators often begins quietly. By the time symptoms such as staining or mold appear, moisture may have already affected flooring materials. If visible moisture signs are already present, reviewing signs of water leaks behind refrigerators can help determine whether immediate attention is necessary.
Safety Steps Before Moving the Refrigerator
Before inspecting water connections, proper safety preparation is essential. Refrigerators are heavy appliances, and sudden movement can damage water lines, electrical connections, or surrounding surfaces. Taking time to prepare the area reduces the risk of injury and prevents accidental damage.
Start by clearing the surrounding space. Remove items from the floor near the refrigerator to create a clear path for movement. Obstacles such as rugs, floor mats, and loose objects can interfere with safe movement and increase the risk of tipping or sudden shifts.
Next, review the position of the refrigerator relative to nearby cabinets and walls. Some installations leave very little clearance, making it difficult to move the appliance without careful positioning. Moving slowly and deliberately prevents stress on connected tubing.
It is also important to avoid pulling the refrigerator too far from the wall without checking for resistance. If tubing becomes stretched or pinched, movement should stop immediately. Excessive strain can damage fittings and create leaks that were not previously present.
If you see water near the power cord, outlet, or rear electrical components, stop the inspection, avoid touching wet electrical areas, and shut off the water supply before continuing.
Whenever possible, inspection should be performed with assistance. Having another person available helps stabilize the appliance and reduces the likelihood of accidental movement. This is especially important for larger refrigerator models that require additional control during repositioning.
Preparation also includes observing the surrounding area for signs of existing moisture. Before moving the appliance, check for visible staining or dampness along nearby flooring seams. If strong moisture odors or visible mold are present, reviewing signs of mold under refrigerators may help determine whether further action is needed.
How to Safely Pull the Refrigerator Away from the Wall
Move the refrigerator only far enough to see the water line and rear fitting. Pulling it too far can stretch the tubing, loosen the connection, or create a leak during the inspection itself.
Begin by gently pulling the refrigerator forward a few inches at a time. Avoid jerking motions or quick shifts, as these movements can stress fittings and tubing connections. If resistance is felt during movement, stop immediately and check whether the appliance is catching on flooring, trim, or cabinetry.
Watch the tubing as the refrigerator moves. The goal is to create enough space to view the water line and connections without stretching the tubing excessively. Ideally, the appliance should move just far enough to allow visual access to the rear connection area.
Some refrigerators include rear rollers or leveling feet designed to assist with movement. If these components are present, movement should remain smooth and steady. Uneven motion can cause twisting forces on tubing, increasing the chance of failure.
As the appliance moves forward, observe the floor behind it. Moisture staining, discoloration, or debris buildup may indicate past leaks or moisture exposure. If moisture damage is already visible, additional inspection steps described in detect hidden refrigerator water line leaks may help confirm whether active moisture is present.
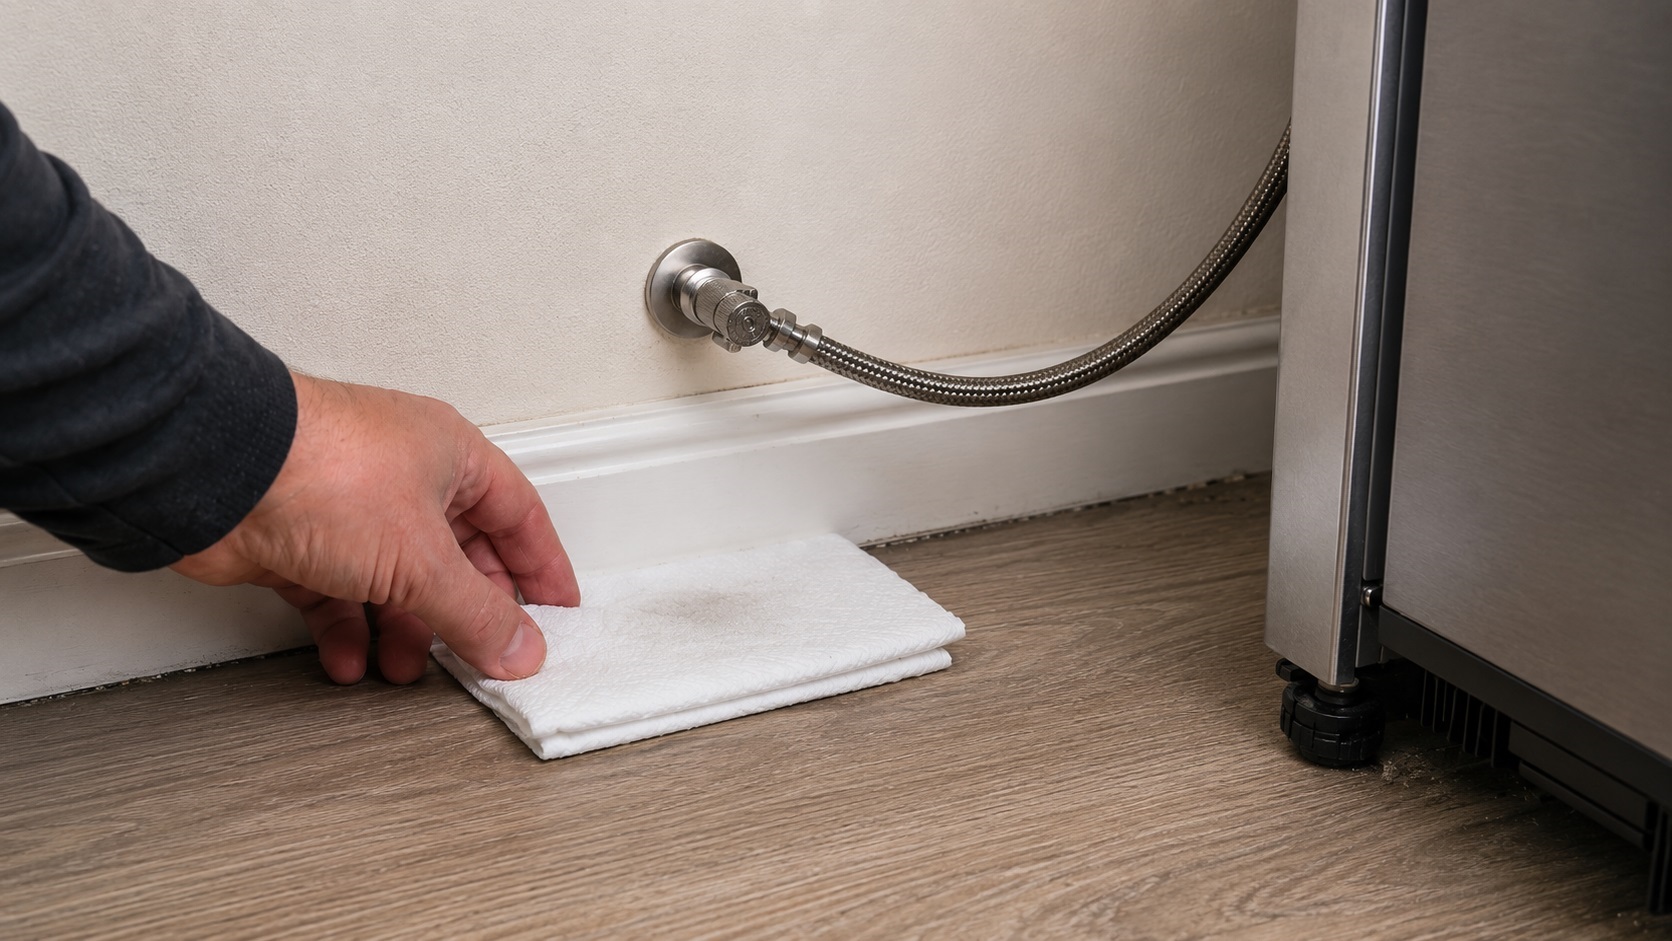
Inspecting the Water Supply Valve
The water supply valve is the starting point of the refrigerator’s water system. This valve controls the flow of water into the tubing that supplies the refrigerator. It is typically located behind the refrigerator, under a nearby sink, or in a basement ceiling below the kitchen.
Begin inspection by visually examining the valve body. Look for signs of moisture accumulation, corrosion, or mineral deposits. Mineral residue often appears as white or chalky buildup around fittings, indicating past water exposure.
Check the connection where the tubing attaches to the valve. The compression fitting should appear stable and free from visible moisture. Even small signs of dampness around this area may indicate a developing leak.
A dry paper towel can help confirm subtle moisture. Gently touch the towel below the valve and around the fitting without twisting the connection. If the towel picks up water, treat the area as a possible active leak.
Another important step is checking the surrounding surface. Moisture stains on nearby walls or flooring often suggest previous water contact. If discoloration appears repeatedly in the same area, it may indicate ongoing moisture exposure rather than a one-time event.
Pay attention to any unusual odors near the valve location. Musty smells may signal hidden moisture accumulation behind walls or beneath flooring. When these odors occur alongside moisture staining, reviewing signs of water leaks behind refrigerators can help determine whether additional inspection is necessary.
Checking Refrigerator Tubing for Damage
Tubing connects the supply valve to the refrigerator inlet connection. This tubing carries pressurized water and must remain intact to prevent leaks. Over time, tubing materials may weaken due to heat exposure, movement stress, or natural aging.
During inspection, examine the full length of visible tubing. Look for changes in shape, color, or surface texture. Healthy tubing typically appears smooth and evenly shaped, without flattening or distortion.
Common signs of tubing damage include:
- Sharp bends or kinks along the tubing path
- Flattened sections caused by pressure
- Cracking or splitting along the surface
- Discoloration or brittleness
- Moisture droplets forming along tubing
Special attention should be given to areas where tubing touches walls or floor surfaces. Repeated friction against rough surfaces can weaken tubing over time. This type of gradual wear often leads to small leaks that remain hidden until damage becomes noticeable.
If tubing appears cracked, brittle, flattened, or sharply kinked, avoid moving the appliance farther and do not try to straighten the line forcefully. Shut off the water supply if moisture is present, then have the damaged tubing evaluated or replaced.
Inspecting Connection Fittings for Leaks
Connection fittings are among the most common failure points in refrigerator water systems. These fittings secure tubing to both the supply valve and the refrigerator inlet connection. Over time, vibration, pressure cycles, and repeated movement can weaken these connection points.
Start with the fitting where the tubing connects to the refrigerator, usually near the lower rear section of the appliance. Then inspect the fitting at the shutoff valve.
Look closely at the area around the fitting. Moisture does not always appear as dripping water. Instead, small leaks often produce subtle residue or surface changes.
Common warning signs at connection fittings include:
- White or chalky mineral deposits
- Dark staining around the connection area
- Rust formation on nearby metal components
- Water droplets forming along the fitting
- Sticky or damp surfaces surrounding the connection
Mineral buildup is particularly important to recognize. These deposits form when small amounts of water evaporate repeatedly, leaving behind visible residue. Even if moisture is not currently visible, mineral residue suggests that water has previously escaped from the connection.
If any of these signs appear, avoid tightening fittings or attempting repairs during inspection. Instead, focus on documenting the observation and determining whether further evaluation is required. In situations where leak symptoms are present, reviewing signs of water leaks behind refrigerators can help confirm whether additional action is necessary.
Inspecting the Tubing Path for Stress Points
Beyond connection fittings, the full tubing path must be inspected for physical stress. Tubing often runs along walls, floors, or cabinet edges before reaching the refrigerator. These areas are vulnerable to damage when appliances shift or when tubing rubs against surrounding surfaces.
Begin by tracing the tubing from the supply valve to the refrigerator inlet. Follow the tubing visually and check for points where the line bends sharply or contacts rough surfaces.
Stress points commonly develop in locations such as:
- Behind cabinet corners
- Near wall edges or trim
- Under the refrigerator frame
- Where tubing loops tightly
- At areas where flooring height changes
These stress points weaken tubing over time. Even if tubing appears intact, excessive bending increases the likelihood of future failure. Straightening severely bent tubing is not recommended during inspection, as sudden changes in position may cause cracking.
Another important inspection detail involves checking for tubing compression. When refrigerators are pushed too tightly against walls, tubing may become pinched between the appliance and surrounding surfaces. This condition reduces water flow and increases pressure within the tubing, raising the chance of leaks.
When compression or abrasion marks appear along tubing, further monitoring becomes necessary. In these cases, moisture conditions should be observed carefully in the days following inspection to confirm that no leaks are developing.
Signs That Require Immediate Attention
Certain inspection findings indicate conditions that require prompt attention. Recognizing these warning signs helps prevent moisture damage from spreading to flooring materials or surrounding structures.
Immediate attention is necessary if any of the following conditions are observed:
- Active dripping or visible water flow
- Persistent moisture pooling beneath tubing
- Strong musty odors behind the appliance
- Soft or warped flooring near connections
- Heavy mineral deposits around fittings
- Corrosion affecting metal components
If active dripping or pooling is present, shut off the refrigerator water supply valve before continuing. Even a small continuous leak can send moisture under flooring layers where damage is harder to see.
If strong odors or visible mold signs appear during inspection, further evaluation may be necessary. Reviewing signs of mold under refrigerators can help determine whether mold growth may already be present beneath the appliance.
In situations where water damage is suspected but not confirmed, additional moisture detection methods may help clarify conditions. Learning how to detect hidden refrigerator water line leaks can provide guidance for identifying concealed moisture problems.
How Often Refrigerator Connections Should Be Inspected
Most refrigerator water connections should be checked every 6 to 12 months, with more frequent inspection after installation, appliance movement, prior leaks, or visible tubing wear.
Some homes benefit from more frequent inspections. Increased inspection frequency is recommended in situations such as:
- Homes with previous refrigerator leak history
- Older refrigerators with aging tubing
- Installations in tight cabinet spaces
- Homes where condensation, corrosion, or moisture has appeared behind the refrigerator before
- After moving the refrigerator for cleaning or repairs
- Following plumbing modifications in nearby areas
Inspection should also occur immediately after installing a new refrigerator or replacing water supply tubing. Newly installed components may shift slightly during initial use, making early inspection especially important.
If inspections are skipped for several years, small leaks may develop unnoticed and spread beneath nearby flooring materials.
When Professional Help Is Necessary
Call a plumber or qualified appliance technician when the inspection shows active dripping, damaged tubing, severe corrosion, or moisture that returns after the area is dried. These conditions usually require repair or replacement, not continued monitoring.
Professional assistance is recommended if any of the following conditions are observed:
- Continuous dripping from connection fittings
- Visible cracking or splitting in tubing
- Severe corrosion around valves or fittings
- Moisture that returns after the area has been wiped dry
- Evidence of water damage beneath flooring
- Strong mold odors that return after cleaning
If moisture damage has already occurred, additional recovery procedures may be necessary. Reviewing how to dry flooring after refrigerator leaks can help guide the next steps after moisture exposure.
Quick Refrigerator Water Connection Inspection Checklist
- Pull the refrigerator forward slowly and stop if the water line stretches.
- Check the shutoff valve for dampness, corrosion, and mineral residue.
- Look closely at the refrigerator inlet fitting and valve fitting.
- Use a dry paper towel to check for subtle moisture around fittings.
- Inspect tubing for kinks, cracks, flattening, brittleness, or abrasion marks.
- Shut off the water supply if active dripping or pooling is present.
- Call a professional if tubing is damaged, fittings are corroded, or moisture keeps returning.
FAQ About How to Inspect Refrigerator Water Connections
How often should refrigerator water connections be inspected?
Most homes benefit from inspection every 6 to 12 months. Older tubing, prior leaks, tight installations, or recurring moisture behind the refrigerator may justify checking every 3 to 6 months.
What are early signs of refrigerator water connection problems?
Early signs include mineral buildup around fittings, slight dampness near tubing, discoloration along flooring seams, and faint musty odors behind the appliance.
Can refrigerator tubing fail without visible damage?
Yes. Tubing can weaken internally before visible cracks appear. Regular inspection helps identify early signs such as stiffness, discoloration, or minor moisture buildup.
Is it safe to inspect refrigerator connections without turning off the water?
Visual inspection can usually be done without shutting off the water supply, as long as no active leak or electrical hazard is present. If you see dripping, pooling, or water near electrical components, stop and shut off the refrigerator water supply valve before continuing.
What should I do if moisture is found during inspection?
If moisture is detected, further evaluation should determine whether a leak is present. In many cases, reviewing detect hidden refrigerator water line leaks can help identify the source of moisture.
2 Comments
Comments are closed.