How to Inspect a Roof for Hail Damage
Inspecting a roof for hail damage should start with safety, not with climbing onto the shingles. After a hailstorm, the roof may be wet, slippery, weakened, or difficult to evaluate from close range without training. Many useful clues can be checked from the ground, from windows, from the yard, and from safe interior areas before anyone steps onto the roof.
The purpose of a hail damage inspection is to look for patterns. One small mark on a shingle may not prove much by itself. But fresh dents on gutters, granules below downspouts, damaged roof vents, cracked shingles visible from the ground, and interior moisture after later rain create a stronger reason to have the roof professionally evaluated.
This guide explains how to inspect a roof for hail damage using a safe, ground-first workflow. It does not replace a professional roof inspection, and it does not cover insurance claims or roof repair decisions. If you are still trying to recognize what hail damage may look like, review the signs of hail damage on roofs before moving into the inspection process.
Hail damage is part of the larger group of common roofing material failures that can lead to moisture problems. If impact damage weakens shingles, ridge caps, flashing, or roof accessories, the roof may become more vulnerable to later water intrusion. For the broader home-moisture framework, see how to find and prevent moisture problems throughout the home.
Start With Safety Before Inspecting for Hail Damage
Do not walk on a storm-damaged roof just to look for hail marks. Even if the roof looks dry from the ground, shingles may be slick, loose granules may reduce traction, and damaged areas may not support movement the same way they did before the storm. A steep roof, wet surface, high eaves, or unfamiliar roof layout makes the risk even greater.
Start with what you can see safely. Use your eyes, binoculars, or camera zoom from the ground. Look from upper-story windows if you have a safe view. Check the yard, gutters, downspout exits, siding, vehicles, and outdoor items. These areas can reveal strong hail evidence without requiring roof access.
A simple inspection order is: property evidence first, gutters and downspouts second, visible roof surfaces third, roof accessories fourth, and interior or attic moisture signs after later rain. This order keeps the inspection safer and helps you build a pattern before deciding whether a roofer is needed.
Do not lean ladders against damaged gutters or climb just to inspect shingles. Gutters may be dented, loose, or slippery after a storm. If you cannot see a roof section clearly from a safe position, leave that section for a professional roofer.
Also avoid inspecting during active storms, lightning, rain, high wind, or poor lighting. Hail inspection is not an emergency unless water is actively entering the home. If there is an active leak, focus on protecting the interior safely and arranging professional help rather than trying to inspect the roof surface yourself.
Treat a homeowner inspection as screening, not diagnosis. You are looking for evidence that justifies a closer professional evaluation.
Step 1: Look for Hail Evidence Around the Property
Before looking at the roof itself, inspect the property around the home. Hail often leaves clearer evidence on items that are easier to see than shingles. These signs help you understand whether the storm was strong enough to affect the roof and which side of the home took the hardest impact.
Check vehicles, siding, screens, and outdoor items
Walk around the home and look for fresh dents or impact marks on vehicles, metal furniture, fences, grills, mailboxes, light fixtures, siding, window screens, and trim. Torn screens, chipped paint, cracked plastic fixtures, or dented metal items can all support the possibility that hail hit the property hard.
These signs do not prove the roof is damaged, but they provide context. If vehicles, gutters, and outdoor items were dented, the roof was likely exposed to the same storm impact. The more supporting signs you find, the more important it becomes to check the roof system carefully.
Look for fresh damage rather than old wear. A dent that was already present before the storm does not help much. New impact marks, especially across several surfaces, create a stronger pattern.
Notice which side of the home took the strongest impact
Hail often hits one side of the property harder than another because wind drives the stones at an angle. As you walk the property, notice whether damage is concentrated on one side of the home. Dents on one gutter line, torn screens on one elevation, or damaged siding on one wall can show the storm direction.
This matters because the roof slope facing the storm may have taken more impact than sheltered slopes. If one side of the house shows heavy property damage, the roof surface above that side deserves closer attention from a safe viewing location.
Check nearby homes and the neighborhood pattern
If nearby homes, vehicles, or outdoor structures show hail impact, your roof may have been exposed to the same storm cell. Neighborhood evidence is not proof of damage on your specific roof, but it helps confirm that the storm was capable of causing damage in your area.
Be careful with assumptions. Hail can vary across short distances, and one roof may be older, newer, steeper, or more exposed than another. Use neighborhood damage as supporting context, not as a final diagnosis.
Step 2: Check Gutters, Downspouts, and Granule Deposits
Gutters and downspouts are useful hail inspection points because they can show both impact marks and shingle granule loss. They are also easier to view from the ground than the roof surface itself. Start with the gutter line on the side of the home that appears to have taken the strongest storm impact.
Look for fresh granules near downspout exits
After hail, check the areas where downspouts discharge water. Look at splash blocks, patios, driveways, mulch beds, decks, and the ground below downspout outlets. Fresh shingle granules often look like coarse sand that matches the roof color.
A small amount of granules is not unusual, especially on older roofs or newer shingles that are still shedding loose manufacturing granules. The concern is a sudden, noticeable amount after a hailstorm. Granules are more meaningful when they appear along with other signs, such as dented gutters, impact marks on roof vents, or visible shingle damage.
Check gutter faces and downspouts for dents
Look at the outer face of gutters, downspout elbows, metal end caps, and exposed downspout sections. Hail may leave small round dents or scattered impact marks on metal surfaces. These dents are often easier to see when light hits the metal from an angle.
Dented gutters do not automatically prove the shingles are damaged. Metal and asphalt shingles respond differently to impact. However, fresh dents show that hail struck the roof edge area with enough force to mark surrounding materials. If the same side of the home also has granule piles or visible roof marks, the roof should be checked more closely.
Understand what granules can and cannot prove
Granules in gutters are a clue, not a final diagnosis. Hail can knock granules loose, but aging, foot traffic, normal weathering, and new-shingle shedding can also leave granules in gutters. The timing and pattern matter.
Granules are more suspicious when they appear suddenly after hail, collect in larger-than-normal amounts, and appear with other impact signs such as cracks, bruised-looking shingle spots, exposed asphalt, or metal dents. They are less conclusive when the roof was already old, already shedding, or showing gradual wear before the storm.
Step 3: Look for Visible Roof Surface Damage From the Ground
After checking the property and gutters, look at the roof surface from safe viewing points. Do not walk onto the roof. Use binoculars, camera zoom, or safe upper-story windows if they give you a better angle. The goal is not to diagnose every shingle from the yard; it is to identify visible signs that justify a closer professional inspection.
Use safe viewing positions
Stand far enough back from the home to see the roof slope clearly. Move around the property and compare different roof faces. If one slope faces the direction of the storm, inspect that side more carefully from the ground.
Look during good daylight. Early morning or late afternoon light can sometimes make dents, lifted edges, and surface irregularities easier to see because shadows are stronger. Avoid inspecting during rain, wet conditions, high wind, or poor visibility.
Take photos from the ground if you see suspicious areas. Camera zoom can help you compare roof sections without climbing. Photos also help you document what changed after the storm.
Look for impact marks, cracks, and damaged ridge caps
From the ground, visible hail damage may appear as scattered dark marks, irregular impact spots, missing granule patches, cracked shingles, damaged ridge caps, or broken roofing material. These signs are easier to see on lower roof slopes or roofs with a clear viewing angle.
Pay special attention to ridge caps, roof edges, valleys, and slopes facing the storm direction. Ridge caps are exposed and may show cracking, bruising, or missing granules after hail impact. If ridge caps appear damaged, the roof should be evaluated because those areas are important for keeping water out along the highest roof joints.
Do not assume every dark spot is hail damage. Algae, age-related granule loss, blistering, foot traffic, and old repairs can create marks that look similar from a distance. Visible roof marks should be interpreted alongside the rest of the inspection evidence.
Watch for damage on different roofing materials
Asphalt shingles may show granule loss, bruising, cracks, or exposed asphalt. Metal roofing may show dents or coating damage. Tile or slate may show cracks, chips, or broken pieces. Wood shakes may show splits or impact dents.
If your roof is not asphalt shingle, do not apply asphalt-only clues too broadly. Different materials show hail damage differently. Broken tile, cracked slate, or dented metal may need professional evaluation even if there is no visible interior leak yet.
Know when visible roof damage is enough to stop inspecting
If you can see cracked shingles, broken roofing material, damaged ridge caps, or obvious puncture-like marks from the ground, you do not need to keep inspecting from risky positions. Visible damage is enough reason to schedule a professional roof evaluation.
The inspection goal is to decide whether the roof needs closer attention. Once the answer is yes, do not climb higher or try to confirm damage by walking on the roof. A roofer can evaluate the roof surface more safely and determine whether the damage is cosmetic, functional, or likely to affect water-shedding performance.
Step 4: Check Roof Accessories and Soft Metal
Roof accessories and soft metal components often show hail impact more clearly than shingles. Many can be viewed from the ground or from safe viewing positions. Dents on these parts do not prove functional shingle damage, but they help confirm that hail struck the roof system with force.
Roof vents and caps
Look for dents on roof vents, vent caps, turbine vents, metal exhaust hoods, and other visible roof accessories. Round or scattered dents on these components are strong supporting evidence of hail impact. If several metal vents show fresh dents, the roof surface around them may also have been hit.
Pay attention to the storm-facing slope. If the vents on one side of the roof are dented while other areas look untouched, the hail impact may have been directional. That can help a roofer focus on the most exposed roof sections during a professional inspection.
Flashing, skylight trim, and chimney metal
Soft metal flashing around chimneys, skylights, valleys, dormers, and roof-wall intersections can also show hail dents. From the ground, some of these areas may be difficult to see clearly, but visible dents, bent metal, or damaged trim should be documented.
Flashing damage matters because flashing protects some of the most leak-prone areas of the roof. Even if the shingles look mostly intact, damaged flashing or skylight trim can increase the risk of water entry during later storms.
Metal valleys or roof-edge details if visible
If your roof has exposed metal valleys, drip edge, metal roof-edge details, or decorative metal roofing components, look for visible dent patterns. Hail dents on these areas may be easier to see when sunlight hits from an angle.
Do not climb onto the roof to check valleys or edge details. If these areas are not visible from a safe position, leave them for a professional inspection. Metal evidence is useful, but it is not worth unsafe roof access.
Step 5: Check Interior Ceilings and the Attic After Rain
Hail damage may not cause an immediate leak. A roof can look mostly intact after the storm and still have damaged shingles, cracked ridge caps, or weakened flashing that becomes a problem during later rain. That is why the inspection should continue inside the home, especially after the next rainfall.
Look for ceiling stains and damp drywall
Check ceilings and upper walls below the roof slopes that faced the hailstorm. Look for new yellow-brown stains, damp spots, bubbling paint, peeling texture, or soft drywall. These signs may indicate that water entered after the roof surface was damaged.
If you find moisture indoors after a hailstorm, compare it with broader signs of roof leaks inside the house. A new stain after hail and rain is more concerning than an old mark that has not changed.
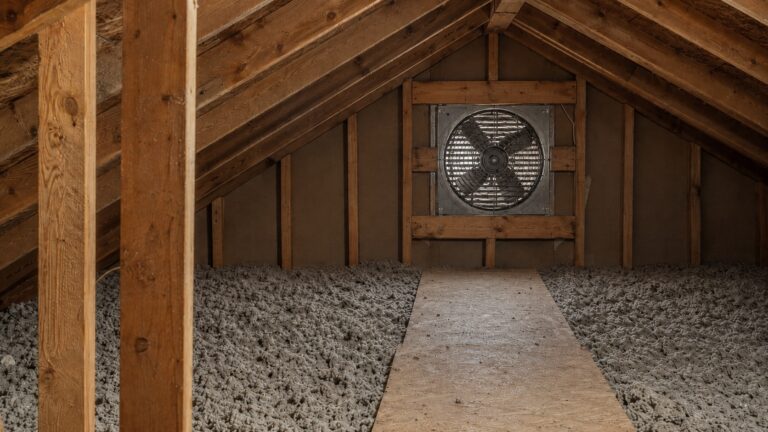
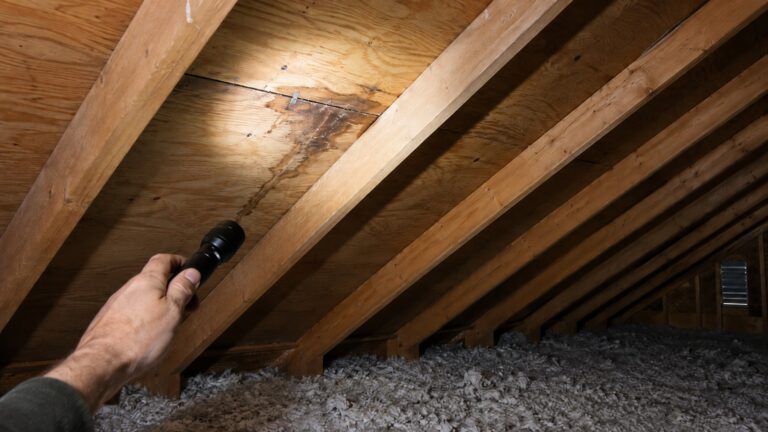
Check attic insulation and roof sheathing safely
If you can access the attic safely, look for damp insulation, darkened roof sheathing, fresh water trails, wet framing, rusty nail tips, or musty odors. Focus on the area below the storm-facing roof slope, around roof vents, near valleys, and below damaged roof accessories if their location is known.
Do not step on ceiling drywall or move through loose insulation without a safe platform. If there is no safe access, inspect only from the attic opening or call a professional. If you see wet insulation, mold-like growth, electrical fixtures near moisture, or active dripping, do not disturb the area or continue deeper into the attic.
If hail damage appears to have allowed water into the roof system, the next step may be to inspect roof areas for leak damage more specifically. The hail inspection tells you where impact may have occurred; the leak-damage inspection helps determine whether water has already entered.
Watch for delayed leak signs
Some roof leaks only appear under certain conditions. A roof may not leak during a light rain but may leak during wind-driven rain, heavy storms, or repeated wetting. After hail, monitor ceilings and attic areas for several rain events if you suspect damage.
Delayed symptoms may include a musty attic smell, stains that slowly darken, insulation that stays damp, or small water marks that appear after storms from a particular direction. Hail impact can weaken the roof before the first obvious leak appears. For the fuller leak-risk explanation, see hidden hail damage that causes roof leaks.
Connect exterior impact to interior moisture patterns
Try to connect exterior evidence with interior symptoms. For example, if the storm-facing slope has dented vents and the room below that slope develops a ceiling stain after rain, the pattern is more meaningful than either sign alone. If granules collect below one roof area and attic insulation below that area becomes damp, the roof should be checked promptly.
This does not mean homeowners should diagnose the exact leak path alone. Roof leaks can travel along rafters, underlayment, sheathing, and framing before appearing indoors. The goal is to notice whether the timeline and location make hail-related moisture entry plausible.
Step 6: Document What You Find
Document the inspection so you have a clear record of what changed after the storm. You are not creating a professional roof report; you are preserving the pattern for a roofer to evaluate.
Write down the date of the hailstorm, the approximate time it happened, and which side of the home appeared to take the strongest impact. Note the size of the hail if you know it, but do not rely on memory alone. If possible, take photos of hailstones, dents, granule piles, damaged exterior items, and any interior moisture signs.
Take photos from safe positions only. Photograph dents on gutters, downspouts, vents, siding, window screens, outdoor furniture, and vehicles. Photograph granules at downspout exits or on hard surfaces. If visible roof damage can be captured from the ground with camera zoom, take wide photos to show the roof area and closer photos to show the suspicious marks.
Also document interior changes. If a ceiling stain appears after the next rain, take a photo and note when it appeared. If attic insulation is damp or roof sheathing looks darker than nearby areas, document the location from a safe position. Do not disturb wet insulation, suspected mold, or damaged materials just to get a closer picture.
Good documentation helps separate old wear from storm-related changes. It also helps you explain the pattern clearly when calling a roofer. A statement like “the south-facing gutter was dented, granules appeared below this downspout, and the ceiling stain appeared after the next rain” is more useful than simply saying “I think the roof has hail damage.”
When a Professional Roof Inspection Is Needed
A professional roof inspection is needed when your safe visual inspection finds multiple signs of hail impact. Dented gutters alone may not prove shingle damage, but dents on gutters, roof vents, flashing, and outdoor items combined with fresh granule loss create a stronger reason to have the roof evaluated.
Call a roofing professional if you see cracked shingles, puncture-like marks, broken roof materials, damaged ridge caps, exposed asphalt, or visible damage on the storm-facing slope. These signs suggest that the roof surface may have been compromised, even if there is no active leak yet.
You should also call a professional if interior moisture appears after the storm. Ceiling stains, damp attic insulation, wet roof sheathing, musty attic odor, or water marks after rain mean the concern has moved beyond surface impact. At that point, the question is not only whether hail hit the roof, but whether water is entering or lingering in the roof system.
Professional inspection is also appropriate when the roof is steep, high, difficult to view, older, brittle, or already showing wear before the storm. Older shingles may be more vulnerable to impact damage, and subtle signs can be hard to evaluate from the ground.
If the inspection points toward widespread impact damage, compare your findings with when hail damage may require roof replacement. If the concern is mainly moisture entry, ceiling stains, attic dampness, or recurring leaks after the storm, review when to hire a roofing contractor for moisture problems.
FAQ
Can I inspect hail damage from the ground?
Yes. You can check gutters, downspouts, siding, vehicles, outdoor items, visible roof accessories, granule deposits, and some roof surface areas from the ground. Ground-level inspection can reveal strong warning signs, but subtle shingle damage may still require professional confirmation.
How soon should I inspect after hail?
Check safe visible signs soon after the storm, especially gutters, downspouts, granule deposits, and damaged exterior items. Then continue monitoring ceilings and attic areas after the next rain. Some hail-related leaks do not appear immediately.
Should I climb on the roof to inspect hail damage?
Most homeowners should not climb onto a roof after hail. The surface may be slippery, damaged, or unsafe, and walking on shingles can cause additional damage. Use ground-level checks, camera zoom, binoculars, and professional inspection when needed.
What do roofers look for after hail?
Roofers look for impact patterns, bruised shingles, cracks, punctures, fresh granule loss, exposed asphalt, dented soft metal, damaged ridge caps, and signs that the roof’s water-shedding surface has been weakened. They also compare roof slopes and storm-facing areas.
Do granules in gutters mean hail damage?
Not always. Granules can come from aging, normal weathering, foot traffic, or new-shingle shedding. Granules are more concerning when they appear suddenly after hail and are paired with dents, cracks, impact marks, or other storm damage.
What if I see no leak after hail?
No visible leak does not guarantee the roof is undamaged. Hail can weaken shingles, ridge caps, flashing, or vents before water reaches the interior. If exterior signs are significant, or if the same roof slope later shows attic dampness or ceiling staining after rain, have the roof checked before the damage spreads.
Hail Damage Inspection Checklist
- Start every hail damage inspection from the ground, not by walking on the roof.
- Look for property-wide hail evidence, including dents on gutters, downspouts, siding, screens, vehicles, and outdoor items.
- Fresh shingle granules near downspout exits are a warning sign, but they do not prove hail damage by themselves.
- Visible roof damage such as cracked shingles, damaged ridge caps, exposed asphalt, or dented roof accessories justifies professional evaluation.
- Interior ceiling stains, attic dampness, or wet insulation after later rain mean the damage may already be allowing moisture in.
- Document the date, storm direction, photos, granule deposits, dents, and interior moisture signs from safe locations.
What to Do After a Hail Damage Inspection
After a hailstorm, the most important question is whether the evidence forms a pattern. One small mark may not prove much, but multiple impact signs across gutters, roof accessories, shingles, granule deposits, and interior moisture deserve closer attention.
If you find visible shingle damage, damaged ridge caps, dented roof accessories, fresh granule loss, or new attic or ceiling moisture, stop the DIY inspection and schedule a professional roof evaluation. Catching roof vulnerability early can prevent small impact damage from becoming a hidden moisture problem inside the attic or living space.