How to Inspect Dryer Vents for Moisture Problems
To inspect a dryer vent for moisture problems, check three things first: the duct behind the dryer, the airflow at the outside vent hood, and the surfaces along the likely vent path. A dryer can still heat and tumble normally while humid exhaust is leaking, slowing down, or condensing inside the duct.
Dryer exhaust carries warm, humid air outdoors. When the vent is crushed, clogged, disconnected, too long, poorly routed, or blocked at the exterior hood, that moisture can collect inside the duct or escape into nearby walls, floors, ceilings, laundry rooms, attics, crawl spaces, or exterior wall cavities. That is why dryer vent inspection belongs in a broader approach to checking hidden moisture inspection areas around the home.
This guide focuses on inspection, not full dryer repair. It shows what to check behind the dryer, how to evaluate exterior airflow, where condensation commonly forms, which nearby surfaces deserve attention, what tools can help, and when the vent route needs professional inspection.
Why Dryer Vent Moisture Problems Are Easy to Miss
Dryer vent moisture problems are easy to miss because the visible lint screen is only one small part of the exhaust path. The transition duct may be hidden behind the dryer, while the main duct may pass through a wall, ceiling, basement, crawl space, attic, garage, or exterior wall before reaching the outside hood.
If warm, humid exhaust moves quickly through a clear, connected duct, most moisture leaves the home. If airflow is restricted, delayed, or leaking, moisture can linger inside the duct or escape into materials that were not designed for repeated damp air.
Four issues cause most dryer vent moisture problems:
- Restricted airflow: Lint buildup, crushed duct, blocked vent hoods, stuck flaps, or long vent runs can slow the exhaust.
- Condensation: Warm dryer exhaust can cool inside metal ductwork, especially in cold spaces or long runs, causing moisture to form inside the duct.
- Air leakage: Loose clamps, disconnected duct sections, gaps, or damaged transition duct can release humid exhaust indoors or into cavities.
- Poor routing: Vent lines with too many bends, low spots, sagging sections, or hidden routes through cold areas are more likely to trap moisture.
If you already see staining, mold growth, damaged trim, or softened materials near the vent path, compare those observations with the visible signs of dryer vent moisture damage. This article focuses on finding the vent condition that may be causing those symptoms.
Start Your Inspection Behind the Dryer
The first inspection point is the area behind the dryer. This is where the dryer exhaust leaves the machine and enters the transition duct. Many moisture problems begin here because the dryer may have been pushed too close to the wall, the duct may be crushed, or the connection may be loose enough to leak humid air into the laundry room.
Before moving the dryer, make sure it is safe to do so. If you have an electric dryer, unplug it before pulling it forward for a closer inspection. If you have a gas dryer and the gas line limits movement, do not force the dryer away from the wall or disturb the gas connection. In that case, inspect only what you can safely see and call a qualified professional if the vent connection is inaccessible.
Once you can see behind the dryer, use a flashlight and look carefully at the duct, wall connection, floor area, and surrounding surfaces. You are looking for evidence that humid air is not staying inside the vent system. A helpful order is: inspect the duct shape first, then the clamps and joints, then the floor and wall around the connection, and finally the airflow while the dryer runs.
Check the transition duct
The transition duct is the short duct that connects the dryer to the wall or floor vent opening. This area is a common failure point because it is flexible, often cramped, and easy to damage when the dryer is moved.
Look for these conditions:
- Crushed duct behind the dryer
- Kinks that restrict airflow
- Sagging duct that could collect lint or condensation
- Tears, holes, or loose seams
- Duct that is too long and looped behind the dryer
- Foil or flexible material that collapses easily
- Old plastic or vinyl duct, which should not be treated as a safe long-term dryer exhaust material
A crushed or kinked transition duct can slow the exhaust enough that moisture remains in the system longer than it should. When warm, damp air sits in the duct instead of moving outside quickly, condensation becomes more likely. If the duct is damaged or poorly attached, that same humid air may escape into the laundry room.
Look for loose clamps, gaps, and damp lint
Next, inspect both ends of the transition duct. One end connects to the dryer outlet, and the other connects to the wall, floor, or main duct opening. Both connections should be secure. A loose clamp can allow humid air and lint to leak into the room every time the dryer runs.
Look for:
- Missing or loose clamps
- Gaps between the duct and dryer outlet
- Gaps around the wall connection
- Lint streaks around the joint
- Damp lint stuck to the duct or wall
- Moisture around the wall penetration
- Dust patterns that suggest air is escaping
Damp lint is especially important. Dry lint buildup is common in dryer systems, but lint that feels wet, clumpy, or sticky can point to condensation or humid air leakage. If the lint around a joint feels damp after a drying cycle, the vent connection may not be sealed properly or airflow may be too weak to carry moisture outdoors.
Watch for warm humid air escaping indoors
After the visual inspection, you can do a simple airflow check from inside the laundry room. Reconnect anything you safely moved, make sure the duct is attached, and run the dryer briefly on an air-only or low-heat setting if it is safe to do so. Stand near the dryer connection and feel for air escaping around the duct joints, but do not reach behind a running dryer or disturb a gas line.
You should not feel warm, humid air blowing into the room from behind the dryer. A slight warmth near the appliance is normal, but active exhaust leaking from a duct joint is not. Escaping dryer exhaust can raise laundry-room humidity, dampen nearby surfaces, and contribute to conditions that support mold growth. If the laundry area already smells musty, it may help to compare your findings with common mold warning signs in laundry rooms.
Also notice whether the laundry room feels unusually humid after the dryer runs. Some warmth is expected, but a room that becomes damp, steamy, or musty during drying cycles may indicate that the dryer exhaust is not leaving the home properly. That can happen when the duct is loose behind the dryer, blocked farther downstream, or routed in a way that traps moisture.
Check Dryer Vent Airflow From the Outside
After inspecting behind the dryer, check the exterior vent while the dryer is running. This outside check matters because it confirms whether humid exhaust is actually leaving the home.
A vent can look connected indoors but still have weak airflow outside because of lint buildup, a stuck flap, a crushed hidden duct, a pest nest, a long run, or a blockage inside the wall. Run the dryer briefly, observe the outside hood, and keep hands and tools away from moving parts.
What strong airflow should look like
A properly exhausting dryer should push a noticeable stream of warm, moist air out of the exterior vent. The vent flap should open easily when the dryer runs and settle closed when the dryer stops. The airflow should feel steady rather than weak, pulsing, or barely noticeable.
If you are unsure, compare it with a later check after the lint screen and visible duct are cleaned; a noticeable improvement points toward restriction rather than normal dryer behavior.
Healthy exterior airflow usually means:
- The flap opens fully or nearly fully during the drying cycle
- Warm air exits with noticeable force
- The airflow remains steady while the dryer runs
- Lint is not packed around the outlet
- The vent hood is not blocked by debris, vegetation, or a screen clogged with lint
What weak airflow may indicate
Weak airflow at the exterior vent does not automatically prove there is hidden moisture damage, but it is a strong warning sign that the vent system needs closer inspection. The dryer may still heat and tumble normally, but the moisture may not be leaving fast enough.
Weak airflow may point to:
- Lint buildup inside the transition duct or wall duct
- A crushed duct behind the dryer
- A disconnected or leaking duct section
- A vent run that is too long or has too many elbows
- A stuck exterior flap
- A blocked exterior hood
- Moisture and lint collecting inside a low section of duct
Long drying times are often part of the same pattern. If clothing takes longer than normal to dry, especially if the dryer feels hot but the clothes remain damp, the vent may not be exhausting properly. Do not assume this is only an appliance problem. It can also be a moisture removal problem caused by poor vent airflow.
Weak airflow should also make you think beyond the dryer itself. If the laundry room is humid, musty, or slow to dry after appliance use, the issue may connect to broader laundry-area moisture behavior. The companion article on why laundry rooms develop mold problems explains how appliance moisture, poor airflow, and hidden damp areas can work together.
How the exterior flap should behave
The exterior flap or damper is not just a cover. It is part of the exhaust system. It should open when air is moving out and close when the dryer stops. If the flap sticks shut, opens only slightly, or is blocked by lint, the dryer may struggle to push humid air outdoors.
Watch for these flap problems:
- The flap does not open when the dryer runs
- The flap opens weakly or only partway
- The flap rattles but little air comes out
- The flap is stuck open after the dryer stops
- The flap is clogged with lint
- The flap is blocked by paint, caulk, debris, or pest nesting material
A flap stuck closed restricts exhaust. A flap stuck open can allow outdoor air, rain splash, pests, or cold air to enter the duct. Either condition can contribute to moisture problems. Cold air entering the duct can also make condensation more likely when warm dryer exhaust moves through the system during a later cycle.
Inspect the Exterior Dryer Vent Hood
The exterior vent hood is easy to overlook because it may be low on a wall, near a porch, behind landscaping, high on an exterior wall, or otherwise difficult to access. But if the hood is blocked or damaged, moisture can back up into the duct and increase the risk of condensation or leakage.
Inspect the exterior vent hood during and after a dryer cycle. If the vent outlet is high on a wall, roof-mounted, or unsafe to reach from the ground, inspect only from a safe location and leave close access to a professional. You want to know whether air exits freely, whether the outlet is clean, and whether the surrounding wall shows moisture clues.
Look for lint buildup and stuck flaps
Lint around the outside hood usually means the dryer is moving at least some exhaust, but heavy buildup can become a restriction. Lint can collect on louvers, screens, flaps, pest guards, and the lower edge of the hood. Over time, that buildup can reduce airflow enough to trap humid air inside the vent.
Look closely for:
- Lint packed around the flap or louvers
- Lint stuck to an exterior screen
- Clumps of damp lint near the outlet
- A flap that cannot close because of lint buildup
- A flap that cannot open because lint has hardened around the hinge
Damp lint at the exterior outlet deserves attention. It can mean humid air is cooling near the termination, moisture is condensing inside the duct, or airflow is too slow. A small amount of dry lint is common, but wet clumps suggest that moisture is lingering where it should be moving out.
Check for moisture, staining, and debris
Inspect the wall area around the dryer vent hood. You are not trying to diagnose every type of wall damage in this article, but the exterior surface can show clues that the vent has been releasing moisture poorly or allowing water back toward the wall.
Look for:
- Dark staining below the vent hood
- Water streaks on siding or masonry
- Paint bubbling around the outlet
- Soft or damaged siding near the vent
- Mildew-like growth around the hood
- Rust on metal vent components
- Gaps where the hood meets the exterior wall
If you find visible staining, softened materials, or suspected damage around the vent path, keep the inspection focused on the vent condition and then review the separate guide to visible signs of dryer vent moisture damage. That keeps the inspection process separate from the damage-identification process.
Make sure the vent is not blocked by vegetation or pests
Outdoor blockages are common. Grass, shrubs, mulch, stored items, snow, leaves, bird nests, rodent nesting material, and insect debris can restrict the vent hood. Even partial restriction can slow airflow and increase moisture retention inside the dryer duct.
Check that the vent outlet has open space around it. Air should be able to leave freely. If the vent hood is close to dense shrubs, behind outdoor storage, buried near mulch, or covered by debris, the dryer may not exhaust properly. A blocked exterior outlet can make moisture problems worse even when the duct behind the dryer looks fine.
Also check whether the vent hood has a screen that traps lint. Some exterior covers are designed in ways that collect lint too easily. Once lint collects at the outlet, humid air slows down, drying time increases, and condensation risk rises. If the outlet repeatedly clogs, the vent cover design or the downstream vent condition may need professional evaluation.
Look for Condensation Along the Dryer Vent Route
After checking both ends of the vent, think about the route between them. Dryer vent condensation is most likely when warm, humid exhaust slows down, cools too quickly, or passes through a cold or poorly routed section of duct.
You may not be able to see the entire route, but accessible duct sections can still reveal risk factors such as long runs, cold spaces, elbows, low spots, sagging duct, corrosion, damp lint, and weak airflow.
Long vent runs
The farther dryer exhaust must travel before it reaches the outdoors, the more opportunity it has to cool, slow down, and deposit lint. Long vent runs are not automatically a moisture problem, but they are less forgiving than short, direct runs. If airflow is already weak, a long route can allow damp air to linger inside the duct.
Look for clues that the vent takes a long path:
- The dryer is far from an exterior wall
- The duct disappears into a ceiling, floor, or interior wall
- The exterior outlet is not near the laundry room
- The vent route passes through an attic, crawl space, basement, or garage
- The dryer has always taken longer than expected to dry loads
If you are unsure where the vent exits, locate the exterior hood first and compare that location with the dryer position indoors. A long distance between the dryer and the outlet does not prove there is a moisture issue, but it does mean airflow and duct condition matter more.
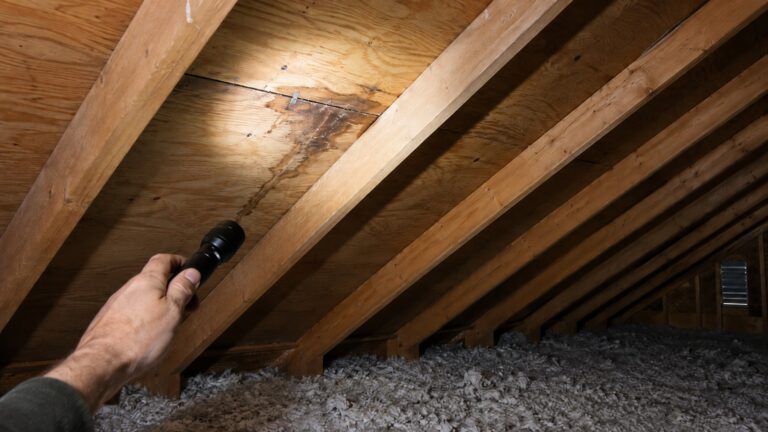
Cold spaces
Condensation becomes more likely when warm dryer exhaust travels through a cold area. This can happen when the duct passes through an unconditioned attic, crawl space, garage, basement, exterior wall, or cold ceiling cavity. Warm air can hold more moisture than cold air. When that air cools inside the duct, some of its moisture can condense on the duct surface.
During inspection, pay attention to any accessible duct sections in colder spaces. Look for:
- Water droplets on metal duct
- Rust or corrosion on duct seams
- Damp lint near joints
- Staining below duct connections
- Wet insulation near the vent path
- Musty odor around enclosed or poorly ventilated spaces
A cold-space vent route does not always require replacement, but repeated condensation means the vent may need cleaning, repair, insulation, rerouting, or professional evaluation. This is especially important when the duct is hidden above finished ceilings or behind walls, where moisture can affect surrounding materials before it is visible.
Elbows and low spots
Elbows, bends, dips, and low spots slow airflow and create places where lint and moisture can collect. A single proper bend may not cause a problem, but multiple elbows or sagging sections can make the exhaust path harder for the dryer to push through.
Inspect any accessible duct sections for:
- Sharp bends close to the dryer
- Multiple elbows in a short distance
- Sagging flexible duct
- Low spots where condensation could collect
- Sections that slope back toward the dryer
- Joints where lint or moisture appears to be escaping
If a duct section sags, lint and moisture can settle in the low point. That restriction can get worse over time because lint holds moisture, moisture helps lint clump, and the clumps further reduce airflow. This cycle can turn a minor routing issue into a recurring moisture problem.
Sagging or crushed duct sections
Sagging and crushed duct sections are especially common behind dryers, above drop ceilings, in crawl spaces, and along unfinished basement routes. These problems are easy to overlook because the dryer may still run, heat, and tumble normally. The issue is not whether the dryer turns on; it is whether the vent can move moisture outdoors efficiently.
A crushed duct reduces the air passage. A sagging duct can hold lint and condensation. A disconnected duct can release humid exhaust into the surrounding area. Any of these conditions can raise moisture risk inside nearby walls, floors, ceilings, or utility spaces.
If the vent route is hidden and you cannot inspect it directly, use indirect clues: weak exterior airflow, repeated long drying times, humid air behind the dryer, damp lint, musty odors, moisture near the vent path, or recurring condensation around the outlet. Those clues may justify a more detailed inspection with tools or a professional dryer vent technician.
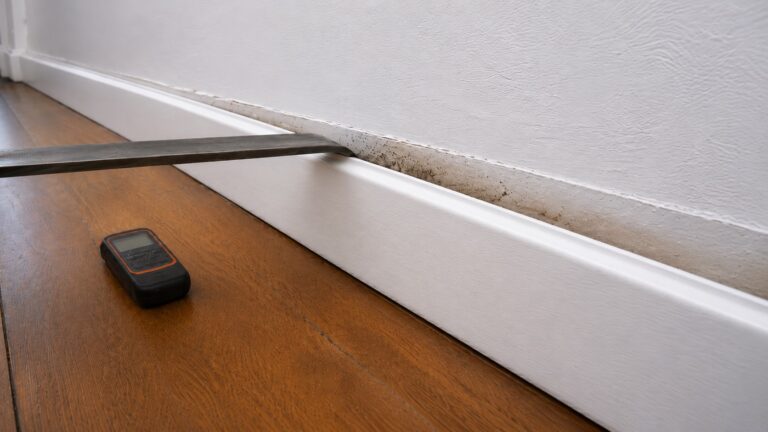
Check Nearby Walls, Floors, and Trim for Moisture Clues
After inspecting the vent itself, check the surfaces around the dryer and along the likely vent path. This step is not a full visible-damage diagnosis. It is a quick check for clues that the dryer vent may be affecting nearby materials.
Start near the dryer wall outlet. Look at the drywall, baseboard, trim, flooring, and any nearby cabinet or shelving. Then check the exterior wall around the vent hood. If the vent travels through a ceiling, basement, garage, attic, crawl space, or adjacent room, inspect accessible surfaces along that route as well.
Look for inspection clues such as:
- Damp or musty smell near the dryer
- Moisture around the wall vent opening
- Soft drywall near the duct connection
- Swollen baseboards behind or beside the dryer
- Flooring edges that feel raised, soft, or uneven
- Staining around ceiling or wall areas near the vent route
- Condensation on nearby cold surfaces after drying cycles
- Moisture readings that are higher near the vent path than nearby control areas
Laundry-room floors deserve special attention because multiple moisture sources can overlap in the same room. A dryer vent issue may combine with washer leaks, hose problems, high humidity, or poor ventilation. If the floor feels soft, swollen, or unstable, review the separate guide to water damage under laundry room flooring so the flooring symptoms are evaluated in their own context.
If you see mold-like spots or smell a persistent musty odor, do not assume the dryer vent is the only cause. Laundry rooms can develop mold from dryer exhaust problems, washer leaks, damp flooring, poor ventilation, or stored wet laundry. The article on mold warning signs in laundry rooms can help separate vent-related moisture clues from broader mold symptoms.
Tools That Help Inspect Dryer Vent Moisture Problems
Careful observation matters most, but a few simple tools can help confirm whether moisture is affecting nearby materials.
Flashlight
A bright flashlight helps you inspect behind the dryer, inside the exterior vent hood, around wall penetrations, and along visible duct sections. Use it to look for lint clumps, loose duct joints, damp surfaces, rust, staining, crushed duct, and gaps around the vent connection.
Hygrometer
A hygrometer measures relative humidity. It can help you compare laundry-room humidity before, during, and after dryer use. If humidity rises sharply during dryer operation and stays elevated, the vent may be leaking humid air indoors or the room may lack adequate ventilation.
Humidity readings alone do not prove a dryer vent defect, but they can show whether dryer operation changes the room environment. This fits into broader whole-home moisture control, especially when laundry humidity affects nearby rooms or enclosed spaces.
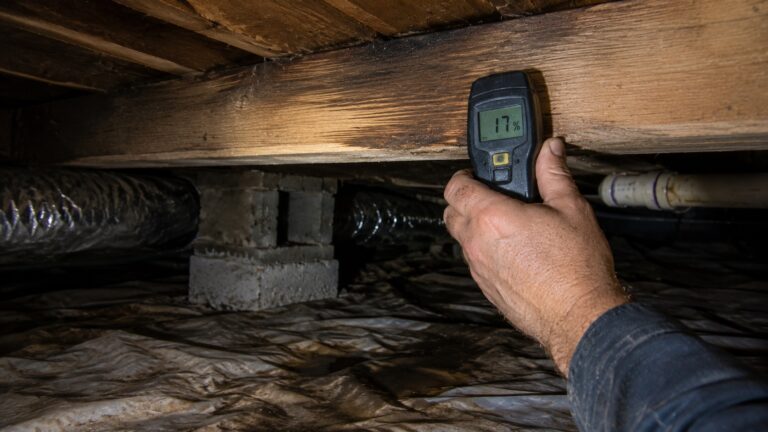
Moisture meter
A moisture meter can help check drywall, trim, and flooring near the vent path. The best use is comparison. Take readings near the suspected vent area, then compare them with similar materials farther away. A higher reading near the dryer wall, floor edge, or vent route may indicate moisture concentration, especially if the same material reads lower a few feet away from the vent path.
Do not rely on one reading by itself. Moisture meters can be affected by material type, density, fasteners, surface finishes, and user technique. Use readings as evidence to investigate further, not as the only diagnosis.
Thermal imaging camera
A thermal camera may reveal cooler areas near duct routes, exterior walls, or hidden damp materials. It does not directly see moisture. It shows temperature differences that may suggest where condensation, air leakage, or dampness could be occurring.
Thermal imaging is most useful when combined with visual inspection and moisture readings. For example, a cool patch near a dryer vent path may be worth checking with a moisture meter, especially after the dryer has been running.
Borescope
A borescope can help inspect hidden cavities if there is already a safe access point, such as an existing vent opening or service access. It should not be treated as permission to cut into walls casually. Use it when inspection access already exists or when a professional is evaluating a hidden route.
A borescope may help confirm disconnected duct sections, lint buildup, corrosion, damp insulation, or water staining near a hidden vent path. This can be especially useful when the dryer vent disappears into a ceiling or wall and exterior airflow is weak.
Common Dryer Vent Inspection Mistakes
A dryer vent inspection can miss moisture clues if you only check the easiest parts of the system. Avoid these common mistakes when inspecting the vent.
Only checking the lint screen
The lint screen is important, but it is not the whole exhaust system. A clean lint screen does not mean the transition duct, wall duct, elbows, exterior hood, or hidden vent route is clean. Lint can still pass beyond the screen and collect inside the vent path.
If the dryer is slow, the laundry room feels humid, or the exterior airflow is weak, inspect beyond the lint screen. The moisture problem may be farther downstream.
Ignoring the exterior vent hood
The outside vent hood is one of the clearest indicators of vent performance. If the flap barely opens, lint is packed around the outlet, or warm air is weak, the dryer may not be moving moisture outdoors efficiently.
Do not assume the vent is fine just because the dryer connection behind the machine looks attached. The exterior outlet confirms whether the exhaust is actually leaving the house.
Assuming long drying time is only an appliance problem
Long drying time can be caused by the dryer itself, but it can also be caused by restricted airflow. If the dryer heats but clothes stay damp longer than usual, inspect the vent before assuming the appliance needs replacement.
A dryer that cannot exhaust properly may run longer, hold moisture in the drum longer, and push humid air through a duct that is already struggling. That can increase condensation risk inside the vent system.
Overlooking crushed duct behind the dryer
A dryer can crush its own transition duct when it is pushed too close to the wall. This is especially common in small laundry closets, tight utility rooms, and spaces where the dryer must fit under shelving or beside a washer.
Even a partial restriction can reduce airflow. If the duct is flattened, kinked, sharply bent, or squeezed behind the machine, it should be treated as a serious inspection finding.
Forgetting that dryer vents can affect hidden spaces
Not every dryer vent moisture problem shows up directly behind the dryer. If a duct leaks inside a wall, ceiling, crawl space, attic, or floor system, the first signs may appear away from the appliance. A musty smell, damp insulation, stained ceiling area, or soft floor section may be connected to a hidden vent route.
When Dryer Vent Moisture Problems Need Professional Inspection
Some dryer vent issues are simple to observe but difficult or unsafe to fully diagnose. If the vent route is hidden, long, high, roof-terminated, or routed through finished spaces, a professional inspection may be safer and more reliable than guessing.
Consider calling a professional if:
- The exterior vent has weak airflow even after the lint screen and visible duct are cleaned
- The dryer vent disappears into a wall, ceiling, attic, crawl space, or finished area you cannot inspect
- You smell musty odors near the dryer or along the vent route
- You find damp lint, condensation, rust, or staining near duct joints
- The laundry room becomes humid every time the dryer runs
- There is suspected moisture inside a wall or floor near the vent path
- The vent is crushed, disconnected, damaged, or made from unsafe material
- The exterior hood is high, roof-mounted, or difficult to access safely
- You have a gas dryer and the connection limits safe access behind the appliance
A professional can clean the full duct run, measure airflow, inspect hidden routing, repair disconnected sections, replace unsafe transition duct, and evaluate whether the vent needs rerouting. If moisture has affected drywall, trim, flooring, or framing, the inspection may also need to involve a water damage, mold, or building repair professional depending on the severity.
After the vent problem is corrected, the laundry room still needs routine moisture control. Better airflow, clean dryer venting, prompt leak response, and room ventilation all help prevent mold in laundry rooms over time.
FAQ About Inspecting Dryer Vents for Moisture Problems
How do I know if my dryer vent has a moisture problem?
You may have a dryer vent moisture problem if the laundry room feels humid during dryer use, clothes take too long to dry, the exterior airflow is weak, the vent flap barely opens, lint feels damp, condensation appears on ductwork, or nearby walls, floors, or trim show moisture clues. The best inspection checks both ends of the vent: behind the dryer and at the outside outlet.
Is condensation inside a dryer vent normal?
Dryer exhaust naturally contains moisture, but persistent condensation inside the vent is not something to ignore. Condensation usually means warm, humid air is cooling before it exits the house, airflow is too slow, the vent run is too long, the duct passes through a cold space, or lint buildup is holding moisture inside the system.
Can a blocked dryer vent cause moisture in walls?
Yes. A blocked or restricted dryer vent can increase pressure and slow airflow. If the duct has loose joints, gaps, damage, or hidden disconnections, humid exhaust can leak into nearby wall or ceiling cavities. Over time, that moisture can affect drywall, insulation, trim, or framing.
Should I inspect the dryer vent from inside or outside?
Inspect both. The inside inspection shows whether the transition duct is crushed, loose, disconnected, or leaking behind the dryer. The outside inspection shows whether air is actually exiting the house with enough force. A vent can look acceptable inside but still have a blockage or restriction farther downstream.
What tools help inspect dryer vent moisture problems?
A flashlight is the most useful starting tool. A hygrometer can show whether laundry-room humidity rises during dryer use. A moisture meter can compare drywall, trim, and flooring near the vent path with unaffected areas. A thermal camera or borescope may help with hidden routes, but these tools should support inspection, not replace common-sense airflow and visual checks.
When should I call a professional for dryer vent moisture problems?
Call a professional if airflow remains weak, the vent route is hidden or inaccessible, the dryer is gas-connected and difficult to move safely, you suspect moisture inside a wall or floor, the exterior outlet is high or roof-mounted, or you find repeated condensation, damp lint, musty odors, or visible material damage near the vent path.
Quick Dryer Vent Moisture Inspection Summary
- Dryer vent moisture problems usually come from restricted airflow, condensation, air leakage, or poor routing.
- The inspection should start behind the dryer, where crushed ducts, loose clamps, and damp lint are common.
- The exterior vent hood is essential because it shows whether humid exhaust is actually leaving the home.
- Weak airflow, stuck flaps, damp lint, long drying times, and condensation along the duct route are important warning signs.
- Nearby walls, floors, trim, and ceilings should be checked for moisture clues, especially when the vent route is hidden.
- Professional inspection is appropriate when the vent is inaccessible, airflow remains weak, or hidden moisture damage is suspected.
A useful dryer vent moisture inspection checks more than the lint screen. Confirm that the transition duct is not crushed, the clamps are tight, exterior airflow is strong, the outside flap opens freely, the vent route does not show condensation clues, and nearby walls, floors, trim, or ceilings do not show signs of hidden moisture.
The most important warning pattern is a combination of weak exterior airflow, damp lint, loose duct connections, stuck vent flaps, long drying times, musty odor, and moisture near the vent path. If the route is hidden, difficult to access, repeatedly damp, or connected to visible material damage, professional inspection is safer than guessing.
One Comment
Comments are closed.