How to Inspect Siding After a Storm for Hidden Moisture Damage
Storm damage to siding is not always obvious from the driveway. A panel may still be on the wall, but wind, hail, debris, or heavy rain can loosen seams, open gaps, crack edges, or shift trim just enough to let water reach the wall system behind it. That is why a post-storm siding inspection should look for more than cosmetic damage.
The goal is not to diagnose every hidden problem from the outside. The goal is to find warning signs that the siding is no longer shedding water the way it should. If storm damage creates an opening at seams, corners, penetrations, windows, doors, or lower wall edges, moisture can begin moving behind the siding long before interior staining appears. Prioritize any area where the storm changed the siding’s alignment, attachment, surface integrity, or seal around a transition point.
This guide explains how to inspect siding after a storm for hidden moisture damage, which exterior details deserve the closest attention, how to document what you find, and when visible siding damage should be checked before water reaches the wall behind it.
Why Storm-Damaged Siding Needs More Than a Quick Look
Siding is part of the home’s exterior water-control system. It helps shed rain and reduce direct exposure to sheathing, framing, insulation, and interior finishes. When storm damage opens a direct path behind the siding, the wall has less margin for drainage and drying.
This is why storm inspection matters. A shallow dent in metal siding may be mostly cosmetic, while a cracked vinyl panel, opened lap, displaced corner post, or separated trim joint can allow wind-driven rain to enter the wall. The difference is not just how the siding looks. The difference is whether the storm changed the way water moves across the wall.
For broader context on how siding, trim, openings, and wall transitions create moisture paths, see how exterior walls allow moisture into homes. A storm inspection is one specific moment when those exterior wall weaknesses can become easier to see.
Storms can damage siding in several ways:
- Wind can unlock, lift, or shift siding panels.
- Hail can crack, dent, chip, or puncture siding surfaces.
- Branches and flying debris can break panels, trim, corners, and wall accessories.
- Wind-driven rain can push water into gaps that normal rainfall may not expose.
- Standing water and splashback can wet lower siding and wall edges after heavy rain.
A useful inspection does not treat every mark as an emergency. Instead, it separates cosmetic marks from moisture-risk damage. The most important question is: did the storm create a gap, crack, hole, separation, loose attachment point, or exposed material that can let water get behind the siding?
Start With a Safe Ground-Level Walkaround
Begin with a full walkaround of the house once conditions are safe. Do not climb wet ladders, walk on slick surfaces, go near downed utility lines, or pull at damaged siding while the storm is still active or the area is unstable. Most early siding damage can be documented from the ground with a phone camera, flashlight, and careful observation.
Walk around every side of the house, not only the side that seemed to face the storm. Wind can swirl around corners, hail can strike multiple elevations, and debris can hit areas that were not directly facing the strongest wind. Pay extra attention to the walls that faced the storm, but still inspect all elevations.
Take wide photos before close-ups. Include at least one photo that shows the damaged area in relation to a window, door, corner, downspout, porch, deck, or other fixed reference point. A wide photo shows which wall was affected and helps connect the damage to a specific area of the house. Then take closer photos of cracks, dents, gaps, lifted panels, or damaged trim. If you later need a contractor evaluation or insurance documentation, the sequence of wide and close photos will be more useful than random close-ups.
As you walk, look for changes in the siding plane. Storm damage often appears as irregularities in the pattern: one course sits higher than the others, one panel bows outward, one seam looks wider, or one corner post appears separated from the wall.
Look from different angles. Some storm damage is easier to see when light hits the wall from the side. A dent, crack, lifted lap, or bowed panel may not stand out when viewed straight on, but it can become obvious when you look along the wall surface.
During this first pass, make note of:
- Loose or missing siding pieces.
- Panels that are cracked, punctured, bowed, or shifted.
- Open seams or widened joints.
- Trim that has separated from windows, doors, corners, or penetrations.
- Damaged caulk around fixtures, vents, and wall openings.
- Wet or stained areas that remain damp longer than surrounding siding.
- Interior rooms that line up with exterior storm damage.
Do not remove siding panels during the first inspection. Pulling panels loose can make the damage worse, interfere with documentation, or expose the wall to more water. If siding needs to be opened for a hidden moisture inspection, that is usually a job for someone who understands the siding system and the water-resistive layers behind it.
Check for Loose, Lifted, or Shifted Siding
After the first walkaround, inspect the siding for movement. Wind damage often shows up as attachment failure before it shows up as obvious breakage. A panel may still be present, but it may no longer be locked, fastened, or seated correctly. If the siding rattles, flaps, or visibly moves during light wind after the storm, treat that as attachment damage even if the panel has not fallen off.
Look for siding that appears lifted, rippled, buckled, bowed outward, or shifted out of line with the courses above and below it. On vinyl siding, check whether the lower edge of a panel has come unlocked from the piece beneath it. On lap siding, check whether boards have lifted away from the wall or opened at the overlap.
Loose siding matters because wind-driven rain can enter behind displaced panels. Even if the wall does not leak during the first storm, the siding may now be vulnerable during the next rain. If the damage pattern looks wind-related, compare what you see with the more specific signs of wind damage on siding so you can separate normal movement from storm-related attachment failure.
Pay close attention to these areas:
- Panel edges: Look for edges that have popped loose, curled outward, or separated from adjoining pieces.
- Horizontal laps: Check whether wind lifted a course enough to open a water path.
- Vertical seams: Look for widened seams or panels that no longer meet evenly.
- Fastener lines: Watch for siding that looks pulled, stretched, cracked, or distorted near nail or screw locations.
- Upper wall sections: High wind can loosen siding near gables, upper stories, and exposed corners.
Do not judge attachment only by whether the siding is still hanging on the wall. A partially loose panel can flap, rattle, or shift during later storms. That movement can enlarge cracks, stress fasteners, and expose the wall to more water over time.
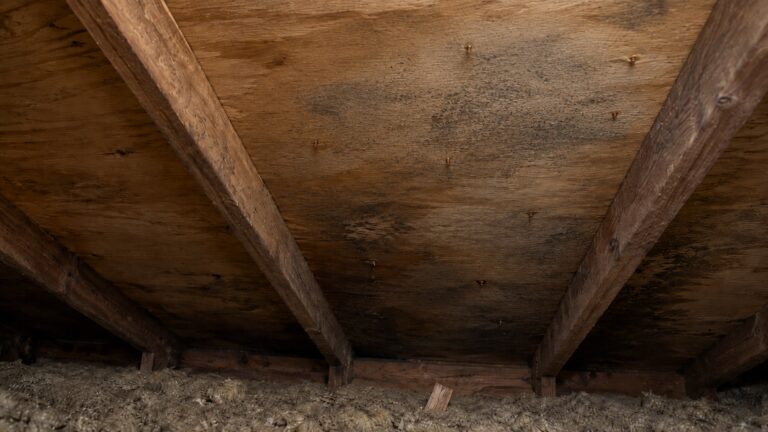
If you can see housewrap, sheathing, insulation, or a dark shadowed gap behind the siding, treat the damage as more than cosmetic. Exposed wall layers are a sign that the siding is no longer protecting the assembly correctly. That does not always mean the entire wall is damaged, but it does mean the area should be repaired or professionally evaluated before repeated rain reaches the opening.
Look for Cracks, Dents, Holes, and Impact Marks
Hail and wind-driven debris usually leave a different kind of damage than wind alone. Instead of shifting large sections, impact damage often appears as dents, cracks, chips, holes, broken corners, or surface fractures. The severity depends on the siding material, the size of the hail or debris, the age of the siding, and how brittle the material has become.
Start by looking at the most exposed walls. Hail often leaves repeated marks on one or two elevations, while debris impacts may appear as isolated damage near trees, fences, patio furniture, or loose objects that were moved by wind. Look at siding from the side as well as straight on, because shallow dents and cracks may only show when light catches them.
Different siding materials show impact damage differently:
- Vinyl siding: Look for cracks, punctures, broken corners, shattered edges, or holes where hail or debris struck brittle panels.
- Fiber cement siding: Look for chipped edges, cracked boards, broken corners, coating damage, and opened butt joints.
- Wood siding: Look for splits, gouges, bruised wood fibers, raised grain, paint damage, and exposed end grain.
- Engineered wood siding: Look for cracked coating, swollen edges, exposed substrate, delamination, or impact breaks near seams.
- Metal or aluminum siding: Look for dents, creases, punctures, distorted seams, and bent trim pieces.
Not every dent means water is entering the wall. A shallow dent in metal siding may be mostly cosmetic if the panel is still sealed at its edges, the seams remain tight, and the surface coating is intact. The concern increases when the impact created a crack, hole, open seam, exposed substrate, damaged coating, or distorted joint.
For a more focused comparison of impact patterns, use the dedicated guide to hail damage on siding. In this storm inspection article, the main point is to decide whether the impact damage changed the siding’s ability to shed water.
Cracks and holes deserve closer attention than surface marks. A small hole can let wind-driven rain reach the water-resistive barrier behind the siding. A crack at the bottom edge of a board can hold moisture. A broken corner can let water wrap around the siding edge and wet the sheathing or trim behind it.
Also check for damage around nearby objects. If a grill, branch, trash can, patio chair, or loose piece of fencing hit the wall during the storm, inspect the siding around the impact point and the surrounding seams. Debris damage may affect a small area, but it can still open a direct water path if the panel or trim was cracked.
Inspect Seams, Corners, Trim, and Wall Penetrations
After checking the main siding surface, inspect the details where siding meets another material. Storm damage around seams, corners, trim, and penetrations can be more important than damage in the middle of a panel because these areas already depend on layered water-control details.
Look closely at vertical seams and butt joints. A small gap may not seem serious from several feet away, but an opened joint can allow wind-driven rain to reach behind the siding. If one seam is wider than the others, one board end has lifted, or one panel edge no longer sits flat, photograph it and monitor the area after the next rain.
Corners are another high-risk area. Corner posts, trim boards, and outside corners often take wind pressure and debris impact. If a corner post is cracked, pulled away, dented, or separated from the siding, water can move around the edge of the wall assembly. On wood or fiber cement siding, cracked corner trim can also expose end grain or joint edges that absorb moisture more easily than the face of the siding.
Next, inspect the siding around windows and exterior doors. These openings are common moisture-risk zones because they involve siding, trim, sealant, flashing, and framing transitions. After a storm, look for cracked trim, separated caulk, open gaps above the window, loose siding beside the frame, or staining below the sill. A storm may not be the original cause of a weak window or door detail, but it can reveal that the area is no longer shedding water correctly.
Wall penetrations also deserve close inspection. Check around:
- Hose bibs and outdoor faucets.
- Dryer vents and exhaust vents.
- Exterior light fixtures.
- Electrical boxes and outlets.
- Cable, satellite, or internet penetrations.
- Gas meters, electrical meters, and utility attachments.
- Pipe penetrations and wall-mounted brackets.
Look for cracked siding, broken mounting blocks, pulled fasteners, missing sealant, separated trim rings, or gaps where a fixture has shifted. If a storm loosened a fixture attached through the siding, water may be able to follow that opening into the wall.
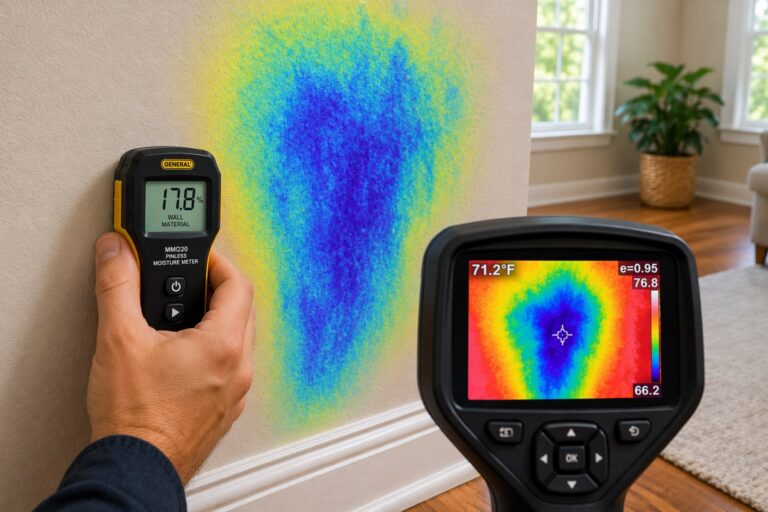
This is where siding inspection begins to overlap with hidden moisture risk. You may not be able to see behind the siding, but visible gaps and failed transitions can tell you where water is most likely to enter. If the damage suggests water may already be getting behind the siding, the next step may be to detect moisture behind exterior siding rather than relying only on surface appearance.
Check Lower Wall Areas Where Storm Water Collects
Lower siding sections are easy to overlook because many homeowners focus on obvious dents or missing panels higher on the wall. But the bottom of the wall often sees some of the heaviest moisture exposure after a storm. Rainwater can splash up from the ground, collect against mulch, flow from clogged drainage areas, or strike the lower wall with wind pressure.
Walk the perimeter and look at the lowest siding courses, skirt boards, bottom trim, and areas near decks, patios, porches, walkways, and landscaping. These areas may not show dramatic storm impact, but they can reveal where water lingered after the storm.
Look for:
- mud splash or debris lines on the siding.
- siding that remains wet after nearby areas have dried.
- swollen lower edges on wood or engineered wood siding.
- paint blistering or peeling near the bottom of the wall.
- soft, darkened, or stained trim boards.
- soil or mulch touching the siding.
- gaps where the bottom edge has pulled loose.
- water marks near patios, decks, or concrete slabs.
Storm water does not need a large opening to create problems. If lower siding is already close to soil, mulch, or hardscape, repeated splashback can keep the area damp. A storm can make that condition worse by driving water into small gaps or saturating materials that were already vulnerable.
Lower wall damage is especially important on wood, engineered wood, and fiber cement siding. These materials can tolerate normal weather exposure when installed and finished correctly, but exposed edges, failed coatings, or repeated wetting can lead to swelling, decay, or hidden moisture behind the wall covering.
If you see staining, swelling, softness, or recurring dampness near the bottom of the siding, compare those symptoms with the broader signs of water damage behind siding. That article can help separate surface wetting from warning signs that water may already be affecting the wall behind the siding.
Look for Moisture Warning Signs Inside the Same Wall
A siding inspection should not stop outside. After a strong storm, check the interior side of any wall where you found exterior damage. Interior symptoms may appear near windows, doors, baseboards, corners, outlets, or lower wall sections that line up with damaged siding outside.
If you see water near electrical outlets, switches, fixtures, or the breaker panel, do not touch the area until it has been evaluated safely.
Look for new or worsening signs such as:
- water stains on drywall or trim.
- bubbling or peeling paint.
- soft drywall near the base of the wall.
- swollen baseboards or window trim.
- musty odor near the exterior wall.
- damp carpet edges or flooring near the wall.
- new discoloration around outlets or corners.
- condensation or dampness that was not present before the storm.
Interior symptoms do not always appear immediately. Water may enter behind siding, wet the drainage plane, collect around sheathing, or soak trim materials before it becomes visible indoors. That is why it helps to check the same wall again after the next rain, especially if the exterior siding remains unrepaired.
Be careful not to assume that a dry interior wall proves the siding is fine. It may only mean water has not reached the finished surface yet. On the other hand, do not assume every interior stain came from siding. Roof leaks, window leaks, plumbing leaks, and condensation can create similar symptoms. The strongest clue is a match between new exterior storm damage and new interior symptoms on the same wall, especially after wind-driven rain.
If you find exterior siding damage and interior dampness near the same wall, the problem has moved beyond cosmetic inspection. That is when hidden siding damage can become a moisture-control issue, especially if the wall continues to get wet during later storms. For a deeper explanation of how concealed siding problems progress, see hidden siding damage that leads to moisture problems.
How to Document Siding Damage After a Storm
Before repairing, cleaning, or moving anything, document the damage clearly. Good documentation helps you compare conditions over time, explain the problem to a contractor, and keep a record of what changed after the storm.
Start with wide photos of each side of the house. Then take closer photos of each damaged area. A close-up of a crack is useful, but it is more useful when paired with a wider photo showing which wall, window, door, corner, or lower siding section the crack belongs to.
For each damaged area, record:
- the date of the storm.
- which side of the house was affected.
- the type of damage you saw.
- whether the siding was cracked, loose, punctured, dented, or shifted.
- whether trim, corners, fixtures, or penetrations were also damaged.
- whether any interior symptoms appeared on the same wall.
- whether the damage changed after the next rain.
Take photos from more than one angle if the damage is hard to see. Dents, bowed panels, and lifted laps often show better when photographed from the side. If the siding is wet, take another photo after it dries so you can tell whether staining, swelling, or discoloration remains.
Do not remove damaged siding just to get a better picture. Removing panels can change the condition you are trying to document and may expose the wall to additional moisture. If a contractor needs to inspect behind the siding, let that inspection happen in a controlled way.
When to Call a Professional After a Siding Storm Inspection
A homeowner can often spot visible storm damage, but a professional inspection is wise when the damage affects the siding’s attachment, water-shedding ability, or the wall behind it. The more the siding has shifted, cracked, opened, or exposed hidden layers, the less it should be treated as a cosmetic issue.
Call a siding, exterior wall, or restoration professional when you see:
- missing siding panels.
- large cracks, holes, or punctures.
- loose sections that move in the wind.
- open seams that expose the wall behind the siding.
- damaged trim around windows, doors, or corners.
- exposed sheathing, housewrap, or insulation.
- water stains or dampness inside the same wall.
- multiple damaged elevations after hail or wind.
- soft, swollen, or deteriorated siding material.
- damage that worsens after later rain.
If damage is widespread, individual repairs may not restore the siding system, especially if the wall behind it has been exposed to repeated moisture. This article focuses on inspection, but if the damage appears severe, review when storm-damaged siding must be replaced before assuming a small patch will solve the problem.
Professional help is also important when the siding material is brittle, discontinued, difficult to match, or installed as part of a more complex exterior wall system. A repair that only covers the visible hole may not restore the drainage, flashing, or trim details that keep water out.
Sort the Damage by Moisture Risk
After inspecting the siding, sort your findings into three groups: cosmetic marks, possible moisture-risk damage, and urgent water-entry problems. This keeps the next step practical and prevents both overreaction and neglect.
Cosmetic marks include shallow dents, surface scuffs, or minor staining that did not crack the siding, open seams, expose substrate, or loosen the panel. These may still matter for appearance or insurance documentation, but they are less urgent from a moisture-control standpoint.
Possible moisture-risk damage includes small cracks, opened joints, lifted laps, damaged caulk, chipped coating, or loose trim. These areas should be photographed, monitored after the next rain, and repaired before repeated wetting causes deeper problems.
Urgent water-entry problems include missing panels, punctures, exposed wall layers, wet sheathing, active interior leaks, damp drywall, swollen trim, or siding sections that flap in the wind. These conditions should be evaluated quickly because the siding is no longer providing reliable protection.
Once the immediate inspection is complete, check nearby interior walls again after the next rainfall. If symptoms appear indoors, the problem may no longer be limited to the exterior surface. A broader moisture plan can help you find, fix, and prevent moisture problems before hidden damage becomes more expensive.
FAQ About Inspecting Siding After a Storm
Can siding look fine but still have storm damage?
Yes. Siding can look mostly normal from a distance while a panel is unlocked, a seam has opened, trim has separated, or a crack is hidden near an edge. That is why post-storm inspection should include alignment, attachment, corners, seams, penetrations, and interior wall checks.
Should I inspect siding immediately after a storm?
Inspect it as soon as conditions are safe. Do not climb wet ladders, walk near downed lines, or pull at damaged materials during unsafe conditions. A ground-level walkaround with photos is usually the best first step after the storm passes.
Are dents in siding always a moisture problem?
No. Some dents are mostly cosmetic, especially on metal siding when seams and coatings remain intact. Dents become more concerning when they distort seams, crack the surface, expose substrate, create holes, or loosen the panel from the wall.
What siding areas are most likely to leak after a storm?
The highest-risk areas are seams, corners, window trim, door trim, wall penetrations, bottom edges, and places where panels have lifted or shifted. These areas already depend on layered water-control details, so storm movement can make small weaknesses more serious.
Should I remove siding to check behind it?
Most homeowners should not remove siding just to inspect behind it. Removing panels can cause more damage or expose the wall to water. If visible damage suggests moisture behind the siding, use non-destructive observation first and call a professional when hidden damage is likely.
Storm Siding Inspection Checklist
- Inspect every side of the house after major wind, hail, debris impact, or wind-driven rain.
- Storm damage matters most when it opens a path for water behind the siding.
- Loose panels, opened seams, cracked siding, damaged trim, and exposed wall layers deserve close attention.
- Check corners, windows, doors, penetrations, and lower wall edges because these areas are common moisture entry points.
- Look inside the same wall for damp trim, stains, musty odor, bubbling paint, or soft drywall.
- Document damage with wide photos, close-ups, dates, and notes before repairs are made.
- Call a professional when siding is missing, loose, cracked, exposing wall layers, or associated with interior moisture symptoms.
Final Check After Storm Siding Damage
Inspecting siding after a storm is about more than finding dents or cosmetic marks. Walk the whole exterior, photograph what you find, check the same wall from inside, and focus on whether wind, hail, debris, or heavy rain changed the siding’s ability to shed water away from the wall. When a crack, opened seam, lifted panel, separated trim detail, or exposed wall layer lines up with indoor dampness, treat it as a wall-protection issue, not just a siding appearance problem.
One Comment
Comments are closed.