How to Inspect Window Sills for Moisture Damage
Window sills are one of the first places moisture damage shows up around a window. Because they sit at the lowest point of the window opening, water from condensation, rain intrusion, or indoor humidity often collects there before spreading into surrounding trim or wall materials.
To inspect a window sill for moisture damage, look for peeling paint, dark stains, soft spots, swollen wood, separated caulk, damp lower corners, and moisture that returns after drying. These early signs can appear before surrounding trim or wall materials show obvious damage.
This guide explains how to inspect window sills step by step, what realistic moisture damage looks like, and how to determine whether the issue is minor or connected to a deeper window problem.
For a broader explanation of how window openings, door openings, trim joints, and surrounding wall materials allow moisture to move inward, see how windows and doors cause hidden moisture problems.
Quick inspection order: start with the lower corners, check the front edge of the sill, inspect the caulk line where the sill meets the frame, press gently for softness, then compare any suspicious area with a dry section of nearby trim. If the same area stays damp or keeps changing after drying, treat it as recurring moisture rather than normal wear.
Why Window Sills Often Show Moisture Damage First
Window sills collect moisture because they sit at the lowest horizontal surface of the window opening. Condensation, small leaks, and humid indoor air often show up on the sill before damage appears on surrounding trim or walls.
Several common conditions cause moisture to concentrate on the sill:
- Condensation forming on cold glass during winter
- Rainwater leaking through small gaps around the window
- High indoor humidity settling on cooler surfaces
- Improper drainage or exterior sealing problems
- Air leaks allowing humid air to contact cooler window components
Repeated moisture can break down paint, weaken caulk, and soften wood or composite materials. The sill may show visible damage before surrounding wall areas look affected.
Understanding how moisture behaves around windows helps you recognize early warning signs before damage spreads. If you’re already seeing broader symptoms around the window area, reviewing the common signs of water damage around windows can help you determine whether the issue extends beyond the sill.
Early Signs of Moisture Damage on Window Sills
Early moisture damage often appears subtle. Homeowners sometimes mistake these changes for normal wear, especially in older homes. However, repeated moisture exposure produces recognizable patterns that differ from ordinary aging.
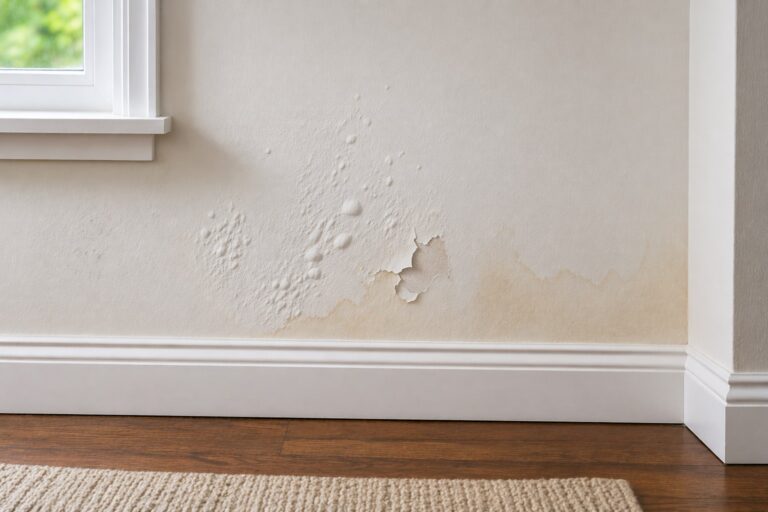
Peeling or Bubbling Paint
Paint failure is one of the earliest visible signs of moisture exposure. When moisture penetrates beneath the paint layer, it weakens adhesion and causes lifting or bubbling.
Look for:
- Small paint bubbles along the lower edge of the sill
- Peeling paint concentrated near window corners
- Paint that flakes off in thin layers
- Uneven paint texture compared to surrounding trim
These signs often develop before the underlying material becomes visibly damaged.
Dark Staining or Discoloration
Water exposure frequently causes discoloration, especially on painted or stained wood sills. This staining usually appears darker than surrounding surfaces and may concentrate near seams or corners.
Common discoloration patterns include:
- Dark streaks along the lower surface
- Localized staining near corners
- Yellow or brown discoloration beneath paint
- Uneven color patches on wood finishes
Discoloration alone doesn’t always mean severe damage, but repeated darkening in the same area suggests ongoing moisture exposure.
Minor Surface Mold or Musty Odors
In areas with consistent moisture, small mold spots may appear on the sill surface. These usually form as scattered specks rather than thick growth.
Early mold development often appears as:
- Small black or gray dots along the sill surface
- Faint musty smells near the window
- Discoloration that returns after cleaning
If visible mold is present, address the moisture source before cleaning the surface. For sill-specific prevention after cleanup, review how to prevent mold on window sills so the same damp conditions do not return.
Swelling or Raised Grain in Wood Sills
Wood absorbs moisture over time. When exposed repeatedly, the wood fibers expand, causing visible surface distortion.
Signs of swelling include:
- Raised or rough wood grain
- Edges that feel uneven to the touch
- Small cracks forming in painted surfaces
- Trim pieces that appear slightly distorted
How to Inspect the Surface of the Window Sill
A careful visual inspection is the first step in evaluating sill moisture damage. This process does not require special tools and can be completed in a few minutes per window.
Start with good lighting. Natural daylight works best, but a flashlight can help illuminate subtle surface changes that might otherwise be overlooked.
Step 1 — Examine the Entire Sill Surface
Begin by scanning the entire length of the sill from one corner to the other. Look closely at the center area as well as the edges where moisture tends to collect.
Pay special attention to:
- Changes in paint texture
- Discoloration patterns
- Small cracks or lifted edges
- Uneven surface areas
- Areas that appear dull or softened
Even small irregularities are worth noting, especially if they appear in the same area after repeated wet or humid conditions.
Step 2 — Inspect the Lower Corners Carefully
The lower corners of the sill are among the most common moisture collection points. Water from condensation or minor leaks tends to settle in these areas.
Check both corners closely for:
- Paint failure concentrated in small zones
- Dark discoloration near joints
- Early mold spotting
- Gaps forming along corner seams
If moisture consistently collects in these locations, it may be related to condensation patterns. Understanding why windows develop condensation and mold can help you determine whether humidity levels are contributing to the issue.
Step 3 — Look Along the Front Edge of the Sill
The front edge of the sill often reveals early paint or material failure. This area experiences repeated exposure to moisture running down the window glass.
Inspect the front edge for:
- Paint lifting along the lip
- Soft or crumbly wood surfaces
- Water marks running downward
- Fine cracks forming in painted finishes
Damage along the front edge may suggest repeated condensation dripping from the glass or minor water entry from above.
How to Check Paint, Caulk, and Seams Around the Sill
After inspecting the sill surface, check the seams that connect the sill to surrounding trim and wall materials. Small caulk gaps, cracked paint, and open joints can let moisture enter gradually over time.
Step 4 — Inspect Caulk Lines Along the Back Edge
The back edge of the window sill — where the sill meets the vertical trim or window frame — is a frequent entry point for moisture. Caulk along this seam should appear smooth, flexible, and fully attached.
Look for these warning signs:
- Cracked or splitting caulk
- Caulk pulling away from the surface
- Gaps forming between caulk and trim
- Discoloration beneath caulk lines
- Small openings near the lower corners
Even narrow gaps can allow moisture to enter repeatedly. If these conditions are present along with visible sill damage, the issue may extend beyond the sill itself. In those cases, reviewing how to detect moisture around window frames can help you check whether nearby frame materials are also affected.
Step 5 — Examine Vertical Trim Where It Meets the Sill
The vertical side trim pieces meet the sill at both corners. These junctions often trap moisture, especially when condensation or small leaks occur.
Focus on these areas for:
- Hairline cracks at trim joints
- Darkened seams at the sill corners
- Paint bubbling near joint intersections
- Gaps forming between trim pieces
Step 6 — Look for Signs of Repeated Water Flow
Repeated moisture exposure often leaves visible patterns. These patterns help identify whether the problem is occasional or ongoing.
Typical flow indicators include:
- Vertical streak marks beneath the window glass
- Staining concentrated directly below condensation lines
- Uneven paint wear in narrow paths
- Localized discoloration beneath known leak points
Patterns that reappear after cleaning or repainting usually indicate recurring moisture rather than isolated events.
How to Test for Softness, Swelling, or Hidden Dampness
Visual inspection identifies many moisture problems, but physical testing helps confirm whether damage has reached deeper into the sill material. Softness and hidden moisture are important indicators that the damage may be progressing.
Step 7 — Press Gently to Test Firmness
Press gently with your fingertip or a blunt plastic tool, not a sharp object that can puncture softened wood. A healthy sill should feel firm and consistent. Areas that feel spongy, crumbly, or noticeably softer than nearby trim may indicate moisture damage below the paint layer.
Press gently in several locations, especially:
- Lower corners of the sill
- Areas with visible discoloration
- Spots where paint appears raised
- Regions near caulk joints
Watch for these signs of moisture damage:
- Surface gives slightly under pressure
- Wood feels spongy rather than firm
- Paint cracks when pressed
- Indentations remain after pressure is removed
Softness usually indicates that moisture has penetrated beyond surface layers.
Step 8 — Check for Surface Swelling or Warping
Moisture absorption causes wood fibers to expand. Over time, this leads to visible distortion that can often be detected by touch.
Run your hand slowly across the sill surface and edges. Notice any:
- Raised ridges or rough areas
- Slight curvature along flat surfaces
- Uneven height between sections
- Loose or separating trim edges
Warping indicates repeated moisture exposure rather than a single isolated event.
Step 9 — Use a Moisture Meter if Available
Moisture meters provide measurable confirmation of hidden dampness. They are especially helpful when visual signs are unclear but moisture exposure is suspected.
If you have access to a moisture meter, test:
- The center of the sill surface
- Both lower corners
- Areas near suspected leaks
- Trim adjacent to the sill
Compare readings from the damaged area with a dry, unaffected section of the same sill or a similar nearby trim piece. A noticeably higher reading in the stained, soft, or swollen area suggests moisture is still present inside the material. If you are considering using this type of tool, reviewing the best moisture meters for detecting hidden water damage can help you understand how to interpret results accurately.
Step 10 — Check Beneath the Sill When Accessible
In some homes, especially older ones, the underside of the sill may be partially visible from inside closets, basements, or crawl spaces. If accessible, inspecting this area provides valuable insight into whether moisture is spreading beyond the surface.
Look for:
- Dark staining on hidden wood surfaces
- Moisture marks beneath the sill edge
- Soft or crumbling material below the visible surface
- Mold development along hidden joints
When Window Sill Moisture Points to a Larger Window Problem
Not all window sill moisture damage is isolated to the sill itself. Surface condensation or small spills may only affect the sill, but recurring dampness, deep softness, or spreading discoloration can point to moisture entering from outside or moving through nearby materials.
Recurring Moisture After Rainfall
If you notice dampness appearing shortly after rainstorms, the moisture source may be related to exterior sealing problems rather than indoor humidity.
Common signs linked to rain-related moisture include:
- Dampness appearing hours after rainfall
- Staining that worsens during wet weather
- Moisture forming even when indoor humidity is low
- Localized damage concentrated near one side of the window
These patterns suggest that water may be entering around the window opening rather than forming from condensation alone.
Moisture Appearing During Cold Weather
Cold weather often increases indoor condensation, especially when indoor humidity is elevated. When warm air contacts cold glass, water droplets form and may drip onto the sill.
Condensation-related patterns usually include:
- Moisture forming during cold mornings
- Water beads visible on window glass
- Dampness concentrated directly below condensation lines
- Damage affecting multiple windows in the home
Understanding the difference between condensation and water entry is essential for proper diagnosis. Reviewing the factors behind window condensation and mold formation helps clarify how indoor humidity contributes to sill damage.
Damage Extending Beyond the Sill Surface
If moisture damage spreads into surrounding trim, drywall, or wall finishes, the problem likely extends beyond the sill alone.
Warning signs include:
- Paint bubbling on nearby walls
- Discoloration spreading upward from the sill
- Soft trim surrounding the window
- Musty odors that persist beyond the immediate area
When these symptoms appear, it is important to evaluate surrounding materials as well. Learning how to inspect moisture around window frames helps confirm whether the moisture source affects multiple components.
What to Do After You Find Window Sill Moisture Damage
After inspection, decide whether the damage looks minor, recurring, or serious. The goal is to dry temporary surface moisture, investigate dampness that returns, and avoid treating repeated damage as a cosmetic issue.
Situations That Usually Require Drying and Monitoring
Some moisture events are temporary and can be resolved without major intervention. These situations typically involve small amounts of moisture that dry quickly and do not cause structural damage.
Examples include:
- Light condensation during seasonal weather changes
- Minor spills that were quickly cleaned
- Temporary humidity increases from indoor activities
- Surface dampness that disappears within a day
In these cases, drying the area thoroughly and monitoring it over time is usually sufficient. If moisture remains or returns, further investigation becomes necessary.
If water exposure has already occurred, reviewing the proper steps to dry window areas after water intrusion helps prevent lingering moisture from causing long-term damage.
Situations That Require Further Investigation
Recurring moisture patterns almost always indicate an ongoing source that requires attention. Ignoring repeated dampness increases the risk of deeper material damage and mold development.
Further investigation is recommended when:
- Moisture returns frequently in the same location
- Paint continues to peel after repairs
- Wood softens progressively over time
- Discoloration spreads beyond the sill surface
- Musty odors develop near the window
Repeated damage should never be treated as normal wear. Moisture that reappears consistently is a sign that underlying conditions remain unresolved.
Situations That May Require Professional Evaluation
Some window moisture problems extend into structural components or wall cavities. In these cases, professional inspection helps prevent hidden damage from worsening.
Consider contacting a professional if you observe:
- Deep softness or crumbling wood
- Water entering during rainfall
- Visible mold spreading across surfaces
- Damage affecting multiple windows
- Persistent moisture despite drying attempts
Professional evaluation may include moisture testing, leak detection, exterior flashing inspection, or checking whether water has moved into surrounding wall materials. Early intervention often prevents more extensive repairs later.
Frequently Asked Questions About Inspecting Window Sills for Moisture Damage
Can a window sill become damp without a leak?
Yes. Condensation is one of the most common causes of damp window sills, especially during colder months. Warm indoor air contains moisture, and when that moisture contacts cold window glass, it forms water droplets that can drip onto the sill.
If moisture appears mainly during cold weather or early mornings, condensation is often the cause rather than an exterior leak. However, repeated dampness should still be monitored closely to prevent material damage.
Does peeling paint always mean the window sill is damaged?
Not always. Paint can peel due to age or surface wear. However, when peeling occurs alongside discoloration, softness, or recurring moisture, it usually indicates moisture exposure beneath the paint layer.
Pay attention to patterns rather than isolated paint failure. Moisture-related peeling typically appears near corners, seams, or areas where water collects repeatedly.
Should I use a moisture meter on my window sill?
A moisture meter can be helpful when visual signs are unclear or when you suspect hidden dampness beneath the surface. These tools provide measurable readings that help confirm whether moisture remains inside the material.
They are especially useful when dampness keeps returning or when you want to confirm that drying efforts worked.
When is window sill moisture damage considered serious?
Moisture damage becomes serious when the material begins to soften, crumble, or show spreading discoloration. Persistent dampness that returns repeatedly is another warning sign that requires further investigation.
Serious damage may also involve moisture spreading into surrounding trim or walls. In those cases, the sill is no longer the only affected component.
Can small mold spots on a window sill mean hidden moisture?
Yes. Mold growth usually indicates that moisture has been present long enough to support microbial growth. Even small mold spots suggest repeated moisture exposure that may not always be visible.
If mold is present, it is important to address both the moisture source and the mold itself. Cleaning alone will not prevent mold from returning if moisture conditions remain unchanged.
Conclusion: Why Early Window Sill Inspection Prevents Larger Damage
Window sill moisture damage often begins with small changes in paint, texture, staining, or firmness. Regular inspection helps you identify repeated moisture patterns before damage spreads into trim, framing, or surrounding wall materials.
If moisture keeps returning after drying, treat the sill as a warning point rather than an isolated cosmetic problem.
Key Takeaways
- Window sills collect moisture easily and often show early warning signs of water exposure.
- Peeling paint, discoloration, and softness are among the first visible signs of sill damage.
- Lower corners and seams are the most common areas where moisture problems begin.
- Recurring moisture usually indicates an ongoing source that requires investigation.
- Moisture meters can help confirm hidden dampness when visual signs are unclear.
- Early inspection prevents moisture from spreading into surrounding trim and wall materials.
- Repeated moisture should never be ignored, even if damage appears minor at first.
2 Comments
Comments are closed.