Signs Roof Flashing Is Failing
Roof flashing is one of the most important water-control details on a roof. It is the metal or formed material used around chimneys, skylights, dormers, roof-to-wall intersections, valleys, edges, and other transitions where ordinary shingles or roofing panels cannot protect the joint by themselves. When flashing starts to fail, water can slip behind the roof covering and enter the attic, wall cavity, ceiling, or structural framing.
The signs of failing roof flashing are not always dramatic. A small gap, rust spot, lifted edge, cracked sealant line, or loose piece of metal may be the first visible clue. Inside the home, the warning sign may be a ceiling stain near an exterior wall, a damp attic area near a chimney, or a recurring leak that appears after wind-driven rain. Because flashing protects the roof’s most leak-prone transition points, even minor deterioration deserves attention.
This article focuses on the warning signs that roof flashing may be failing. It does not explain every mechanical reason flashing leaks or provide a step-by-step repair tutorial. For the broader roofing moisture system, see Most Common Roofing Material Failures. For the deeper explanation of why flashing details allow water in, see Why Roof Flashing Failures Cause Leaks.
Why Failing Roof Flashing Is Easy to Miss
Failing roof flashing is easy to miss because the roof surface may look fine while a small transition detail is starting to separate, rust, crack, or pull loose. From the ground, missing shingles or storm damage may be obvious, but a narrow gap beside a chimney, sidewall, skylight, dormer, or roof edge can be much harder to see.
These small defects matter because flashing failures often begin as detail problems before they become large leaks. Once water gets behind the flashing, it can follow sheathing, rafters, insulation, or wall framing before it finally shows up indoors.
Flashing Protects the Roof’s Weakest Transitions
The main roof surface is designed to shed water down the slope. Flashing protects the places where that simple water-shedding pattern is interrupted, such as walls, chimneys, skylights, vent curbs, dormers, valleys, and roof edges.
These transition points are more vulnerable because water can collect, slow down, change direction, or be pushed sideways by wind. When flashing loosens, rusts, bends, cracks, or pulls away, water may move behind the protective layer instead of over it. That is why flashing can leak even when the surrounding shingles, panels, or tiles still look serviceable.
The First Signs Are Often Small
Early flashing failure may show up as subtle changes rather than obvious holes. A homeowner may notice a thin gap along a wall, a lifted metal edge, a rust stain below a chimney, or old caulk cracking around a roof detail. These signs may seem minor, but they can indicate that the flashing is no longer sealed, supported, or overlapping correctly.
Small symptoms matter most when they appear in high-flow areas. Flashing near chimneys, sidewalls, dormers, valleys, and roof edges handles a lot of water during storms. A small opening in one of those areas can let water enter during wind-driven rain even if the roof stays dry during lighter weather.
Early signs should be taken more seriously on older roofs because flashing, sealants, fasteners, and surrounding materials may all be aging at the same time. If you are trying to understand how age changes leak risk across the entire roof system, see How Roof Age Affects Leak Risk.
Interior Stains May Appear Away From the Flashing
One reason flashing leaks are confusing is that the indoor stain may not appear directly below the flashing defect. Water can enter near a chimney or sidewall, run along the underside of the roof deck, follow a rafter, soak insulation, or travel down a wall cavity before it reaches drywall.
A ceiling stain in a corner, near an exterior wall, or beside a chimney chase may point to flashing even if the visible stain is several feet from the actual roof opening. If the same area becomes damp after storms, dries out, and then returns after the next rain, flashing should be considered as a possible source.
Flashing Failure Can Look Like Other Roof Problems
Flashing failure can be mistaken for shingle damage, valley failure, roof penetration leaks, siding leaks, or attic condensation. The symptoms can overlap because water may enter at one location and appear somewhere else. A stain near a roof transition does not automatically prove that flashing is the source.
For example, a leak near a plumbing vent may be a pipe boot issue rather than a flashing problem. Moisture near a valley may be caused by valley deterioration or debris rather than sidewall flashing. Damp roof sheathing in cold weather may be condensation from poor attic airflow rather than rain entering through flashing.
The goal is to recognize flashing as a strong possibility when symptoms appear around roof transitions, but not to assume it is the only possible cause. If the source is not obvious, use a roof leak inspection process instead of guessing from stains alone.
Visible Exterior Signs Roof Flashing Is Failing
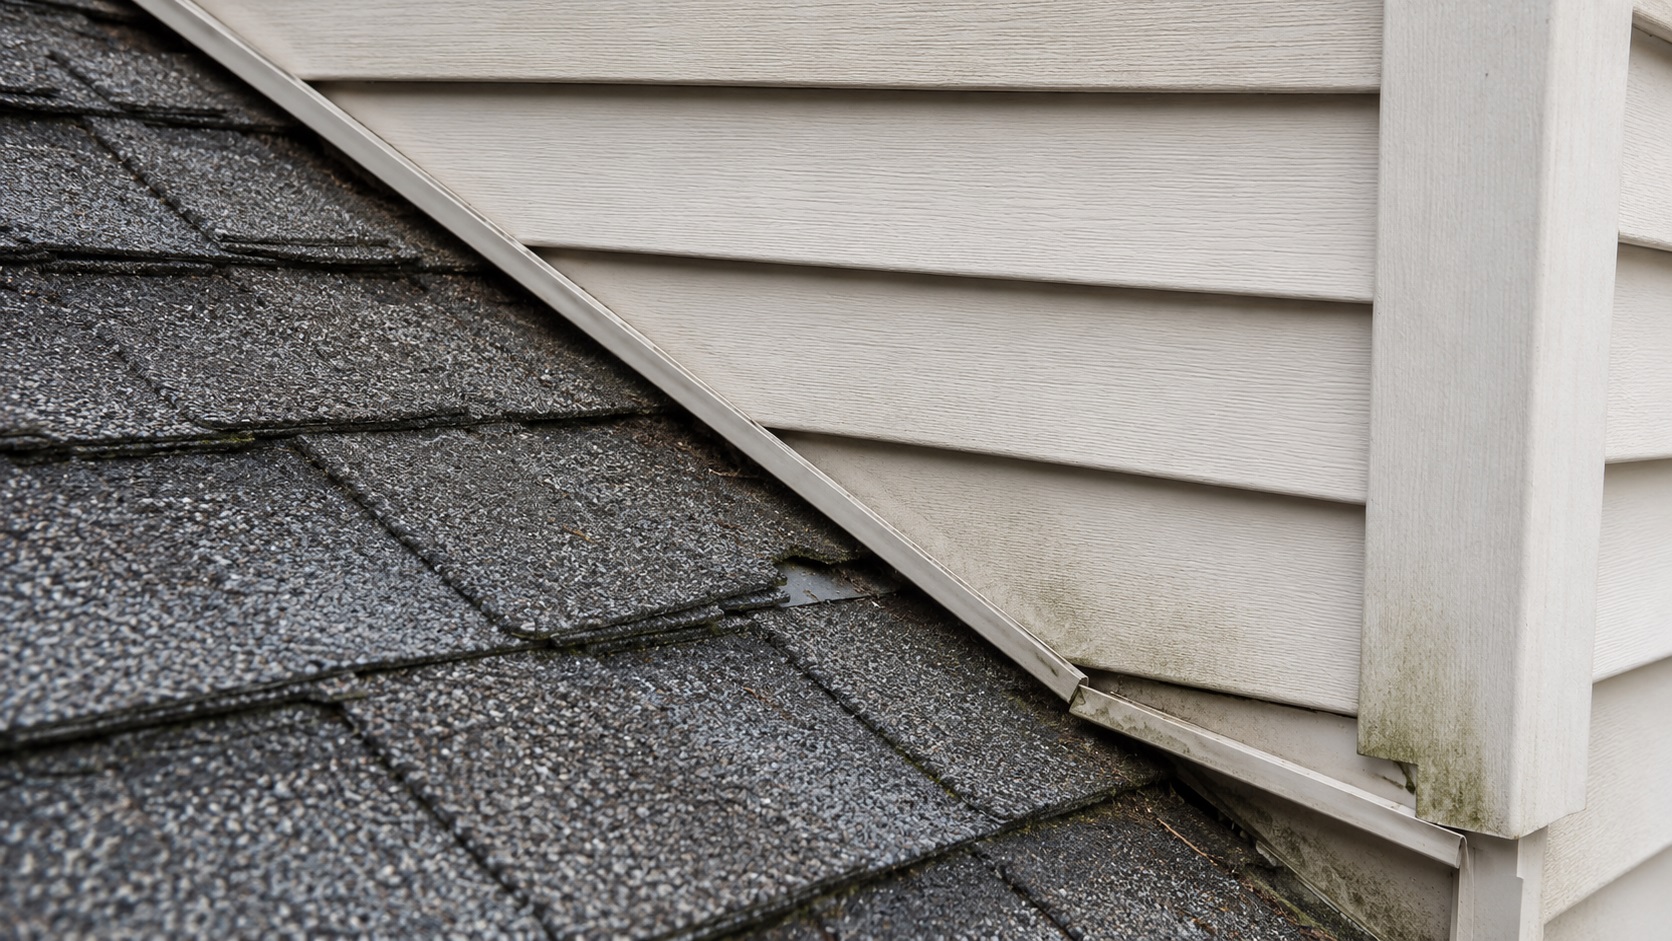
Exterior flashing problems are often visible before a major interior leak appears. The challenge is that many signs are small and easy to dismiss. Homeowners should not climb onto steep, wet, fragile, or high roofs to inspect flashing. Many clues can be seen from the ground with binoculars, from an upper window, or during a professional roof inspection.
When looking at flashing from a safe location, focus on areas where the roof meets another surface. Chimneys, sidewalls, dormers, skylights, roof edges, and valleys are common places where flashing problems first appear. The flashing should look secure, properly overlapped, and integrated with the surrounding roof materials. If it looks loose, rusted, patched, lifted, or separated, it may no longer be controlling water correctly.
A simple way to check the pattern is to compare the suspect detail with similar roof details on the same house. One chimney side, dormer wall, or roof edge that looks more patched, stained, lifted, or rusted than the others deserves closer attention.
Rust, Corrosion, or Staining on Metal Flashing
Rust or corrosion is one of the most visible signs that metal flashing is deteriorating. Rust does not always mean water is actively entering the home, but it does mean the flashing material is weakening. Flaking rust, pitting, pinholes, or rust at a bend or seam is more concerning than light surface discoloration.
Rust is more concerning when it appears near seams, fasteners, corners, or places where flashing meets masonry, siding, shingles, or roof edges. Those are the areas where water control depends on tight overlaps and secure attachment. Rust streaks below flashing can also show that water is repeatedly running over or behind a deteriorating metal edge.
Corrosion should be taken seriously when it appears with other symptoms such as ceiling stains, damp attic sheathing, lifted flashing, cracked sealant, or visible gaps. In that case, the flashing may not just be aging. It may already be allowing water into the roof assembly.
Loose, Lifted, or Separated Flashing
Flashing should not be visibly pulling away from the surface it is supposed to protect. If metal is lifted along the edge, separated from a wall, loose around a chimney, or no longer tucked under the correct roofing layers, water may be able to enter behind it.
Loose flashing is especially risky during wind-driven rain. Rain does not always fall straight down. Wind can push water sideways, upward under edges, and into small openings. A flashing gap that stays dry during light rain may leak during a heavy storm when water is driven against the roof transition.
Separation can happen at step flashing, counterflashing, apron flashing, skylight flashing, dormer flashing, or edge flashing. The location matters, but the warning sign is similar: the metal is no longer sitting tight, overlapping correctly, or directing water back onto the roof surface.
Cracked Sealant, Failed Caulk, or Old Tar Patches
Cracked sealant around flashing is a common early warning sign. Sealant can dry out, shrink, split, or pull away from metal, masonry, siding, or shingles. Once that happens, water can work into the joint the sealant was supposed to protect.
Old tar or caulk patches are also important clues. A heavy patch of roofing cement may mean someone tried to stop a previous leak without correcting the flashing detail underneath. These patches may work temporarily, but they often crack, separate, or trap water as they age.
Caulk alone is not a long-term substitute for properly installed flashing. Flashing should shed water mechanically through correct overlap, placement, and integration with the roof system. Sealant may support certain details, but if a joint depends entirely on a bead of caulk to keep water out, it is more vulnerable to failure.
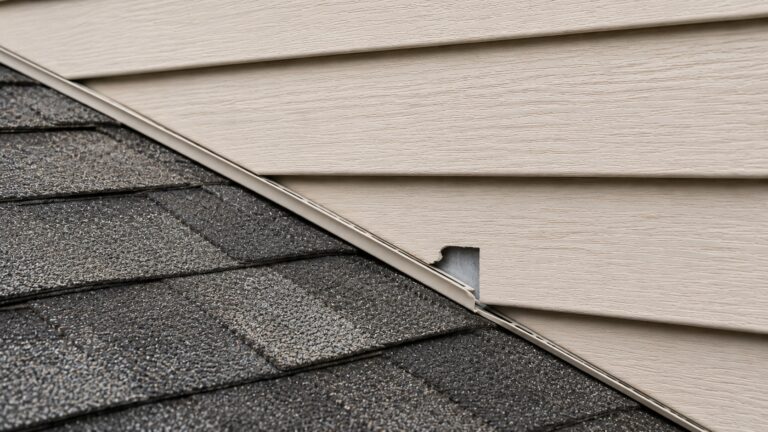
Missing, Bent, or Poorly Overlapped Flashing
Missing flashing is a serious warning sign because the roof transition may have little protection against water entry. This can happen after poor installation, storm damage, previous repairs, or roof replacement work that did not integrate the flashing correctly.
Bent flashing can also create problems. If metal is folded, dented, or pushed out of position, water may no longer flow over it correctly. Bent flashing can create pockets where water sits, openings where water enters, or edges that direct water behind siding or shingles.
Poor overlap is another common issue. Flashing pieces must be layered so water flows over the next piece, not behind it. If pieces are reversed, too short, misaligned, or not integrated with shingles and siding correctly, water can bypass the flashing even when the metal itself is not rusted.
Exposed Nail Heads or Fasteners Around Flashing
Exposed fasteners around flashing can become leak points if they are placed incorrectly, loosened, rusted, or no longer sealed. A nail or screw hole may look small, but it can allow repeated water entry when exposed to roof runoff.
This is especially concerning near chimneys, sidewalls, skylights, and roof edges where water flow is concentrated. Fasteners should not be the only thing holding a water-control detail together. If flashing looks dependent on exposed nails, patched fasteners, or failing sealant, the detail may need professional evaluation.
Stains on Siding, Masonry, or Fascia Below Flashing
Sometimes flashing failure first appears on nearby exterior surfaces instead of inside the home. Dark streaks, water stains, peeling paint, swollen trim, or rot below a roof-wall intersection can suggest that water is missing the intended drainage path.
Kickout flashing is a common example. This small flashing detail directs water from a roof-wall intersection into the gutter. If it is missing or poorly installed, water can run behind siding and cause wall damage. The roof may not show an obvious leak from inside the home right away, but the wall assembly may be getting wet.
Exterior staining below flashing should not be ignored, especially if it appears after rain or keeps returning in the same area. It may be an early sign that water is escaping the roof drainage path and entering a wall, trim, or roof-edge assembly.
Interior Signs That May Point to Flashing Failure
Interior moisture signs can be one of the first clues that roof flashing is failing, especially when exterior symptoms are hard to see from the ground. Flashing leaks often show up near roof transitions, even if the stain appears slightly away from the actual defect.
The strongest interior clue is a repeated moisture pattern near a roof feature. If a stain appears after rain near a chimney, skylight, dormer, exterior wall, roof edge, or upper corner of a room, flashing should be considered as a possible source.
Ceiling Stains Near Exterior Walls
Ceiling stains near exterior walls can point to failed roof-to-wall flashing, especially where a roof slope meets siding, masonry, stucco, or a dormer wall. These stains may appear as yellow-brown marks, dark rings, peeling paint, softened drywall, or bubbling texture.
A flashing-related ceiling stain often becomes more noticeable after wind-driven rain. Wind can push water under lifted flashing or into small gaps that may not leak during ordinary rainfall. If the stain dries between storms and returns after heavy weather, the pattern deserves closer inspection.
Ceiling stains can have other causes, including plumbing leaks, condensation, siding leaks, or window leaks. However, when the stain sits below a roof-wall intersection, flashing becomes one of the most likely suspects. For broader indoor roof leak symptoms, see Signs of Roof Leaks Inside the House.
Water Marks Near Chimneys, Skylights, or Dormers
Chimneys, skylights, and dormers are common flashing locations because they interrupt the roof surface. If drywall, trim, ceiling material, or attic framing near one of these features shows staining after rain, the flashing should be checked.
Chimney flashing problems may show up as stains on the ceiling near the chimney chase, damp attic framing beside masonry, or discoloration on nearby drywall. Skylight flashing problems may appear as stains around the skylight opening, bubbling paint, or damp trim. Dormer flashing problems may show as stains near dormer walls, upper corners, or the ceiling line below the dormer.
These symptoms do not prove flashing is the only issue. Skylights can also leak from glazing seals, curbs, or condensation. Chimneys can leak from crowns, masonry absorption, caps, or deteriorated mortar. Dormers can leak from siding or window details. But when water appears around roof transitions, flashing should be checked before assuming the stain is only an interior moisture problem.
Stains That Return in the Same Area After Rain
Recurring stains are more concerning than one-time discoloration. If the same ceiling or wall area gets damp after storms, dries out, and then returns after the next rain, the home likely has an active moisture path. Flashing failure is a strong possibility when the recurring stain is near a roof transition.
This pattern matters because small flashing openings may leak only during wind-driven rain, long rain events, ice buildup, or heavy roof runoff. You may not see dripping every time it rains, but repeated staining means water is entering often enough to affect interior materials.
Recurring stains should not be repeatedly painted over without finding the source. Paint may hide the symptom temporarily, but it does not stop water from entering the roof assembly, insulation, wall cavity, or ceiling materials.
Peeling Paint, Bubbling Drywall, or Soft Ceiling Areas
Flashing leaks can create more than stains. Moisture may cause paint to peel, drywall tape to loosen, ceiling texture to bubble, or drywall to feel soft. These signs suggest that water has reached interior finish materials and may have been present longer than it appears.
Soft drywall or bubbling paint near a chimney, skylight, dormer, or exterior wall should be treated as a warning sign. Moisture may be trapped above the ceiling surface or inside the wall cavity. Even if the area feels dry at the moment, previous wetting may have damaged the material.
If the surface is actively wet, sagging, spreading, or near electrical fixtures, the area should be inspected promptly and treated as a safety concern. Flashing leaks can remain localized at first, but repeated wetting can damage insulation, framing, sheathing, and drywall over time.
Attic Clues Around Flashing Leak Areas
The attic often gives clearer evidence than the finished interior because it exposes the underside of the roof system. If flashing is leaking, attic clues may appear near chimneys, sidewalls, valleys, skylights, dormers, or roof edges. These clues can help separate a roof-origin leak from plumbing, window, or interior humidity problems.
When checking an attic, homeowners should avoid stepping on ceiling drywall, wet insulation, unsafe framing, or areas near exposed electrical components. Use safe access only, stay on proper framing or platforms, and call a professional if the attic is difficult to enter, poorly lit, steep, moldy, or actively wet.
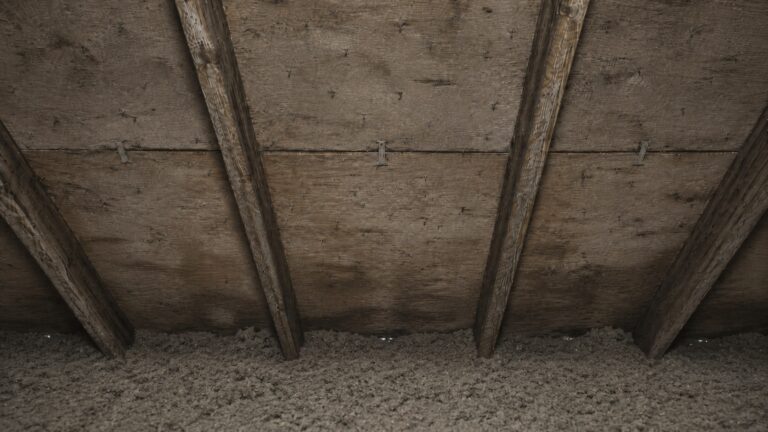
Darkened Roof Sheathing Near Transitions
Dark staining or damp-looking roof sheathing near a roof transition can suggest water entry near flashing. The sheathing may look darker than surrounding wood, show streaks, or have repeated moisture marks that follow the slope of the roof.
Flashing-related sheathing stains are often located near chimneys, sidewalls, skylight curbs, dormers, or valley edges. The stain may not be directly below the exterior flashing gap because water can spread along the underside of the roof deck before dripping.
Dark sheathing can also come from condensation, especially in poorly ventilated attics. The pattern helps. Condensation is often more widespread, while a flashing leak is usually more localized near a roof detail or transition.
Water Trails on Rafters or Framing
Water trails on rafters, trusses, or framing members can help trace moisture back toward a flashing location. These trails may appear as dark lines, mineral marks, rusty nail stains, or discoloration running down a slope.
Because water follows gravity and framing paths, the visible drip point may be lower than the actual leak source. A stain on a rafter may lead back toward a chimney, roof-wall junction, skylight, or dormer flashing detail. This is one reason attic inspection can be more useful than relying on the ceiling stain alone.
Wet Insulation Near Chimneys, Walls, or Skylights
Wet insulation near a roof transition is a serious clue. Insulation can absorb and hold water, making a small flashing leak harder to notice from the living space below. The ceiling may not stain immediately, but the insulation may stay damp and keep surrounding materials wet.
If insulation is damp near a chimney, sidewall, dormer, or skylight, the nearby flashing should be inspected. Wet insulation should not be ignored because it can lose performance and contribute to hidden moisture problems in ceilings or wall cavities.
If the leak source is not obvious, How to Detect Hidden Roof Leaks is the better next step because it focuses on tracing roof-origin moisture rather than only identifying flashing symptoms.
Rusty Nails or Fasteners Near a Flashing Area
Rusty nail tips, fasteners, or metal stains near a roof transition can suggest repeated moisture exposure. This does not always prove an active flashing leak, but it shows that the area has been damp enough for metal components to corrode.
Rust near a chimney, sidewall, skylight, or dormer should be considered with other clues. If it appears with dark sheathing, damp insulation, musty odor, or recurring ceiling stains, flashing failure becomes more likely. If rust is widespread across the attic, condensation or general ventilation problems may also be involved.
Where Flashing Failure Usually Shows Up First
Flashing can fail anywhere it is poorly installed, damaged, corroded, or exposed to heavy water flow. However, some roof areas are more vulnerable than others because they handle concentrated runoff or connect different materials together. These locations deserve extra attention when stains, damp attic areas, or visible roof damage appear nearby.
Chimneys
Chimneys are one of the most common places for flashing-related leaks because they interrupt the roof surface and require several flashing details to work together. Step flashing, counterflashing, apron flashing, cricket flashing, masonry joints, and sealant details may all be involved depending on the chimney and roof design.
Warning signs near chimneys include rusted metal, separated counterflashing, gaps between flashing and masonry, stains on nearby roof decking, damp attic framing, or ceiling marks near the chimney chase. Chimney areas can also leak from masonry absorption, cracked crowns, missing caps, or deteriorated mortar, so flashing should be inspected as part of the full chimney moisture path.
Roof-to-Wall Intersections
Roof-to-wall intersections are high-risk areas because water running down the roof has to be directed away from the wall assembly. Step flashing, counterflashing, siding integration, and kickout flashing all matter in these locations.
A common warning sign is staining, peeling paint, swollen trim, or rot below the place where a roof edge meets an exterior wall. This can happen when water runs behind siding instead of being directed into the gutter. Missing or poorly installed kickout flashing is especially risky because it can send roof runoff into the wall system.
Skylights and Dormers
Skylights and dormers create multiple roof transitions in a small area. Flashing has to protect the uphill side, side edges, lower edge, and corners. If any part of the flashing system is loose, reversed, missing, or poorly sealed, water can enter around the opening.
Symptoms may include damp trim, stains around skylight wells, ceiling marks beside dormers, peeling paint near upper corners, or attic moisture around framing. Skylights and dormers can also have window, curb, siding, or condensation issues, so the exact source should be confirmed before assuming the flashing is the only problem.
Valleys and Roof Edges
Roof valleys and edges handle concentrated water flow. Valley flashing can deteriorate, become blocked with debris, or be damaged by poor installation. Edge flashing and drip edge details can fail when they are bent, missing, corroded, or not directing water into the gutter correctly.
Because valleys have their own failure patterns, they should not be diagnosed only as general flashing problems. If the symptoms are concentrated in a valley, use Signs Roof Valleys Are Failing as the more specific guide.
Roof Penetrations and Vent Areas
Some roof penetrations use flashing, but they are not always the same problem as wall or chimney flashing failure. Plumbing vent boots, exhaust vents, roof jacks, and other penetrations can leak because of cracked rubber, loose collars, broken vent bases, or deteriorated seals.
If the moisture appears around a pipe boot, exhaust vent, or roof opening rather than a wall, chimney, skylight, or valley, the more specific issue may be a penetration leak. In that case, Signs Roof Penetrations Are Leaking is the better follow-up article.
Signs the Problem May Not Be Flashing
Flashing failure is common, but it is not the only cause of moisture near roof transitions. Before assuming flashing is the source, consider whether the pattern fits another roof or home moisture problem. This is especially important when the visible stain is far from the suspected flashing area.
The Leak Appears Around a Pipe, Vent, or Roof Opening
Moisture around plumbing vents, exhaust vents, satellite mounts, or other roof openings may come from the penetration itself rather than nearby flashing. Rubber boots can crack, vent bases can loosen, and collars can separate. These problems can look similar to flashing leaks because they also occur at interruptions in the roof surface.
The Moisture Is Widespread in the Attic
If dampness, staining, or rusty nail tips appear across large areas of the attic, the issue may be condensation or poor ventilation rather than a localized flashing leak. Flashing leaks usually create more concentrated patterns near a transition, while condensation often affects broader roof sheathing areas.
Widespread attic moisture may require a ventilation and humidity evaluation instead of only a flashing repair. Replacing flashing will not solve condensation caused by warm indoor air leaking into a cold attic.
The Stain Is Below a Window, Siding Joint, or Plumbing Line
Not every stain near an exterior wall comes from the roof. Siding leaks, window flashing problems, door leaks, plumbing lines, or wall penetrations can send water into wall cavities and create stains that look like roof leaks. If the stain does not line up with a roof transition, the investigation should include other exterior and interior moisture sources.
The Roof Surface Is Worn in a Wider Area
Sometimes flashing is blamed when the larger roof surface is failing. Missing shingles, cracked tiles, deteriorated underlayment, damaged metal panels, or widespread roof aging can allow water in near a flashing area even if the flashing itself is not the only defect.
If the roof is older and several details are deteriorating at once, flashing may be part of the problem but not the whole problem. In that case, the flashing symptoms should be considered alongside the overall roof condition.
When Flashing Failure Needs Professional Inspection
Flashing problems should be inspected promptly when there are signs of active water entry, repeated staining, visible separation, corrosion, or hidden moisture. Flashing is difficult to evaluate fully from the ground because the most important overlaps and edges may be hidden beneath shingles, siding, masonry, or ridge details.
Professional inspection is especially important when you see any of these patterns:
- Repeated ceiling stains after rain
- Water marks near chimneys, skylights, dormers, or exterior walls
- Loose, lifted, or separated flashing
- Rust holes or advanced corrosion
- Missing kickout flashing at roof-wall intersections
- Failed tar patches or cracked sealant around roof transitions
- Wet attic insulation near flashing areas
- Darkened roof sheathing near chimneys, skylights, sidewalls, or valleys
- Storm damage near flashing details
- Leaks that return after previous roof repairs
A roofer can determine whether the flashing can be repaired locally or whether sections need to be replaced and integrated correctly with shingles, siding, masonry, or roof edges. If the moisture problem is active, recurring, or difficult to trace, When to Hire a Roofing Contractor for Moisture Problems can help clarify when professional help is the safer option.
Flashing problems also matter because they can affect more than the roof surface. Water that enters behind flashing may reach attic insulation, sheathing, ceiling drywall, wall cavities, trim, or framing. If the leak has already spread beyond the roof detail, it should be treated as part of a broader moisture-control issue, not just a cosmetic roof defect.
Frequently Asked Questions
What does failing roof flashing look like?
Failing roof flashing may look rusted, lifted, bent, loose, separated, cracked, patched, or poorly overlapped. You may also see gaps near chimneys, skylights, walls, dormers, or roof edges. Cracked sealant, exposed fasteners, and water stains below flashing are also warning signs.
Can bad flashing cause ceiling stains?
Yes. Bad flashing can let water enter near chimneys, skylights, dormers, roof-wall intersections, valleys, and exterior walls. The ceiling stain may not appear directly below the flashing because water can travel along sheathing, rafters, insulation, or wall cavities before reaching drywall.
Is rusted flashing always leaking?
No. Rusted flashing is not always actively leaking, but it means the metal is deteriorating. Rust becomes more concerning when it appears with gaps, lifted edges, holes, cracked sealant, nearby stains, damp attic sheathing, or recurring moisture after rain.
Why does flashing leak only during wind-driven rain?
Small flashing gaps may stay dry during light rain but leak when wind pushes water sideways under lifted edges, behind siding, or into roof-wall transitions. This pattern is common around chimneys, dormers, skylights, and sidewalls where water flow changes direction.
Can flashing be repaired, or does it need replacement?
Minor localized issues may be repairable, such as a small loose edge or limited sealant failure. Flashing is more likely to need replacement when it is missing, badly corroded, separated, poorly overlapped, storm-damaged, or repeatedly leaking after previous repairs. Do not rely on caulk or tar alone if the flashing is loose, reversed, or no longer layered correctly.
Should I inspect roof flashing myself?
You can look for visible flashing problems from the ground, attic, or a safe upper window. Do not walk on steep, wet, fragile, high, or storm-damaged roofs. If flashing is hard to access or an active leak is present, a professional roof inspection is safer.
What to Do if Roof Flashing Looks Like It Is Failing
If roof flashing looks rusted, lifted, separated, cracked, patched, or poorly overlapped, do not judge the problem by the roof surface alone. Match the exterior clue with any interior stains, attic moisture, wet insulation, or recurring dampness after rain.
If the signs point to flashing, the next step is to confirm the water path before painting over stains or adding more sealant. Flashing symptoms can overlap with penetration leaks, valley problems, condensation, siding leaks, window leaks, plumbing leaks, and general roof wear.
If flashing failure has already caused hidden dampness, ceiling stains, or repeated leaks, think beyond the visible roof detail. Water that bypasses flashing can affect insulation, drywall, framing, and wall cavities. For broader follow-up after moisture has entered the home, see How to Find, Fix, and Prevent Moisture Problems in Homes.
3 Comments
Comments are closed.