Most Common Roof Installation Mistakes
Roof installation mistakes can cause problems long before a roof reaches the end of its expected lifespan. Some mistakes create visible warning signs right away, such as uneven shingle lines, exposed nails, or poor roof edges. Others stay hidden until the first heavy rain, a strong wind event, or months of moisture exposure reveal the weakness.
The most common roof installation mistakes are not always isolated surface defects. A roof is a layered water-shedding system. Decking, underlayment, drip edge, flashing, shingles, fasteners, valleys, and ventilation all have to work together. When one layer is skipped, misaligned, poorly fastened, or poorly integrated, the roof may become more vulnerable to leaks, wind damage, trapped moisture, and premature failure.
This article explains the most common roof installation mistakes, why they matter, and how they can lead to roof leaks or structural moisture problems. If you are already seeing visible symptoms and want to compare them against workmanship clues, start with the guide to signs a roof was installed incorrectly. This article focuses on the underlying mistakes that often cause those signs.
The Roof Installation Mistakes Most Likely to Cause Leaks
The highest-risk roof installation mistakes are usually the ones that affect water control at transitions and edges. Bad flashing, missing drip edge, poor valley work, weak underlayment, incorrect fasteners, and roofing installed over damaged decking are more serious than small cosmetic shingle alignment issues. If a newer roof leaks, loses shingles early, or shows attic moisture after storms, these hidden installation details should be checked before assuming the roofing material itself failed.
Why Roof Installation Mistakes Cause More Than Cosmetic Problems
A roof can look acceptable from the ground and still have installation defects below the surface. Straight shingles are important, but they are only one part of the system. A roof also needs sound decking, correctly lapped underlayment, properly integrated flashing, secure fasteners, clean valleys, working roof edges, and balanced ventilation.
Most roofing materials are designed to shed water downward, not hold standing water indefinitely. When installation mistakes interrupt that path, water can move sideways, back up under shingles, follow fasteners, enter around penetrations, or soak into wood components. This is why some of the most serious mistakes are not cosmetic. They affect how water and air move through the roof assembly.
Poor roof installation can lead to:
- Leaks after ordinary rain
- Wind-lifted shingles
- Moisture trapped under roofing materials
- Wet roof decking or attic insulation
- Fascia and soffit deterioration
- Mold risk in attic or ceiling cavities
- Premature shingle failure
- Shortened roof lifespan
- Warranty disputes or rejected workmanship claims
This is also why roof installation mistakes fit into the broader issue of common roofing material failures. A material may appear to fail early, but the real cause may be improper fastening, poor ventilation, bad flashing, weak decking, or poor water control at the edges.
Installing New Roofing Over Bad Decking
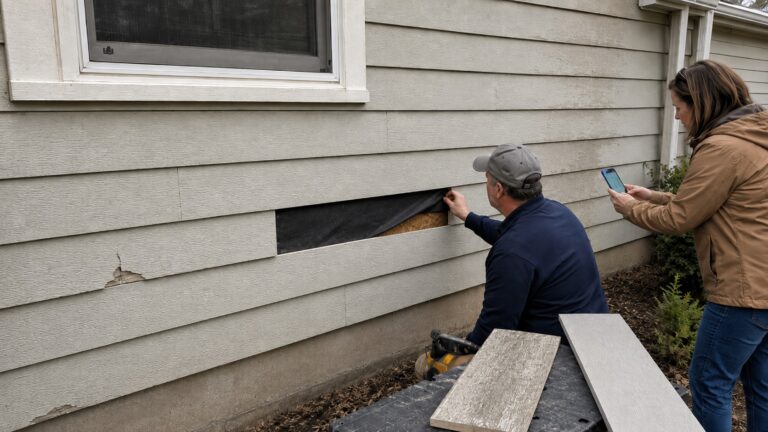
One of the most serious roof installation mistakes is installing new roofing over damaged, soft, rotten, or uneven decking. The roof deck is the structural surface that supports the shingles and fasteners. If that surface is weak, the new roof may look finished but still lack a reliable foundation.
Bad decking can come from old leaks, trapped attic moisture, long-term condensation, storm damage, poor ventilation, or previous roof failures. If a contractor covers damaged sheathing instead of replacing it, the new roof may inherit the old problem. Shingles can appear wavy, fasteners may not hold properly, and moisture-damaged wood may continue deteriorating below the new materials.
This mistake matters because the roof deck affects both water resistance and wind resistance. Nails need sound wood to hold the roofing materials in place. If the decking is soft or delaminated, shingles may lift, shift, or blow off more easily. Water that enters later may also spread faster through wood that was already weakened.
Common decking-related installation mistakes include:
- Failing to inspect the roof deck after tear-off
- Covering over soft or rotten sheathing
- Installing shingles over uneven roof surfaces
- Ignoring water-stained decking in the attic
- Using fasteners that do not hold securely in the existing deck
- Failing to correct sagging or damaged sections before installing new materials
A homeowner may not see bad decking directly once the roof is installed. Instead, the clues may appear as waves, soft-looking sections, nail pops, repeated leaks, or shingles that do not sit flat. If the roof surface looks uneven and there are signs of deeper movement or moisture damage, it may be necessary to evaluate whether the problem is only surface-level or whether you need to tell if roof damage is structural.
Decking mistakes can make other installation details fail. Even correctly installed shingles may perform poorly if the surface beneath them is unstable.
Poor Underlayment or Ice and Water Barrier Installation
Underlayment is the backup layer beneath the visible roofing material. Shingles are the first line of defense against rain, but underlayment helps protect the roof deck if wind-driven rain, ice backup, or minor surface failure allows water past the shingles. When this layer is installed poorly, the roof loses an important part of its moisture protection.
Common underlayment mistakes include poor overlap, wrinkles, gaps, tears, loose sections, incorrect sequencing, or missing protection in high-risk areas. Eaves, valleys, roof-wall intersections, and low-slope transitions are especially important because they are more likely to handle heavy water flow or water backup.
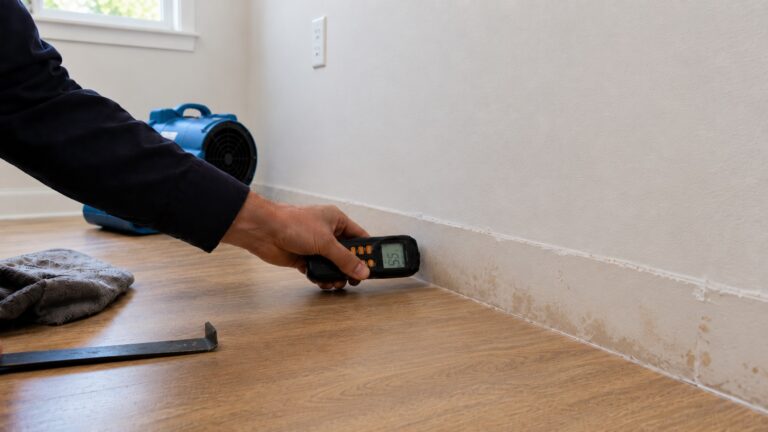
An underlayment mistake may not be visible after the roof is finished. The homeowner may only notice the result later: damp decking, attic staining, ceiling marks, or leaks that appear when rain is heavy or wind-driven. That is why underlayment quality is usually evaluated through installation photos, attic inspection, or professional roof inspection rather than ground-level appearance.
Ice and water barrier placement is another common quality-control issue. In colder climates, eaves and valleys may need extra protection where ice dams or water backup are possible. In warmer climates, peel-and-stick membranes may still be used in valleys, around penetrations, or other vulnerable areas depending on the roof design and local practice. The important principle is that vulnerable areas need a continuous backup layer that sheds water in the same direction as the rest of the roof system.
If underlayment is installed in a way that traps water instead of shedding it, even good shingles may not prevent moisture entry. Water that reaches the backup layer should continue moving downward and outward. It should not be directed into seams, behind edge metal, or toward roof penetrations.
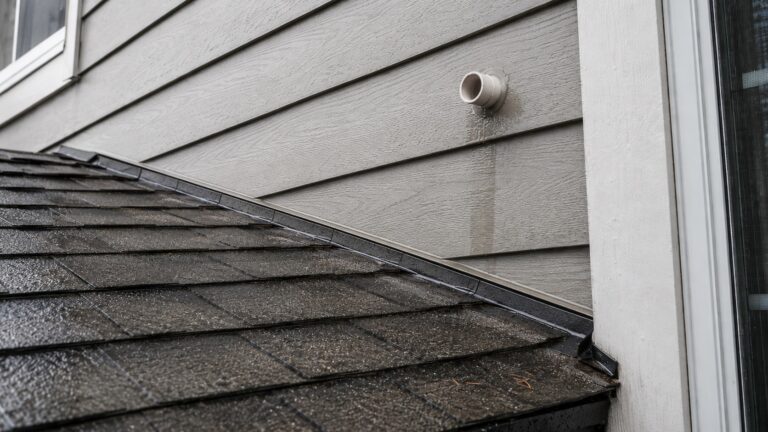
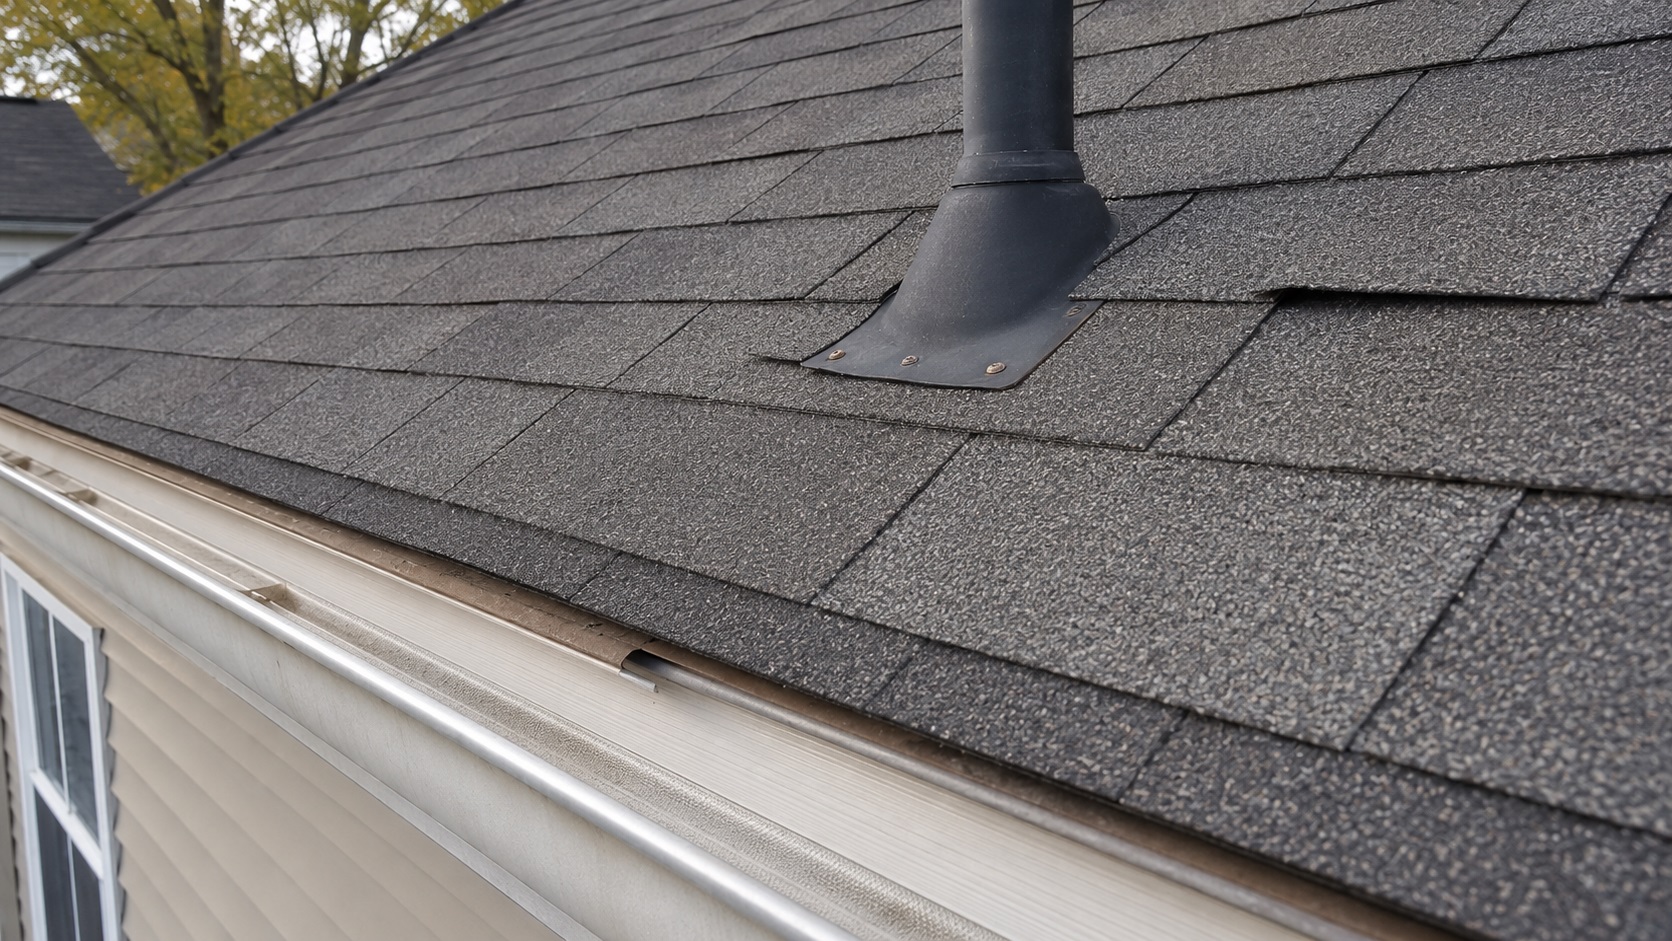
Missing or Incorrect Drip Edge Details
Drip edge is the metal flashing installed along roof edges to help direct water away from the roof deck, fascia, and rake edges. It may look like a small detail, but it plays a major role in protecting the edge of the roof system. Missing, poorly placed, or inconsistent drip edge can allow water to curl back toward wood components instead of falling cleanly into the gutter or away from the edge.
This mistake often shows up around eaves and rakes. If shingles are cut too short, water may not reach the gutter correctly. If shingles overhang too far, they may bend, crack, or become vulnerable to wind lift. If drip edge is missing or installed in the wrong sequence with the underlayment, water can reach the roof deck edge or fascia.
Warning signs of drip edge or roof-edge mistakes include:
- Water running behind gutters during rain
- Stains on fascia boards shortly after roof installation
- Soft or peeling wood near roof edges
- Uneven shingle overhangs along eaves or rakes
- Gaps between edge metal, shingles, and gutters
- Drips appearing behind the gutter instead of inside it
Edge mistakes can cause more than roof damage. Water that misses the gutter can splash against siding, collect near exterior walls, or contribute to recurring moisture near the foundation. That is why roof-edge detailing is part of whole-home moisture control, not just roofing appearance. A roof replacement should help prevent moisture problems throughout the home, not redirect water into new vulnerable areas.
Incorrect Flashing Around Roof Transitions
Flashing mistakes are among the most common roof installation errors that cause leaks. Flashing protects places where the roof surface changes direction or meets another material. Chimneys, dormers, skylights, plumbing vents, sidewalls, headwalls, valleys, and roof penetrations all require careful water control because they interrupt the normal shingle pattern.
A roof can have perfectly new shingles and still leak if the flashing was reused, poorly integrated, loosely fastened, or replaced with sealant shortcuts. Flashing should guide water onto the roof surface and away from openings. It should not depend mainly on caulk, roofing cement, or exposed fasteners in water paths.
Common flashing installation mistakes include:
- Reusing damaged or poorly fitted old flashing
- Failing to install step flashing properly along walls
- Poor chimney flashing or counterflashing details
- Poorly integrated vent, skylight, or roof-opening flashing
- Using excessive sealant instead of proper metal flashing
- Leaving gaps where the roof meets vertical surfaces
- Installing flashing in a way that directs water behind shingles or siding
Flashing errors often reveal themselves as leaks near roof transitions. A ceiling stain below a chimney, damp insulation near a plumbing vent, or water marks near a skylight may point to flashing rather than the main roof surface. If you want the deeper cause-focused explanation, review why roof flashing failures cause leaks.
Sealant-heavy repairs are another warning sign. Sealant has a place in some roofing details, but it should not be the main defense against water at major transitions. Over time, exposed sealant can dry, crack, shrink, or separate. When that happens, the leak returns because the underlying flashing detail was never correct.
Flashing mistakes can send water into hidden areas before the homeowner sees obvious dripping. Moisture may travel along rafters, insulation, roof decking, or wall framing before it stains a ceiling.
Poor Roof Penetration Sealing
Roof penetrations are common leak points because every vent pipe, exhaust vent, skylight, satellite mount, or roof opening interrupts the normal water-shedding surface. A new roof can still leak if the shingles look clean but the penetration details are weak.
Common roof penetration installation mistakes include loose vent boots, cracked pipe collars, exposed fasteners, poorly sealed vent flanges, reused rubber components, and openings that depend too heavily on surface sealant. These details often fail faster than the surrounding shingles because they move, age, and collect water differently than the main roof surface.
If leaks appear near bathroom vents, plumbing stacks, attic vents, or skylights, the issue may be a penetration detail rather than a broad roof failure. For symptom-based clues, compare the problem with signs roof penetrations are leaking.
Poor Shingle Layout, Exposure, or Starter Strip Placement
Shingle installation mistakes are some of the easiest roofing errors for homeowners to notice, but the underlying issue is not always obvious. A shingle roof depends on consistent layout, proper exposure, correct overlap, and a secure starter course. If those details are wrong, the roof may look uneven, shed water poorly, or become more vulnerable to wind uplift.
The starter strip is especially important because it protects the first course of shingles along the eaves and rakes. If the starter course is missing, misaligned, reversed, or poorly positioned, wind and water can attack the roof edge more easily. This can lead to lifted lower courses, edge leaks, and premature shingle failure.
Common shingle layout mistakes include:
- Shingle courses that are not straight
- Incorrect exposure between rows
- Joints that line up too closely
- Poor offset patterns
- Missing or poorly placed starter strips
- Shingles cut poorly at edges, valleys, or penetrations
- Ridge caps installed unevenly or poorly secured
These mistakes matter because shingles are designed to overlap in a way that keeps water moving down the roof. If joints, laps, or courses are placed incorrectly, water may reach areas that should have remained protected. Wind can also catch poorly aligned edges and gradually loosen the roof surface.
Some shingle mistakes are cosmetic. Others affect roof performance. A slightly uneven visual line may not be an emergency, but repeated misalignment, lifting, sliding, or early leaks should be taken seriously. For a more focused symptom-based explanation, use the guide to improper roof shingle installation signs.
The distinction matters: this article explains the installation errors that cause performance problems, while the symptom guide helps you decide whether the finished roof is showing those errors from the outside.
Wrong Fastener Placement or Nail Depth
Fasteners hold the roof system in place, but they only work correctly when they are placed and driven properly. One of the most common roof installation mistakes is poor nail placement. Nails that are too high, too low, angled, overdriven, underdriven, or placed into weak decking can reduce shingle holding strength and create leak risks.
High nailing can leave shingles less secure because the fastener may miss the correct reinforced area. Low nailing can leave fasteners exposed or interfere with the intended overlap. Overdriven nails can cut into the shingle and weaken the attachment point. Underdriven nails can hold shingles up, creating raised spots where wind and water can enter.
Fastener mistakes may show up as:
- Exposed nail heads
- Nail pops or raised bumps under shingles
- Shingles that lift in moderate wind
- Shingles sliding out of position
- Rust marks near fasteners
- Repeated blow-offs on a newer roof
This type of mistake can be hard for homeowners to confirm without a roof inspection, but the performance clues are important. If shingles lift or blow off shortly after installation, the issue may not be the shingle itself. It may be poor fastening, weak decking, poor sealing, or a combination of installation problems.
Fastening mistakes can also create warranty concerns. Roofing products are usually tested and rated based on correct installation. If the roof was fastened outside the required pattern, the material may not perform as expected. That is why fastener quality is one of the first things many inspectors look for when evaluating a premature roof failure.
Valley Installation Errors
Roof valleys are high-risk areas because they collect water from two roof planes. During heavy rain, a valley carries more water than most other parts of the roof. Small installation mistakes in this area can create repeated leaks, especially when water is directed under shingles or toward fasteners.
Valley installation depends on the roof design and material system, but the principle is always the same: water must have a clear, protected channel to drain off the roof. If the underlayment, shingles, metal valley, cut lines, or fastener placement are wrong, water may find a path into the roof assembly.
Common valley mistakes include:
- Poorly lapped underlayment in the valley
- Shingles cut too close to the water channel
- Fasteners placed where heavy water flow can reach them
- Valley metal installed unevenly or poorly secured
- Overreliance on sealant instead of layered water control
- Debris left in valleys after installation
- Poor transitions where valleys meet gutters or lower roof sections
Valley leaks can be difficult to trace because water may enter at one point and travel before it becomes visible indoors. A ceiling stain may appear several feet away from the actual roof entry point. If water stains show up after storms, or if attic materials are damp below a valley, the roof should be evaluated before assuming the stain is from a plumbing or condensation problem.
Because valleys manage so much water, they should never look patched together or heavily smeared with roofing cement as the main defense. A clean valley installation should control water through layout and layering, not just surface sealant.
Ignoring Roof Ventilation During Replacement
Roof ventilation is not separate from roof installation. When a roof is replaced, the contractor may remove, cover, add, or modify vents. If the ventilation system is not considered as part of the installation, the roof may shed rain correctly but still develop attic moisture problems.
Ventilation mistakes can include blocked intake vents, insufficient exhaust, mixing incompatible exhaust systems, installing ridge vents without enough soffit intake, or failing to correct bathroom and kitchen exhaust ducts that discharge into the attic. These problems can trap warm, moist air under the roof deck.
When attic ventilation is poor, moisture may condense on roof sheathing, rafters, nails, or insulation. Homeowners may mistake these symptoms for a roof leak because the attic appears wet, even when rainwater is not the direct cause.
Ventilation-related installation mistakes are especially important in homes with previous attic moisture problems. If a roof replacement does not address blocked intake, poor exhaust balance, or existing damp sheathing, the new roof may continue to experience moisture stress from below.
This is one reason roof installation quality affects more than the exterior surface. A roof can fail from rain above, trapped moisture below, or both. If moisture has already appeared inside the attic or ceiling system, it is useful to compare the symptoms with water damage from roof leaks so the source is not misidentified.
Poor Final Inspection and Cleanup
Some roof installation mistakes happen because the main work was rushed and the final inspection was weak. Small missed details can create leaks, wind problems, gutter issues, or safety hazards later.
A good final inspection should check the roof surface, flashing, vents, valleys, ridges, edges, gutters, and ground-level cleanup. It should also catch exposed nails, damaged shingles, loose materials, poor cuts, debris in water channels, and areas where sealant or flashing details need correction.
Common final inspection mistakes include:
- Leaving exposed nails in water-shedding areas
- Missing damaged shingles caused during installation
- Failing to check pipe boots, vents, and flashing transitions
- Leaving shingle scraps or debris in valleys or gutters
- Not checking whether gutters still drain properly
- Failing to inspect the attic after roof work
- Leaving loose ridge caps or poorly finished edge details
- Not providing installation photos or warranty documentation
Cleanup mistakes can also create real problems. Debris in valleys or gutters can slow drainage and hold moisture against roofing materials. Loose nails around the property create safety concerns. Scraps left on the roof may slide into gutters or block downspouts during rain.
A final inspection should not be treated as a formality. It is the last chance to catch workmanship issues before they become leaks. If a roof develops problems shortly after installation, photos from the final inspection can help show whether the issue was present from the beginning or developed later.
How Homeowners Can Reduce the Risk of Roof Installation Mistakes
Homeowners do not need to understand every technical roofing detail to reduce the risk of poor installation. The goal is to ask the right questions before the work begins and request documentation while the roof is being installed. A good contractor should be able to explain how the roof system will be handled, not just quote a shingle price.
Before hiring a roofer, ask how they will inspect the roof deck after tear-off. This matters because damaged sheathing is often hidden until the old roof is removed. The contract should explain how decking replacement will be priced and documented if damaged areas are found.
Ask about underlayment, ice and water protection, drip edge, flashing, valleys, ventilation, and cleanup. These are not small details. They are the parts of the roof system that help prevent leaks, protect edges, manage transitions, and reduce moisture problems. If a contractor cannot explain them clearly, that may be a warning sign.
Useful questions include:
- Will damaged roof decking be replaced before new shingles are installed?
- Will old flashing be replaced or reused?
- What underlayment will be installed, and where will extra water protection be used?
- How will valleys, chimneys, skylights, and roof-wall intersections be handled?
- Will drip edge be installed at eaves and rakes?
- Will attic ventilation be checked during the roof replacement?
- Will you provide photos of hidden layers before the roof is covered?
- What workmanship warranty is included?
Photos are especially useful. Once shingles are installed, homeowners cannot see decking repairs, underlayment overlap, ice barrier placement, or flashing layers. Installation photos help confirm that the hidden parts of the roof were not skipped.
Ask for photos at three points if possible: after tear-off, after underlayment and flashing are installed, and after the final cleanup. Those photos are often more useful than distant finished-roof photos because they show the layers that disappear once the roof is complete.
After installation, look for early warning signs. These may include leaks after the first storm, shingles lifting, debris in gutters, crooked courses, exposed nails, water behind gutters, or attic moisture. If you notice these problems, document them before repairs begin. If the issue involves active leaks or interior staining, use a careful process to inspect roof areas for leak damage instead of assuming the visible stain is the whole problem.
When Roof Installation Mistakes Need Professional Evaluation
Not every questionable detail means the roof is failing. A small cosmetic issue may not affect performance. But some installation mistakes should be inspected quickly because they can allow water into the home or weaken the roof system.
Professional evaluation is important when a newer roof leaks, loses shingles early, shows repeated fastener problems, has visible flashing gaps, or allows moisture into the attic. These are not normal signs of a properly performing roof. They may indicate a localized defect, or they may point to broader workmanship problems.
Avoid walking on a wet, steep, icy, or visibly damaged roof to confirm the problem yourself. Many installation problems can be documented safely from the ground, from a window, or from the attic until a qualified roofer can inspect the roof surface.
Call for evaluation if you notice:
- Ceiling stains after roof replacement
- Water dripping during rain
- Wet attic insulation or stained roof decking
- Multiple lifted or missing shingles on a newer roof
- Leaks near chimneys, skylights, vents, valleys, or walls
- Water running behind gutters
- Soft, sagging, or visibly distorted roof areas
- Repeated repairs that do not stop the leak
If the roof is still under warranty, start by reviewing the contract and contacting the original installer with clear documentation. Provide photos, dates, weather conditions, and a calm description of the problem. If the response is unclear, the roof is actively leaking, or the issue appears widespread, an independent inspection may be appropriate.
When moisture has entered the home, the inspection should include more than the exterior roofing materials. Roof leaks can affect attic insulation, roof decking, rafters, drywall, trim, and wall cavities. If the leak has been active for a while, evaluate whether the issue is still a roof surface problem or whether it has started to affect the structure below.
For contractor selection, do not focus only on the lowest repair price. A repair contractor should be able to identify the moisture path, explain whether the issue is flashing, fastening, decking, ventilation, or drainage related, and correct the underlying problem. If you are hiring someone new, review how to choose a roofing contractor for leak repairs before approving corrective work.
FAQ
What is the most serious roof installation mistake?
The most serious mistakes usually involve flashing, roof decking, underlayment, or fastening because they affect water entry and structural performance. A cosmetic shingle issue may look bad, but hidden flashing or decking mistakes can cause leaks and moisture damage before the homeowner sees obvious symptoms.
Can roof installation mistakes cause leaks years later?
Yes. Some mistakes cause leaks immediately, but others take time to appear. Poor flashing, weak sealant reliance, bad fastening, trapped moisture, and ventilation mistakes may not become obvious until storms, heat, aging sealants, or repeated wetting expose the weakness.
Should old flashing be reused during roof replacement?
Old flashing should not be reused automatically. Some metal components may still be usable in specific situations, but damaged, corroded, poorly fitted, or incompatible flashing can create leak risks. Many roof leaks after replacement happen near transitions where flashing was reused or poorly integrated.
Is it a mistake to install shingles over old shingles?
It can be a mistake if the old roof hides damaged decking, trapped moisture, uneven surfaces, leaks, or poor ventilation problems. Some reroofing situations may be allowed, but a full tear-off gives the contractor a better chance to inspect and repair the roof deck before installing new materials. If you are comparing overlay limits, review how many layers of shingles are too many.
How can I tell if a roofer skipped important installation steps?
Review your contract, installation photos, warranty paperwork, and visible roof details. Warning signs include early leaks, exposed nails, poor edge details, uneven shingle lines, debris left in gutters, or moisture in the attic. If the same problem appears in several areas, get a professional second opinion because the issue may be broader than one missed detail.
Key Takeaways About Roof Installation Mistakes
- The most serious roof installation mistakes usually affect water control, wind resistance, or hidden structural support.
- Bad decking, poor underlayment, weak flashing, missing drip edge, incorrect fasteners, and poor valley work are bigger risks than minor cosmetic shingle unevenness.
- Chimneys, skylights, vents, pipe penetrations, valleys, roof edges, and roof-wall intersections deserve extra attention because they interrupt the normal shingle pattern.
- Poor attic ventilation during roof replacement can create moisture problems even when rainwater is not leaking through the shingles.
- Before hiring a roofer, ask how they handle decking inspection, underlayment, drip edge, flashing replacement, valleys, ventilation, cleanup, photos, and workmanship warranty.
- After installation, document early leaks, lifted shingles, exposed nails, water behind gutters, attic moisture, or repeated repairs before approving corrective work.