How to Find, Fix, and Prevent Moisture Problems in Homes
Home moisture issues usually begin before the damage is obvious. A small leak, damp basement wall, humid room, roof flashing gap, plumbing drip, or poorly dried material can create conditions that spread quietly through walls, floors, ceilings, cabinets, insulation, and structural wood. By the time you see stains, smell musty air, notice soft drywall, or find mold, the visible symptom may only be one part of a larger moisture system.
The most important thing to understand is that moisture problems are rarely solved by treating the surface symptom alone. Cleaning mold does not fix the source of moisture. Painting over a stain does not dry a wall cavity. Running a dehumidifier does not stop an active leak. Replacing damaged drywall does not prevent the same problem from returning if the source, drying, and prevention steps are incomplete.
In real homes, the mistake is usually not that the repair was useless. It is that the repair started one step too late in the process, after moisture had already spread into materials or one step too early, before the source was fully understood.
This guide is the main DryHomeGuide starting point for understanding how home moisture problems begin, how to detect them, how to fix them in the right order, and how to prevent them from coming back. It connects the major moisture-related systems in a home, including hidden leaks, mold, indoor air quality, basement water intrusion, humidity, dehumidifier use, water damage prevention, and structural moisture damage.
If you already know which issue you are dealing with, you can move directly into the most relevant guide. If you are still trying to understand what kind of moisture problem you have, start here and use the sections below to narrow the problem before choosing the next step.
If your main concern is moisture that keeps returning, hidden dampness, or warning signs that do not clearly point to one source, start with how to detect repeated moisture problems after this overview.
Start Here: Choose the Right Moisture Guide
Use the guide below to choose the best next step based on what you are seeing in your home. This page explains the full moisture system, but each linked guide goes deeper into one major part of the problem.
| If your main issue is… | Start with this guide |
|---|---|
| Visible mold, recurring mold, or mold after water damage | How to Remove Mold Permanently |
| Moisture, dampness, stains, or odors that keep coming back | How to Detect Repeated Moisture Problems |
| Musty air, mold exposure concerns, or indoor air problems | Mold Exposure and Indoor Air Quality |
| Basement leaks, damp foundation walls, or seepage after rain | Why Hydrostatic Pressure Causes Basement Leaks |
| Condensation, damp air, or uncertain humidity levels | How to Test Indoor Humidity Levels |
| Choosing, placing, sizing, or using a dehumidifier | How to Choose and Use a Dehumidifier Effectively |
| Preventing the same moisture damage from returning | How to Prevent Recurring Moisture Damage |
| Soft wood, framing concerns, roof/siding leaks, or structural damage | Structural Moisture Problems in Homes |
What This Moisture Guide Covers
This guide explains the full moisture problem system at a homeowner level. It helps you understand where moisture starts, how it moves through a home, how to recognize warning signs, how to choose the right repair sequence, and how to prevent the problem from returning.
It does not replace detailed guides for mold removal, basement waterproofing, humidity testing, dehumidifier selection, structural repair, or specific leak detection. Instead, it helps you understand the whole problem first so you can move into the right detailed guide with a clearer diagnosis.
Moisture Problems Are Usually a System, Not a Single Symptom
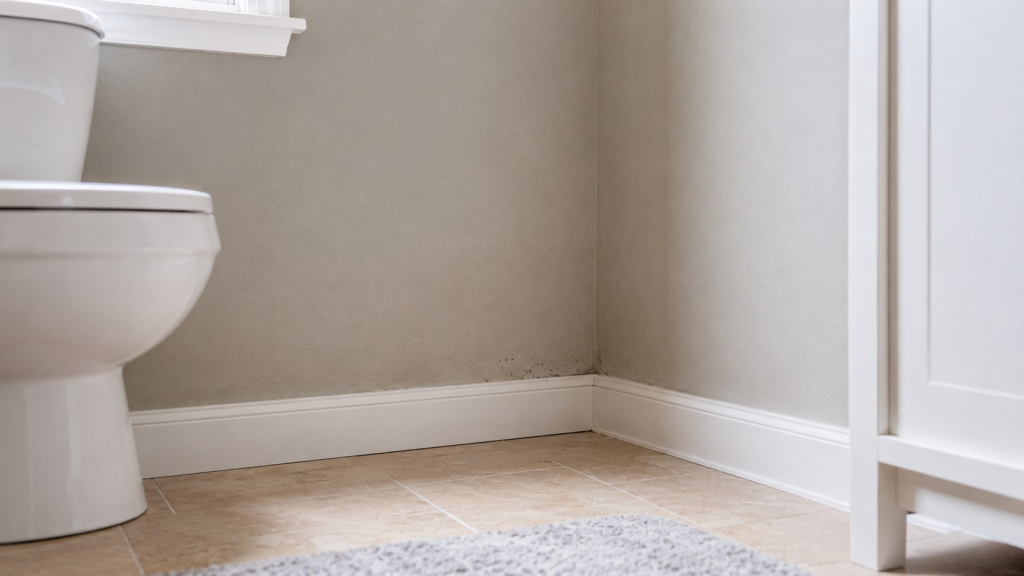
A moisture problem often looks simple from the outside. You may see a brown ceiling stain, peeling paint, damp basement corner, mold spot, warped floor edge, swollen baseboard, or condensation on windows. But the visible symptom is only the point where moisture has finally become noticeable.
The actual source may be somewhere else. A ceiling stain may come from roof flashing, attic condensation, plumbing above the ceiling, or water traveling along framing before it appears below. Damp drywall near a window may come from failed exterior sealing, condensation, poor drainage, or a hidden leak inside the wall. Mold behind trim may be caused by repeated humidity, a slow plumbing leak, exterior water entry, or moisture trapped after a previous cleanup.
That is why moisture problems should be approached as a sequence instead of a single repair. A good moisture diagnosis asks:
- Where is the water or humidity coming from?
- How is it moving through the home?
- Which materials absorbed moisture?
- Is the affected area drying naturally, staying damp, or getting wet again?
- Is there mold, odor, staining, soft material, or structural weakening?
- What needs to be fixed first so the damage does not return?
This system-based approach helps prevent the most common mistake homeowners make: fixing what they can see while missing the cause they cannot see.
The Basic Moisture Sequence
Most home moisture problems follow a pattern. The exact source can vary, but the sequence usually looks like this:
- Source: Water or humidity enters the home through a leak, condensation problem, drainage issue, foundation seepage, ventilation problem, or indoor humidity source.
- Spread: Moisture moves into porous materials such as drywall, wood, insulation, trim, flooring, cabinets, or basement surfaces.
- Hidden retention: Materials may stay damp behind finished surfaces even after the visible area looks dry.
- Visible symptoms: Stains, odors, swelling, peeling paint, condensation, mold, or soft materials begin to appear.
- Damage or growth: If moisture remains long enough, it can support mold, weaken materials, or contribute to recurring damage.
- Repair and prevention: The source must be corrected, materials dried or replaced, and the area monitored so the problem does not return.
This is why a moisture problem should not be handled as a cosmetic issue first. The correct order is source control, drying, damage assessment, repair, prevention, and monitoring.
Where Moisture Problems Usually Start in a Home
Moisture can begin in many parts of a home, and different sources require different solutions. Some problems are caused by liquid water entering from outside. Others come from plumbing, indoor humidity, condensation, poor drainage, or incomplete drying after previous water damage. The first step is to identify the category of moisture you are dealing with.
Roof and Exterior Water Entry
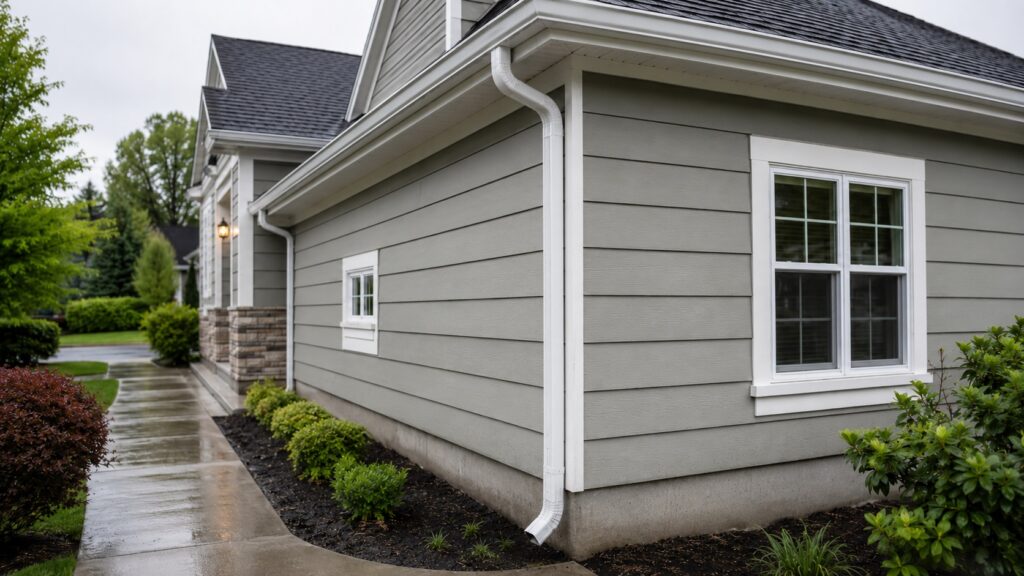
Roof leaks, failed flashing, damaged shingles, chimney gaps, siding failures, and exterior wall penetrations can allow water to enter the home from above or from the side. These problems may show up as ceiling stains, attic dampness, wall discoloration, musty odors, or moisture around windows and exterior-facing walls.
Exterior water entry is often confusing because water does not always appear directly below the opening. It can follow framing, sheathing, insulation, trim, or wall cavities before it becomes visible inside. If the symptoms appear after rain, near exterior walls, around chimneys, close to windows, or under rooflines, the source may be part of the exterior building envelope.
For a deeper structural explanation of these pathways, use how water enters homes through structural gaps.
Plumbing and Appliance Leaks
Plumbing leaks can be obvious, but many are slow and hidden. A small drip under a sink, behind a dishwasher, near a toilet, behind a washing machine, inside a wall, or around a supply line can wet surrounding materials for days or weeks before the damage becomes obvious.
Slow plumbing leaks often create localized symptoms. You may notice cabinet swelling, soft flooring, loose tile, musty odors, staining, recurring mold, or moisture at the base of a wall. Because plumbing water can stay hidden behind cabinets, walls, floors, and appliances, the visible damage may underestimate the actual affected area.
When plumbing leaks affect framing, floors, walls, or other structural materials, the issue connects to the broader structural damage system explained in how plumbing leaks cause structural damage.
Basement Seepage and Foundation Moisture
Basements are one of the most common areas for moisture problems because they sit below or partly below ground level. Water can enter through foundation cracks, basement wall seepage, floor-wall joints, poor exterior drainage, clogged gutters, saturated soil, or pressure against the foundation.
Basement moisture may appear as damp walls, musty odors, efflorescence, wet corners, floor dampness, peeling coatings, mold growth, or recurring moisture after heavy rain. Some basement problems are caused by water entering through a specific crack or opening. Others are caused by pressure from wet soil around the foundation.
If basement leaks are connected to water pressure around the foundation, read why hydrostatic pressure causes basement leaks. If the problem is more about full basement control systems, drainage, sump pumps, and waterproofing strategy, use how to waterproof basements and control water intrusion.
Windows, Doors, Siding, and Wall Openings
Windows and doors create openings in the exterior wall system, which makes them common moisture entry points. Water can get in through failed seals, poor flashing, deteriorated caulk, damaged trim, siding gaps, or improper drainage around the opening. These problems may appear as stains near frames, swollen trim, peeling paint, damp drywall, mold around corners, or soft materials beneath the opening.
Window and door moisture can also be confused with condensation. A cold window surface in a humid room may collect moisture even when there is no exterior leak. But if water appears after rain, stains are spreading into the wall, or trim is swelling, the issue may involve water intrusion rather than indoor humidity alone.
For window and door moisture pathways, use how windows and doors cause hidden moisture problems.
Indoor Humidity and Condensation
Not every moisture problem starts as a leak. High indoor humidity can cause condensation on cool surfaces, dampen enclosed areas, encourage mold growth, and make materials slow to dry. Bathrooms, kitchens, laundry areas, basements, closets, crawl spaces, and poorly ventilated rooms are especially vulnerable.
Condensation happens when warm, moist air contacts a cooler surface. That surface may be a window, exterior wall, ceiling area, pipe, concrete wall, or hidden cavity. If the surface stays damp repeatedly, mold and material damage can develop even without an obvious leak.
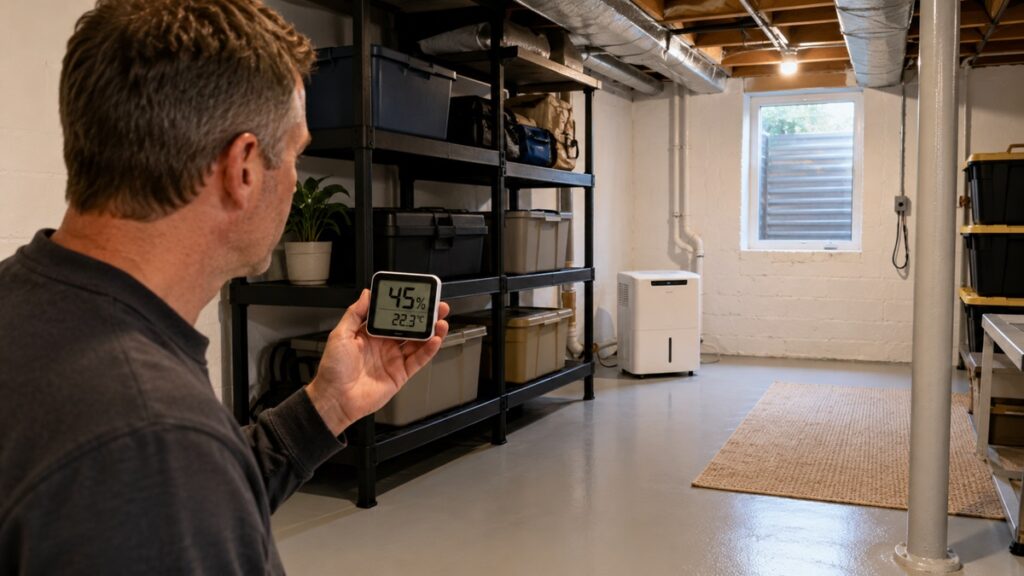
Because humidity is invisible until it creates symptoms, measuring it matters. The EPA recommends keeping indoor humidity between 30 and 50 percent because high humidity can increase the likelihood of mold. If you suspect damp indoor air, start with how to test indoor humidity levels.
Is It a Leak, Humidity, or Seepage?
Many moisture problems look similar at first, but the pattern usually gives clues. A leak often creates a localized stain, drip, soft spot, or wet area near a plumbing fixture, roofline, window, door, appliance, or ceiling path. A humidity problem usually appears as condensation, damp air, musty rooms, or moisture on cool surfaces during humid conditions. Basement seepage often appears after rain, near foundation walls, along floor-wall joints, or in areas affected by soil moisture and drainage.
The fix depends on which pattern is present. Leaks need source repair. Humidity problems need measurement, ventilation, drying, and sometimes dehumidification. Seepage often requires drainage, grading, foundation, or basement water-control evaluation. Treating all three the same way can lead to recurring moisture because the visible symptom may disappear while the real source remains active.
Incomplete Drying After Previous Water Damage
Some moisture problems begin after the original water event is already over. A leak may be repaired, a spill may be cleaned, or a flooded area may look dry on the surface, while moisture remains inside drywall, insulation, subflooring, cabinets, baseboards, or framing.
This is one reason moisture problems return after repairs. The source may have been fixed, but the materials were never fully dried. Or the visible surface may have dried while hidden layers stayed damp. When that happens, stains, odors, mold, swelling, or soft materials can appear later.
If moisture keeps returning after cleanup, repair, or drying, use why moisture problems keep returning to understand the recurrence pattern.
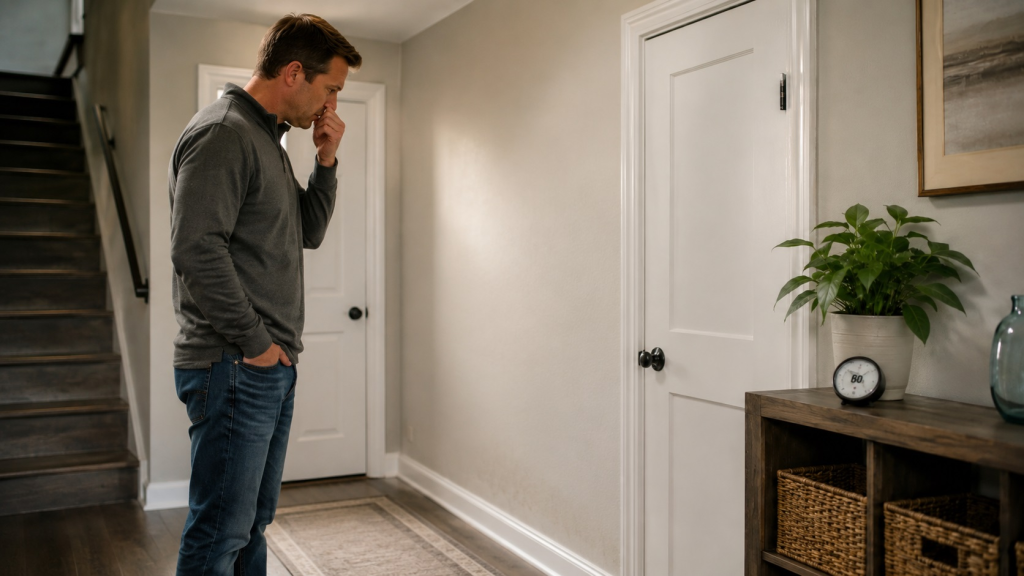
Early Warning Signs of Moisture Problems
Moisture problems are easiest to control when they are found early. The challenge is that early moisture signs are often subtle. They may look like normal aging, minor stains, seasonal humidity, or small cosmetic defects. But when several clues appear together, or when the same problem keeps returning, moisture should be investigated.
How Serious Is the Moisture Problem?
A moisture problem is usually more urgent when the source is active, the affected area is spreading, materials feel soft, mold is visible, the same area keeps getting wet, or the problem involves structural materials, electrical areas, plumbing systems, ceilings, or basement water after rain.
A small, dry stain from an old repaired leak may only need monitoring. A spreading stain, recurring musty odor, damp drywall, soft flooring, repeated basement moisture, or mold that comes back after cleaning needs closer investigation. The more often the material gets wet, and the longer it stays damp, the more important it becomes to identify the source before covering or repairing the surface.
Visual Signs
Common visible signs include stains, discoloration, peeling paint, bubbling drywall tape, darkened baseboards, warped flooring, swollen trim, rusted fasteners, damp basement walls, or condensation that appears repeatedly. A single small mark may not always mean a major problem, but spreading stains or recurring discoloration should not be ignored.
Odor and Air Clues
A musty smell is often one of the first signs of hidden moisture. It may be strongest in basements, closets, bathrooms, under sinks, around windows, near carpets, or in rooms that stay closed for long periods. Odor does not prove there is mold, but it does suggest that moisture, poor drying, or organic material may be involved.
Material Changes
Moisture changes materials. Drywall may soften, wood may swell, trim may separate, flooring may cup, cabinets may bubble, and paint may peel. These symptoms often matter more than the size of the visible stain because they show that the material has absorbed or retained moisture.
Recurring Symptoms After Cleaning or Repair
If mold, stains, dampness, odors, or condensation return after cleaning or repair, the underlying moisture problem may still be active. Recurrence often means the source was not fully corrected, the affected material was not fully dried, humidity remains too high, or the area is still being exposed to moisture.
For repeated dampness, slow hidden leaks, and early warning patterns across home systems, read signs of slow hidden water leaks.
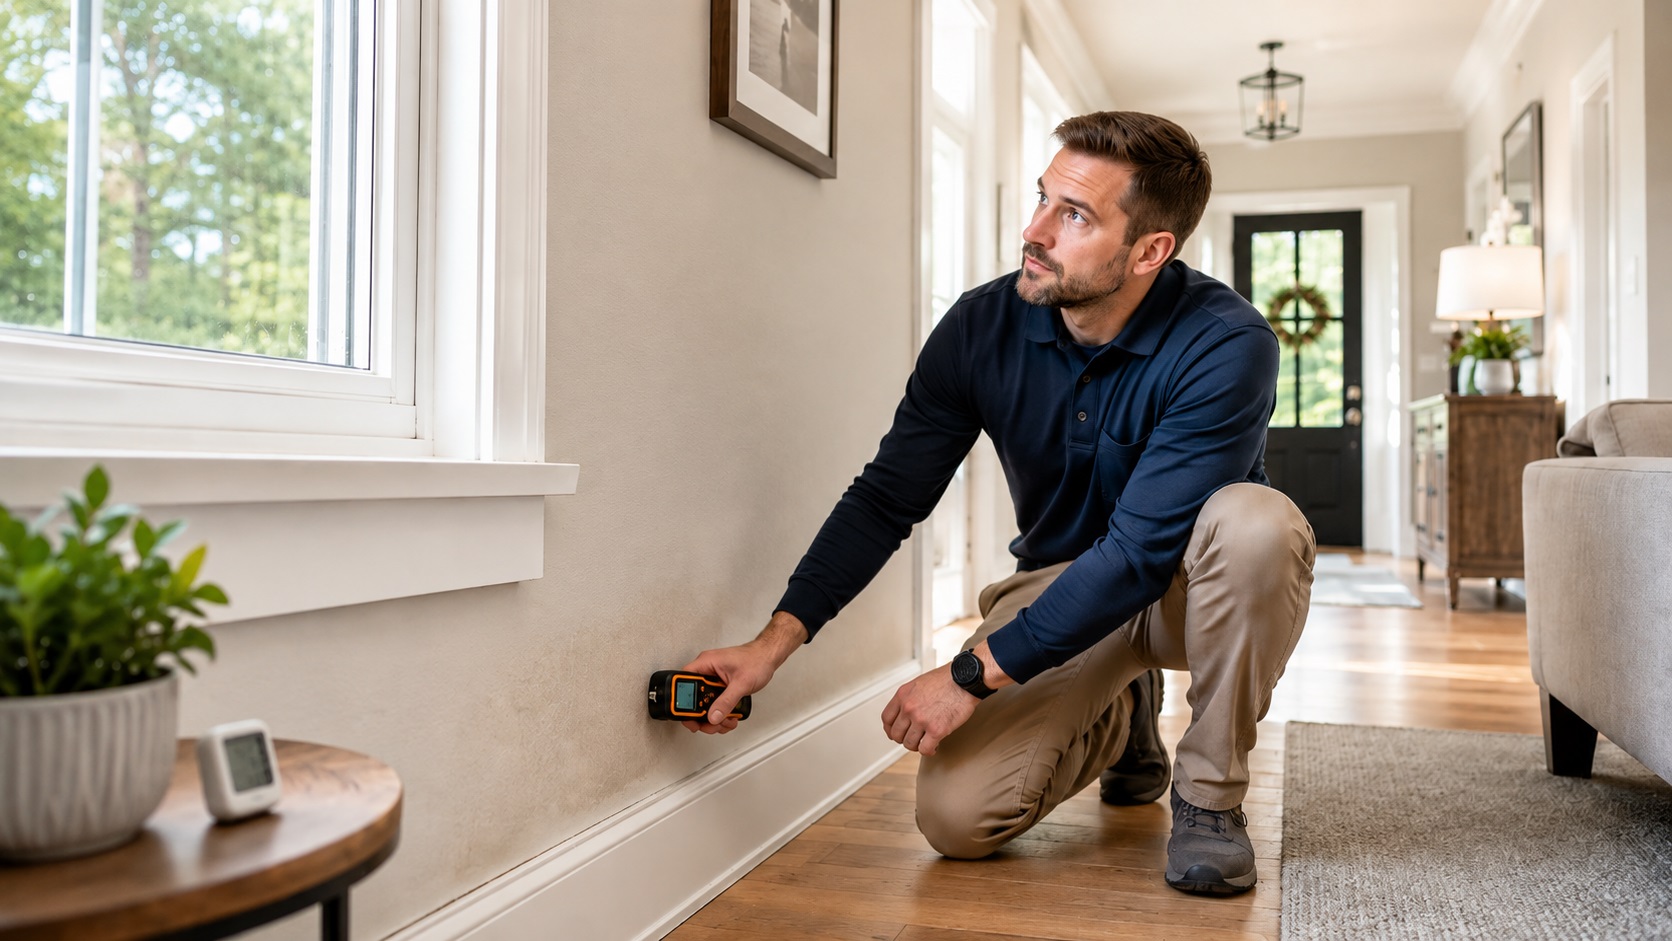
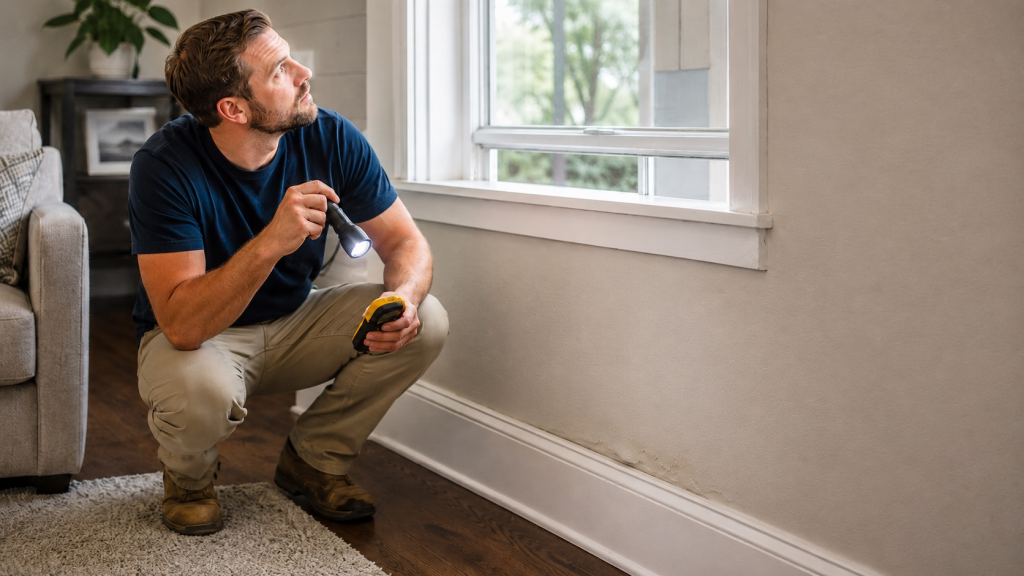
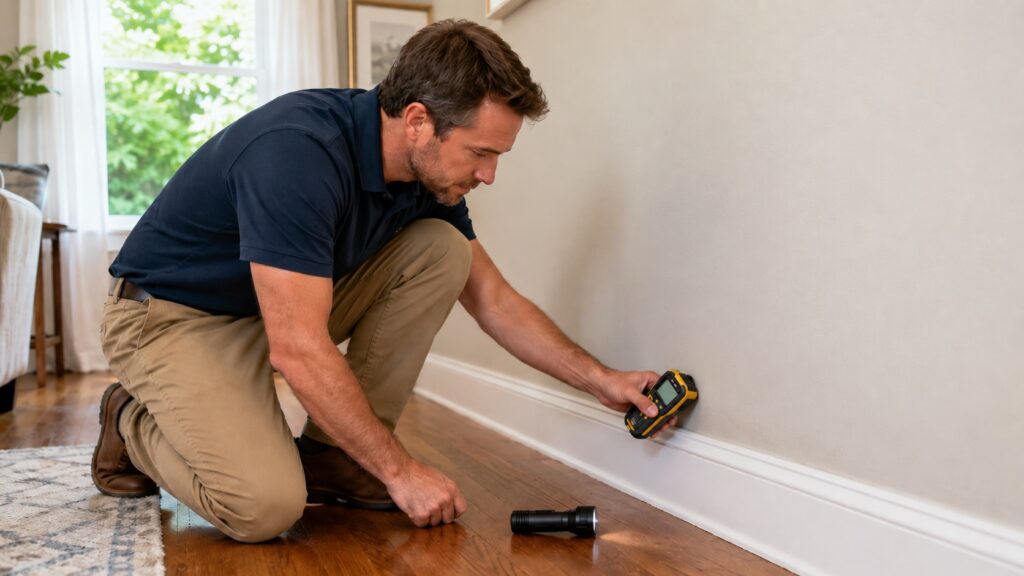
How to Find Hidden Moisture Before It Spreads
Finding hidden moisture is not only about looking for the wettest spot. It is about tracing the problem back to the most likely source, then checking the materials and spaces where moisture could have traveled. A stain, odor, or soft area may be the first clue, but it may not be the source.
Start by asking when the symptom appears. Moisture after rain points toward the roof, siding, windows, doors, foundation, drainage, or basement walls. Moisture near sinks, toilets, tubs, showers, dishwashers, washing machines, refrigerators, or water heaters points toward plumbing or appliance leaks. Moisture that appears during humid weather, in closed rooms, on windows, or on cool surfaces may point toward humidity and condensation.
Start With the Most Likely Source
The source category usually gives the first direction for inspection. For example, a ceiling stain below a bathroom should make you check fixtures, supply lines, drain lines, toilet seals, shower walls, and flooring above the stain. A damp basement wall after heavy rain should make you look at exterior grading, gutters, downspouts, foundation cracks, soil saturation, and hydrostatic pressure. Condensation on windows should make you check indoor humidity before assuming the window is leaking.
This matters because moisture repairs fail when the visible damage is treated before the source is identified. Drywall can be patched, paint can be replaced, and mold can be cleaned, but the problem will return if moisture is still entering or condensing in the same area.
Check Nearby Materials and Connected Areas
Moisture often spreads beyond the first visible sign. Water can move behind baseboards, under flooring, through insulation, along framing, into cabinets, behind wall trim, or across ceiling materials. A small stain may represent a larger hidden wet area if the material behind it has absorbed water.
Look for connected clues around the affected area:
- soft drywall near the stain
- swollen baseboards or trim
- musty odor nearby
- loose flooring or cupping boards
- paint bubbling beyond the visible stain
- cabinet floor swelling under sinks
- mold at corners, seams, or hidden edges
- condensation on nearby cool surfaces
- repeated dampness after rain or high humidity
For location-based guidance, use how to find hidden moisture in different areas of your home. That guide is the better next step when the problem is tied to a specific room, surface, or building area.
Use Humidity and Moisture Clues Carefully
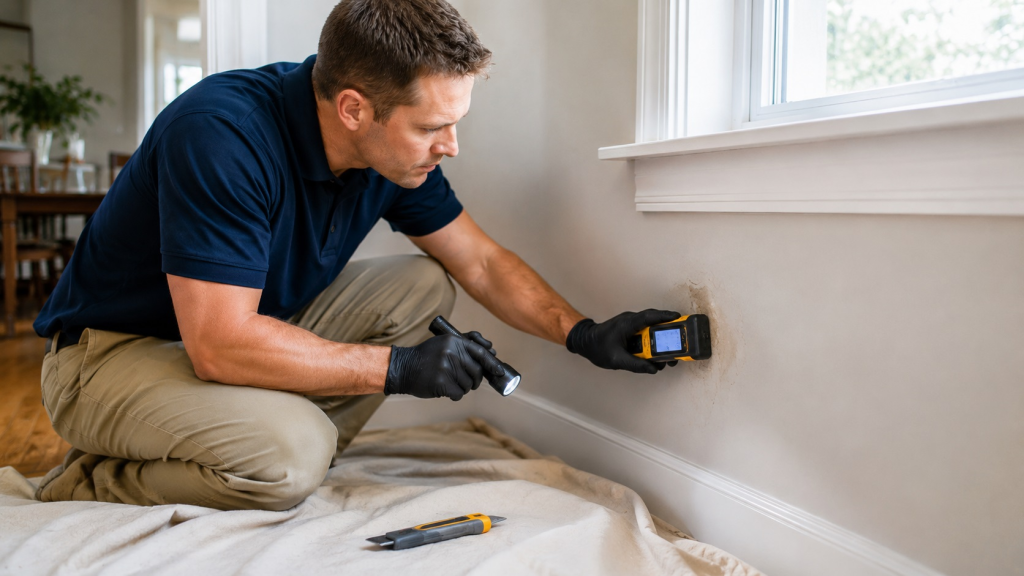
Humidity readings, moisture meters, stains, odors, and material changes can all help identify a problem, but no single clue explains everything by itself. A high humidity reading may explain condensation, but it does not rule out a leak. A dry surface may not prove that the inside of the wall is dry. A musty smell may suggest hidden dampness, but it does not identify the exact source.
Moisture meters can help compare affected and unaffected areas, but readings depend on material type, tool type, depth, and surface conditions. A meter reading should be treated as a clue, not the entire diagnosis. When readings stay high, symptoms spread, or moisture keeps returning, the source needs closer investigation.
Know When Hidden Moisture Needs Professional Inspection
Some moisture problems are reasonable to inspect visually, especially when the source is obvious and the affected area is small. Others need professional evaluation because the moisture may be inside a wall, ceiling, floor system, attic, basement assembly, or structural component.
Consider professional help when:
- moisture keeps returning after repair
- mold appears in multiple areas
- there is a strong musty odor with no visible source
- drywall, flooring, subflooring, or framing feels soft
- the affected area involves electrical, plumbing, or structural systems
- basement water appears repeatedly after rain
- roof, siding, window, or foundation leaks are suspected
- you cannot identify where the moisture is coming from
The goal is not to overreact to every stain. The goal is to avoid covering, painting, or repairing materials before the source and hidden moisture path are understood.
How Moisture Leads to Mold Problems
Mold problems usually begin as moisture problems. Mold needs the right conditions to grow, and moisture is the condition homeowners can most often control. The EPA explains that the key to mold control is moisture control, which is why mold cleanup without moisture control often leads to recurrence.
A small patch of mold may look like a surface issue, but the deeper question is why that surface stayed damp long enough for growth to appear. The cause might be a leak, condensation, poor airflow, damp insulation, basement seepage, high humidity, wet drywall, or repeated water exposure. Until that cause is corrected, mold can return even after cleaning.
Why Mold Usually Means Moisture Was Present First
Mold often appears on or near materials that have stayed damp, such as drywall, wood, paper-faced materials, flooring, trim, insulation, ceiling surfaces, bathroom walls, basement surfaces, and window areas. The visible growth may be small, but it points to a moisture condition that should be understood.
Common moisture conditions that can support mold include:
- slow leaks inside walls or cabinets
- repeated condensation on windows or exterior walls
- bathroom humidity that does not clear quickly
- damp basement surfaces
- wet insulation or drywall after water damage
- poor airflow in closets, storage areas, or corners
- recurring water intrusion around windows, doors, roofs, or siding
The mold itself may need cleaning or professional remediation depending on severity, material type, and spread. But the long-term solution always depends on controlling the moisture source.
Why Cleaning Mold Without Controlling Moisture Fails
Cleaning visible mold may remove what you can see, but it does not change the conditions that allowed it to grow. If humidity stays high, a leak continues, a wall cavity remains damp, or an area is repeatedly exposed to water, mold can return on the same surface or nearby materials.
This is especially common in bathrooms, basements, window areas, closets, under flooring, behind baseboards, and inside wall cavities. These areas often combine moisture with poor airflow, hidden materials, or repeated wetting.
If mold has already appeared and you need the mold-specific pathway, use how to remove mold permanently. This main moisture guide explains why mold develops, but the mold hub is where mold cleanup, surface-specific guidance, and mold recurrence should be handled in more detail.
When to Move From Moisture Control Into Mold-Specific Guidance
Move into mold-specific guidance when mold is visible, suspected behind materials, returning after cleaning, creating persistent odor, or affecting porous materials. Moisture control still matters, but mold adds another layer of decision-making because the affected material, growth extent, location, and cleanup method all matter.
In general, the broader sequence is:
- find the moisture source
- stop the active wetting
- determine whether materials are still damp
- identify whether mold is present or likely
- clean, remove, or replace affected materials as appropriate
- correct the condition that allowed mold to grow
- monitor the area for recurrence
This sequence keeps mold cleanup connected to the moisture system that caused it.
How Moisture Affects Indoor Air Quality
Moisture problems can affect how a home smells, feels, and functions. Damp materials, hidden mold, high humidity, poor ventilation, and repeated water exposure can contribute to musty air and uncomfortable indoor conditions. Even when visible damage is limited, the air may give clues that moisture is present somewhere in the home.
Indoor air quality concerns are especially common when moisture is hidden. A wall cavity, basement corner, crawl space, attic area, cabinet base, or damp flooring layer may not be visible, but odor can move into living areas. This is why musty air should be treated as a moisture clue, not only an air freshening problem.
Damp Materials, Odors, and Airborne Concerns
Musty odors often develop where moisture remains trapped in porous materials or low-airflow spaces. Drywall, wood, insulation, carpet padding, cabinets, cardboard storage, and basement materials can hold moisture long enough to create odor even if the surface looks normal.
High humidity can also make a home feel stuffy or damp. It can slow drying, encourage condensation, and make small moisture problems harder to resolve. Rooms with poor airflow, frequent water use, or cool surfaces may show symptoms before the rest of the house does.
Why Air Quality Problems Often Trace Back to Hidden Moisture
Air quality problems related to dampness often require source thinking. If a room smells musty, the solution may not be an air purifier first. The better first question is: what material or space is staying damp?
Possible sources include:
- a slow plumbing leak behind a wall or cabinet
- damp basement surfaces
- mold behind trim or drywall
- wet carpet padding or subflooring
- condensation inside exterior wall areas
- attic or roof moisture
- crawl space moisture entering the living area
- stored materials absorbing humidity
Air treatment may help in some situations, but it does not replace moisture source control. If the odor, dampness, or suspected mold exposure is the main concern, use mold exposure and indoor air quality for the air-quality pathway.
How Moisture Damages Building Materials and Structures
Moisture damage depends on the material, the amount of water, the length of exposure, and whether the area gets wet repeatedly. Some materials can dry after minor exposure. Others may swell, delaminate, weaken, grow mold, or need replacement if they stay wet too long.
The key is to separate cosmetic symptoms from material damage. A stain may be only surface discoloration, or it may be the visible clue above wet insulation, softened drywall, damaged subflooring, or wood deterioration. The longer moisture remains, the more important material evaluation becomes.
Drywall, Insulation, Flooring, and Trim
Drywall can stain, soften, bubble, crumble, or support mold when it stays wet. Insulation can hold moisture inside cavities and slow drying. Flooring may cup, swell, loosen, or trap moisture underneath. Trim and baseboards often reveal lower-wall moisture because they swell, separate, darken, or hide dampness behind them.
These materials are important because they often cover the hidden parts of the problem. A dry-looking painted wall may still have damp insulation behind it. A floor surface may look acceptable while the subfloor below stays wet. A baseboard may hide moisture at the floor-wall joint.
Subfloors, Framing, Joists, and Structural Wood
Structural wood does not usually fail from one brief contact with moisture, but repeated or prolonged wetting can create serious concerns. Subfloors, joists, beams, wall framing, roof framing, and other structural members can weaken if they stay damp, rot, or are repeatedly exposed to leaks.
Warning signs may include soft flooring, sagging, persistent dampness, visible rot, darkened wood, musty odor, repeated mold, or movement around affected materials. These signs do not automatically prove structural failure, but they do mean the moisture history and material condition should be evaluated carefully.
Roofing, Siding, Windows, Doors, and Exterior Systems
Moisture damage is not limited to interior surfaces. Roof aging, flashing failure, siding gaps, exterior wall leaks, window seal failures, door frame leaks, and poor drainage can all allow water into materials that are supposed to protect the home. These exterior systems often fail gradually, which means the first interior symptom may appear long after the outside vulnerability began.
Exterior moisture problems are also likely to recur if the outside pathway is not corrected. Interior repair alone cannot stop rainwater entering through failed flashing, damaged siding, a leaking window opening, or a roof defect.
When Structural Moisture Requires Repair Evaluation
Structural evaluation becomes more important when moisture affects load-bearing materials, roof framing, floor systems, foundation-adjacent areas, exterior walls, or repeated leak locations. It is also important when materials remain soft, sagging, rotten, unstable, or damp after the source appears to be fixed.
For deeper guidance on structural consequences, use structural moisture problems in homes. This main guide explains the relationship between moisture and building materials, but the structural hub should handle repair risk, system-specific damage, and when professional evaluation is needed.
How to Fix Moisture Problems in the Right Order
The right repair depends on the source, material, severity, and location of the moisture problem. But the order matters almost every time. If the repair sequence is wrong, the home may look better temporarily while the underlying moisture condition continues.
The safest way to think about moisture repair is not “What can I cover, clean, or replace?” but “What has to happen first so this does not come back?”
Step 1: Find and Stop the Source
The source must be corrected before cosmetic repair begins. If water is still entering, leaking, condensing, or accumulating, the same damage can return after new paint, new drywall, new flooring, mold cleaning, or surface repairs.
Depending on the source, stopping moisture may involve fixing a plumbing leak, repairing roof flashing, improving exterior drainage, correcting a window or door leak, addressing basement seepage, reducing humidity, improving ventilation, or stopping condensation. The solution should match the source. A dehumidifier can help with damp air, but it cannot repair a roof leak. Mold cleaner can remove visible growth, but it cannot stop basement seepage. Paint can hide a stain, but it cannot dry a wall cavity.
Step 2: Dry Affected Materials
After the source is stopped, affected materials need to dry or be removed. Drying is not only about the visible surface. Drywall, subfloors, cabinets, insulation, carpet padding, framing, trim, and basement materials can hold moisture behind or beneath what you can see.
In minor cases, ventilation, dehumidification, air movement, and time may be enough. In more serious cases, wet materials may need to be opened, removed, or professionally dried. The important point is that repair should not trap moisture inside the structure. Covering damp materials can lead to odor, mold, swelling, and recurring damage later.
Step 3: Check for Mold or Contamination
If materials stayed wet long enough, mold may be part of the problem. Visible mold, musty odors, recurring discoloration, damp porous materials, or hidden moisture behind finishes should be evaluated before repairs close the area back up.
Not every moisture problem becomes a major mold problem, but mold risk increases when water remains in porous materials, airflow is limited, and the affected area is not fully dried. If mold is present, the cleanup approach should fit the material and extent of growth. Surface cleaning may be enough for some small, non-porous or lightly affected areas, while porous materials, hidden growth, or widespread contamination may require removal or professional remediation.
Step 4: Repair Damaged Materials
Only after the source is controlled and the affected area is dry should repair become the main focus. Repairs may include replacing drywall, trim, insulation, flooring, cabinet materials, ceiling sections, damaged sheathing, or other components. In structural areas, repair may require a qualified contractor or specialist.
The goal is not only to make the surface look new. The repair should restore the material, remove damaged or contaminated components, and avoid sealing moisture into the home. If the original problem involved recurring water entry, the repair should also include the detail that prevents the same moisture path from returning.
Step 5: Prevent Recurrence
Prevention is what separates a completed repair from a temporary fix. Once the source has been corrected and the material repaired, the home still needs a strategy to keep the same area from getting wet again.
That may mean improving drainage, maintaining gutters, monitoring humidity, using a dehumidifier, repairing exterior gaps, checking plumbing connections, improving ventilation, sealing appropriate exterior details, maintaining basement water-control systems, or watching the area after heavy rain. Prevention should match the original cause.
For long-term prevention strategy, use how to prevent recurring moisture damage.
Step 6: Monitor the Area Afterward
Moisture problems can return slowly. After a repair, the area should be monitored during the conditions that caused the original problem. If the leak happened after rain, check after heavy rain. If the issue happened during humid weather, monitor humidity and condensation during humid periods. If the problem came from plumbing, check the area after repeated use.
Monitoring helps catch recurrence before it becomes another major repair. A repaired area that stays dry through the same conditions is much more trustworthy than an area that only looks dry on the day the work is finished.
How to Prevent Moisture Problems From Coming Back
Moisture prevention is not one product or one repair. It is a whole-home maintenance strategy. The goal is to reduce water entry, control indoor humidity, improve drying conditions, maintain vulnerable systems, and watch areas that have had problems before. Energy.gov notes that controlling moisture can help prevent mold growth and improve home comfort, which is why prevention needs to address the whole house, not only the visible damage.
Prevention is especially important because many moisture problems return for predictable reasons. The visible damage was fixed, but the source remained. The leak was repaired, but the materials were not fully dried. Mold was cleaned, but humidity stayed high. A basement wall was coated, but exterior drainage still pushed water against the foundation. A dehumidifier was added, but the active leak was never corrected.
Control Indoor Humidity
Indoor humidity can make moisture problems worse even when it is not the only cause. High humidity slows drying, encourages condensation, and can keep enclosed spaces damp. Bathrooms, basements, laundry areas, crawl spaces, closets, kitchens, and poorly ventilated rooms are often the first areas to show symptoms.
The best first step is measurement. Without humidity readings, it is easy to mistake a humidity problem for a leak, or a leak for a humidity problem. Use how to test indoor humidity levels if you need to confirm whether humidity is part of the issue.
Improve Drainage and Exterior Water Management
Many moisture problems begin outside the home. Roof runoff, clogged gutters, short downspouts, poor grading, saturated soil, splashback, and water collecting near the foundation can all increase the chance of moisture entering basements, crawl spaces, exterior walls, and lower-level rooms.
Good exterior water management moves water away from the structure before it becomes an interior problem. This may involve maintaining gutters and downspouts, correcting soil slope, managing roof runoff, preventing water from pooling near the foundation, and watching basement or crawl space areas after storms.
Maintain Roofing, Siding, Windows, Doors, and Plumbing
Moisture prevention depends on the systems that keep water out and carry water safely through the home. Roofing, flashing, siding, windows, doors, plumbing lines, appliance hoses, drains, and fixtures all need periodic attention.
Small failures in these systems can create large hidden moisture problems. A loose flashing detail, small plumbing drip, aging washing machine hose, cracked exterior seal, or failing window trim may wet hidden materials long before the problem is obvious. Preventive inspection is often easier and less expensive than repairing long-term damage after the moisture spreads.
Use Dehumidifiers Correctly Where They Are Appropriate
Dehumidifiers can be useful when excess indoor humidity is part of the problem. They are especially common in basements, crawl spaces, damp rooms, humid climates, and areas where ventilation alone does not keep moisture under control.
However, a dehumidifier should not be used as a substitute for leak repair, waterproofing, roof repair, plumbing repair, or drainage correction. If liquid water is entering the home, that source still has to be fixed. A dehumidifier can help manage air moisture and support drying conditions, but it cannot stop active water intrusion.
For equipment selection, placement, sizing, and operation, use how to choose and use a dehumidifier effectively.
Monitor Problem Areas After Repairs
Areas that have leaked once deserve extra attention. Check them again after rain, seasonal humidity changes, plumbing use, basement water events, or temperature swings that can cause condensation. Recurring moisture is easiest to stop when you catch the first signs instead of waiting for stains, mold, odors, or material damage to return.
Monitoring does not have to be complicated. It can include visual checks, humidity readings, moisture meter comparisons, odor checks, and watching whether repaired materials remain stable. The key is to monitor under the same conditions that caused the first problem.
Choose the Right Next Guide for Your Moisture Problem
Because moisture problems can begin in different systems, the best next step depends on what you are seeing. Use the guide below to move from this sitewide overview into the correct DryHomeGuide hub.
If You See Mold
If mold is visible, suspected behind materials, or returning after cleaning, move into how to remove mold permanently. Mold is usually connected to moisture, but mold cleanup, material decisions, and recurrence prevention need their own guidance.
If Moisture Keeps Coming Back
If stains, odors, dampness, mold, or condensation keep returning after cleaning or repair, use how to detect repeated moisture problems. Recurring moisture often means the source, drying, humidity, repair, or monitoring step was incomplete.
If the Air Feels Damp or Musty
If the main issue is musty air, suspected mold exposure, damp indoor conditions, or indoor air concerns after moisture damage, use mold exposure and indoor air quality. Air symptoms often trace back to hidden moisture, damp materials, poor ventilation, or mold-prone areas.
If the Basement Leaks or Stays Damp
If moisture appears in the basement, especially after rain, around foundation walls, along the floor-wall joint, or near damp concrete surfaces, use why hydrostatic pressure causes basement leaks. Basement moisture often involves soil pressure, drainage, seepage, foundation details, and water-control systems.
If Humidity Is High or Condensation Keeps Appearing
If the problem looks like condensation, damp air, sweating windows, stuffy rooms, or humidity-related moisture, use how to test indoor humidity levels. Testing helps separate humidity problems from leaks and gives you a clearer starting point.
If You Need a Dehumidifier
If humidity is confirmed or dampness is controlled partly through equipment, use how to choose and use a dehumidifier effectively. The right dehumidifier strategy depends on room size, moisture load, placement, drainage, runtime, and maintenance.
If You Are Trying to Stop Future Damage
If the active problem has been repaired and your main goal is to prevent the same issue from returning, use how to prevent recurring moisture damage. Prevention should match the original source, whether it was a leak, humidity, basement seepage, poor drying, or exterior water entry.
If Structural Materials May Be Affected
If moisture may involve framing, subfloors, joists, roof structures, siding systems, exterior walls, foundation-adjacent materials, or repeated long-term damage, use structural moisture problems in homes. Structural moisture needs careful evaluation because damage can extend beyond the visible surface.
Frequently Asked Questions About Moisture Problems in Homes
What is the first thing to do when you find moisture in your home?
The first step is to identify where the moisture is coming from. Do not start with paint, surface cleaning, or cosmetic repair. Look for the source first, such as a plumbing leak, roof leak, basement seepage, window leak, exterior wall failure, condensation, or high indoor humidity. Once the source is controlled, the affected materials can be dried, evaluated, repaired, and monitored.
How do you know if moisture is from humidity or a leak?
Humidity problems usually appear as condensation, damp air, musty rooms, moisture on cool surfaces, or symptoms that become worse during humid weather. Leaks are more likely when moisture appears after rain, near plumbing fixtures, under appliances, around windows or doors, below bathrooms, near rooflines, or in one localized area. Sometimes both are involved. A leak can wet materials, while high humidity slows drying and makes the damage worse.
Can a dehumidifier fix moisture problems?
A dehumidifier can help when the problem involves high indoor humidity, damp air, slow drying, or condensation. It cannot fix active water intrusion. If water is entering through a roof, foundation, plumbing line, window, door, siding gap, or basement wall, that source still needs to be repaired. A dehumidifier is a control tool, not a substitute for leak repair or waterproofing.
Does moisture always lead to mold?
No. Moisture does not always lead to mold, especially if the affected area is dried quickly and the source is corrected. Mold risk increases when moisture remains in porous materials, airflow is limited, humidity stays high, or the same area gets wet repeatedly. The longer materials stay damp, the more important it becomes to check for odor, discoloration, visible growth, and hidden moisture.
Why do moisture problems keep coming back?
Moisture problems usually return because one part of the repair sequence was incomplete. The source may not have been fully corrected, the materials may not have dried completely, humidity may still be too high, the wrong repair may have been used, or the area may not have been monitored under the same conditions that caused the original problem. Recurrence is a sign that the moisture system needs to be rechecked, not just cleaned again.
When should you call a professional for a moisture problem?
Call a professional when the source is unclear, moisture keeps returning, mold appears in multiple areas, structural materials may be affected, basement water repeats after rain, roof or siding leaks are suspected, electrical or plumbing systems are involved, or materials feel soft, sagging, rotten, or unstable. Small surface problems may be manageable, but hidden moisture and repeated damage often need a more careful inspection.
How can you prevent moisture damage long term?
Long-term prevention means controlling the source, not just reacting to symptoms. Maintain gutters and drainage, repair leaks quickly, monitor humidity, ventilate damp rooms, use dehumidifiers where appropriate, inspect basements and crawl spaces, watch window and door areas, maintain roofing and siding, and check repaired areas after rain or humid weather. The best prevention strategy depends on where the original moisture came from.
Final Thoughts on Finding, Fixing, and Preventing Moisture Problems
Moisture problems are easier to solve when you treat them as a system. The visible symptom is important, but it is not always the source. A stain, smell, patch of mold, damp basement wall, swollen baseboard, or soft floor may be the clue that points to a deeper issue involving water entry, humidity, condensation, poor drying, or repeated material exposure.
The best approach is to slow down and follow the right order. Find the source. Stop the moisture. Dry the affected materials. Check for mold or damage. Repair what needs to be repaired. Prevent the same problem from returning. Then monitor the area under the same conditions that caused the issue in the first place.
If you are not sure where to go next, choose the guide that matches your strongest clue. Visible mold belongs in how to remove mold permanently. Dampness that keeps returning belongs in how to detect repeated moisture problems. Musty air or possible exposure concerns belong in mold exposure and indoor air quality.
If the problem is below grade, start with why hydrostatic pressure causes basement leaks. If condensation or damp air is the main clue, start with how to test indoor humidity levels. If you already know humidity control equipment is part of the solution, move to how to choose and use a dehumidifier effectively.
After the immediate problem is under control, how to prevent recurring moisture damage can help you keep it from coming back. If the issue involves framing, roofing, siding, floors, or other building materials, structural moisture problems in homes is the better next step.
Moisture control is not only about fixing one wet spot. It is about understanding how water and humidity move through a home, correcting the source, and keeping the home dry enough that mold, material damage, and recurring repairs do not become the next problem.
16 Comments
Comments are closed.